


Feedback
Last date modified: 2026-Jul-14
Gmail API
Connecting your Google Workspace to Legal Hold takes some setup in both Google and Relativity. Begin with the credential setup in Google.
Considerations
Consider the following when using the Google Mail API for hold communications:
- Your refresh token must be updated when it reaches certain limitations. For more information, see Google's documentation.
Limitation examples:- The user has revoked your app's access.
- The refresh token has not been used for six months.
- The user changed passwords and the refresh token contains Gmail scopes.
- The user account has exceeded a maximum number of granted (live) refresh tokens.
- If an admin set any of the services requested in your app's scopes to Restricted. The error is admin_policy_enforced.
- The session length set by the admin could have been exceeded.
- The Gmail API is not compatible with incoming email.
- You must use a Client ID and Client Secret that is specific to these email settings. For example, you cannot use the Client ID and Client Secret entered for preservation in-place.
Requirements
You must complete the following steps in order before setting up a Gmail to communicate:
- Create a Google Cloud project.
- Enable required APIs for the project.
- Set up OAuth2 consent screen.
- Create credentials.
- Add email settings.
After completing these required steps, you can use a Gmail account in RelativityOne.
Create a Google Cloud project
Create a Google Cloud project to create, enable, and use all Google Cloud services. You will use this account to manage APIs.
To create a Google Cloud project:
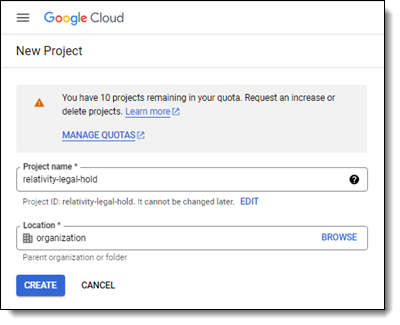
- Open the Cloud Resource Manager page, then click Create Project.
- Enter information into the fields:
- Project name—enter a descriptive name for your project.
- Organization—enter the name of your organization.
- Location—enter the parent organization or folder.
- Click Create.
Enable required APIs for the project
Next in the process, you must enable the required Google Cloud Console APIs and associate them to a new project.
To start enabling APIs:
- In the Google Cloud Console, select the newly created project.
- In the left-navigation menu, select API & Services > Library.
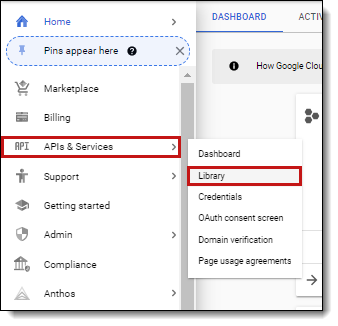
This will open up the Library page that includes all available APIs. - Enter Gmail API in the search bar and search.
- Click the Gmail API option, then click Enable.
Set up OAuth2 consent screen
Follow the steps below to create an OAuth2 consent screen.
- Open Google Cloud Console and select newly created project.
- Click on the Navigation menu.
- Select APIs & Services > OAuth consent screen.
- If this is for a new application, click Get started.
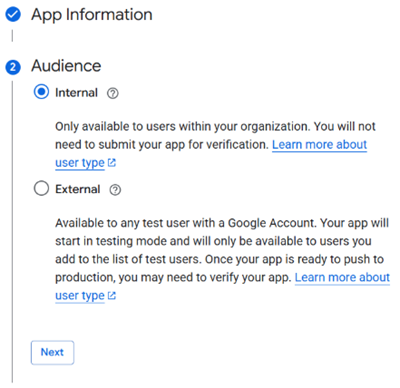
- Enter the App Information and click Next.
- Enter descriptive App name. For example, Relativity Legal Hold.
- Enter a User support email from within your organization.
- Set Audience to Internal and click Next.
- Enter an email from within your organization in the Contact Information field and click Next.
- Select the I agree to the Google API Services: User Data Policy checkbox and click Continue.
- Click the Create button.
- Navigate to Branding.
- In the Branding section scroll down to the Authorized Domain section and click to Add Domain.
- Enter relativity.one as Authorized Domain.
- Click Save and Continue.
In the next step, you will add scopes.
You cannot use the same scopes used in Preservation in-place.
- Click Add or remove scopes.
- Enter filter and select gmail.send, or enter it in a text box.
- Click Update.
- Click Save and Continue.
Create credentials
You must create credentials, enter an authorized redirect URL, and save your client ID and secret.
You must use a Client ID and Client Secret that is specific to these email settings.
- Click the navigation menu in the top left corner.
- Hover over APIs & Services > Credentials.
- Click Create Credentials.
- Click OAuth Client ID credentials.
- Enter the following information in the fields:
- Application type—select Web application.
- Name—enter a name for the credentials.
- Authorized redirect URIs—enter the case sensitive URL.
- For example, https://{instanceURL}.com/Relativity.REST/api/kCura.LegalHold.Services.ILegalHoldModule/Google%20Authorization%20Manager/workspace/{WorkspaceID}/GoogleMail/HandleAuthenticationRedirect.
- When the {InstanceURL} is a Relativity instance URL and {WorkspaceID} is the Relativity workspace artifact ID where you are setting up the data source.
- InstanceURL— log into your RelativityOne workspace. The base URL shown is the InstanceURL. For example, https://company.relativity.one/Relativity/.../workspace/1016855/
- WorkspaceID— log into your RelativityOne workspace. The numerical value in the URL is the Workspace ID. For example, https://company.relativity.one/Relativity/.../workspace/1016855/
- To add more than one authorized redirect URI:
- Navigate to the Authorized redirect URIs section.
- Click + Add URI [2].
- Enter your specific redirect URI. Repeat this for any additional URIs you need.
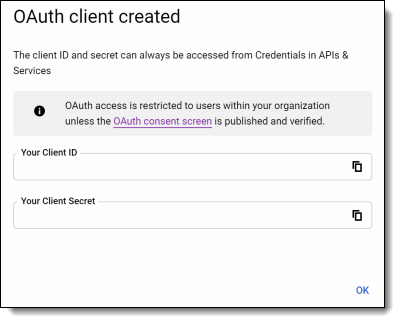
- Click Create.
After clicking Create, you will have your Client ID and Client Secret. You will need to use them when adding your email settings.
Add email settings
After completing the required steps in Google, you can then set up the account in RelativityOne.
Before adding email settings, make sure you understand all Considerations and completed all tasks in the Requirements sections.
To set up Gmail for Legal Hold:
- Navigate to the Legal Hold Settings page.
- Click Edit.
- Locate the Outgoing Email section.
- Enter information in the fields. For more information, see Outgoing email fields.

- Update another section or click Save.
Outgoing email fields
Enter the information you gathered in Google into the following fields:
You must use a Client ID and Client Secret that is specific to these email settings.
- Email processor type—select Gmail API.
- Client ID—enter the Client Id copied from Google’s OAuth2 credentials page.
- Client Secret—enter Client Secret copied from Google’s OAuth2 credentials page. For more information, see Create credentials.
- From Email Address—enter the email address you authenticated with Google. Relativity will only use the email inbox that you authenticated with.
- Reply to Email Address—enter the email address you authenticated with Google. Relativity will only use the email inbox that you authenticated with.
If authentication is successful, you will see the following message:

For more information, see Outgoing email fields.