Last date modified: 2026-Feb-13
SAML 2.0 provider
SAML is an open-standard format for exchanging authentication and authorization data between an identity provider (IdP) and a service provider (SP).
As a service provider, Relativity supports SAML IdP-initiated single sign-on (SSO). However, it does not support SP-initiated SSO.
Relativity uses SAML assertions (tokens) to verify the users mapped to the identity provider. SAML assertions contain information on the identity of the individual who has logged in. Assertions also contain the identity provider issuing the assertion, known in Relativity as the Issuer URL. Each Assertion is typically prepared for a specific receiver, known as the Audience. Assertions protect this information by cryptography signing it. An Assertion is only valid if it is from a known Issuer URL to the expected Audience and correctly signed.
Considerations
- SAML assertions must be cryptographically signed for Relativity to verify their authenticity. Make sure your SAML IdP is configured accordingly.
- You can use Relativity with any SAML 2.0-compliant IdP, such as Centrify, Okta, Microsoft Active Directory Federation Service (ADFS), or OneLogin.
- RelativityOne only supports the RSA-SHA256 assertion signing algorithm.
- After saving the Authentication provider for the first time, the system generates the Redirect URL. Placeholder values may need to be added to the third-party Authentication setup before obtaining this value.
Configuring a SAML 2.0 authentication provider
To add a SAML 2.0 authentication provider, complete the fields below.
Authentication Provider Information
- Name—enter a user-friendly name for the authentication provider.
- Provider Type—select SAML2.
- Enabled—the provider is enabled by default, but you can disable it.
- Site URL—set the URL that users enter in the browser to access an instance of Relativity.
Authentication Provider Settings
- Audience—the unique identifier of the service provider (SP). We recommend using the same value as your Site URL.
- Issuer URL—the unique identifier of the identity provider (IdP).
- Certificate—an x509 certificate provider by the identity provider.
- Subject Claim Type (Optional)—The attribute in the SAML subject used to validate the login. We recommend to leave this blank.
Configuring specific SAML providers
The following sections provides the guidelines for integrating Relativity with Okta and ADFS.
This is an example of configuring Okta.
Initial configuration:
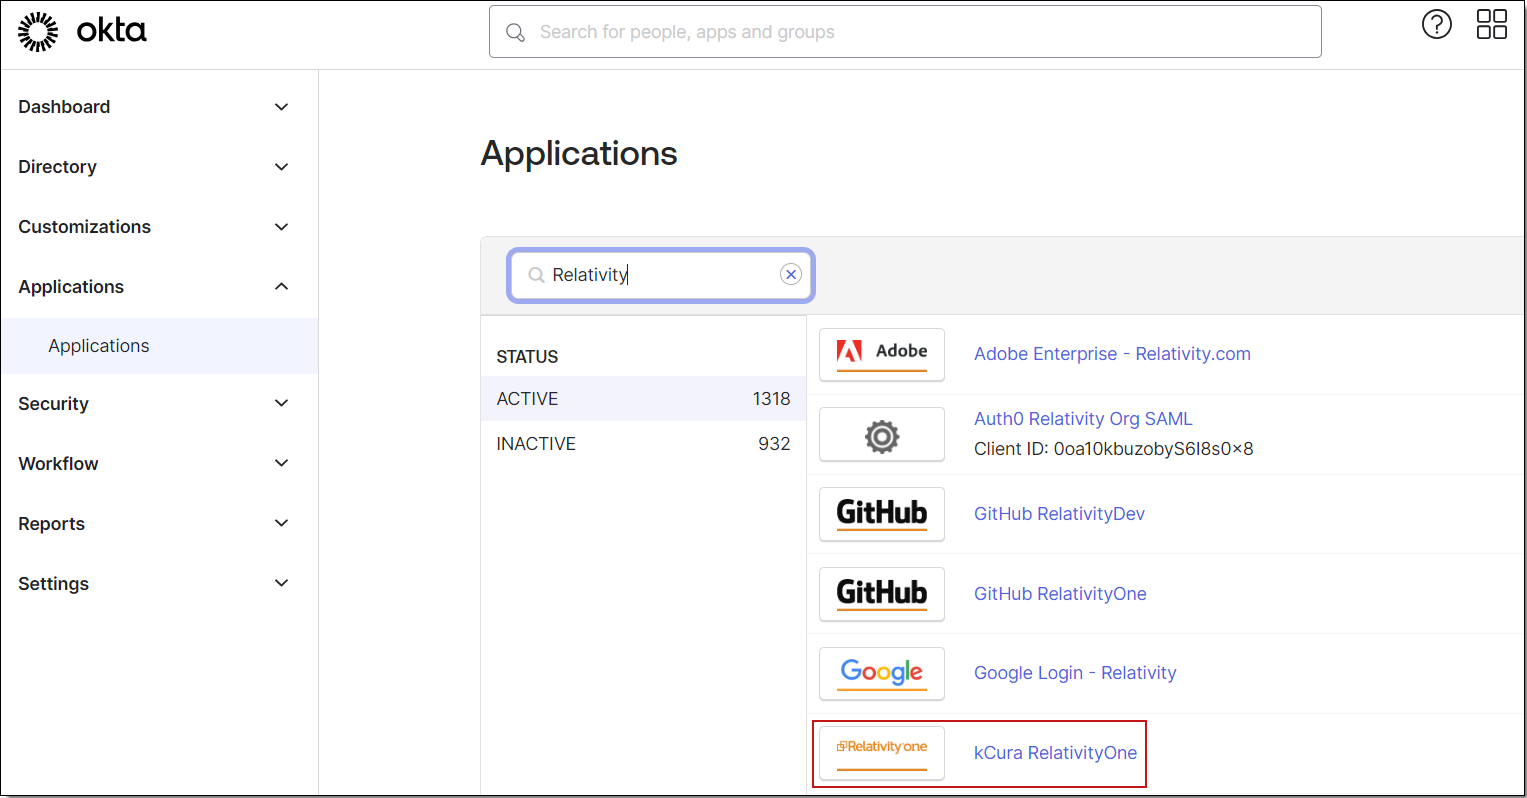
- In the Okta admin console, navigate to Applications and search for Relativity.

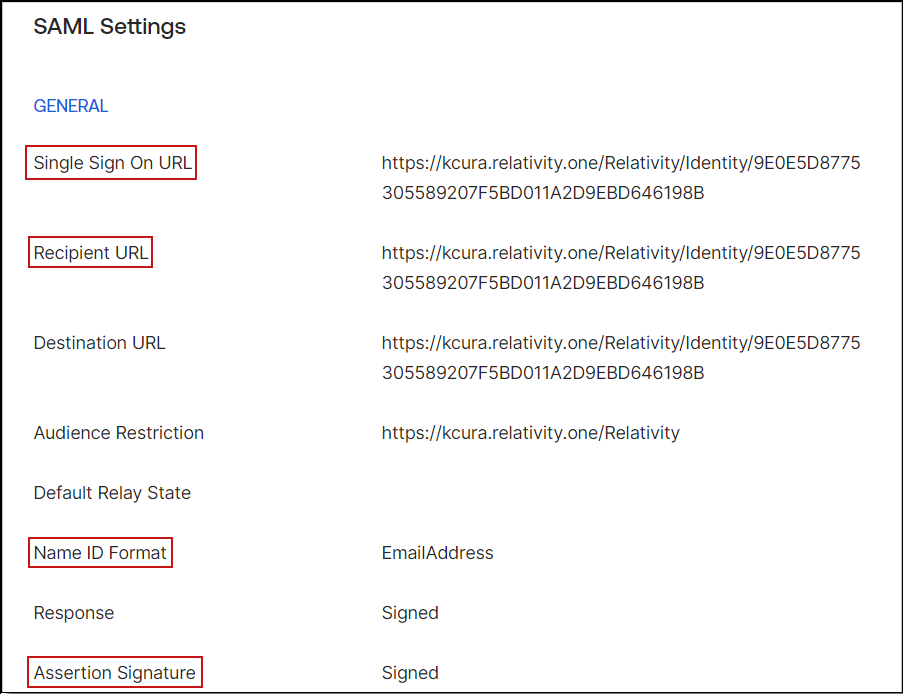
- Navigate to the General tab and specify these SAML settings:

- For the single sign-on URL, for enter your Relativity Instance URL. This is the URL that is used for public access to go to your web servers.
- For Recipient URL, put in a unique identifier, such as the URL for your instance. Note this value for later.Audience URI is case-sensitive. Specifying /relativity instead of /Relativity can break your authentication.
- For the Name ID Format you would like to use for logging in, select Email.
- For Assertion Signature, select Signed.

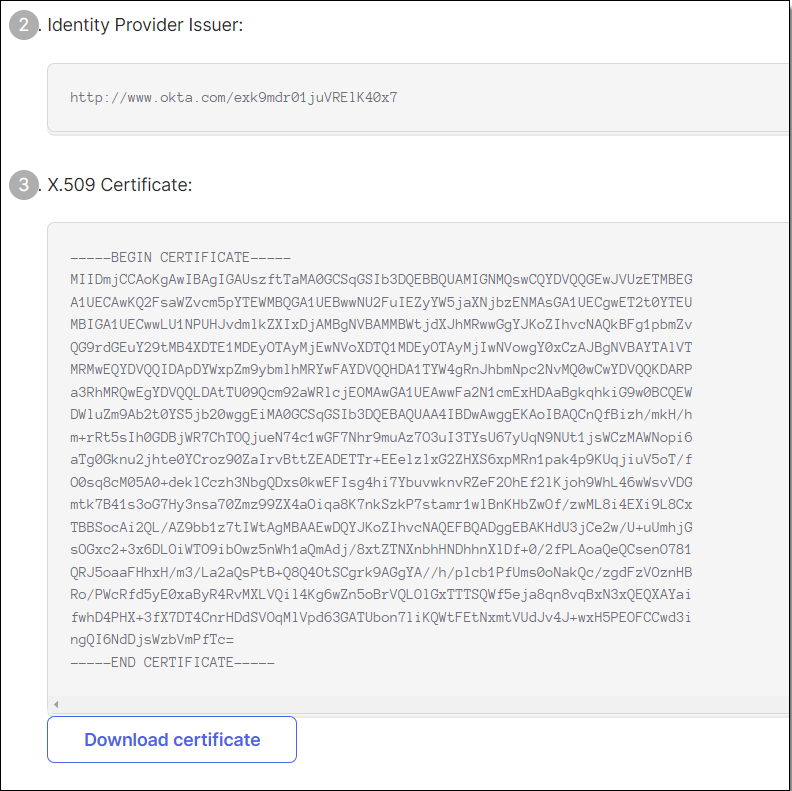
- You have now partially configured you application in Okta to set up logging in to Relativity. You must now configure the SAML provider in Relativity. These Okta values can be found under the Sign on tab.
- The Audience URI (SP Entity ID, from the previous step).
- The Identity Provider Issuer (In Okta, click View Setup Instructions on the Sign On tab).
- The X.509 Certificate (also in Setup Instructions).

Single Sign On using SAML will not work until you configure the app to trust Okta as an IdP.
Next, set up the SAML 2.0 authentication provider in Relativity:
- Log in to Relativity with system admin credentials.
- Open the Authentication Provider tab.
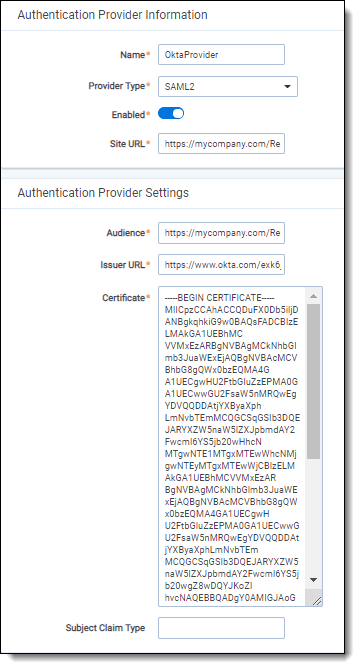
- Click New Authentication Provider. The Authentication Provider Information form opens.
- Enter a name for your provider.
- Select SAML2 from the Provider Type drop-down menu.

- Enter the site URL. This is the URL users enter into the browser to access this instances of Relativity.
- Enter the Audience URI (SP Entity ID) from Okta in the Audience field.
- Enter the Identity Provider Issuer from Okta in the Issuer URL with.
- Enter the X.509 certificate from in Okta in the Certificate field.
- (Optional) If you are using a specific user identifier claim that is not the default claim, enter it as the Subject Claim Type.
- Click Save.
- Note the Redirect URL on your new authentication provider.
 js
js
You have now set up your Relativity instance to list for SAML 2.0 assertions at a given endpoint on your server (the Redirect URL).
Next, finish setting up the SAML IdP in Okta:
- Log in to Okta and navigate to the application you created earlier.
- Update the single sign-on URL to be the Redirect URL given to us by Relativity on the authentication provider you have created.

You have now configured Okta to send SAML 2.0 assertions to your Relativity instance, and Relativity is set up to verify the SAML assertions.
You must also assign Okta users to the SAML application, and then map the users to SAML login method in Relativity. When configuring the login method, you must specify the user's email in the SAML2 Subject field (if you select Email as the application username in Okta). For more information, see Managing user authentication methods.
You can also configure ADFS as a SAML 2.0 authentication provider for Relativity.
Note these terminology difference between Relativity and ADFS:
| ADFS | ||
|---|---|---|
| Audience | Relying Party Identifier(s) | https://[company name].relativity.one/Relativity |
| Redirect URL | End-Point URL | https://[company name].relativity.one/Relativity/Identity/<random string> |
| Issuer URL | Services Trust End-Point (SAML) | http://<adfs-service>/adfs/services/trust |
| SAML Subject Name | Claim Type | Name ID, E-Mail Address, UPN (Leave blank in Relativity SAML Provider configuration) |
| n/a | Claim Rules | Incoming, Transformation, Outgoing Claim Rules (see below) |
When setting up claim rules, you must send Name ID as default claim type for Relativity. Use these guidelines:
- Add Send LDAP Attributes As Claims: Select Email Addresses or User-Principal-Name to E-Mail Address from the AD store.
- Add Pass Thru Claim for E-Mail Address or a Transforming claim.
- Add Transforming Claim (from E-Mail Address to Name ID).


