


Feedback
Last date modified: 2026-Jul-14
RelativityOne Connect
Use a single login to access all your RelativityOne workspaces and instances with Connect. Securely connect multiple instances and let users navigate between them securely with cross-authentication using OpenID Connect as the single sign-on provider (SSO). With Connect you can log in to Relativity once and access workspaces across multiple instances that are connected as federated instances.
Once the connection between the instances is created, the Relativity users can sign in and navigate between workspaces in the different instances.
RelativityOne Connect allows you to leverage another instance as a trusted identity provider for your environment. This functionality allows users within the connected instance to authenticate directly into yours. This eliminates the need for a single user to have multiple credentials within RelativityOne. However, you must exercise caution when assigning the Connect login method. Granting this access effectively cedes control over user authentication to the external instance for users with the Connect login method. This means the connected instance verifies user identities and grants access to your environment. Therefore, it's critical to reserve the Connect login method exclusively for users whose identities you trust and whose access needs can be effectively managed by the external instance. Assigning Connect to your internal users could compromise your security posture, as unauthorized individuals from the connected instance could potentially gain access to your environment.
RelativityOne Connect cannot be used to connect two instances owned by the same customer (or their global entity). In order to connect two instances owned by the same customer, please see
Follow the links below for Quick Reference Guides:
- RelativityOne Connect - RelativityOne primary contact (PDF)—high-level workflow for enabling RelativityOne Connect for an instance.
- RelativityOne Connect - Admin (PDF)—high-level workflow for connecting users to multiple instances.
- RelativityOne Connect - User (PDF)—high-level workflow for signing in and navigating between multiple instances.
Enabling RelativityOne Connect
To enable Connect and connect two or more Relativity instances, each party's RelativityOne primary contact must complete a RelativityOne Connect Request form. This applies unless the two instances are owned by the same customer (or their global entity).
To begin using RelativityOne Connect, the primary RelativityOne contact at your organization needs to navigate to the Community site.
As your organization’s primary RelativityOne contact, navigate to the Community site. In the Community site, navigate to RelativityOne Connect Request Form.
- In the top navigation menu, click Support.
- On the Support page, click the Submit or resume button under RelativityOne Requests.If you don't see the RelativityOne Requests section, you are not the RelativityOne Primary Contact. Please make sure you are logged in as the primary contact to move forward in requesting a form.
- In the RelativityOne Request page, click the Choose Request Type drop-down menu.
- Select RelativityOne Connect.
- Click Next.
This opens the RelativityOne Connect Request Form.

In the request form, confirm that the name and the email address match your information. Then continue filling out the form by entering the instance name of your RelativityOne tenant and the instance name of the RelativityOne instance that you want to connect to by completing the following fields:
- Instance Name of your RelativityOne tenant—the name of your organization's instance.
- Instance Name of the RelativityOne tenant you want to connect to—the name of the instance name that you want organization's instance to connect to.
Once entered, click Next. Confirm the request was submitted and click Finish.

Once submitted, Relativity can confirm the RelativityOne primary contacts email addresses and instance names. Once confirmed, a new authentication provider option is available when updating a user's login method.
To connect to more than one RelativityOne instance, you will need to submit multiple requests.
Once the request has been submitted, Relativity can confirm the RelativityOne primary contacts email addresses and instance names. Once confirmed, a new authentication provider option is available when updating a user's login method.
Finding instance names
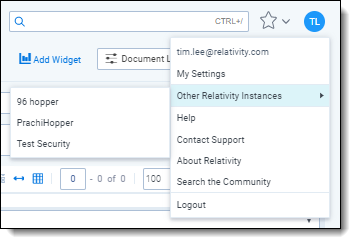
Find the instance names in the User options drop-down menu. Copy the instance name from your instance and retrieve the other instance name.

Connecting users to different instances
To connect users to multiple instances with their one set of login credentials, navigate to the Admin-level Users tab. Find the user that needs to be connected and select the user.
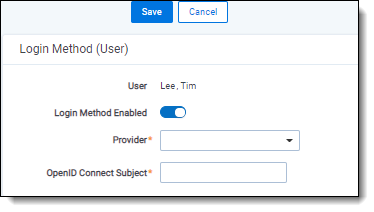
Once the user is selected and their user information page is available, add a new Login Method.
- In the Login Method section, click New.
- Click the Provider drop-down menu.
- Select the instance name of the connected environment.
- Enter the OpenID Connect Subject.The OpenID Connect subject is the user email address in the other instance.
- Click Save.
An already existing user also needs the default password provider login method removed.
Each instance has that instance’s group and security permissions. If the users already exist from previous engagements, no action is needed.
Navigating between instances
As a user, the links to the connected instances appear in the User drop-down menu. The available instance names are available in the Other Relativity Instances drop-down option. Hover over the Other Relativity Instances and click the name of any instance.
By default, the connected instances in the Other Relativity Instances drop-down option are visible to all users. If you want to limit who can see the instances in the drop-down option, apply item-level security to the connected instance in the Federated Instances tab. For more information on individual item security, see
Once clicked, you need to confirm your credentials with your SSO provider. Once confirmed, you can navigate within the newly opened instance.
Updating RelativityOne Connect after a URL change
When a connected instance's URL changes, two records must be updated manually in the instance that holds the connection:
- The Federated Instance record that points to the changed instance
- The Redirect URL on the OAuth2 client configured for that connection
The authentication provider's redirect URL updates automatically, however, the OAuth2 client in the connected instance does not update automatically. A stale Redirect URL on the OAuth2 client causes login failures for users navigating between instances.
To update the OAuth2 client:
- In the connected instance, open the OAuth2 Client tab.
- Open the OAuth2 client associated with the connection.
- Update the Redirect URL to reflect the new instance URL.
- Click Save.
Also update the Federated Instance record for the changed instance.
Billing information
To avoid double billing, we look at the domain for the user's email. So if a user with the same email address exists in multiple instances, they will not be billed multiple times.
User type information
The User Type, is something that can be used to tag a user as someone coming from another instance. It is only for organizational uses, and doesn't affect billing.
As a user, you can use it to categorize users that we create. If you'd like a user to work with RelativityOne Connect, they need to work on the two instances that are connected. It's important to make sure that the user exists in both instances, so you can use the user type to distinguish that this user was created, so you can log in.
Frequently asked questions
No. Each RelativityOne environment maintains its own groups and permissions. When you add a Connect login for a user, you can restrict their permissions in the target environment by placing them only in specific groups. If you do not assign them to a group with user- or workspace-management rights, they cannot add users or modify groups in the other instance.
Assigning your internal users a Connect login method means they authenticate through the external environment. In that scenario, an administrator of the external instance could potentially take over your user’s account and access your environment. Relativity recommends reserving Connect logins for external collaborators only. Additional safeguards include giving external users only the permissions they need, ensuring both instances enforce strong security controls (for example, MFA), and coordinating with the other administrator about account policies and deactivation procedures.
No. RelativityOne Connect does not automatically check whether the user exists in the other environment. Administrators need to coordinate with their counterparts in the connected instance to confirm and, if necessary, create the account on both sides.
You can add a RelativityOne Connect login method to a user in your own instance, but the user must also exist (with the same email address) in the other instance for authentication to succeed. Connect does not automatically provision accounts across environments.