


Feedback
Last date modified: 2026-Apr-21
OpenID Connect
OpenID Connect is an identity layer on top of the OAuth 2.0 protocol. You can verify the identity of the end user based on the authentication performed by an authorization server, as well as to obtain basic profile information about the end user. You can use any provider that supports the OpenID Connect protocol.
FedRAMP requirements for RelativityOne Gov instances mandate the customer's Authority URL must undergo a review by the Relativity Security team. Following a successful review, the URL will be added to the Relativity firewall allow list prior to setting up single sign-on authentication.
The following Authority URLs are already approved and do not require review:
- okta.com
- login.microsoft.com
- login.microsoftonline.com
- login.microsoftonline.us
- login.windows.net
This documentation contains references to third-party software, or technologies. While efforts are made to keep third-party references updated, the images, documentation, or guidance in this topic may not accurately represent the current behavior or user interfaces of the third-party software. For more considerations regarding third-party software, such as copyright and ownership, see Terms of Use.
Configuring an OpenID Connect authentication provider
To add OpenID Connect on top of your OAuth2 configuration, enter the required information in the fields listed below.
The Authentication Provider information (such as Client ID, Client Secret, and endpoints) should be generated by your Identity Provider (IdP), unless otherwise specified by your organization.
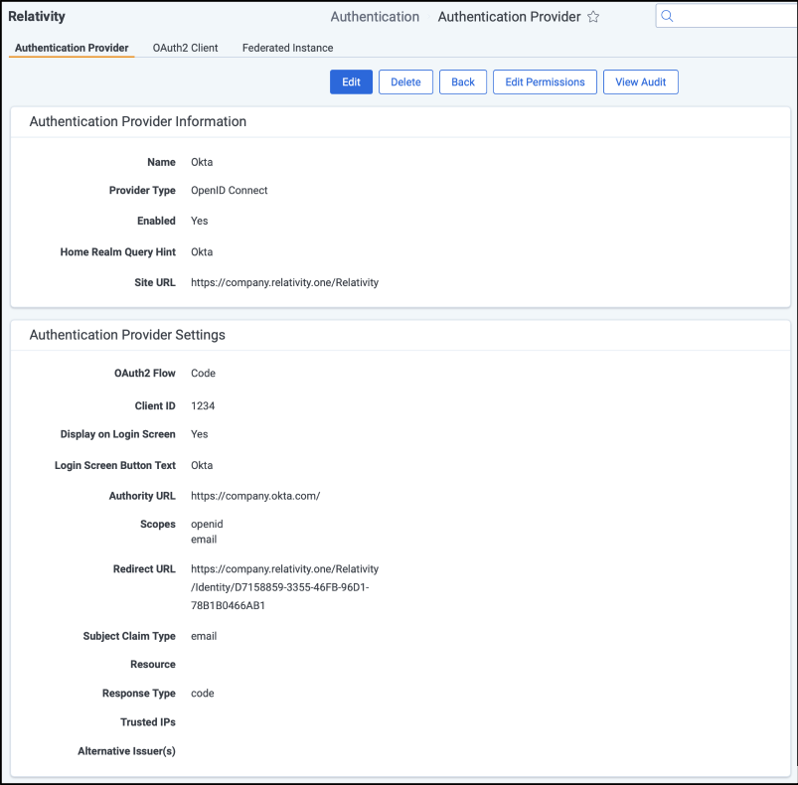
Authentication Provider Information
- Name—enter a user-friendly name for the authentication provider.
- Provider Type—select OpenID Connect.
- Enabled—the provider is enabled by default. However, you can disable it.
- Site URL—set the URL that users enter in the browser to access an instance of Relativity.
Authentication Provider Settings
- OAuth2 Flow—select either Implicit or Code.
- Client ID—enter your application's ID.
- Display on Login Screen—determines if the OpenID Connect button displays on the login page.
- Login Screen Button Text—determines the text that appears on the button displayed on the login page.
- Authority URL—enter the URL that hosts the OpenID configuration well-known endpoint.
- Scopes—the default value for this field is openid. The openid checkbox must be selected because it's a required setting. However, you can also select the email or profile option. The identity provider responds with the claims associated with the scopes that you request. In other words, the scopes translate into claims that you can use.
- Redirect URL—After saving the new Authentication Provider RDO (Relativity Dynamic Object), it will be shown in the settings.
- Example—<https://company.relativity.one/Relativity/Identity D7158859-3355-46FB-96D1-78B1B0466AB1>
- Subject Claim Type—the default value for this field is sub. Enter one of the following values based on the scopes that you set:
- If you selected only OpenID in the Scopes field, this field must be set to sub.
- If you selected OpenID and email in the Scopes field, set this field to upn.
- If you selected OpenID and profile in the Scopes field, set this field to a property available from the identity provider. These properties differ for each provider.
- Resource — what is being accessed by your OIDC provider
This value should remain unchanged unless instructed otherwise by your IT department.
- Response Type—specifies how your provider responds to the authentication request. In this case, the response includes a code.
This value should remain unchanged unless instructed otherwise by your IT department.
- Trusted IPs — specifies a list of trusted IP addresses for a user. Authentication fails if a user attempts to log in to Relativity from an unauthorized OP address. This list of IPs is evaluated in conjunction with the individual user's trusted IP list.
- Alternative Issuer(s) - set this field to the issuer in your OpenID configuration if it does not match your authority URL. Refer to your IT department for guidance on if this field needs to be set
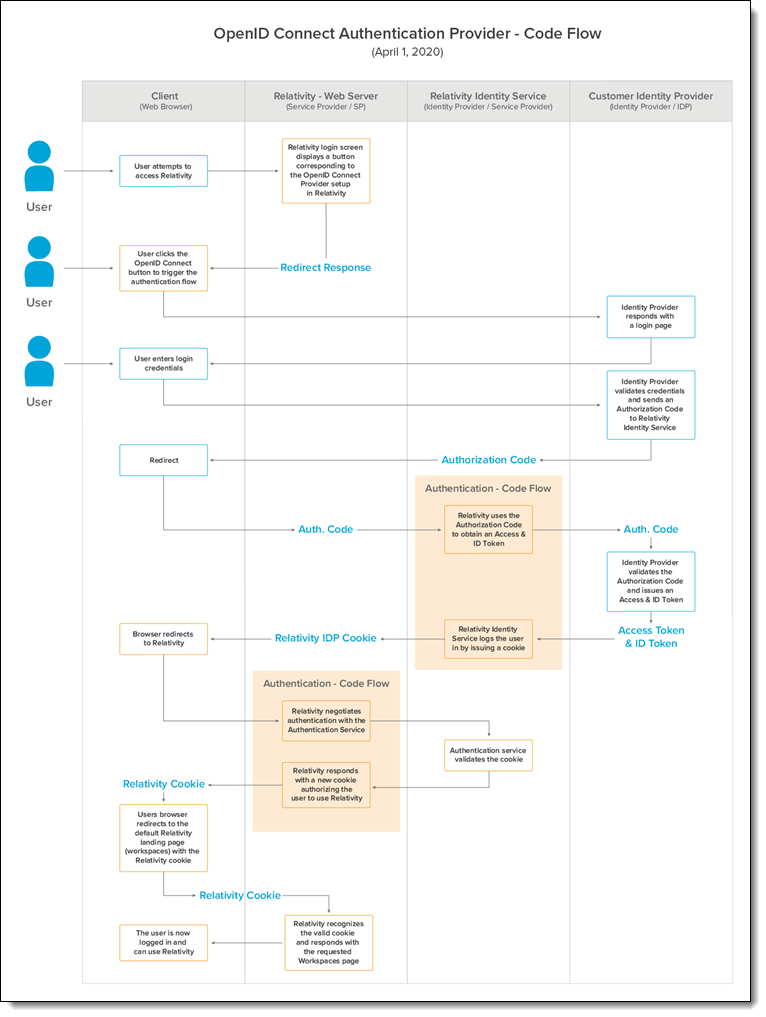
OpenID Connect authentication provider flows
There are two authentication provider flows used with Relativity: code flow and implicit flow. Below are two images showing a detailed OpenID Connect authentication flow for both.
Just-in-time provisioning
Just-in-time provisioning lets an admin control access Relativity environments through an external ID provider, such as Okta. Instead of creating groups in Relativity, they can be created in Okta or similar provider. When created in another provider and mapped in Relativity, the required login objects are automatically created in Relativity.
JIT is only available with OpenID Connect and is not supported for SAML.
JIT provisioning takes user claims from the access token provided by the external ID provider and uses the claims to setup a User for login to Relativity.
JIT User Provisioning automatically creates the objects necessary for login, and the Required Claims feature restricts users from using JIT User Provisioning. For example, this feature can be used to restrict access to a tenant to users within a geographic region.
When a user logs in, Relativity checks to see if the client exists, then checks if the user exists. If both exist, Relativity then checks to see if the user group exists. If all these items exist, the user can log into Relativity. Personal group and Group claim mapping assignments are checked on every login. Users are assigned/removed to groups on every login, based on the Group Claim Mappings. For more information, see Group claim mapping .
To set up just-in-time provisioning on the authentication provider page, complete the fields below.
- Implement—whether JIT Provisioning is enabled or disabled.
- Client—this sets the Relativity Client a user is assigned to when provisioned.
- Username Claim Type—the Claim Type used to set a user’s username. This should be mapped the claim containing the email address.
- First Name Claim Type—the Claim Type used to set a user’s first name.
- Last Name Claim Type—the Claim Type used to set a user’s last name.
- Personal Group—toggle used to set if a Personal Group should be created for a user.
- Personal Group Claim Type—the Claim Type used to set the personal group’s name.
- Group Claim Type—the Claim Type used with Group Claim Mappings when determining group assignments for a user.
- Default Trusted IPs—a list of IP address values that are automatically set to the user’s TrustedIPs setting.
The identity provider (IdP) must send the following claim types for just-in-time provisioning features to function correctly:
- User creation— the IdP must include the Username Claim Type, First Name Claim Type, and Last Name Claim Type in the token. If any of these claim types are not sent by the IdP, user creation does not take effect.
- Group mapping—the IdP must include the Group Claim Type in the token. If the Group Claim Type is not sent by the IdP, group mapping does not take effect.
Group claim mapping
This section will add the users to the specified group on login. The groups need to be existing in Relativity. A token can include two or more group mappings. Group assignments from Group Claim Mappings are performed on every login.
User Claims are provided by a client’s identity provider. Relativity does not control the claims assigned to a user. Relativity only checks that the claims are present when provisioning a user. The claims are passed to Relativity in the access token from the client’s identity provider during the login process.
Group mapping claim values must be present in the token. Just-in-time user provisioning cannot query external endpoints (such as AzureAD's graph API) to determine group membership.
Any matching claims are then compared to the Group Claim Mappings. Claim values that match the Group Claim Mappings determine which group to assign a user as a member. If the user claims do not match any Group Claim Mappings, then the user is removed from that group.
Groups that users are added to outside of group claim mappings need to be administered manually.
Required claim
Required Claims is an optional setting that System Admins can configure on their authentication providers. Required claims is used to control what users gain access to a tenant. JIT user provisioning automatically creates the objects necessary for login, and the Required claims feature restricts users from using JIT user provisioning. For example, this feature can be used to restrict access to a tenant to users within a geographic region.
This setting is used with JIT-enabled authentication providers. Admins can set a list of claims that Relativity will check for when provisioning a user. A user must have at least one required claim to be a provisioned user. System Admins can set multiple claims as Required Claims, and a user must have at least one to pass the check.
The Required Claims check only works on the initial login. It will deny a user from being provisioned. If a user already exists in the system, then Required Claims does not affect login.
Personal claim group
The Personal Group feature allows for controlling permissions at the user level within Relativity. Normally, permissions in Relativity are set on the Group object. By creating a group for every user in Relativity (a user’s personal group), you can effectively set permissions for individual users. This is an optional feature.