


Feedback
Last date modified: 2026-Jul-24
Admin
Set up users, groups, and workspaces from anywhere with the RelativityOne app for iOS.
All lists are searchable. Pull down on the device and a search bar appears.
All users within groups that have the View Admin Repository security permission has access to the Admin section of the app.
This functionality is not available in RelativityOne Government environments.
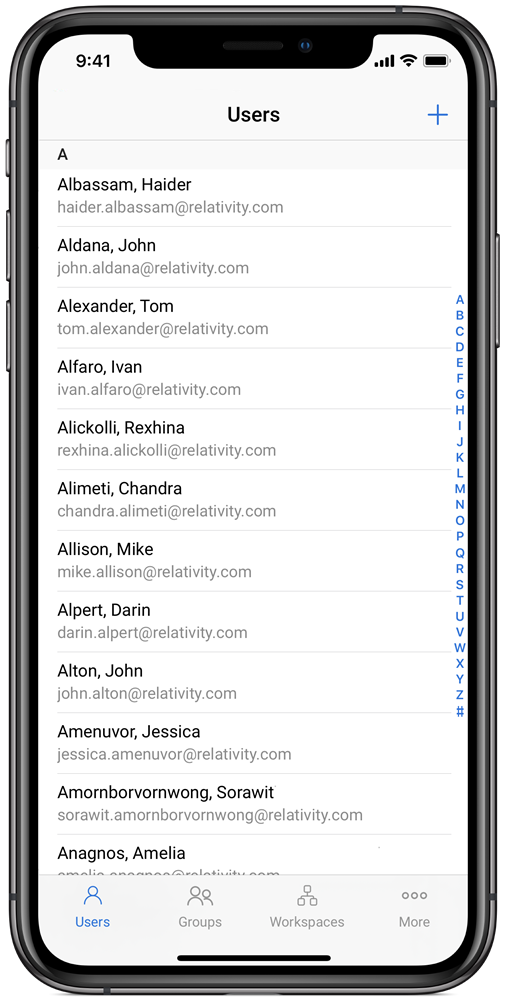
Users
The Users tab is the default admin tab. The first thing an admin sees is the user list. From the user lists, you can view, add, and edit users. An admin can also send a user an invitation email, manage login methods, and view the groups the user is associated with.
To create a user, follow the steps below.
- In the User list, tap +.
- Complete the fields on the form. See Fields.
- Tap Save.
The User Information fields are:
- First Name - the user’s first name. This field must be between 1 and 50 characters.
- Last Name - the user’s last name. This field must be between 1 and 50 characters. The system displays a user as <last name>, <first name>.
- Email Address - the user’s email address. While the system won't validate this information, you must enter it in the following format: name@domain.extension.
- Type - the user type. The default values are internal or external, but you can add any type value. Type is for reference purposes only and has no impact on access or billing.
- Client - the client associated with the user. Tap
 to select from available clients. Items on the selected client list are set by a system view. It's possible you'll see only a sub-set of items.
Relativity users can have the same first and last name, but the email address must be unique.
Access fields:
- Relativity Access - a drop-down menu that where you can control the user’s access to Relativity.
- Enabled - the default value. Enabled users can to log in to Relativity and are considered for billing under your Relativity license.
- Disabled - users cannot access Relativity and won't be counted or billed as named users on your Relativity license.
When Relativity is first deployed, the system sets the Relativity Access field for existing users using the following criteria. A system admin can change a user's access at any time.- If a user is in a group with rights to a workspace, their Relativity Access is set to Enabled.
- If a user is not in a group with rights to a workspace, their Relativity Access is set to Disabled.
- Disable on Date - the date when the user's Relativity access is disabled. Use the field to auto-disable users on a specific date in the future, for example, when managing contact reviewers. When you specify the date, it can't be in the past.
The Disable on Date value is in UTC and does not represent local time.
Permissions:
- Change Settings - users without admin rights can change their settings depending on whether the drop-down menu is enable or disabled.
- First name
- Last name
- Email address
- Item list page length
- Default selected file type
- Advanced search default
- Enable or disable Native Viewer Cache Ahead
- Change Document Viewer - users can change document viewer modes depending on whether the drop-down menu is enabled or disabled.
- Enabled - users can select which viewer they want to use. You can still set a default viewer in the Document Viewer field, but users can switch between viewers.
- Disabled - users can't select which viewer they want to use. Whatever viewer appears in the Document Viewer field in User Settings is the only viewer the user has access to.
- Document Skip - controls whether or not the user has the ability to skip documents during review that no longer meet the original conditions of a view due to propagation. The available options are:
- Enabled - enables the Skip function.
- Disabled - disables the Skip function.
- Force Enabled - always enables the Skip function so that the user can't turn it off. This option is only available for system admins.
- Keyboard Shortcuts - choose a default setting for the keyboard shortcuts icon in the core reviewer interface. This property is set to Enabled by default.
The Default Settings fields are:
- Item List Page Length - a numeric field indicating the default list length for all views in Relativity except for views that are embedded into layouts as an Associative Object List. You can set it from 1 to 200. Associative object lists in a layout do not inherit this value (the default number of items per page for these lists is 10 and cannot be customized).
- Document Viewer - determines which viewer the user can access when reviewing documents.
- Default - only available in Internet Explorer. This option pulls the from the UseLegacyViewer instance setting to determine which viewer the user can access.
- HTML - uses the HTML viewer to review documents.
- Document Viewer Preference - the default viewer mode:
- Viewer
- Native
- Image
- Long Text
- Production
- Show Filters - determines whether or not filters on all columns are visible by default for that user.
- Visible - shows filters by default.
- Hidden - hides filters by default.
If a user is logged in to Relativity while a system admin alters this setting, the user must log out and log back in again for the setting to take effect. This also applies if the system admin is altering the setting on his or her own account. - Saved Search Owner - determines whether saved searches are public or private by default. If set to Public, the search is public and all users with rights to it can see it. If set to Logged in User, the search is private and only the logged in user is able to see it. The property’s default value is configurable on a system level.
- Document Skip Preference
- Skip - advances a user to the next document in the queue that matches the defined view conditions when the user taps Save and Next.
- Normal - document review operates normally, displaying all documents in the queue.
- User-Group Email Notifications (if applicable) - user's preference for email notifications when adding or deleting Users or Groups.
- All Emails - receive all email notifications.
- No Emails - receive no email notifications.
- Only Failed Operations - receive email notifications on failed operations only.
Other User Details
- Keywords - an optional field where extra group information may be recorded.
- Notes - an optional field where extra group information may be recorded.
Within a user's profile, an admin can:
- Edit the user's profile - update the user's information by editing the fields. For more information, see Fields.
- Send the user an invitation email - send an invitation by tapping Send User Invitation Email and confirm in the pop-up modal.
- Manage the user's login methods - update the current login method by tapping on the method. Create a new login method by tapping +.
- View groups - view the groups the user is associated with in all workspaces within the instance.
You cannot use the RelativityOne mobile app to send password reset emails. You must use the web app to perform this action.
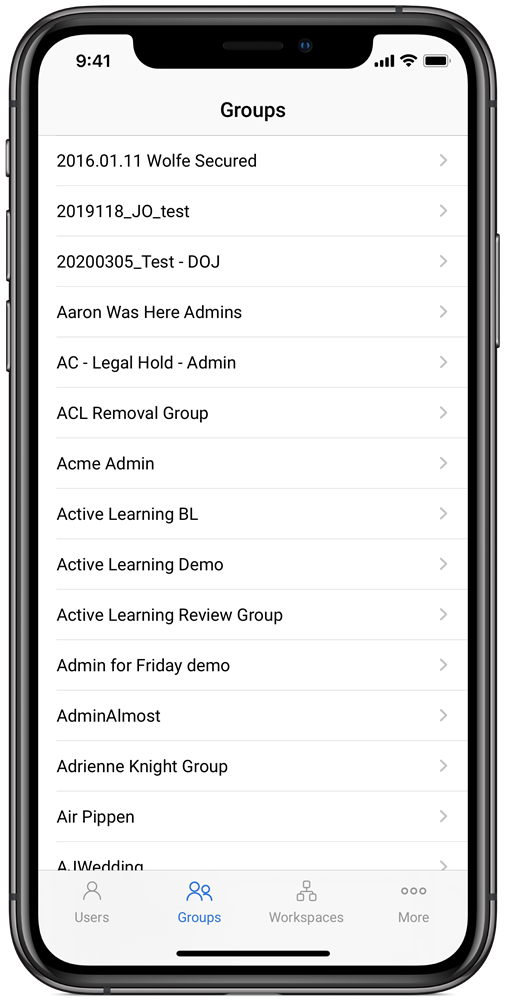
Groups
View, create, and organize groups from the RelativityOne mobile app for iOS. From the groups list, tap a group to view the users in the group and add new users.
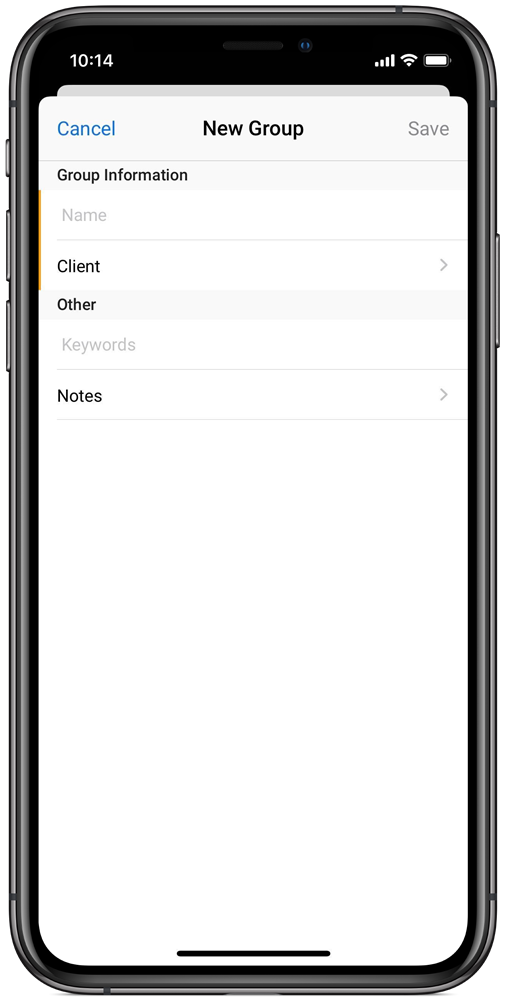
To create a new group, tap + in the top right corner on the Groups tab. Once tapped, a pop-up modal displays and you can start creating the group. To create the group, you'll need to add the following information:
Group information
- Name - the group’s name, which is the only required field for creating a group. This field must be between 1 and 50 characters.As your Relativity environment grows, arbitrary group names like "Group 1" can produce a confusing administrative workflow. Name each group according to their purpose and permission level, such as "ACME Co. Reviewer" and "ABC Corp. Administrators."
- Client - a required field that makes the group a child object of the chosen client.
Other
- Keywords - (Optional) a field where extra group information may be recorded.
- Notes - (Optional) a field where extra group information may be recorded.
Once the group information is added, tap Save.
To add users to a group, locate and tap into the desired group. In the group list of users, tap +. After tapping, a list of already created users are available to add to the group. Tap one or more users to add. Once all users are selected, tap Save. The user is then processed and a confirmation email is sent to the user. The user will immediately have the group's permissions.
To remove a user, locate and tap into the desired group. Swipe left on the name of the user to open up a confirmation pop-up modal. In the pop-up modal, tap Remove.
Workspaces
From the Workspaces tab, tap into a workspace. Within the workspace, you can manage a workspace's groups, copy permissions from one group to another, or start reviewing documents.
Tap Group Management to view the list of groups within the workspace. Within the group list, you can add or remove a group.
To add a group, tap the + icon. Select one or more groups within the instance that you want to add to the workspace. Tap Save.
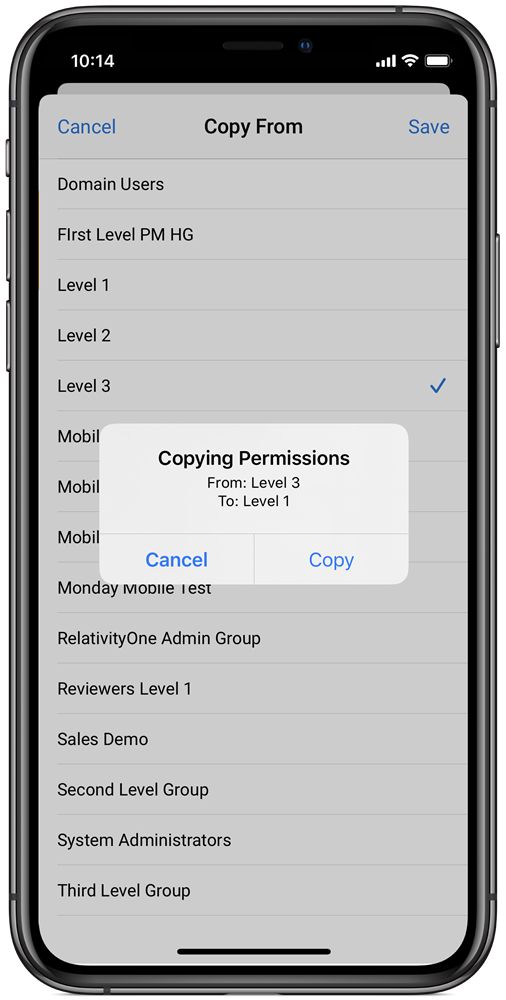
To copy permissions to a group:
- Tap the name of the group that needs the updated permissions.
- Tap Copy From to open a list of other groups in the workspace you can copy permissions from.
- Select and tap on the group you want to copy permissions from.
- Tap Save.
- Tap Copy to confirm that you want the permissions copied.
Once confirmed, the group will have the same permissions of the other group.
To remove a group from the group list, swipe left on the name of the group. In the pop-up modal, tap Remove.
Tap Review documents to start reviewing. After tapping Review Documents, you can choose to view documents, saved searches, and folders. Tap one to take you into the workspace.
