


Feedback
Last date modified: 2026-Apr-06
Using Migrate (workflow)
Managing the migration source
Registering your Relativity Server instance with RelativityOne for the first time
Before creating a new migration, you must first register your Relativity Server instance to define a migration source. This will allow you to view all the workspaces from the given Relativity Server instance in Migrate.
- When you launch Migrate for the very first time, a registration modal appears so that you can register your Relativity Server instance.
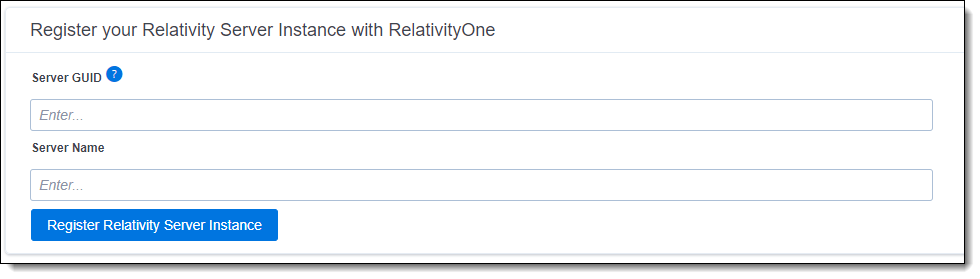
- Enter the Server GUID. You can find this in your Relativity Server instance within the InstanceIdentifier Instance Setting under the Value column.
- Enter a user-friendly name in Server Name.
- Click Register Relativity Server Instance. During the registration process, which may take several minutes, the Registering Relativity Server Instance modal will be visible. It will close after a successful registration. All the workspaces from registered Relativity Server instances will be visible in the list. See example.
Adding an additional migration source
- To add a new Migration Source, click the Add new link.
- Register your new Relativity Server instance with RelativityOne. See Registering your Relativity Server instance with RelativityOne for the first time.
Editing a migration source
- To edit Migration Source name, choose the proper Relativity Server instance from the drop-down and click the Edit (pencil) icon.
- Enter a new name, and then click Save.
Deleting registration of a migration source
You cannot delete an instance which has been already used as migration source for any migration (regardless of the status of the migration).
- To delete the registration of migration source, choose the proper Server instance from the drop-down, and then click the Delete icon (trash).
- To delete the registration of a migration source, click Yes, Delete Registration on this informational modal.
Primary migration workflow
Step 1 - Creating a new migration
Migrate can handle one migration at a time. When there is no migration in In Progress or Completed With Errors status you can start a new migration.
- Launch Migrate.When any migration is In Progress or has Completed With Errors, a warning message is displayed when assigning workspaces
- When on View All Migrations page, click New Migration button in the upper left corner.
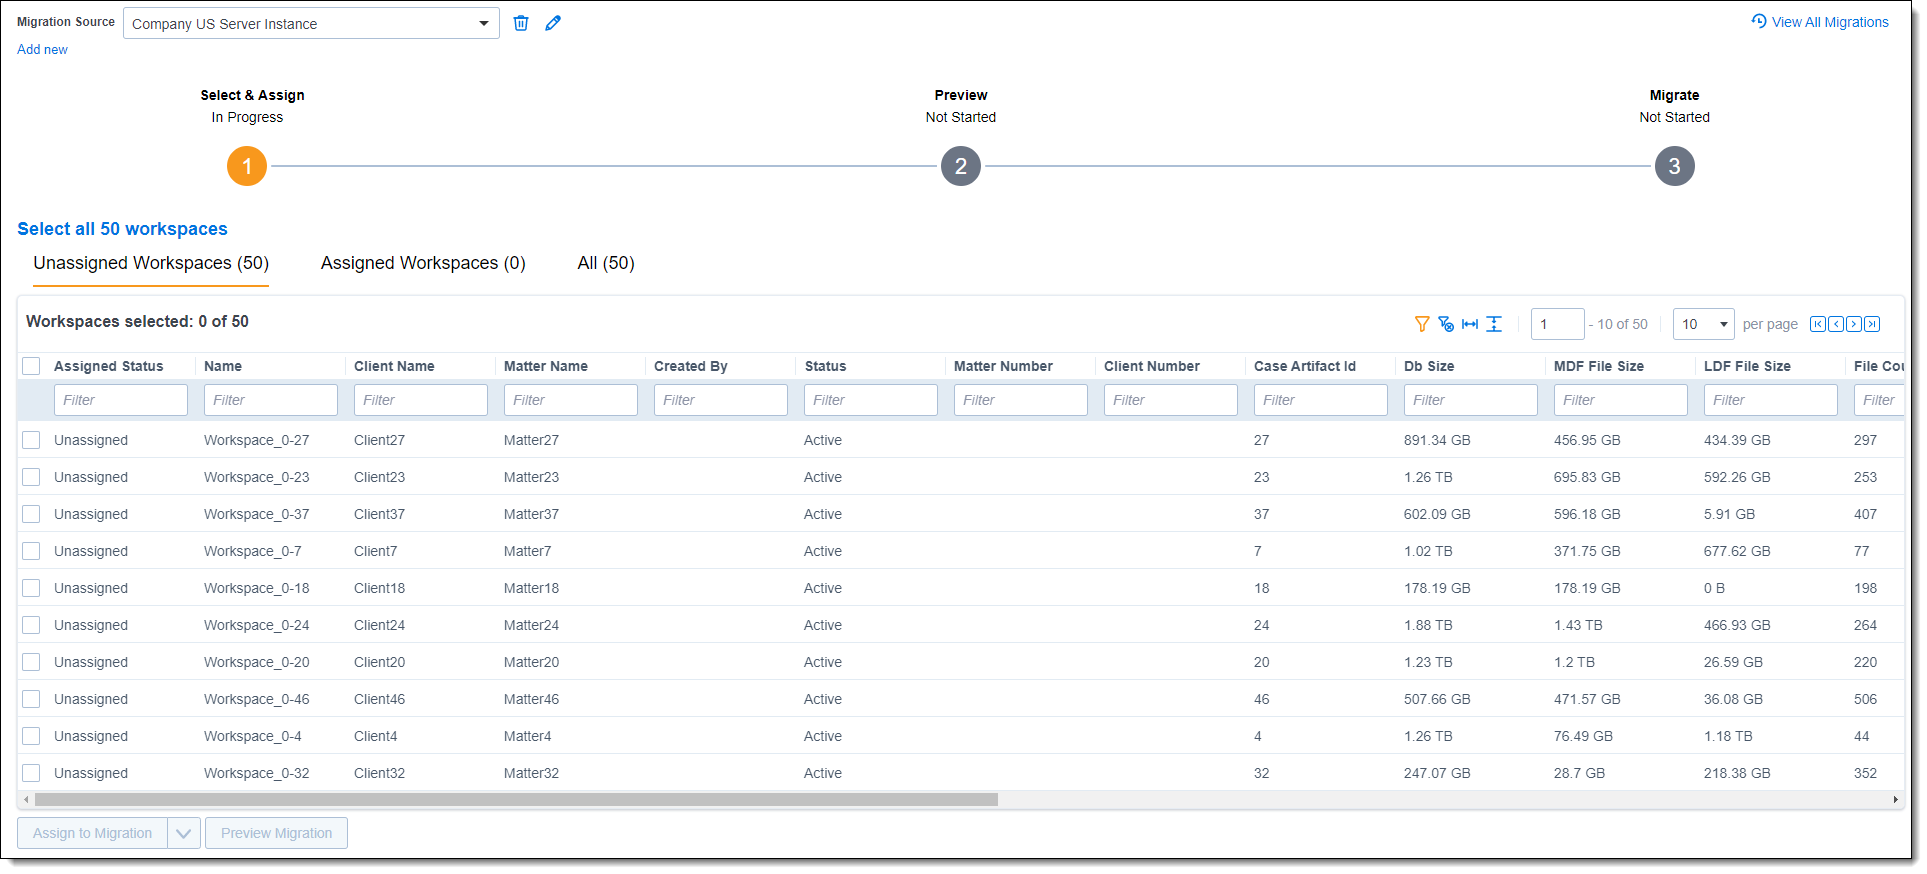
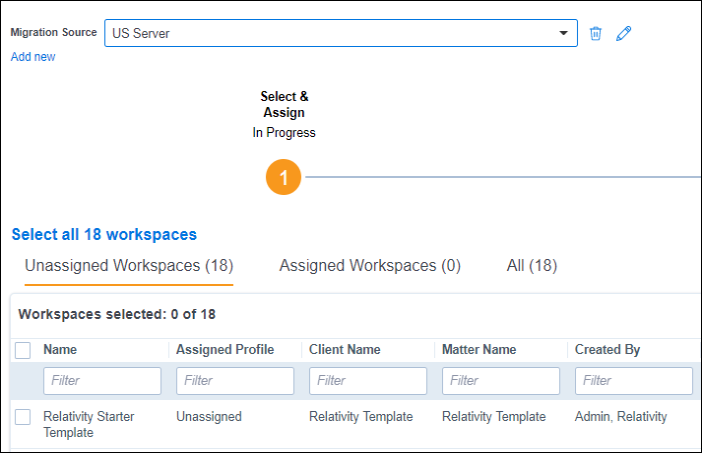
Step 2 – Selecting and assigning workspaces for migration
The Select & Assign step allows you to browse the workspaces you need to migrate, select them and assign to one of the pre-defined migration profiles. Depending on the profile selected you can either migrate all the workspace data or only a specific portion. For more information, see Profiles description. Currently, there is no ability to create a custom Profile.
Assigning workspace to a Profile also assigns a workspace to a migration.
This step consists of three tabs:
- Unassigned Workspaces—a list and count of all unassigned workspaces from selected migration source.
- Assigned Workspaces—a list and count of all assigned workspaces to migration from selected migration source.
- All—list and count of all the workspaces both assigned and unassigned from selected migration source.
Profiles description
Choose to skip, include (True) or exclude (False) profile details.
- Skip—if the migration process encounters missing files or if the application will not install, it will be skipped and the job will continue.
- True—to include in migration.
- False—to excluded from migration.
| Profile Details | All Data | No Files | No Processing | No Linked Files | DataGrid, Processing and Files |
|---|---|---|---|---|---|
| Include DB Backup | True | True | True | True |
True |
| Include Conceptual | True | True | True | True | False |
| Include DataGrid | True | True | True | True | True |
| Include Linked Files |
True |
False | False | False | False |
| Include Processing | True | True | False | True | True |
| Processing Missing File | Skip | Skip | Skip | Skip | Skip |
| Application Error Export | Skip | Skip | Skip | Skip | Skip |
| Include dtSearch | True | True | True | True | False |
| Include Structural Analytics | True | True | True | True | False |
| Include Repository Files | True | False | True | True |
True |
| MissingFile | Skip |
Skip | Skip | Skip | Skip |
| Include Processing Files | True | False | False | True | True |
| Include Extended Workspace Data | True | True | True | True | False |
Table above in list view:
- All Data
- Include DB Backup - True
- Include Conceptual - True
- Include DataGrid - True
- Include Linked Files - True
- Include Processing - True
- Processing Missing File - Skip
- Application Error Export - Skip
- Include dtSearch - True
- Include Structured Analytics - True
- Include Repository Files - True
- MissingFile - Skip
- Include Processing Files - True
- Include Extended Workspace Data – True
- No Files
- Include DB Backup - True
- Include Conceptual - True
- Include DataGrid - True
- Include Linked Files - False
- Include Processing - True
- Processing Missing File - Skip
- Application Error Export - Skip
- Include dtSearch - True
- Include Structured Analytics - True
- Include Repository Files - False
- MissingFile - Skip
- Include Processing Files - False
- Include Extended Workspace Data – True
- No Processing
- Include DB Backup - True
- Include Conceptual - True
- Include DataGrid - True
- Include Linked Files - False
- Include Processing - False
- Processing Missing File - Skip
- Application Error Export - Skip
- Include dtSearch - True
- Include Structured Analytics - True
- Include Repository Files - True
- MissingFile - Skip
- Include Processing Files - False
- Include Extended Workspace Data – True
- No Linked Files
- Include DB Backup - True
- Include Conceptual - True
- Include DataGrid - True
- Include Linked Files - False
- Include Processing - True
- Processing Missing File - Skip
- Application Error Export - Skip
- Include dtSearch - True
- Include Structured Analytics - True
- Include Repository Files - True
- MissingFile - Skip
- Include Processing Files - True
- Include Extended Workspace Data – True
- DataGrid, Processing and Files
- Include DB Backup - True
- Include Conceptual - False
- Include DataGrid - True
- Include Linked Files - False
- Include Processing - True
- Processing Missing File - Skip
- Application Error Export - Skip
- Include dtSearch - False
- Include Structured Analytics – False
- Include Repository Files - True
- MissingFile - Skip
- Include Processing Files - True
- Include Extended Workspace Data – False
Assigning a workspace to a migration profile
To assign workspace to a migration, select a workspace, from either Unassigned Workspaces or All tab. Then, click the Assign to Profile drop-down list, and finally choose the proper profile.
The Assign to Profile button is disabled when no workspace is selected.
You can select/unselect your workspace(s) by:
- Clicking Select all [# count] workspaces / Unselect all workspaces buttons to select all / unselect all the workspaces from selected migration source.
- Selecting the check box next to the Name column to select/unselect all the workspaces viewed on a page.
Unassigning a workspace from a migration profile
To unassign a workspace from migration profile, select a workspace, from either Assigned Workspaces or All tab. Then click the Unassign button.
The Unassign button is disabled when no workspace is selected. Unassigning workspace from a profile also unassigns a workspace from a migration.
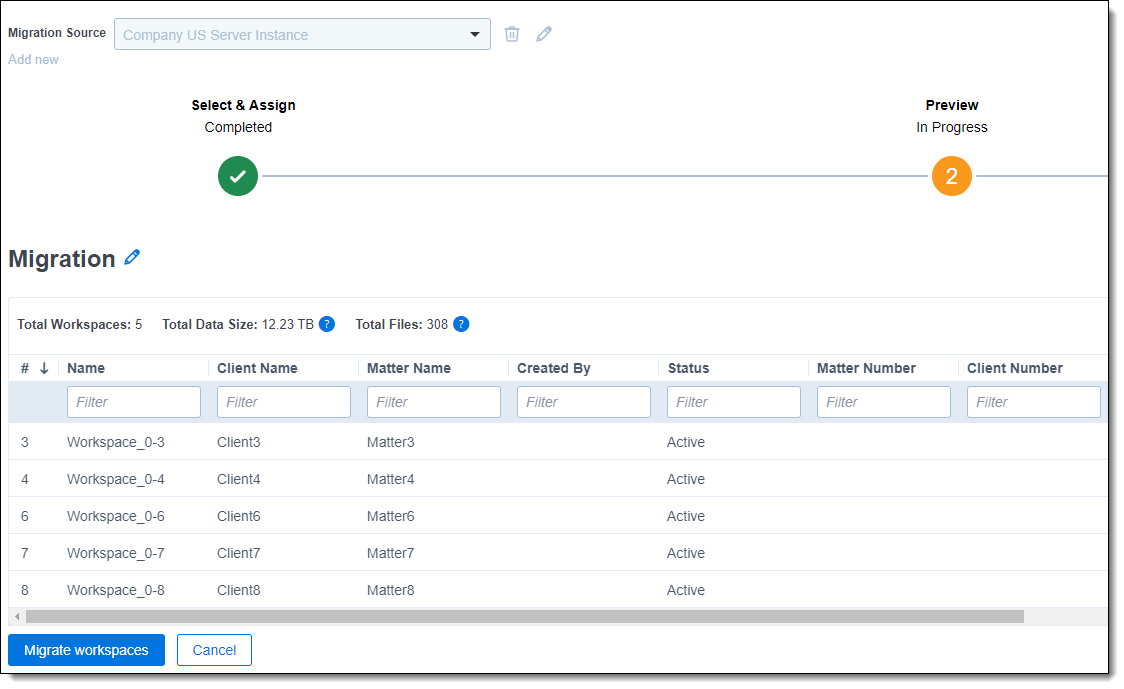
Step 3 – Previewing your migration
While on the Preview step, workspaces are filtered in ascending order based on file count. The workspace with the lowest file count is displayed first. Since file count has significant impact on performance, Migrate starts the migration based on this order to make migration jobs quicker and more efficient.
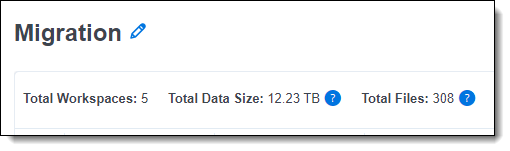
The Preview step provides all the necessary information about migration size, workspace count and files count. In addition, you can name a migration to be more meaningful to you and manage email notifications to keep your team informed about ongoing migrations.
To preview your migration, when all appropriate workspaces have been assigned to migration profile, click Preview Migration.
When on the Preview step, you can easily learn about migration scope by looking at Total Workspaces count, Total Data Size and Total Files count. Hover over the tooltip question mark  icon to learn more about data scope.
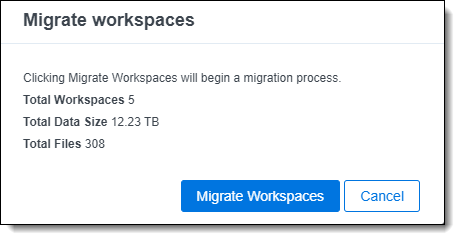
Step 4 – Migration
The Migrate step is where you execute your migration. This screen enables you to track your migration in a single place. Regardless as to whether a workspace is being archived on Relativity Server, transferred to Staging or restored to RelativityOne—all these steps are being tracked here.
You can either track the migration progress from the wave (entire migration) or at the workspace level.
- Begin your migration by clicking on Migrate Workspaces in the Preview step.
- Basic information about the migration is displayed. To proceed, click Migrate Workspaces and the migration will start immediately. You will be able to cancel workspace migration only when a workspace is in the In Queue, Archiving, or Transferring status.
Once your migration is in progress, you can track it. See Using Migrate (workflow) for this information.
Step 5 - Tracking migrations
You can track migrations in the following ways:
- Viewing all migrations
- Viewing migration status
- Viewing migration wave progress information
- Viewing workspace status
Viewing all migrations
View All Migrations is a list of all in progress or completed, regardless of the status, migrations on RelativityOne instance.
To view all migrations, during workspace assignment or migration step, click View All Migrations(upper right corner).

When on the Select & Assign step, View All Migrations is only available before selecting a workspace. When at least one workspace is selected View All Migrations is not available.
Viewing migration status
Migration statuses include the following:
- Scheduled—the first migration status right after clicking Migrate Workspaces.
- In Progress—when migration is in progress.
- Completed—all the workspaces are successfully migrated or some workspaces are canceled
- Completed With Warnings—failed workspaces are abandoned. For more information, see Abandon Failed Workspace Migrations.
- Completed With Errors—at least one workspace is in any failed status and all the others are in Migrated status.
- Canceled—all the workspaces are canceled
Viewing migration wave progress information
Migration wave progress information includes the following:
- Total Workspaces—presents current migrated workspaces count out of the total workspaces count
- Total Data Size—presents current migrated data size out of the total data size
- MDF File Size
- LDF File Size
- Image File Size
- Native File Size
- Production File Size
- Total Files—presents current migrated files count out of the total files count
- Processing Files
- Repository Files
- Failed Workspaces—presents failed workspaces count
- Abandon Workspaces—presents abandon workspaces count
Viewing workspace status
Workspace status properties include the following:
- In Queue—workspace is scheduled and waiting to be archived
- Cancel Requested—workspace was requested to be cancel
- Cancel Request Failed—workspace failed on cancel request
- Canceling—workspace is being canceled
- Canceling Failed—workspace failed on cancel
- Canceled—workspace is successfully canceled
- Archive Requested—workspace was requested to be archived
- Archive Request Failed—workspace failed on archive request
- Archiving—workspace is being archived
- Archiving Failed—workspace failed on archive
- Archive Created—workspace has been archived
- Transfer Requested—workspace was requested to be transferred
- Transfer Request Failed—workspace failed on transfer request
- Transferring—workspace is being transferred
- Transfer Failed—workspace failed on transfer
- Transfer Completed—workspace has been transferred
- Restore Requested—workspace was requested to be restored
- Restore Request Failed—workspace failed on restore request
- Restoring—workspace is being restored
- Restoring Failed—workspace failed on restore
- Migrated—workspace is successfully migrated
- Abandon Requested—failed workspace was requested to be abandoned
- Abandoned—failed workspace has been abandoned
- Abandon Failed—failed workspace failed on abandon
Viewing workspace progress details
To see detailed information about workspace progress
- Click the details icon (within Details column). The following Workspace Progress Details modal opens.
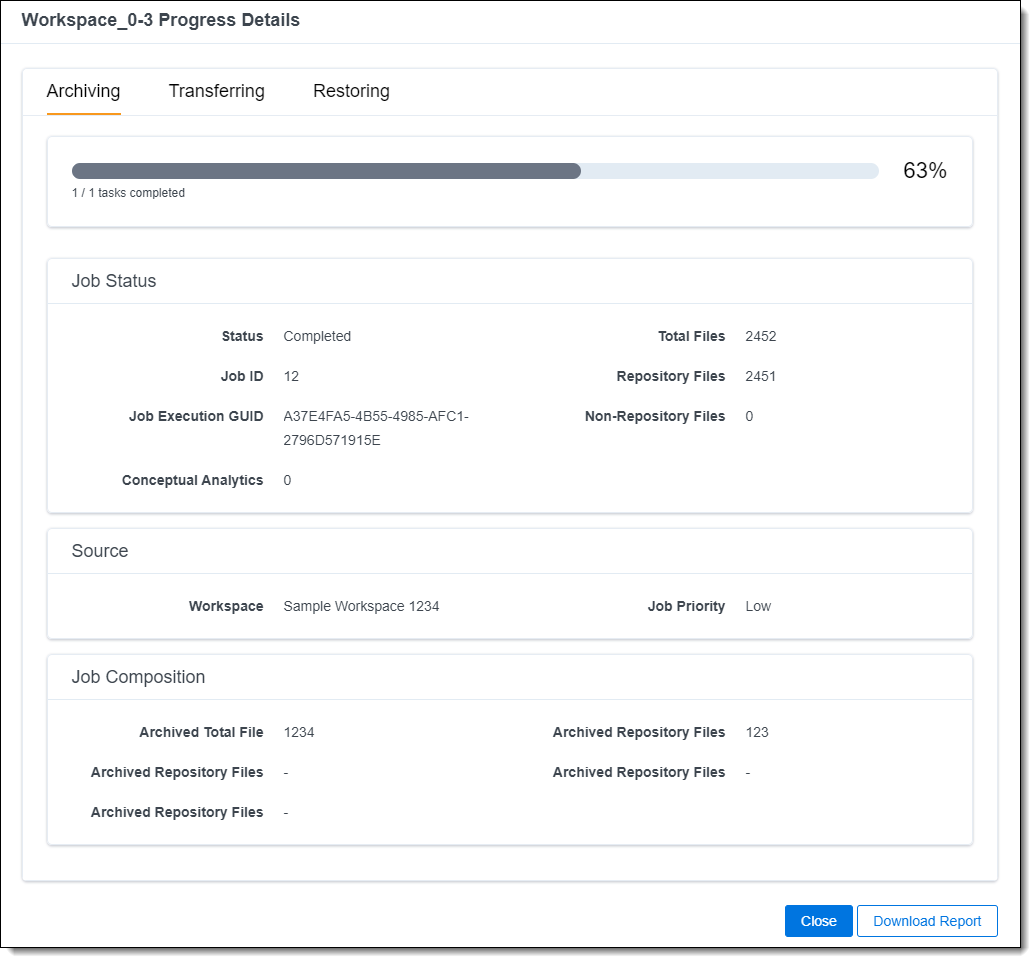
You can track migration progress on each step of its migration workflow, for example, archiving, transferring, restoring.
Move between the tabs to learn more detailed information about a step. The content of the tabs can vary workspace by workspace. - Click Download Report to download a detailed report of Workspace Progress details.Currently this report is a JSON format. The report file will be in the following format: <workspace name>_details_<timestamp>.json. For example, Sample Workspace_details_2020-12-01-10-28-27.json.
Other available actions
Changing the migration name
You can change the migration name on Preview, Migrate and View All Migrations page.
- To edit the migration name, click the Edit icon (pencil) next to Migration.
- Edit the name as needed, then click Save. The default migration name is “Migration[migration consecutive number]”, for example Migration, Migration1, Migration2, etc.
Canceling migration setup
You can cancel a migration setup at Select & Assign and Preview step.
- To cancel migration setup, click Cancel at the Select & Assign or Preview step.
- On the confirmation modal that appears, click Yes, Cancel Setup.You will start over from the assigning workspaces step.
Canceling workspace migration
You can cancel a migration of a workspace at In Queue,Archiving, and Transferring status.
- Click the circled X
 icon next to the workspace status on the Migrate step.
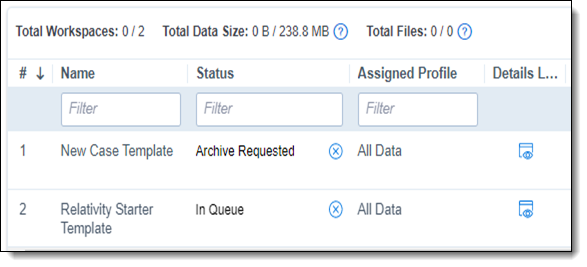
- On the confirmation modal that appears, click Confirm. The status of the workspace will change to Canceled and the workspace will not be migrated.
Managing email notifications
You can use email notifications to keep your team informed about ongoing migrations. To manage email notifications:
- Click Manage Notifications during the Preview step. The following modal will appear.
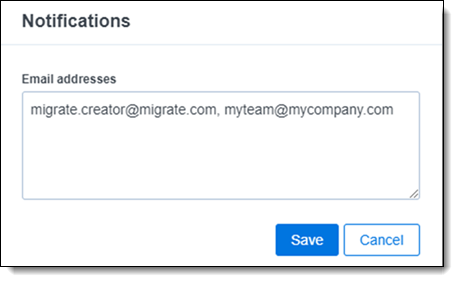
- Insert the necessary email addresses separating them with comma, then click Save.The Migration creator is added to notifications for the migration by default. A maximum of 25 email addresses can be added.
The following statuses will trigger the email notifications:
- Migration Status: In Progress; right after the start of migration
- Migration Status: Completed
- Workspace Status: Failed
- Migration Status: Completed With Errors
- Migration Status: Completed With Warnings
Subject
- [Migrate] - <RelativityOne instance>; <Migration Name>: In Progress
Message
MIGRATION DETAILS
- Migration Name
- Migration Source
- Migration Created By
- Start Time
- Migration Status In Progress
- Total Workspaces
- Total Data Size
- Total Files
Subject
- [Migrate] - <RelativityOne instance>; <Migration Name>: Completed
Message
MIGRATION DETAILS
- Migration Name
- Migration Source
- Migration Created By
- Start Time
- Migration Status Completed
- Total Workspaces
- Total Data Size
- Total Files
Subject
- [Migrate] - <RelativityOne instance>; <Migration Name>: Completed after Abandon
Message
MIGRATION DETAILS
- Migration Name
- Migration Source
- Migration Created By
- Start Time
- Migration Status Completed
- Abandoned Workspaces
Subject
- [Migrate] - <RelativityOne instance>; <Migration Name>; Failed Workspace: <Workspace Name>
Message
MIGRATION DETAILS
- Migration Name
- Migration Source
- Migration Created By
- Start Time
- Workspace Name
- Workspace Migration Status
- Error message
Subject
[Migrate] - <RelativityOne instance>; <Migration Name>: Completed With Errors
Message
MIGRATION DETAILS
- Migration Name
- Migration Source
- Migration Created By
- Start Time
- Migration Status Completed With Errors
- Total Workspaces
- Total Data Size
- Total Files
Troubleshooting errored workspace migrations
When migration is in Completed With Errors status and there are workspaces in Failed status, you cannot start a new migration. In addition, a warning message will be displayed in a notification bar.
There are two options to solve this issue:
- Retry failed workspace migrations to retry migration of selected workspaces, one at a time. See Retrying failed workspace migrations.
- Abandon failed workspace migrations to complete the migration without workspaces with errors. All the workspaces in any failed status will be changed into Abandoned and migration will be completed without errors with status Completed With Warnings. This will allow to set up another migration if needed. See Abandoning failed workspace migrations .
Retrying failed workspace migrations
You can retry failed workspace migration after migration has completed with errors. You can only run one retry at a time. To retry other failed workspace migrations, you must wait for the retry of the previous workspace to complete.
- To retry a workspace migration, click the Retry icon next to workspace Status.

- On the confirmation modal that appears, click Yes, Retry Workspace.The migration status will change from Completed With Errors to In Progress, and workspace migration will resume from the place it has failed.
When retrying a workspace migration, Retry icons for other failed workspaces will not be available until the retry of the migration is completed.
Abandoning failed workspace migrations
- Click Abandon (#) Failed Workspace Migrations.
- On the confirmation modal that appears, click Yes, Abandon all. All the workspaces in any Failed status will be requested to be abandoned. When successful, their status will be changed into Abandoned , and the migration will be completed without errors and with a status of Completed With Warnings.
Workspace migrations during RelativityOne maintenance window
Migrate carries out a few actions during a workspace migration. The response during a maintenance window will depend on the step of the process Migrate is in:
| Migration step | Maintenance window effect |
|---|---|
|
Archiving on Relativity Server |
The maintenance window will have no effect on the archive process. |
| Transferring to RelativityOne | If the maintenance window starts during the transfer, it may stop or fail the transfer, and this step will need to be restarted from the Migrate tab. |
| Restoring in RelativityOne | If the maintenance window starts during the restore phase, this may stop the current restore step. You will be able to restart it from the Migrate tab or the ARM tab within the RelativityOne instance. |