


Feedback
Last date modified: 2026-Jul-22
Migrate setup and configuration
This task should be performed under the guidance of your RelativityOne specialist. Please submit a request via the Customer Support form for assistance.
Pre-installation considerations
Before you install Migrate, it's recommended that you copy all required ID values to a text file so that you can easily copy and paste them during installation. These include:
| Setting | RelativityOne or Server | Description | Location |
|---|---|---|---|
| ResourcePoolID | RelativityOne | ArtifactID of the resource pool used to restore archives | Server & Agent Management > Resource Pools tab |
| CacheLocationID | RelativityOne | ArtifactID of the cache location associated with Resource Pool | Server & Agent Management > Servers tab |
| DatabaseServerID | RelativityOne |
ArtifactID of the distributed SQL associated with Resource Pool |
Server & Agent Management > Servers tab |
| FileRepositoryID | RelativityOne |
ArtifactID of the file share associated with Resource Pool |
Server & Agent Management > Servers tab |
| ArchiveFileSharePath | Server | File path location of ARM archives | ARM > Configuration tab > ARM Archive Locations |
| BCP Path for the SQL Primary Server | Server | Path for the SQL Primary Server | Server & Agent Management > Servers tab |
| InstanceIdentifier | Server | Server GUID (identifier) of Server instance used to register in RelativityOne | Instance settings |
Migrate network setup
Refer to RelativityOne network access for comprehensive information on RelativityOne network setup information.
For information on allowing your internal network or company configurations to use Import/Export with Express Transfer, and ROSE, see this Data Transfer Tools Knowledgebase article on the Community. You must have valid Community credentials to access this information.
For a list of ports and DNS requirements, see RelativityOne technical overview > Migrate.
Installing and configuring Migrate (RelativityOne)
Follow these steps to install and configure Migrate with RelativityOne.
If you need help configuring your Migrate application instance settings in RelativityOne or if you experience technical issues or Migrate is not working as expected, please use the Customer Support form to submit a request for assistance.
- Set the Migrate restore locations by entering values into Value fields for the following instance settings in the Relativity.Migrate section:
- Resource Pool(RelativityOne)—to locate Artifact ID for ResourcePoolID, check the Server & Agent Management > Resource Pools tab. You may need to add ArtifactID column to your view.
- CacheLocationId—use the Cache Location Server artifactId associated to the Resource Pool selected above.
- DatabaseServerId—use the SQL - Distributed artifactId associated to the Resource Pool selected above.
- FileRepositoryId—use the Fileshare artifactId associated to the Resource Pool selected above.To locate Artifact ID for the CacheLocationID, DatabaseServerID, and FileRepositoryID fields, check the Server & Agent Management > Servers tab.
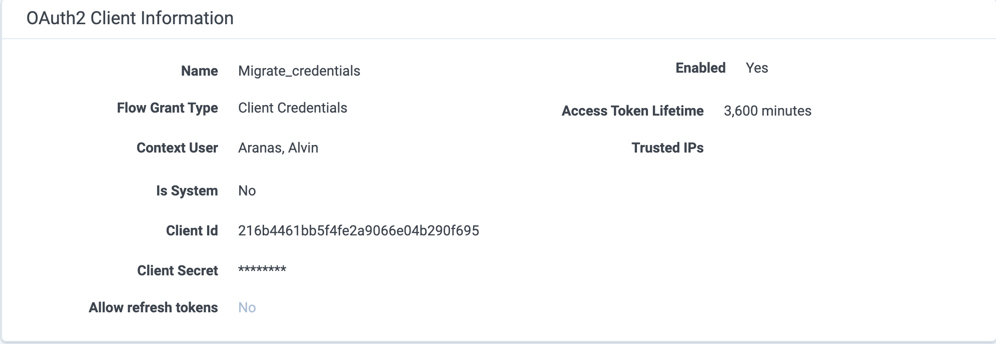
- Add an OAuth2 Client for the Migrate application.
- Navigate to the OAuth2 Client tab in RelativityOne.
- Click Create New OAuth2 Client and enter the following information:
- Name—enter name. Please note this field only supports alpha-numeric characters.
- Flow Grant Type—select Client Credentials
- Context User
- the user must be an active System Administrator.
- the user must also be in a group, other than the System Administrators, that is added to at least one workspace built on the resource pool with the associated file shares. Be aware that if the user does not have access to the workspace that is associated to the resource pool with the file share, Migrate will not have appropriate permissions to transfer data to RelativityOne.
- Access Token Lifetime—select 3600
- Click Save.
- Copy the Client ID and the Client Secret values that are displayed because they will be needed later in the configuration.
Installing and configuring Migrate (Relativity Server)
Minimum supported version: Beginning April 30, the minimum supported Migrate Server version is 9.9.11 or later. This version is required for all customers. If your environment is running on an older version of Migrate, contact Support to advise you on further steps.
Relativity Server 2024 and above
Migrate Server 9.9.11+ is only compatible with Relativity Server 2024 and above.
Follow these steps to install and configure Migrate:
- Make sure that port 443 traffic from the Agent server that will host the Migrate agents is unblocked for the RelativityOne technical overview > Migrate URL: https://help.relativity.com/RelativityOne/Content/Getting_Started/RelativityOne_technical_overview.htm#Migrate.
- Find and download the latest Migrate.Server RAP file located in the Relativity Applications folder from the Community.
- Install the Migrate.Server RAP file on your Relativity Server instance.
- Add one of each of the required agents as additional agents do not increase performance:
- Migrate – Supervisor Agent
- Migrate – Workspace Crawler Agent
- Migrate – Archive Builder Agent
- Migrate – Migration Data Sender Agent
- Set instance setting:
- Name—ArchiveFileSharePath
- Section—Relativity.Migrate
- Type—Text
- Value—path to your ARM archive file share
- If Credentials tab is not visible, you need to do either of the following before you can set up the appropriate credentials for Migrate:
- unhide the tab by setting Visible—Yes
- create the tab by setting the following:
- Name—Credential
- Tab Type—Object
- Object Type—Credential
- Set as Default Tab—No
- Visible—Yes
- Add AFS credentials under the Credentials tab:
- Type—AFS
- Name—Migrate_[your name]
- URL—RelativityOne instance base URL. For example, https://example.relativity.one. Do not include '/Relativity' in the URL—this does not work for Migrate Server version 9.9.11 or higher.
- Account Name—OAuth2 Client ID
- Account Key—OAuth2 Client Secret
- Set ARM configuration by entering the following instance setting:
- Name—Diagnostics
- Section—kCura.ARM
- Field Type—True/False
- Value—True
- Ensure ARM is up to date—ARM version 12.2.9.11+ is required.
Relativity Server versions below 2024
Migrate Server 9.9.11+ is only supported in Relativity Server 2024 and later versions.
This ensures:
- Minimal disruption to migration workflows
- Compatibility with your Relativity Server version
- Proper configuration for your on-premise environment