Last date modified: 2026-Feb-05
User Import Application
The Relativity User Import Application allows you to efficiently manage multiple users. You can import users from CSV files, including their Relativity settings, and export lists of users with their settings for backup or transfer.
Downloading Community Files
Make sure you're logged in with your valid Relativity Community credentials.
If you're not logged in:
- Click the Community file link.
- Enter your credentials on the Community login screen that appears.
- The file will download to the bottom left corner of your screen.
If you're logged in, the file will download automatically to the bottom left corner of your screen when you click the link.
If you encounter a "URL No Longer Exists" error after clicking a Community link, it might signal a single sign-on error related to the SAML Assertion Validator. Reach out to your IT department for assistance.
Supported Versions
You can find all versions of this solution on the Community via this User Import Application search string. You must be logged in to the Community for that string to return results.
Category
The Relativity User Import Application includes the following components:
- Agents
- Event handlers
- Custom pages
Special considerations
Passwords and Authentication:
- The User Import application is intended only for System Administrators. No other groups can run the solution.
- Passwords are not imported or exported. Imported users with default password providers must use the "Forgot your password?" link to create a new password.
- Only Default Password Provider and Default Integration Authentication Provider are supported. Other authentication types won't be imported or exported.
- System Administrators can restrict password resets for imported users by setting the "CanChangePassword" column to "FALSE" in the import file.
Login Methods:
- Unsupported login methods (e.g., Default RSA Provider) are not imported or exported. Users with unsupported methods will be imported without login methods and must use the "Forgot your password?" workflow to create a new password.
Partial Imports and Errors:
- Partial imports indicate a user creation step failed. Validate the user's information and login methods, update as needed, or remove and retry the import.
- Worker queue records are removed as job errors are recorded. The total imported/exported records may not be accurate until job completion.
Other Considerations:
- Relativity Admin and Service Account cannot be imported.
- Install the application in only one workspace.
- Import files require header rows with populated values.
- Relativity prevents the import of existing users, including bulk reassignments between existing users and groups.
- Missing destination groups for imported users will cause errors. Create users and groups before importing.
- Duplicate group names: Users are imported into the first duplicate group.
- All users are added to the "Everyone" group, even if the group column is blank in the import file.
- Empty "Trusted IP" fields for users invalidate the "Outside Trusted IPs" setting for two-factor authentication.
-
Uninstalling the application:
- Disables manually created agents due to removed tables.
- Deletes database tables, queue records, and existing jobs.
- Custom components may not perform or behave identically to native Relativity features.
- Solutions are thoroughly tested but are not considered core features and have a different level of support than the Relativity platform.
Deploying and configuring the solution
To deploy and configure the solution, you must first add it to the Application Library as a Relativity application. You can then install and configure the solution in a workspace.
To add the application to the Application Library:
- Log in to Relativity.
- Click the user drop-down menu in the upper-right corner of Relativity, then click Home.
- Click the Applications & Scripts tab, then click the Application Library tab.
- Click Upload Application.
- Click Browse, navigate to and select the .rap file, and then click Open.
- Click Save.
Preparing the workspace
Once you've added the application to the Application Library, install and configure it in a single workspace. To do this, select the solution application from the library and install it in your chosen workspace.
Installing the application
To install the Relativity application in the workspace:
- Click the user drop-down menu in the upper-right corner of Relativity, then click Home.
- Click the Applications & Scripts tab, then click the Application Library tab.
- Click the name of the User Import Application.
- Under Workspaces Installed, click Install.
- Click the ellipsis next to Workspaces.
- Select the destination workspace and click Ok.
- Click Save.
Export utility job
You can create and run an export utility job from the Export Utility Job tab in the workspace where you installed the application. Within that workspace, create and run an export utility job by completing the following workflow:
- Click New Export Utility Job.
- Complete the following fields:
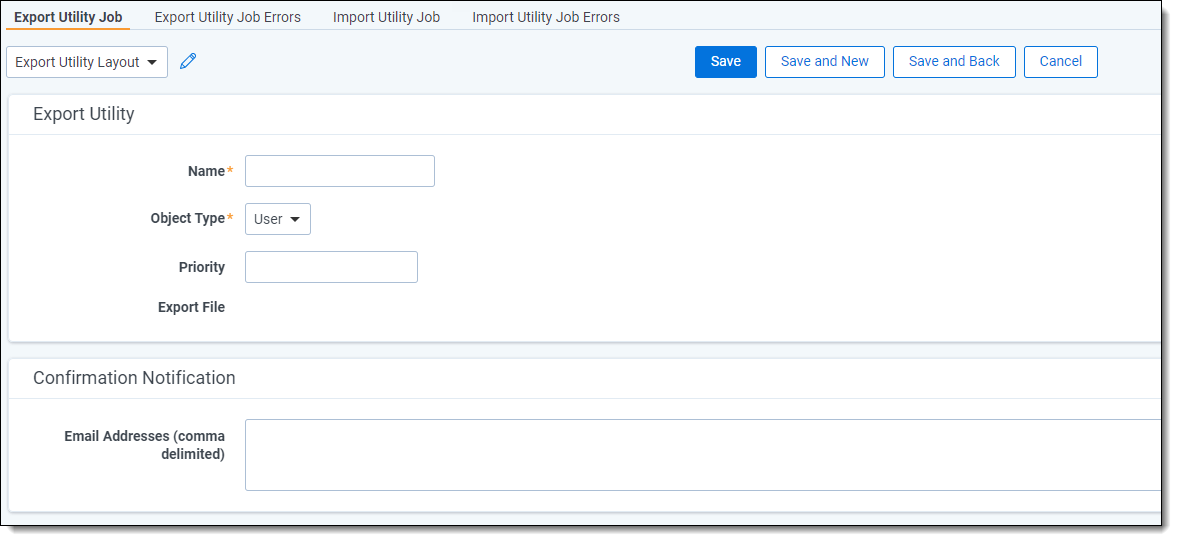
- Name - enter a name for your export job.
- Object Type - select User.
- Priority - (optional) enter a priority for your export job. The lower the number, the higher the priority. Negative numbers are acceptable.
- Confirmation notification - enter a comma delimited list of email addresses to send a notification to once the export utility job completes.
- Click Save.
- From the Manage Export Job console, click Submit.
- Once you click Save, the Status section populates with the following information:
- Status - the status of the export utility job.
- Created On - the date and time the export utility job was created.
- Created By - the name of the user who created the export utility job.
- System Last Modified On - the date and time the export utility job was last modified.
- System Last Modified By - the name of the user who last modified the export utility job.
After you click Submit, Relativity agents begin processing your export utility job. The Progress section populates with the following information:
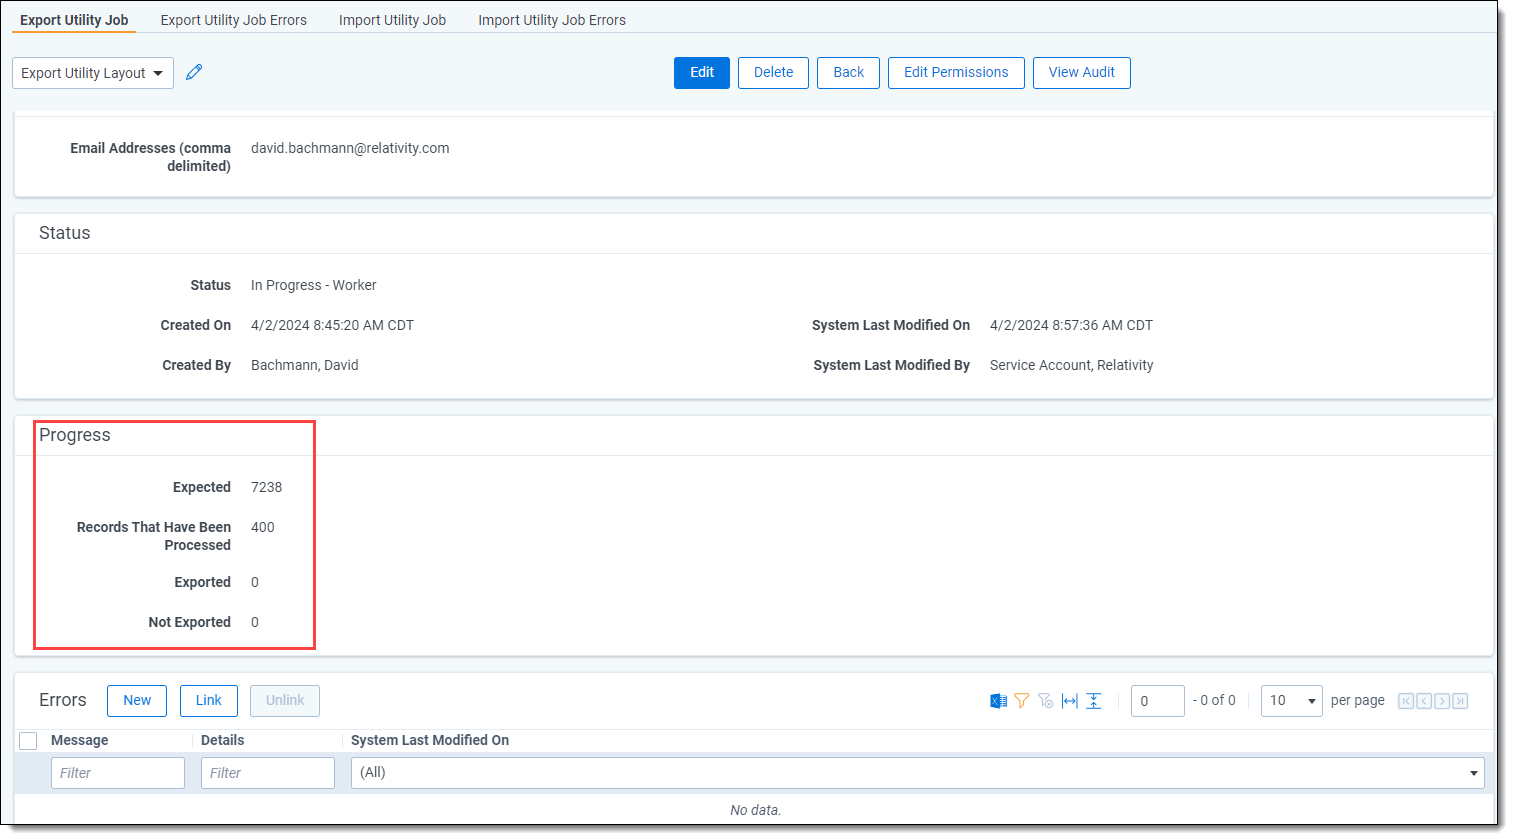
- Expected - the expected number of users to be exported.
- Records That Have Been Processed - the number of users whose data has been prepared for export. This number is updated as the page refreshes.
- Exported - the number of users exported in the export file.
- Not exported - the number of users not exported in the export file.
Click Cancel to stop the job from running.
Once the agents finish the export, Relativity populates the Export File field on the export utility job with a CSV file that contains a list of users and their Relativity settings for the object type you specified. Click the file name to download your export file.
Viewing export errors
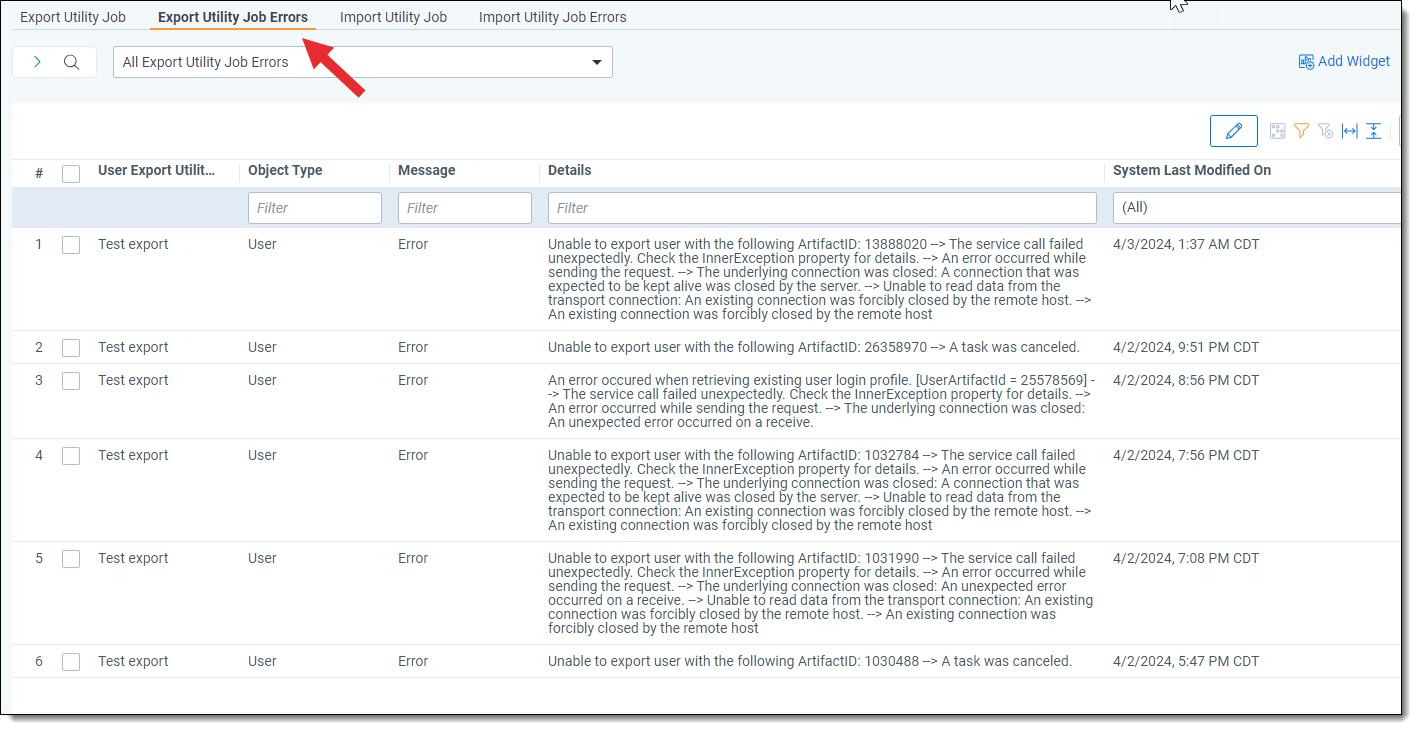
You can view export errors on the Export Utility Job Errors tab. Errors are also linked to your export utility job.
Import utility job
You can run an import utility job from the Import Utility Job tab. To run an import utility job, complete the following workflow:
- Click New Import Utility Job.
- Complete the following fields:
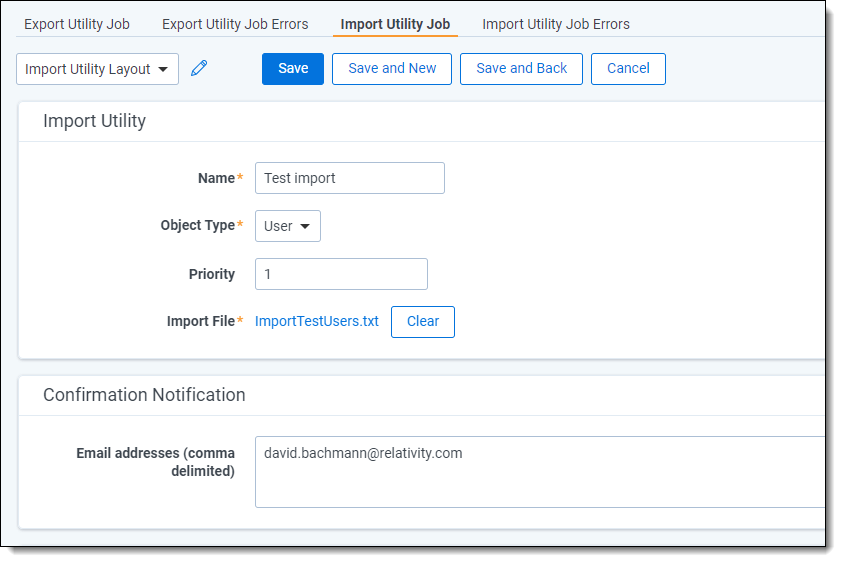
- Name - enter a name for your import job.
- Object Type - select User. Once you select the User object type from the drop down, download this template to populate with the user data you want to import.
- Priority - (optional) enter a priority for your import job.
- Import File - select the object file you want to import. You can also select the template you downloaded and populated with your object data. For more information, see User Import Application.
- (Optional) Under Confirmation Notification, enter any email addresses that you want to send a confirmation notification to once the import completes. Separate each entry with a comma.
- Click Save.
- (Optional) Click Validate to validate your import file before you import your users. If there are any errors, you can view them in the Errors section and on the Import Utility Job Errors tab. For more information, see Viewing import errors. Validating the import file does not automatically submit it. You must click Submit after validating the file to import users.
- Click Submit to validate and import your file. Clicking Submit validates file against user information in Relativity.
Once you click Save, the Status section populates with the following information:
- Status - the status of the export utility job.
- Created On - the date and time the export utility job was created.
- Created By - the name of the user who created the export utility job.
- System Last Modified On - the date and time the export utility job was last modified.
- System Last Modified By - the name of the user who last modified the export utility job.
After you click Submit, Relativity runs your import job. Click Cancel to stop the job from running.
Progress
- Expected - the expected number of users to be imported.
- Imported - the number of users imported via the import file
- Not imported - the number of users not imported to Relativity.
Click Cancel to stop the job from running.
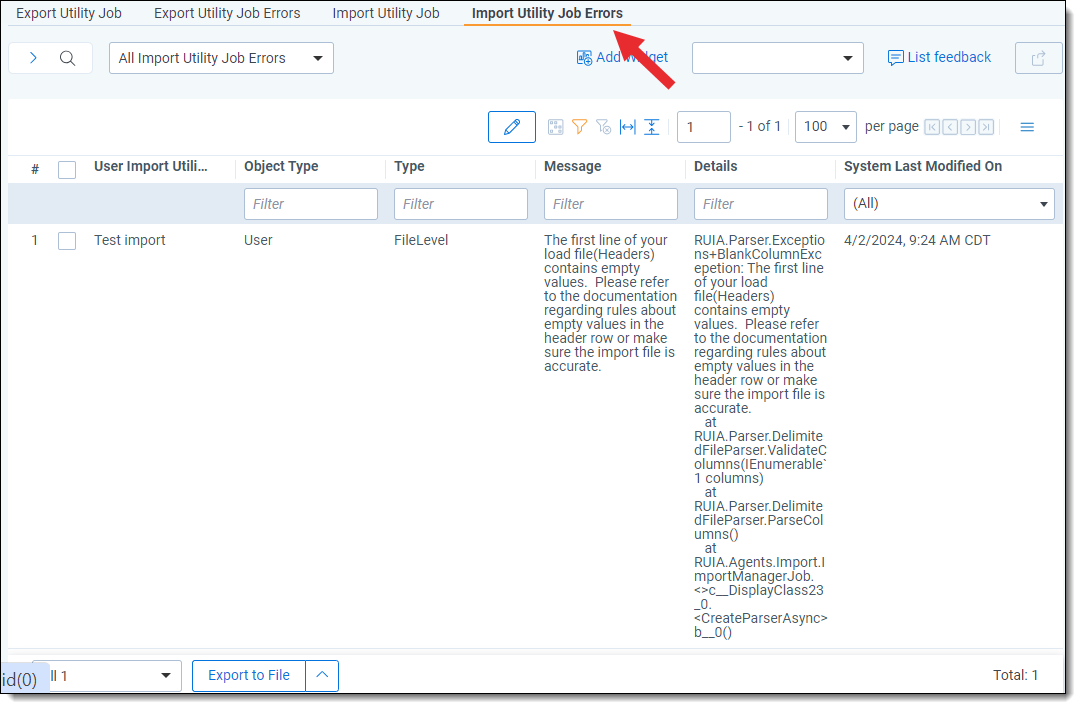
Viewing import errors
You can view import errors on the Import Utility Job Errors tab. Errors are also linked to your import utility job.
Performance metrics
| Test |
Test scenario |
Operation time (hh:mm:ss) |
|---|---|---|
|
Export |
1 manager agent, 1 worker agent 1000 users |
00:08:37 |
|
Export |
1 manager agent 5 worker agent 1000 users |
00:03:13 |
|
Validation |
1 manager agent, 1 worker agent 1000 users |
00:20:48 |
|
Validation |
1 manager agent 5 worker agent 1000 users |
00:07:34 |
|
Validation and Import |
1 manager agent, 1 worker agent 1000 users |
01:16:55 |
|
Validation and Import |
1 manager agent 5 worker agent 1000 users |
00:50:16 |
On this page


