


Feedback
Last date modified: 2026-Jul-14
Propagate coding post-import
You must have valid Relativity Community credentials in order to download any Community file linked to the documentation site. You'll need to enter those credentials on the Community login screen if you're not already logged in. If you're already logged in to the Community at the time you click a link, the file is automatically downloaded in the bottom left corner of your screen. If you get an error message stating "URL No Longer Exists" after clicking a Community link, it may be due to a single sign-on error related to the SAML Assertion Validator, and you should contact your IT department.
The Propagate Coding Post-import solutions passes along, or spreads, the value of one or more fields to documents that are part of the same relational group. For more information, see Relational groups. The solution also reports any coding variances within those relational groups. For example, the relational group "EA53" includes one document with a "Responsive" designation. When the solution runs, the other documents with the "EA53" are given the "Responsive" designation. For more information, see Example of propagating.
Before you begin
The Propagate Coding Post-import solution performs several tasks to help you assign field values from one document to others that are part of the same relational group and returned by a saved search that you specify. You can customize the solution by specifying which field defines relational groups, which fields to propagate values to, and whether and how to address any coding variances within relational groups. The solution also reports coding variances, which can help you work with reviewers to address the variances. This solution provides two primary ways to propagate values. The first is a set of scripts, agents, and other components that propagate values to multiple fields when you run the solution manually or automatically according to a schedule that you define. The second is a script that propagates values to only one field when you run the script manually, "on demand." To learn more about the script, see Propagating to one field on demand.
Components
This solution consists of the following components:
- Event handlers
- Custom agents
- Custom pages
- Relativity script that runs at the environment level
Considerations
Before you deploy and run the solution, it's important to keep the following in mind:
- Audit records are created for each document that is updated by the propagate coding worker agent. The audit records have an action of "Update", not "Update - Propagation", and the associated user is the Relativity Service Account.
- You can install multiple propagate coding worker agents in one Relativity instance. Each agent picks up the next available job and runs it to completion.
- This application changes field values and those changes cannot be undone. We recommend that you back up the database before you run the solution.
Performance
This application's performance depends primarily on the number of documents in the workspace and the number of documents that are updated. To optimize performance, we recommend that you run propagation jobs based on saved searches that return no more than 100,000 documents and return unique sets of documents. For example, avoid referencing the same saved search in more than one propagation job. In addition, the application's performance depends on the type of field that you're propagating data to and, for Single Choice or Multiple Choice fields, the number of choices for the field.
Deploying and configuring the solution
To deploy and configure the solution in a Relativity instance, you perform two basic tasks:
- Install the Relativity application.
- Configure email notifications.
Downloading and adding the application to the Application Library
To begin using this solution, download and add it to the Application Library as a Relativity application.
To download the application:
- Log in to the Relativity Community, and click on the Relativity Applications folder.
- Locate the newest Propagate Coding Post-import .rap file that is compatible with your version of Relativity and select it.The solutions in the Relativity Applications folder are sorted from most recently modified to oldest. As a result, solutions at the top of the page are normally the newest versions of the respective solutions. If you see more than one version of the solution, select the .rap file with the higher version number to ensure you're deploying the most up-to-date solution.
- Click Download.
To add the solution to the Application Library:
- Navigate to the Application Library tab.
- Click Upload Application.
- Click Select File.
- Navigate to and select the application file included in the solution, and then click Open.
- Click Save to upload the file to the Application Library.
Preparing the workspace
After you deploy the solution to the Relativity instance, you're ready to install and configure the solution in a workspace by performing a few basic tasks:
- Create and configure a propagation processing job.
- Optionally define a schedule for running the propagation processing job.
Creating and configuring the propagation job
To create and configure a propagation processing job:
- In the workspace, click the Propagate Coding Post-Import tab.
- Click New Job.
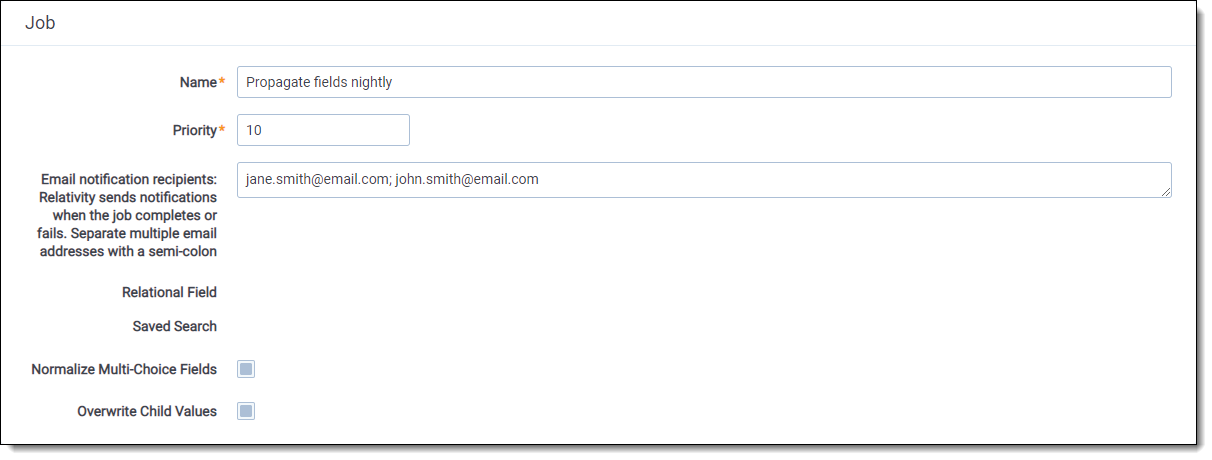
- Complete the following fields:
- Name - enter a descriptive name for the job. Job names must be unique.
- Priority - enter a number that indicates the priority of the job in the processing queue. Jobs are sent to the propagate coding worker agent first by priority and then by creation date and time. A lower priority number results in a higher priority for running the job. To learn how to view all jobs and their priority, see Viewing job status and history below.
- Email notification recipients - enter the email address of each user whom you want to receive an email notification when the job is complete. The notification message provides details about the job, including status and any errors that occurred. To notify multiple users, separate each user's email address with a semi-colon (;).
- Click Save.
- In the console to the right, click Configure Job.
- Complete the following fields:
- Relational Field - select the name of the relational field that defines groups of related documents to propagate values to.
- Saved Search - select the saved search that contains the documents you want to propagate values to. Ensure that the saved search returns all related documents; including the documents that values will be propagated to as well as documents that values will be propagated from. Values are propagated only to documents that are returned by the specified saved search.
- Normalize Multi-Choice Fields - when selected, multiple choice fields are coded as a combination of values in the relational group instead of only propagating the value of a parent document.
- Overwrite Child Values – when selected, if the value of the field for a child document is different from the parent document, the value for the child document is overwritten with the value from the parent document even if the parent value is blank or empty. This option must be selected if the Normalize Multi-Choice Fields option is also selected.
- Select Fields To Propagate – select the checkbox next to each field to propagate values to.
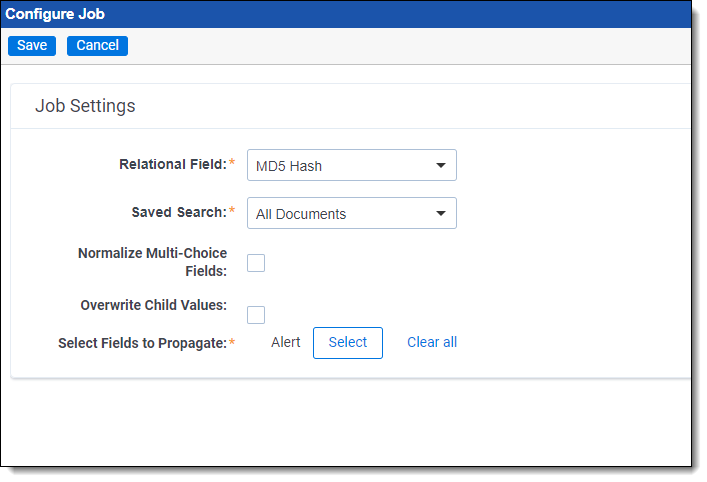
- Click Save.
After you create and configure the propagation job, you can run it manually or optionally define a schedule to run it automatically at specific times.
Defining a schedule for running the propagation job
If you prefer to run the propagation job automatically at specific times, you can define a schedule for it. Note that this is optional. You always have the option of running the job manually by clicking Start Job in the job console. If you choose to define a schedule, you can also override the schedule and run the job manually at any time by clicking Start Job in the console.
To define a schedule for running the job:
- In the console on the job page, click Set Schedule.
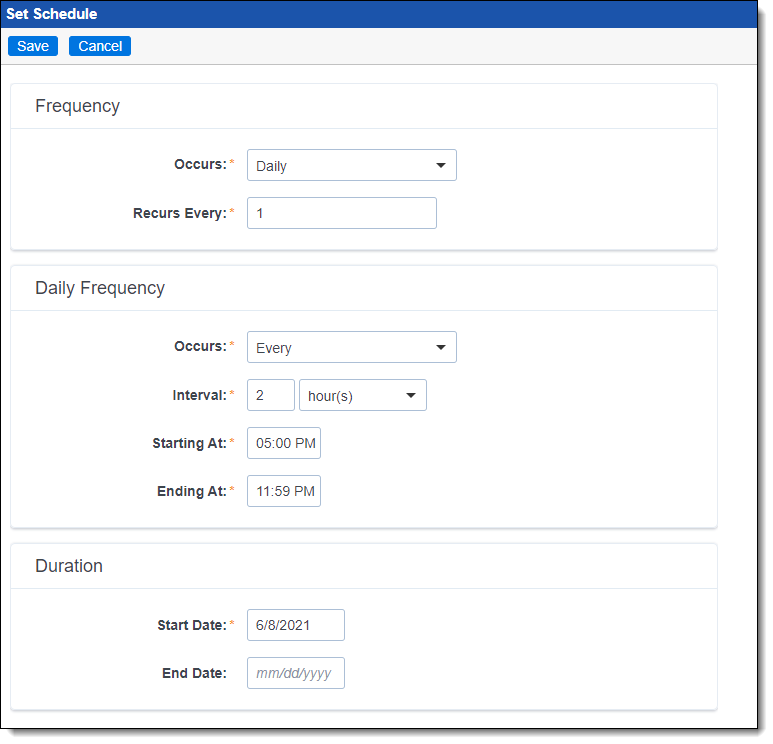
- In the Frequency section, complete the following fields:
- Occurs - the base time interval for running the job. Currently, Daily is the only available option.
- Recurs Every - specify how often you want to run the job based on the selected time interval. For example, type 1 to run the job every day, type 2 to run the job every other day, and so on.
- In the Daily Frequency section, complete the following fields to specify how often and when you want to run the job during the specified time interval:
- Occurs – select one of the following options to determine how often the job runs:
- Once - select this option to run the job once a day.
- Every - select this option to run the job multiple times a day according to a specific interval as defined by the Interval field below.
- Interval - This option is only available if the Every option is selected in the Occurs field. Select an option from the drop-down menu on the right to determine whether the job's run interval will be defined in hours or minutes and then entered the desired hours or minutes interval in the left field to set the amount of time that will pass between runs of this job.If a job is running when the end time occurs, the job finishes processing the current set of documents, sets the job status to "Complete", and resumes processing when the next available time frame begins. If you don't enter an end time, the job runs until it finishes processing all documents.
- in the Duration section, complete the following fields to specify a date range for running the job:
- Start Date - Enter or select the date you wish to first run the job.
- End Date - Enter or select the date you wish to stop running this job.
- Occurs – select one of the following options to determine how often the job runs:
- Click Save.
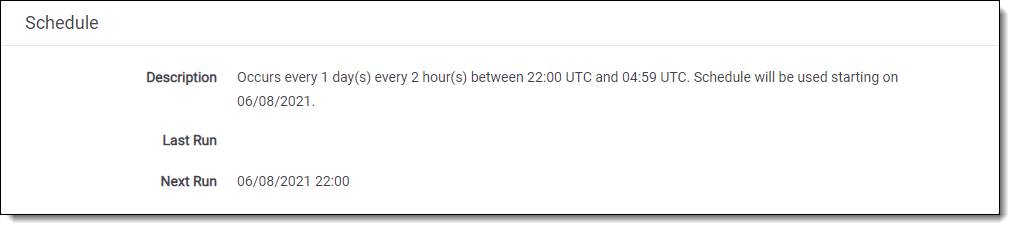
In the Schedule section of the job page, the Description field displays a summary of the schedule that you defined and the Next Run field indicates the next time when the job is scheduled to run.
Running the solution
This solution runs primarily through the propagation job that you created and configured when you prepared the workspace. This means that you have two options for running the solution, depending on whether you defined a schedule to run the job automatically. You can run the job manually or wait for the next scheduled run to finish. To check the status of a job, you can run a script that's included in this solution to generate a report with the history and details of propagation jobs.
Running the job manually
To run the job manually:
- In the workspace, click the Propagate Coding Post-Import tab.
- Click the name of the propagation job.
- In the console, click Start Job.
The job is added to the queue with a high priority and is run when a propagation worker agent becomes available.
Viewing job status and history
When jobs are sent to the processing queue, they are ordered first by priority and then by creation date and time across the Relativity instance. This solution includes a script that you can run to view a report of all the propagation jobs for the Relativity instance as well as details about each one, including status, priority, and workspace.
To view a report of propagation jobs:
- Navigate to the Relativity Script Library tab.
- Click the name of the Propagate Coding Post-Import: View Jobs script.
- In the console, click Run Script, and then click Run in the pop-up window that appears. The page displays the report, which lists all the jobs that exist in the Relativity instance and are associated with a Propagate Coding Post-Import application, along with the order in which they'll be executed.
Understanding parent to child results
The results of propagating field coding from parents to child may vary depending on your job configuration settings. The tables below demonstrate the relationship between the Overwrite Child Values and Normalize Multi-Choice fields when running propagation against Single Choice and Multi-Choice fields for a group of documents.
- Overwrite Child Values: No
Normalize Multi-Choice Fields: NoDocument Identifier Single Choice Before Single Choice After REL0001 Hot Hot REL0001.001 <blank> <blank> REL0001.002 Responsive Responsive REL0002 <blank> Responsive REL0002.001 <blank> Responsive REL0002.002 Responsive Responsive Document Identifier Multi-Choice Before Multi-Choice After REL0001 Hot Hot REL0001.001 <blank> <blank> REL0001.002 Needs Redaction; Needs Review Needs Redaction; Needs Review REL0002 <blank> <blank> REL0002.001 <blank> <blank> REL0002.002 Needs Redaction; Needs Review Needs Redaction; Needs Review - Overwrite Child Values: Yes
Normalize Multi-Choice Fields: NoDocument Identifier Single Choice Before Single Choice After REL0001 Hot Hot REL0001.001 <blank> Hot REL0001.002 Responsive Hot REL0002 <blank> <blank> REL0002.001 <blank> <blank> REL0002.002 Responsive <blank> Document Identifier Multi-Choice Before Multi-Choice After REL0001 Hot Hot REL0001.001 <blank> Hot REL0001.002 Responsive Hot REL0001.003 Needs Redaction; Needs Review Hot REL0002 <blank> <blank> REL0002.001 <blank> <blank> REL0002.002 Responsive <blank> REL0002.003 Needs Redaction; Needs Review <blank> REL0003 Hot; Responsive; PII Hot; Responsive; PII REL0003.001 Responsive Hot; Responsive; PII REL0003.002 <blank> Hot; Responsive; PII - Overwrite Child Values: Yes
Normalize Multi-Choice Fields: YesDocument Identifier Single Choice Before Single Choice After REL0001 Hot Hot REL0001.001 <blank> Hot REL0001.002 Responsive Hot REL0002 <blank> <blank> REL0002.001 <blank> <blank> REL0002.002 Responsive <blank> Document Identifier Multi-Choice Before Multi-Choice After REL0001 Hot Hot; Responsive; Needs Redaction; Needs Review REL0001.001 <blank> Hot; Responsive; Needs Redaction; Needs Review REL0001.002 Responsive Hot; Responsive; Needs Redaction; Needs Review REL0001.003 Needs Redaction; Needs Review Hot; Responsive; Needs Redaction; Needs Review REL0002 <blank> Responsive; Needs Redaction; Needs Review REL0002.001 <blank> Responsive; Needs Redaction; Needs Review REL0002.002 Responsive Responsive; Needs Redaction; Needs Review REL0002.003 Needs Redaction; Needs Review Responsive; Needs Redaction; Needs Review REL0003 Hot; Responsive; PII Hot; Responsive; PII REL0003.001 Responsive Hot; Responsive; PII REL0003.002 <blank> Hot; Responsive; PII
Viewing the results
To view the results of running the solution, navigate to any view or layout that contains the fields that you set to propagate when you configured the propagation job. For each field that's set to propagate, the results are one of the following:
- Documents updated - If all the documents in a relational group had the same value for a field, the value was propagated to all other documents in the group where the field was not set.
- Documents not updated - If documents in a relational group didn't have the same value for a field, no values were propagated to any documents in the relational group.
To view a detailed report of the results, you can run the "Propagate Coding Post-Import Last Run Results" script that's included in this solution. The script generates a report indicating the number of documents that were updated for each field and other information about those updates.
To run the script:
- In the workspace, click the Case Admin tab, and then click the Scripts tab.
- Click the name of the Propagate Coding Post-Import Last Run Results script.
- In the console, click Run Script, and then click Accept in the modal.

- In addition to viewing the results directly in Relativity or by running the results script, you might also receive an email notification each time a propagation job finishes running. When you created the propagation job, you had the option of entering the email address of each person whom you want to receive an email notification when the job finishes running. The notification message provides details about the job, including any errors that occurred. The following is an example of a notification message.

Viewing coding variances
To help you identify and research instances where documents weren't updated due to coding variances, this solution creates a Multiple Object field (on the Document object) named “Variance Indicator – job name”. You can use the field in a saved search condition to view coding variances.
To view coding variances:
- In the workspace, create a new saved search.
- Under Conditions, click Variance Indicator - job name in the Field drop-down list, and then click these conditions in the Operator drop-down list.
- Under Value, click the Select icon, and then create a value with the following criterion:
- Field – Variance Indicator - job name
- Operator – any of these
- Value – Each field that is set to propagate
- Click OK.
- Specify the fields and sort order for the resulting view.
- Click Save and Search. The result set appears and, depending on the fields that you added to it, displays coding variances.
- You can then use the results of the saved search to review and resolve any coding variances before the propagation job runs again.
Deleting job results
After you view the results of one or more propagation jobs, you can optionally delete details about those jobs to ensure that they don't appear in future reports. To do so, run the "Propagate Coding Post-Import Last Run Results Clean Up" script, which is included in the solution.
To delete job results:
- Navigate to the Scripts tab.
- Click the name of the Propagate Coding Post-Import Last Run Results Clean Up script.
- In the console, click Run Script.
- Click on the Delete Results Before field and either enter or select the latest date of the data that you want to delete. Results for all dates before the date that you choose are deleted when the script runs.
- Click Run.
Propagating to one field on demand
If you want to quickly propagate values to a single field on demand or you see performance issues when you run the propagation jobs and agents included in the complete Propagate Coding Post-Import solution, you can use the Propagate Coding Post-Import script that's also included in the solution. The script runs at the workspace level and does the following for each relational group of documents that are returned by a specified saved search:
- Identifies the parent document or document with the lowest artifact ID and finds the value in a specified field.
- Depending on how you configure the Overwrite Child Values setting for the script, propagates the value of the field to all other documents in the same relational group.
If you set Overwrite Child Values to "No", the following occurs:
- If all the documents contain the same value for the field to propagate, the value is propagated to any documents that are in the relational group and where the field is not set.
- If the documents contain different values for the field to propagate, no values are propagated to documents in the relational group and coding variances are displayed in a report.
If you set Overwrite Child Values to "Yes", the following occurs:
- The value of the field for the parent document is propagated to all child documents that are in the relational group and where the field is not set.
- If the value of the field for a child document is different from the parent document, the value for the child document is overwritten with the value from the parent document.
- If the value of the field is not set for the parent document, the value for all child documents is changed to "not set" to match the parent document.
For a helpful example of how values are propagated in specific scenarios, see the example below.
Running the script
For optimal performance, we recommend running the script with a saved search that returns no more than 100,000 documents. In addition, script performance depends on the type of field that you're propagating data to and, for Single Choice or Multiple Choice fields, the number of choices for the field.
Propagating field values to the same set of documents by using both the script and the propagation agents can produce unexpected results. In addition, you cannot run more than one instance of the script at the same time. In other words, if you start running the script on one computer, you cannot start running the script on another computer until the first instance finishes running.
To run the script:
- In the workspace, navigate to the Scripts tab.
- Click the name of the Propagate Coding Post-Import script.
- In the console, click Run Script.
- Complete the following fields:
- Relational Identifier - select the relational field that defines groups of related documents to propagate values to. The following field types are available: fixed length, long text, date, user, Yes/No, whole number, decimal, currency, single choice, multiple choice, and multiple object.
- Field to Propagate – Click the name of the field that you want to propagate values to. The field must be one of the following field types: fixed length, long text, date, user, Yes/No, whole number, decimal, currency, single choice, multiple choice, and multiple object.
- Saved Search - select the saved search that contains the documents you want to propagate values to. Ensure that the saved search returns all related documents; including the documents that values will be propagated to as well as documents that values will be propagated from. Values are propagated only to documents that are returned by the specified saved search.
- Normalize Multiple Choice Fields - enables overwrite to child values. If you select Yes, multiple choice fields are coded as a combination of values in the relational group. If you select No, multiple choice fields are only propagated if documents in the relational group share the same value.
- Audit Propagation - select Yes to create an audit record for each change that's made to documents by the script. The resulting audit records have an "Update-Propagation" action and are logged under the user who runs the script. select No if you don't want to create any audit records for changes that are made by the script.
- Overwrite Child Values – select Yes to propagate the same value to all documents in a relational group, regardless of any variances for the field. Click No to propagate a value to all documents in a relational group only if there are no variances for the field within the relational group.
- Click Run.
Example
This example walks through a specific scenario that demonstrates how the "Propagate Coding Post-Import" script propagates values based on various conditions. In the example, the script is run with the following settings:
- Saved Search - All Documents
- Relational Identifier - MD5 Hash
- Field to Propagate - Designation
- Overwrite Child Values - No
When the script runs, it does the following:
- The relational group "EA53B1B19A449C0539B324522D7A5CD8" propagates the "Responsive" choice to all related documents where the Designation field was not set because all related documents that were already set for the field had the value "Responsive".
- The relational group "11A3AA1E226C273C8D6174E59F49903D" propagates the "Non-Responsive" choice to all related documents where the Designation field was not set because all related documents that were already set for the field had the value "Non-Responsive".
- The relational group "A95C2F62DE9F4B342ADA216156649027" doesn't propagate any values for the Designation field because there were coding variances within the related documents. For this group, the script generates a report with details about the variances.
Although relational group "A95C2F62DE9F4B342ADA216156649027" contains coding variances, you might want to overwrite those variances and set the value of the Designation field to "Responsive" for all the child documents because the parent document is coded as "Responsive."
You can do this by changing the Overwrite Child Values setting to "Yes" and running the script again. If you do this, no coding variances are reported and the parent document's "Responsive" value is propagated to all child documents.
Upgrading this application
Propagate coding post-import can be upgraded using the Application Library. To learn more, visit Application Library.