


Feedback
Last date modified: 2026-Apr-06
File validation application
You must have valid Relativity Community credentials in order to download any Community file linked to the documentation site. You'll need to enter those credentials on the Community login screen if you're not already logged in. If you're already logged in to the Community at the time you click a link, the file is automatically downloaded in the bottom left corner of your screen. If you get an error message stating "URL No Longer Exists" after clicking a Community link, it may be due to a single sign-on error related to the SAML Assertion Validator, and you should contact your IT department.
The File Validation application solution determines whether any document files are missing from the file server. The solution performs the following tasks:
- Checks existence on a file share of all files linked to documents in RelativityOne. This includes Data Grid.
- Searches for document files on a file server. For example, it searches for natives, images, production images, and transcripts.
- Uses a field that you specify to indicate whether any of those files are missing from the server.
- Provides a report containing a detailed list of the missing files.
Before you begin
The application searches for missing files on a file server and sets the value of a Yes/No field designated as the missing files indicator. The value in this field indicates whether the files were found.
The application validates document files in batches of 1,000. It validates only those documents where the value of the missing files indicator field is Null. You can use this report to determine which files to restore on the file server.
Review the following before running:
- Only system administrators should run this application.
- This application doesn't validate files for documents where the missing files indicator field is set to Yes or No. It also doesn't reset the value of the field each time you run it.
- No other file validation jobs should exist in the workspace when you run this script.
- Running the solution multiple times for a workspace won't necessarily produce comprehensive results. Before running the solution a subsequent time, do either of the following:
- Clear all existing values in the missing files indicator field.
- Create and use a new missing files indicator field.
- Ensure that Data Grid text migration is complete before running file validation.
- If you run a data grid text migration job after restoring a workspace with ARM, ensure that the text migration job is complete before running file validation. If you run file validation while a migration job is still in progress, Relativity incorrectly displays missing files in your workspace.
Supported versions
For RelativityOne, use version 10.15.1 of the File Validation application.
You can find all versions of this solution on the Community via this File Validation application search string. You must be logged in to the Community for that string to return results.
Some past versions of this application may no longer be eligible for support by Customer Support.
Components
This solution consists of the following components:
- Agents:
- File Validation Worker
- File Validation Manager
- Relativity application
- Event handlers
- Custom object
- Relativity script that runs at the workspace level
Permissions
The following permissions are required to run the File Validation application.
| Object security | Tab visibility |
|---|---|
|
File Validation Job - View, Edit, Delete |
File Validation Job - Job tab |
Deploying and configuring the solution
To deploy and configure the solution, download it from Relativity Community and add it to the Application Library as a Relativity application. These agents monitor and perform the file validation tasks.
Downloading the application
Complete the following steps to download the solution:
- Log in to the Community.
- Select the version that is compatible with your Relativity instance.The solutions in the Relativity Applications folder are sorted from most recently modified to oldest. As a result, solutions at the top of the page are normally the newest versions of the respective solutions. If you see more than one version of the solution, select the .rap file with the higher version number to ensure you're deploying the most up-to-date solution.
- Click Download.
Adding the solution to the Application Library
Complete the following steps to add the solution to the Application Library:
- Log in to Relativity.
- Click the user drop-down menu in the upper-right corner of Relativity.
- Click Home.
- Click the Applications & Scripts > Application Library tabs.
- Click Upload Application.
- Click Browse.
- Select the File Validation.rap file.
- Click Open.
- Click Save.
Preparing the workspace
After deploying the solution, you can install and configure it in a workspace by completing these tasks:
- Install the solution application from the Application Library. See Installing the solution application.
- Create a new missing files indicator field. This field stores the results generating by running the solution. It indicates whether any files are missing for a document. See Creating the missing files indicator field.
Installing the solution application
Complete these steps to install the application:
- Click the user drop-down menu in the upper-right corner of Relativity.
- Click Home.
- Click the Applications & Scripts > Application Library tabs.
- Click the name of the File Validation application.
- In the Workspaces Installed section, click Install.
- Access the Workspaces section.
- Select the check box for each workspace where you want the solution installed.
- Click OK.
- Click Save.
Creating the missing files indicator field
Complete these steps to create the missing files indicator field:
- In a workspace, click the Workspace Admin > Fields tabs.
- Click New Field.
- Create a new field with the following settings:
- Object Type - Document
- Name - Enter Missing Files or any other name that you want for this field.
- Field Type - Yes/No
- Select any other settings that you want for the field.
- Click Save.
Running the solution
To run a File Validation job:
- In your workspace, click the Job tab.
- Click New File Validation Job.
- Enter a name for the job in the Name box.
- Access the Missing File Indicator field.
- Select the Yes/No field that you created to indicate whether any files are missing
- Click OK.
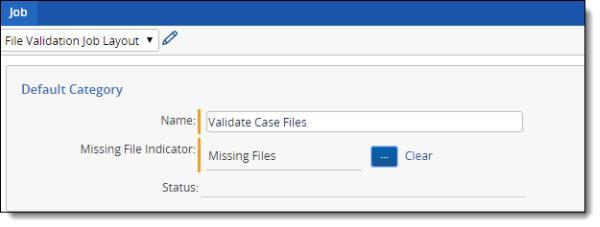
- Click Save. The solution creates the job with a status of New.
- Click Submit to run the job.
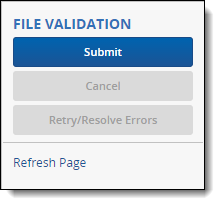
- The job status changes to Waiting. When the File Validation Manager begins running the job, its status changes to In Progress. The manager runs the jobs based on the order used to submit them.
- After the job is complete, its status changes to New. The Messages section displays the date and time when the job completed.
Canceling a job
To cancel a File Validation job after submitting it, click Cancel in the console.
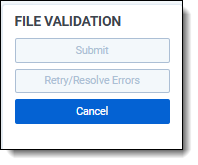
The job stops after the manager finishes validating the current set of document files. The job status changes to New. Additionally, the Messages section displays the date and time when the job was canceled.
Viewing the results
The File Validation Worker validates document files in batches of 1,000. It validates files only for those documents where the missing files indicator field is Null.
If a document’s files don't exist on the file server, the worker sets the missing file indicator field to Yes. If all of a document’s files exist on the file server, the worker sets the missing file indicator field to No. Refer to the values in the missing file indicator field to determine which documents are missing files.
In addition to populating the missing files indicator field, a File Validation job generates a missing files report. The report contains a detailed list of files that weren't found on the file server. When you subsequently run a File Validation job, the worker clears and repopulates the missing files report with the results from that run.
Complete the following steps to view the missing files report:
- In a workspace, click the Case Admin > Scripts tabs.
- Click the name of the View Missing Case Files script.
- Click Run Script.
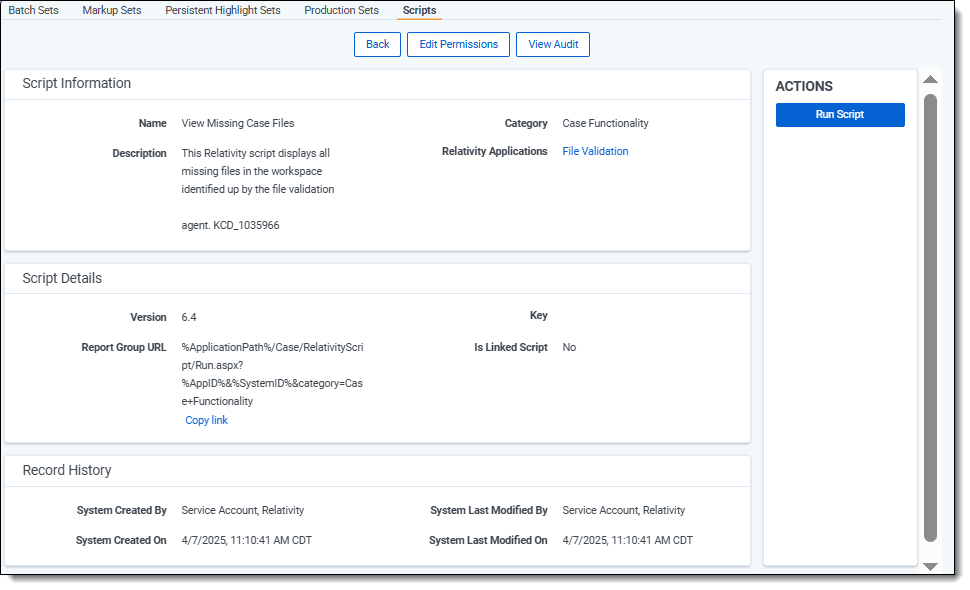
When the script is done running, it displays a report containing the following:
| Column | Description |
|---|---|
| File Validated On | The date and time when the worker validated the document files. |
| Document Identifier | The identifier of the document with one or more missing files. |
| Document Identifier ID | The artifact ID of the document with one or more missing files. |
| File Path | The path to the file that is missing from the file server. |
| File Type | The type of file that is missing from the file server. For example, the file types include Native, Image, Production Image, or Transcript. |
Handling errors
If errors occur after you submit a File Validation job, its status changes to Error. The Messages section displays the errors that occurred. To rerun the job, click Retry/Resolve Errors in the console.
Rerunning the solution
If you need to rerun the solution, do the following. Skipping any of these steps will cause errors.
- Delete the previous job from the File Validation Job tab.
- Clear all values from the indicator field or create a new Yes/No indicator field.
- Run the script.
FAQ
Only one job can exist per workspace. Delete the old job or clear/create a new indicator field.
It indicates an existing job or indicator field conflict. Delete the job or clear/create a new field.
Text migration is still running. Wait until it completes and rerun file validation.
Navigate to the File Validation Job tab, select the job, and click Delete.