


Feedback
Last date modified: 2026-Feb-05
Date field parsing
The Date Field Parsing application parses the date and time from a Date field. It then writes the values to a separate text field for each document returned by a specific saved search.
Before you begin
The Date Field Parsing application parses date and time values from date source field. It adds these values to two different destination fields. The source is a Date field, while the destinations are Fixed-Length Text or Long Text fields. The application completes this process and all the documents are returned by a specific saved search. When configuring the application, you need to specify the following items:
- A specific saved search.
- The Date field with the data to parse.
- The fields used to store date and time values.
- The format uses for date and time values.
Accessing the application
For the latest supported version of this application, contact Support.
Components
This solution consists of a Relativity application that runs at the workspace level.
Considerations
Review the following considerations for this solution:
- This script should only be run by a system admin. If you are not a system admin, we recommend you do not run this script.
- The script overwrites the values in the destination fields. You can't undo these modifications.
- The script doesn't parse a date or time value from the date source field for a document when the field is NULL.
- This application doesn't support the client domains (multi-tenancy) and Data Grid features of Relativity.
Deploying and configuring the solution
To deploy and configure the application in a Relativity instance, you perform two basic tasks:
- Install the Relativity application.
- Create the destination fields for storing information.
Adding the application to the Application Library
To add the application to the Application Library:
- Navigate to the Application Library tab.
- Click Upload Application.
- Click Select File, navigate to and select the Date field parsing file, and then click Open.
- Click Save.
- Click Select, select the workspace(s) where you want to install the application and click the right arrow icon. Once all the desired workspaces have been moved to the right section, click Apply.
The application is installed in the selected workspaces.
Creating the destination fields
Before you run the solution, ensure that destination fields exist for storing the date and time values. You can use existing fields or create new fields for storing these values. The solution overwrites any values stored in existing fields.
The destination fields must be Fixed-Length Text or Long Text fields. Designate two fields if you want to store both date and time values. Designate a single field if you want to store only the date or time values.
Complete these steps to create one or more fields to store the parsed data:
- Navigate to the Fields tab.
- Click New Field.
- In the Object Type drop-down, select Document.
- Enter a name for the field in the Name field. You can choose any name for the field name.
- In the Field Type drop-down, select either Fixed-Length Text or Long Text.
- Select any other options that you want for the field.
- Click Save and Back.
- To create an additional destination field, repeat steps 2 - 7.
Running the solution
After setting up the workspace, complete the following steps to configure and run the solution:
- In the workspace, navigate to the Scripts tab.
- Click Run in the row of the Date Field Parsing script.
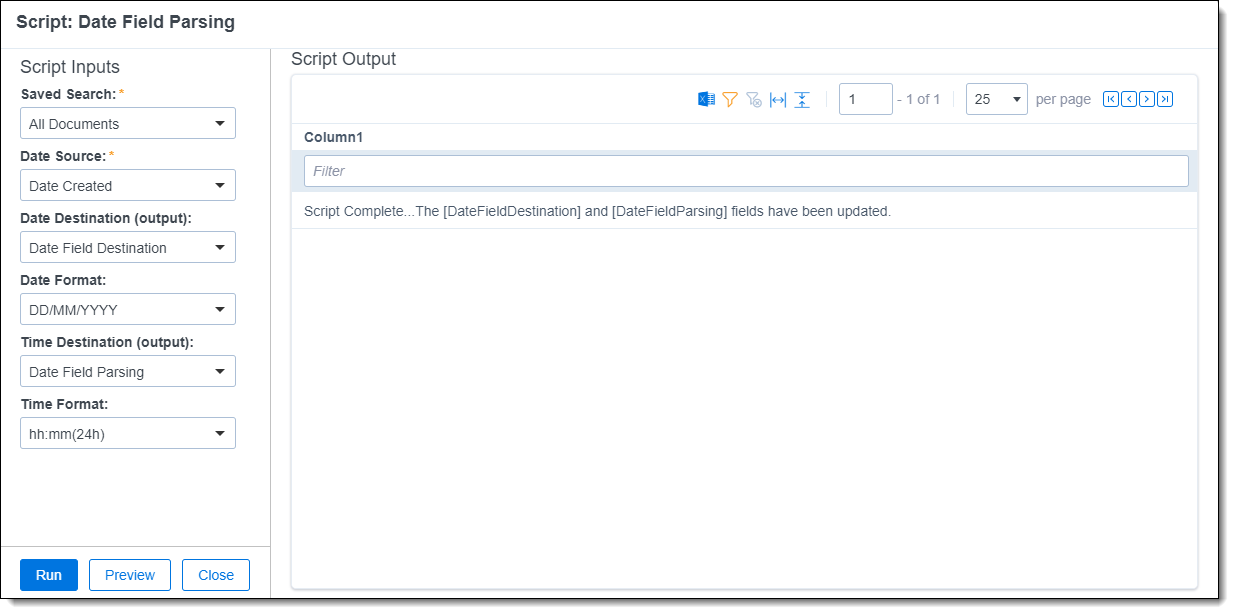
The Script: Date Field Parsing modal displays. - Complete the following fields:
- Saved Search - Click the name of the saved search. This search returns the group of documents with data that you want to parse and store.
- Date Source - Click the name of the field that contains the data to parse. The field must be a Date field associated with the Document object.
- Date Destination (output) - Optionally, click the name of the Fixed-Length Text or Long Text field used to store date values. The script parses these values from the Date Source field. Leave this field blank if you don't want to parse and store date values.
- Date Format - Optionally, click the format used to store date values. The script parses these values when you select a Date Destination (output) field. Leave this field blank if you don't want to parse and store date values.
The following table uses the date January 25, 2015 to illustrate the format options.Format Example DD/MM/YYYY 25/01/2015 DD/MM/YY 25/01/15 MM/DD/YYYY 01/25/2015 MM/DD/YY 01/25/15 YYYYMMDD 20150125 - Time Destination (output) - Optionally, click the name of the Fixed-Length Text or Long Text field used to store time values. The script parses these values from the Date Source field. Leave this field blank if you don't want to parse and store time values.
- Time Format - Optionally, click the format used to store time values. The script parses these values when select a Time Destination (output) field. I Leave this field blank if you don't want to parse and store time values.
The following table uses the time 7:18 PM to illustrate the format options.Format Example hh:mmAM (or PM) 07:18PM hh:mm:ssAM (or PM) 07:18:43 PM hh:mm(24h) 19:18 hh:mm:ss(24h) 19:18:43
- Click Run.
The script parses data from the specified Date field. It makes the following updates for each document returned by the specified saved search:
- If you selected a Date Destination (output) field, the script adds the date value in the Date Source field to the field that you selected. It also uses the format that you selected.
- If you selected a Time Destination (output) field, the script adds the date value in the Date Source field to the field that you selected. It also uses the format that you selected.
After script runs successfully, it displays the Script Complete message. This message indicates that the destination fields now contain the appropriate data for each document.
Viewing the solution results
You can view the results of the script by navigating to a view, layout, or other items that contain the destination fields that you selected when configuring the script, as described above.
The following are examples of standard fields included in the script results:
- Control Number
- Date Sent
- Destination Date
- Destination Time