Adding preservation hold settings using Modern Authentication
The Preservation Hold Settings page is used to add, edit, or remove preservation hold data sources from legal hold projects with Microsoft 365 data sources. Preservation hold settings temporarily grant collection admin permissions to the specified account user to determine custodian SharePoint site access privileges during target discovery.
Preservation in-place functionality uses modern authentication, which is certificate-based authentication (CBA) that allows for multi-factor authentication (MFA) and is known to be more secure than providing username and password via the basic authentication method.
A legal hold admin will need to run through a one-time setup to connect Microsoft 365 to Relativity (see Prerequisites below).
Background information
Our previous preservation in place functionality in the Legal Hold application used Basic Authentication (Username and Password) for authenticating with Microsoft Purview eDiscovery Standard.
Due to Microsoft’s deprecation of Basic Authentication in many places of O365, support for basic authentication in our product was deprecated as of June 1, 2023, and we updated our authentication approach to use the modern authentication. For more information on Microsoft’s deprecation of Basic Authentication, please refer to Microsoft's documentation.
Permissions
Enable the Preservation Hold Settings security permission in order to create a Preservation Hold Setting. For more information on security permissions, see Legal Hold Application Permissions.
Prerequisites
If you are intending to use preserve in place, a Microsoft 365 account that has eDiscovery Manager, SharePoint Admin, and Compliance Admin permissions will need to be created. For more information, see the next section on "Creating a Microsoft 365 admin account."
Creating a Microsoft 365 admin account
To connect Relativity Legal Hold to your Microsoft 365 tenant, create a dedicated, non-personal Microsoft 365 service account. Multi-factor authentication is supported with Modern Authentication as well.
Also, during the setup of the service account in Microsoft 365, assign the eDiscovery Manager, SharePoint admin and Compliance admin roles to the service account. These roles are required for Microsoft Outlook, OneDrive, and SharePoint, and allow Relativity Legal Hold to initiate preservation requests.
If the admin account cannot be granted SharePoint Admin privileges in Microsoft 365 for security reasons, you can utilize the Entity OneDrive URL feature to facilitate OneDrive preservations. You are still unable to preserve SharePoint site URLs since SharePoint Admin privileges are required by Microsoft.
Adding preservation hold settings
Follow the steps to configure preservation hold settings. This is a one-time setup to create data sources for a preservation hold.
Step 1: Setup in Microsoft
The person performing the steps below should be a Microsoft Azure admin and familiar with setting up certificates. Follow steps below to set up app-only authentication in Azure AD. For more information, see Microsoft's documentation for setting up app-only authentication in Azure AD.
- Registering the application in Azure AD.
- Assign the following API permissions with Admin consent granted to the application:
- Exchange.ManageAsApp
- Sites.Read.All (this is a Graph API permission)
- Generating a self-signed certificate.
- Notes:
- You will need the .pfx file (not the .cer file) generated when entering data in the “Step 3: Preservation Hold Settings Configuration" section below.
- You can also use a purchased or generated certificate from your organization.
- Attaching the certificate to the Azure AD application.
- Assigning Azure AD roles of Compliance Administrator and Exchange Administrator to the application.
-
Create an Application Secret in your newly created Azure application.
You will use the information created in this step for the next few steps below.
Step 2: Run PowerShell Script to create a Service Principal
Now that you’ve setup an app in Azure AD in Step 1 above, you need to create a Service Principal that is associated with the app. To do this, you will need to run the following PowerShell script:
## Authenticate with Microsoft (including providing answer for MFA)
$AppId = "Application-ID-FROM-AZURE-AD"
$appName = "AppNAME-FROM-Azure-AD"
$spDisplayName = "your_sp_displayname"
# access token is passed to Connect-AzureAD
# the user logging, will require admin permissions.
Connect-AzureAD
$AADApp = Get-AzureADServicePrincipal -SearchString $appName
# create service principal in scc
connect-ippssession
New-ServicePrincipal -AppId $AADApp.AppId -ServiceId $AADApp.ObjectId -DisplayName $spDisplayName
$SP = Get-ServicePrincipal -Identity $spDisplayName
#this is the new command that is added
Add-eDiscoveryCaseAdmin -Confirm:$false -User $appId
disconnect-exchangeonline -Confirm:$falseReplace these values with your information:
- $AppId—replace "Application-ID-FROM-AZURE-AD" with the Application ID that was created in Step 1: Setup in Microsoft.
- $appName—replace "AppNAME-FROM-Azure-AD" with the Application Name that was created in Step 1: Setup in Microsoft.
- $spDisplayName—replace "your_sp_displayname" with a display name for your service principal. This can be any name that you want to use to identify the service principal, for example RLH_PIP_ServicePrincipal.
Step 3: Preservation Hold Settings Configuration
-
Navigate to the Preservation Hold Settings tab within Hold Admin.
-
Click the New Preservation Hold Settings button.
-
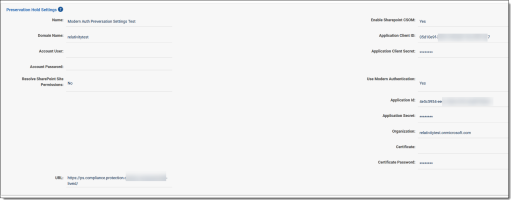
Fill out these fields as follows:
- Name—enter the name to identify the data source.
- Domain Name—enter the Microsoft 365 Tenant name. The domain name is located between @ and .onmicrosoft.com. For example, the domain in ediscovery@relativity.onmicrosoft.com is relativity.
- URL—this read-only URL is the connection to Microsoft 365 Protection Services utilized by Relativity Legal Hold.
- Account User—leave this field blank. It is not used with Modern Authentication.
- Account Password—leave this field blank. It is not used with Modern Authentication.
- Resolve SharePoint Site Permissions—select Yes to temporarily grant the required permissions to the Account User in order to obtain the list of custodians that have access to a given site during the target discovery process.
Note: If this option is not enabled, it is possible that not all targets will be returned during the discovery process. The Account User must have all required permissions to read the site properties. For more information, see Microsoft's documentation.
- Use Modern Authentication—select Yes.
- Application ID—enter the Application ID that you created in Step 1: Setup in Microsoft.
- Application Secret—enter the Application Secret that you created in Step 1: Setup in Microsoft.
- Organization—enter the fully qualified domain name of your Microsoft tenant (organization), including the ".onmicrosoft.com" portion. For example, relativitytest.onmicrosoft.com.
- Certificate—Attach the self-signed certificate that you created in Step 1: Setup in Microsoft.
- Certificate Password—enter the password that protects the private key of the certificate that you created in Step 1: Setup in Microsoft.
-
Click Save.
Step 4: Validate Preservation Hold Settings
After saving the Preservation Hold Settings, you have the option to validate that the setup succeeded.
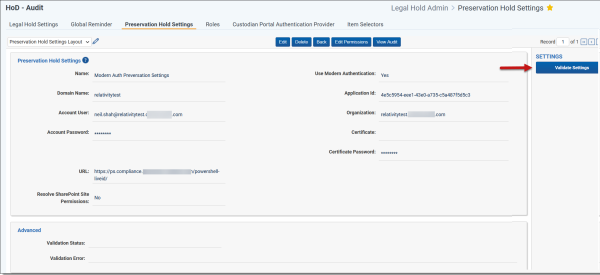
Click the Validate Settings button under the Settings bar on the right side to validate that Modern Authentication is configured correctly. This will create and then delete a sample preservation case in Microsoft Purview.
If the validation worked correctly, the Validation Status field will display “Validated.” If it did not, the Validation Error field will contain the error message and you will need to correct the error.
Once the validation is successful, you are ready to set up Preservation Holds using the Legal Hold Wizard. See Creating a preservation hold case.
Step 5: Configuring SharePoint preservation holds
If you're interested in placing a hold on SharePoint sites, you will need to follow the steps in Setting up SharePoint Discovery for preservation holds.
Deleting a preservation hold setting
To delete a preservation hold setting, delete all projects using the setting first. To learn how to delete projects, see Deleting a project. Once the projects have been deleted, navigate to the Preservation Hold Setting and click the Delete button. This action deletes the preservation hold setting from Legal Hold.
Note: Due to background processes, the preservation hold setting may not be immediately deleted.


