


Managing a legal hold project
Managing a Relativity Legal Hold project includes creating, reviewing, updating, and closing projects.
Creating a project
Create a legal hold project in the Projects tab using the Project Wizard. Using the project wizard, you can create a new legal hold or project from scratch or from a template in six steps.
To start creating a project, navigate to the Projects tab:
- From the Projects tab, click New Project.
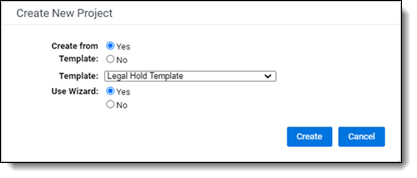
The Create New Project dialog appears.
- Select one of the following options:
- Create from Template - create a new project using a existing template. See Installing Legal Hold for more information.
- Create Blank Project - create a new project from scratch.
- If you're creating a project from a template, select the template in the drop-down menu.
- Select Yes to use the project wizard. Select No to use the alternate project creation method.
- Click Create.
From here, use the Legal Hold Project Wizard.
Note: If the Project Wizard is disabled or you don't have the proper permissions, see the Alternate project creation method.
Using the project wizard
The Legal Hold project wizard takes you through each step for creating a legal hold project. After completing the projects details, communications, schedule, preserve in place, managing custodians, and summary steps, the project is set up.
When creating a new project, the project wizard appears by default. To disable to the project wizard, navigate to Legal Hold Settings. In Legal Hold Settings, set the Use Project Wizard value to No. When set to No, the wizard is hidden on the New Project modal when you click the New Project. For more information, see Adding legal hold settings. When creating a new project, each step of creating a project is separate. For information on creating a project using the old method, see Alternate project creation method.
Project - View, Create, Edit
Entity - View
Custodian Role - View, Create, Delete
Role - View
Communication - View, Create, Edit, Delete
Questionnaire - View, Create, Edit, Delete
Questionnaire Question - View, Create, Edit, Delete
Question - Create, Delete
Attachments - Create, Delete
Admin Operations - Manage Object Types
Mass Operation - Assign to Entity
When a step is complete and you need to move to the next step, click  . Click the Next button after entering the correct information, which displays a success message, to save your progress and move to the next step. A red failure message displays if information is incorrect or missing. Use the
  to move to the previous step.
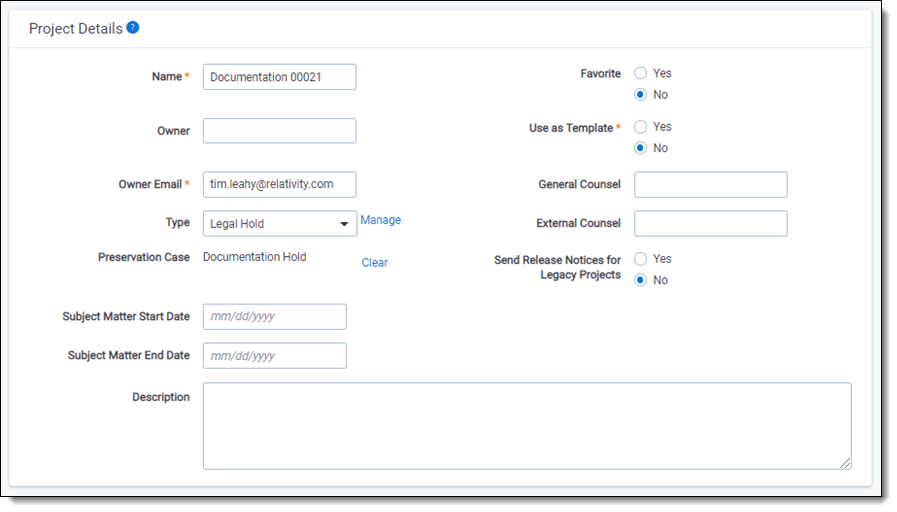
Project Details
Add general information about the legal hold project in the Project Details step.
- Add information to fields.
- Name - the project name.
- Owner - (Optional) the project owner's name.
- Owner Email - the project owner's email address. There are two instances when a project owner receives email notifications:
- When a custodian doesn't have an associated manager.
- When custodian is externally removed or externally modified, meaning removed or modified in Microsoft's Security & Compliance Center.
- Type - (Optional) the type of project. By default, the Legal Hold Type is available. Click Add to add a new type choice.
- Favorite - select Yes or No to visually indicate whether the project is a favorite from the Projects landing page.
- Send Release Notice for Legacy Projects - (Optional) select Yes or No to allow users to send a release notice to custodians without prior communications. The default setting is set to No.
- Use as Template - select Yes to flag project as a template for future project creation use. This template will appear in the Create New Project drop-down list. Select No to not use this project as a template.
- Subject Matter Start Date - (Optional) the earliest date that data relevant to the matter exists.
- Subject Matter End Date - (Optional) the most recent date that data relevant to the matter exists.
- General Counsel - (Optional) the name of the company or organization's general counsel.
- External Counsel - (Optional) the name of the company or organization's external counsel.
- Click Next.
(click to expand)

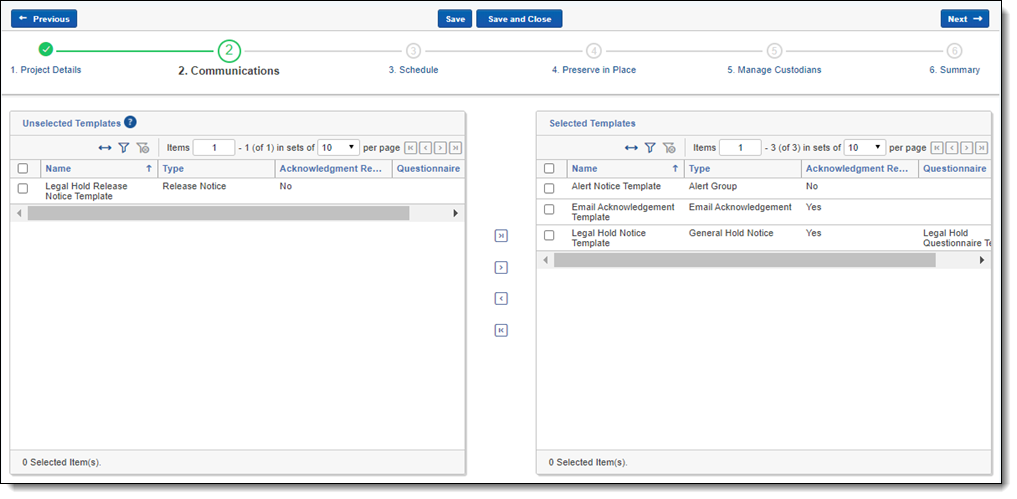
Communications
Complete the Communication set by assigning communications to the project. You can assign communications to multiple projects in your workspace. You will need to have already created communications. For information on creating communications, see Creating a communication.
On the Communications step, follow the steps below to add communications to the project:
- Locate communication in Unselected Communications.
- Click the checkbox next to a communication.
- Click Next.
(click to expand)
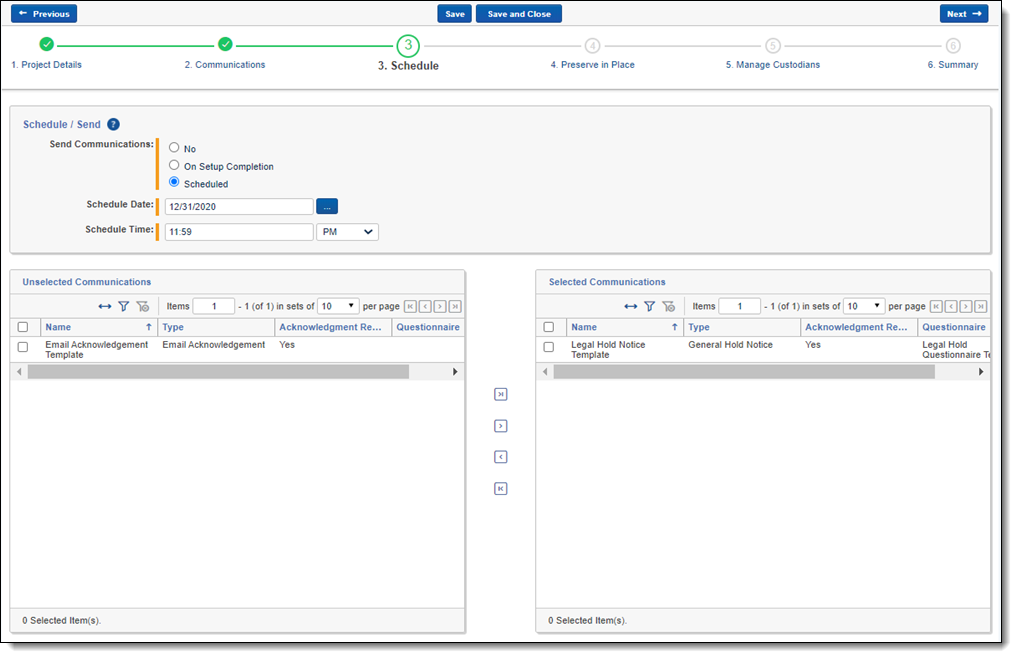
Schedule
Complete the Schedule step by assigning dates, times, and communication recurrence levels in the project.
Follow the steps below to schedule communications:
- Set the communication level.
- Choose start date.
- Choose end date.
- Click a check box next to a communication.
- Click the right-arrow box to move selected communication. Click the double-right-arrow box to move all communications.
- Click Next.
(click to expand)
Preserve in Place
Add a preservation hold by completing the Preserve in Place step. To add a preservation hold, enter information in the following fields:
- Add information to the preservation fields.
- Preserve in Place - Select Yes to add a preservation hold to project. Select No to skip this step.
- Name - the name of the Preservation Case.
- Retry Count - the number of times Legal Hold will retry to correct a failed Preservation Hold process.
- Retry Interval (Minutes) - the number of minutes between each retry.
- Monitoring Interval (Hours) - the number of hours between each time Legal Hold monitors Office 365 for deletions/disabling or edits to filter criteria made within Office 365 Security & Compliance Center. Default is 1 hour.
- Start Date - (optional) a preservation filter criteria that preserves data starting with this date.
- End Date - (optional) a preservation filter criteria that preserves data ending with this date.
- Auto-Discover Targets - option to catalog all accessible sites in Sharepoint. If not enabled, the target discovery process can be manually started later in the process.
- Re-Discover Wait Window (Hours) - the number of hours between each the next discovery process.
- Click Next.
(click to expand)

Note: Users cannot add or edit a Preservation Case in Edit mode after the preservation hold is initiated.
For more information on preservation holds, see Creating a preservation hold case.
Manage Custodians
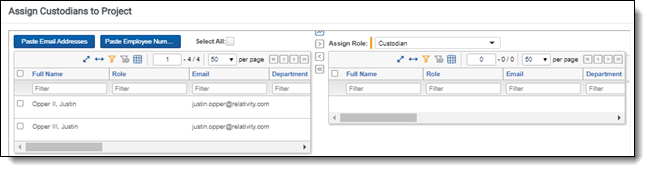
Complete the Manage custodians step by assigning custodians to the project. Follow the steps below to assign a custodian:
- From the Unselected custodians table, use the column filters to locate custodians.
- Click a check box next to a custodian.
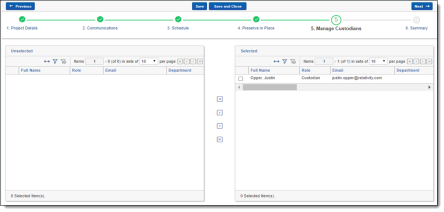
- Click
 to add select custodians. Click
  to add all custodians.
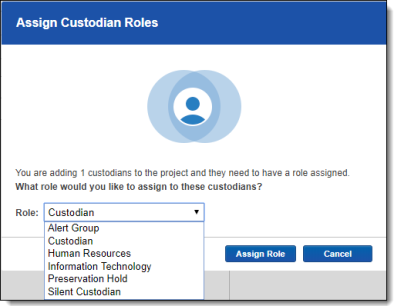
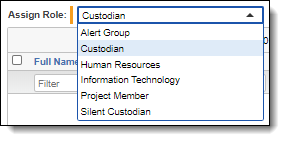
 - Assign a role when adding a custodian using the Assign Role drop-down menu. See Assigning roles to custodians.
- Notes: To assign a different roles, group a custodian or custodians by role when assigning custodians to a project.
Summary
Complete the creation of the project by reviewing all steps taken when creating the project before finalizing. Complete the legal hold project setup by clicking Complete Setup.
(click to expand)

- Complete the fields on the Project Details layout. See Project Details layout fields.
- Click Save. The newly created project details page appears, and is also added to the Projects landing page.
- (Optional) From the Project Details page Project console, you can:
- Assign custodians to a project. See Assigning custodians to a project.
- Close a project. Closing a project.
Project Details layout fields
The Set Project Details layout contains the following fields:
- Name - the project name.
- Owner - (Optional) the project owner's name.
- Owner Email - the project owner's email address.
- Type - (Optional) the type of project. By default, the Legal Hold Type is available. Click Add to add a new type choice.
- Preservation Case - the data source for the project's preservation hold.
Note: Users cannot add or edit a Preservation Case in Edit mode after the preservation hold is initiated.
- Subject Matter Start Date - (Optional) the earliest date that data relevant to the matter exists.
- Subject Matter End Date - (Optional) the most recent date that data relevant to the matter exists.
- Description - (Optional) the description of the project.
- Favorite - select Yes or No to visually indicate whether the project is a favorite from the Projects landing page.
- Use As Template - select Yes to flag project as a template for future project creation use. This template will appear in the Create New Project drop-down list. Select No to not use this project as a template.
- General Counsel - (Optional) the name of the company or organization's general counsel.
- External Counsel - (Optional) the name of the company or organization's external counsel.
- Send Release Notices for Legacy Projects: (Optional) select Yes or No to allow users to send a release notice to custodians without prior communications. The default setting is set to No.
Assigning custodians to a project
In order to send a communication, you need to assign a custodian to a project. You can assign a custodian after creating a project. You can also assign custodians to multiple projects in your workspace.
To assign a custodian:
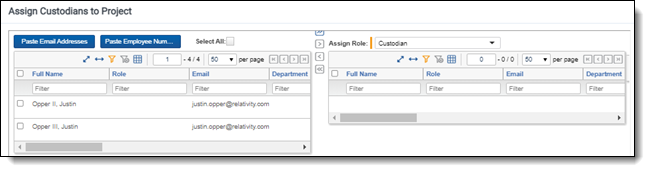
- From the Project Details page, click Assign from the Project console. See Project console.
- From the Assign Custodians to Project picker, use the column filters to locate custodian(s).
- From the Unselected window, choose:
- Select From List - pick from a list of custodians in Legal Hold.
- Paste Email Addresses - add a list of email addresses, separated by a comma or new line.
- Notes: Bulk paste does not work with white spaces before and after emails. Bulk paste will not work with apostrophes in the email addresses
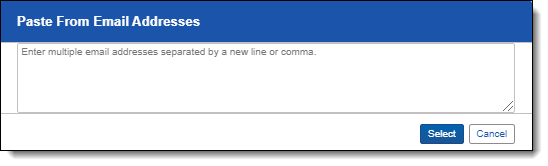
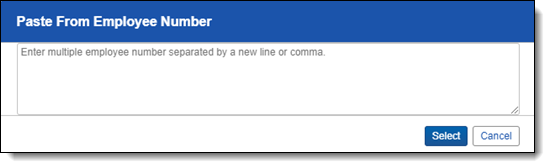
- Paste Employee Number - add a list of employee numbers, separated by a comma or new line.
- Select From List - pick from a list of custodians in Legal Hold.
- Assign a role when adding a person using the Assign Role drop-down menu. See Assigning roles to custodians.
- (Optional) Add more custodian information in the Advanced drop-down menu.
- Role Notes - (Optional) add specific information regarding a custodian’s involvement in a hold. For example, “Jane is a key player in this litigation, and we should plan to collect all her Word documents and emails.”
- Access to Sensitive Material - (Optional) select Yes or No to denote whether the custodian has access to sensitive material that may be involved in the litigation.
Note: You can view the Advanced custodian information from Project Details > Custodians tab. See Project Details.
- Click Select (#).
- Click Assign to assign custodian(s) to the project.
Securing a project
Secure a Legal Hold project and other Legal Hold objects by clicking  to lock a project.
System admins can access the Legal Hold Application RDO workspace permissions to manage custom permissions at the workspace level. This level of control prevents specified users from specific actions such as sending communications or assigning custodians to projects.
Note: In order for system admins to have access to the functions controlled by the Legal Hold Application Permissions, you must add those system admins to another security group or add a new group with access to the Legal Hold Application Permissions.
For more information, see Securing a project.
Closing a project
You can close a project when a project has completed. When you close a project, the status is Closed and all custodians are released. Legal Hold sends release communications to any custodian actively on hold.
To close a project:
- From the Project console, click Close Project.
- If the project has any active people still associated with it, you need to select a release notice.
- Click Assign.
- Click Save. Doing this sends the release notice to any active custodian that hasn't yet received a release notice and closes the project.
Open a closed project by clicking Open Project on the Project console. Once you open a closed project, you can send communications again. Doing this re-activates anyone still associated with the project.
Closing a project with a preservation hold
You must have the preservation hold permission to close a project with custodians that have preservation holds. If you don't have preservation permissions, you cannot close a project with an active preservation hold, and the Close Project button in the Project Console will be disabled.
To close a project with custodians on a preservation hold, follow the steps below
-
Click the Close Project button. The Close Project pop-up modal appears.
-
Select a Release option.
-
with Communication - select to alert the custodian that they've been released.
-
Silently - select to not alert the custodian that they've been released.
-
-
Click the Using drop-down menu if releasing with a communication, and select a communication.
-
Click Send and Close.
Once complete, the custodians will be notified they've been released.
Deleting a project
If you choose to delete a project, note that Legal Hold removes all associated objects and information contained in the project.
- To delete a project from the Project Details page, click Delete. At the prompt, click Delete. See Project Details.
- To delete a project from the Projects landing page, select the project and click Delete from the actions menu. At the prompt, click Delete. See Project Details.
Note: A project cannot be deleted when a custodian is on a preservation hold. To remove a custodian from a preservation hold, change the role to a non-preservation role. For more information on custodian roles in Legal Hold, see Assigning roles to custodians.