


After you’ve imported data you can use filters to isolate a set of data. Use filtering to run quality control tasks to check or fix errors, extract text, as well as produce or export documents. Filters are similar to creating saved searches in Relativity and are especially useful when you’re performing tasks that require you to include or exclude a specific set of documents.
Note: For more information on how to execute filters in the RPC, see the Filtering scenarios in the RPC video webinar on the Relativity Training site.
Creating a filter
This section includes generic steps for creating a filter. For information about specific filter type options, see Filter types.
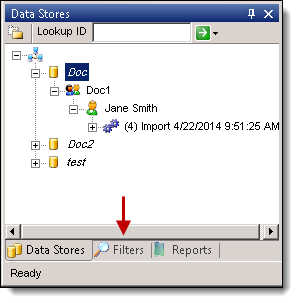
- In the Data Stores window, highlight a data store that you want to filter, and click the Filters tab at the bottom of the store list. If the Filters tab isn't visible here, right-click on the data store name and select Filter(s)... The Filters tab won't be visible if you previously had it open but then closed out of it.
- Click New Filter to display a list of filter types.
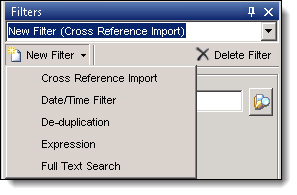
- Select a filter type, and enter a name in the New Filter box and press Tab. We recommend clicking Tab after entering the filter name, as this will ensure that the name is saved. Under some circumstances, not clicking Tab lists the filter merely by its default name of "New Filter (<Type>)."
- Enter the required information for the filter type that you selected. You will see specific fields for each filter type displayed in the center of the tab. See Filter types.
- Select one or both of the following options to determine additional actions when the filter flags an item:
- Flag the parent if it is a child item - if the filter flags a child item, then the parent will also be flagged.
- Flag all children of flagged parent - if the filter flags the parent, then the children will be flagged. Select this option if you only want to search for parent documents, but you also want to include the children of the documents that had a hit.
- If you simply click Execute without flagging anything, the filter you've set up will only flag documents that actually meet the search criteria. This could be problematic if you want to then export the filtered data, especially in situations in which you've hit on a keyword that’s a child document but you didn’t hit on the parent document. This is because you can’t export a child document without also exporting its parent. Thus, it's recommended that you check either the flag the parent if it is a child item or the flag all children of a flagged parent option. Checking both of these brings in the entire family, which you can then export.
- Flagging all children of a flagged parent ensures that you capture all children of a parent that contained a keyword hit.
- If you have a parent item and it has, for example, ten children and one of the children hits on the keywords you entered and you check the flag for parent and then execute the filter and then export the data, it will display as one parent and one child.
- Click one of these buttons:
- Rediscover - queues the files in the filter for re-import. The filter must be executed first for this button to function.
- Clone Filter - clones the filter.
- You can use the clone option to create a filter using identical date settings or keyword terms and then adjust the job list it's filtering. Alternatively, you can keep the jobs being filtered on and just change, for example, the end date on a date filter.
- The newly created filter clone won't have any items in the filter until you click Execute. To clone a filter, click Clone Filter, enter a name for the new filter, press the Tab key, modify the filter according to your needs, and click Execute.
- You can't modify filters used in an export that uses a setting of New, Replacement or Supplemental. If you need to alter a locked filter, you must first clone the filter and then edit the clone.
- Execute - runs the filter and populates the data in the RPC. Until you click Execute in the Filters window, you haven't yet set the filters you've created or added.
Note: When you see a list of import jobs in the filter window after selecting a filter type, those jobs are sorted by Job ID by default, but you can sort on any column (Custodian, Project, Job ID, CreateOn, etc.) you want to.
Once you've filtered data, you can create export files for review or production. See Exporting data.
Displaying filter results
To display the filter results, complete the following steps:
- In the Data Stores window, right-click on an import job, and select Inspect.
- From the Matter Inspector, click
 , and select a filter in the Filter to apply box.
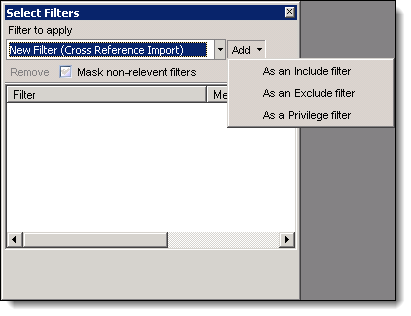
- Click the Add drop-down arrow to select the filter type.
- As an Include filter - includes any document that matches the criteria set in this filter. For example, you could add a keyword search as an include filter, so that all documents with this keyword are exported.
- As an Exclude filter - excludes any document that matches the criteria set in this filter.
- As a Privilege filter - flags documents that are potentially privileged based on their inclusion of privilege-relevant terms found in the full text search.
- In the matter inspector, adding a privilege filter has no impact on the documents displayed.
- Privilege filters are limited to exporting; however, a Boolean search is most often used for a privilege filter.
- Close the window after you have selected all the required filters.
- Click Refresh Needed to display a list of documents match your filter settings. For more information about the Matter Inspector, see Performing Quality Control Tasks.
Filter types
This section describes how to use the various filter types supported by the RPC.
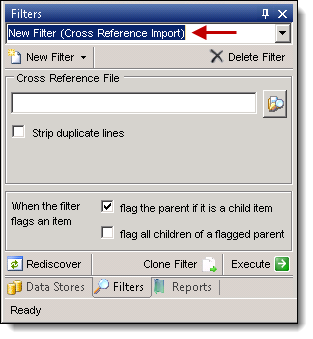
Cross reference import filter
When you are importing data, this filter uses the file ID as a cross reference. You can have multiple cross reference import filters for a single data store. You can define five metadata fields in the cross reference text file used by this filter. See Formatting the cross reference file.
- Select Cross Reference Import in the New Filter menu.
- Enter a name in the New Filter box and press Tab.
- To configure the filter, browse or enter the path to your file.
- Select Strip duplicate lines if you want any duplicate file IDs in the cross reference filter removed.
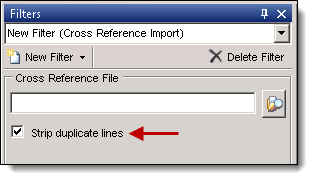
- To run the filter, continue with Step 5 in Creating a filter.
Formatting the cross reference file
When you import data using the Cross Reference Import filter, you need to supply a text file containing additional metadata fields. These user-defined fields can be used for external data, such as branding, tagging, reference, and export information, as well as external control numbers.
Note: The FileID is the only required field. Other fields are optional.
You must follow the required format for the cross reference file. The first row in the file must be a header row, which is not imported when you run the filter. You can also define up to five metadata fields in the cross reference text file:
- EXTRA1
- EXTRA2
- USERDEFINED1
- USERDEFINED2
- USERDEFINED3
Use the format in the sample file illustrated below:
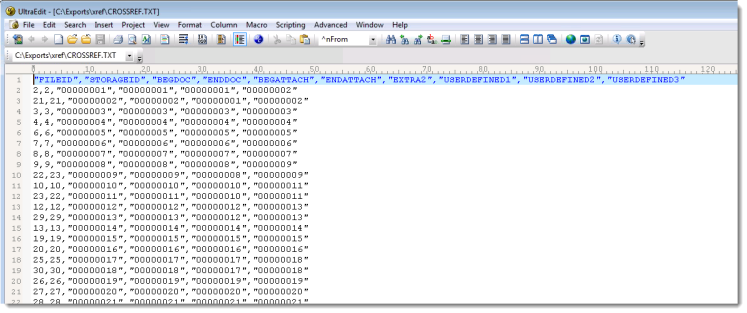
Note: Use two sets of double quotation marks to represent a blank.
Date/Time filter
For this filter, you can set specific date ranges and metadata after ingestion. This filter uses a metadata search so it does required extracted text for the selected custodian.
- Select Date/Time Filter in the New Filter menu.
- Enter a name in the New Filter box and press Tab.
- Click the Custodian checkbox for one or more jobs that you want to filter for date and time.
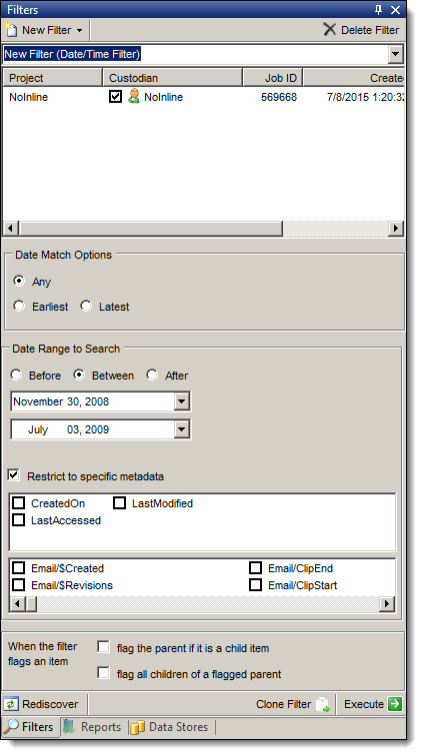
- Select a Date Match Option:
- Any - filters on any date available for a document. Each document is associated with multiple dates, such as document sent date, delivered date, date last printed, and so on. When you select this option, the document will be returned if any of the dates match.
- Earliest - filters on the earliest date in the metadata list. Usually filters on the create date.
- Latest - filters on the latest date in the metadata list. Usually filters on the last modified date.
- To specify a data range, select Before, Between, or After. Use the date drop-down option to select a date. (The beginning date starts at midnight, while the end date terminates at 11:59.)
- To control the metadata used by the filter, select Restrict to specific metadata, and then choose the metadata fields. These fields are based on the metadata discovered in the document collection during import. They are pulled dynamically from the database.
Note: When running a date filter, make sure to restrict that filter to specific metadata or else it will return hits on any date that meets the parameters you entered. This may include parameters that you don't care about when executing a date filter, such as Last Printed On. In this way, not restricting to specific metadata often results in an over-inclusive document list and costs you time during your QC process.
- To run the filter, click Execute.
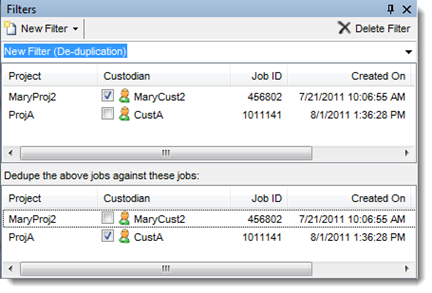
Deduplication filter
Use the Deduplication filter to remove multiple copies of a document from a data set by selecting two groups of custodians for this process. When you run a deduplication filter for the first time, the RPC generates the hash tables used for it, and adds them to the database. The performance time is improved when you re-run the filter because these tables are already built.
You can use this filter in the following ways:
- Dedupe the custodian against self - you can de-dupe the data set of a custodian against itself. For example, you could de-dupe the laptop against the desktop of a custodian.
- Dedupe one custodian against another - you can select one custodian whose document set may contain duplicates, and then another custodian whose data set determines the documents to be removed. For example, you may want to dedupe the messages in John’s mailbox against those in Jane’s. See Targeted deduplication filter scenario.
- Dedupe against multiple custodians - you can dedupe one custodian against multiple custodians. The RPC uses a weighting algorithm to determine which documents to dedupe, when the same custodian is in both groups.
Note: The Deduplication filter does not delete any documents. It simply does not return them in the list of documents.
- Select Deduplication in the New Filter menu.
- Enter a name in the New Filter box and press Tab.
- Click the Custodian checkbox for one or more jobs in the top window that you want de-duplicated against the jobs selected in the bottom window.
- Ensure that the Use content hash option under the Loose Files section is checked. This option should always be enabled. Note that this option will be removed from the GUI in an upcoming release.
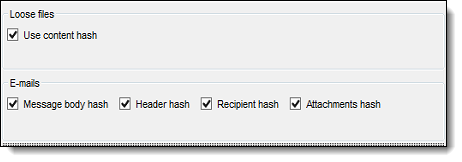
- Select filtering options for E-mails. You can select a combination of different hashes that the RPC will use to identify duplicate files.
- Relativity Processing generates four different hashes for emails and keeps each hash value separate, which allows users to de-duplicate in processing based on individual hashes and not an all-inclusive hash string. For example, if you’re using processing, you have the ability to de-duplicate one custodian’s files against those of another custodian based only on the body hash and not the attachment or recipient hashes.
- Body hash - takes the text of the body of the e-mail and generates a hash.
- Header hash - takes the message time, subject, author’s name and e-mail, and generates a hash.
- Recipient hash - takes the recipient's name and emails and generates a hash.
- Attachment hash - takes each SHA256 hash of each attachment and hashes the SHA256 hashes together.
- Relativity Processing generates four different hashes for emails and keeps each hash value separate, which allows users to de-duplicate in processing based on individual hashes and not an all-inclusive hash string. For example, if you’re using processing, you have the ability to de-duplicate one custodian’s files against those of another custodian based only on the body hash and not the attachment or recipient hashes.
-
- To run the filter, click Execute.
Targeted deduplication filter scenario
Let's say that you want to dedupe John's documents against Jane's documents. Before deduplicating, you need to ensure that any documents in John's data set containing the term "Fruit Loops" are relevant and therefore should be included in the results. Likewise, any documents in Jane's data set containing the term "Cheerios" should also be included in the results.
To perform this targeted deduplication filter:
- Create Full text search filters on:
- John's data set for the word "Fruit Loops". See Full text search filter.
- Jane's data set for the word "Cheerios". See Full text search filter.
- Create a new Deduplication filter and ensure the following are set:
- Source filter - Jane's Cheerios filter. Add as an Exclude filter.
- Target filter - John's Fruit Loops filter. Add as an Exclude filter.
- Execute the filter to dedupe against both custodians. Documents returned will still contain documents with terms "Fruit Loops" and "Cheerios" specified in John's and Jane's Exclude filters.
Expression filter
With an Expression Filter, you can use C# syntax to write custom code to manipulate the data set. The code runs on the desktop, and it is dynamically compiled and executed on the database.
This filter type is frequently used for checking errors that occurred during text extraction.
- Select Expression in the New Filter menu.
- Enter a name in the New Filter box and press Tab.
- Click the Custodian checkbox for one or more jobs that you want to filter with your custom code.
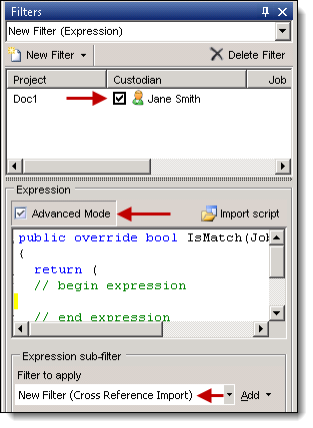
- Enter a code for a simple filter in the Expression box. If you want to use C# syntax, click Advanced Expression to auto-generate an outline of a method, and then enter your code.
- To run the expression on a limited set of data, select a filter in the Sub-Filter box.
- To run the filter, continue with Step 5 in Creating a filter.
The following sections provide examples of expression filters. Note that none of these examples requires advanced mode.
Example: Find documents with no error message and aren't flagged as unprocessable
Use the following expression to isolate documents that have an error message but are not flagged as unprocessable. This filter is useful for situations in which you've run text extraction and want to rerun anything that threw an error.
public override bool IsMatch(Job job, Matter matter)
{
return (
// begin expression
IsIn((matter.Message != "") && (matter.Unprocessable == false))
// end expression
);
}
Example: Find password-protected documents
Use the following expression to isolate password-protected documents.
public override bool IsMatch(Job job, Matter matter)
{
return (
// begin expression
IsIn(matter.Message.Contains("Password"))||(matter.Message.Contains("password"))
// end expression
);
}
Example: Find text within the VirtualPath
Use the following expression to isolate a string of text within the VirtualPath.
public override bool IsMatch(Job job, Matter matter)
{
return (
// begin expression
IsIn(matter.VirtualPath.Contains("Sent Items")
// end expression
);
}
Example: Find specific file extensions
Use the following expression to isolate specific file extensions. You must enter all file extensions in CAPS, not in lower case; if you enter the extensions in lower case, the filter will provide no results.
public override bool IsMatch(Job job, Matter matter)
{
return (
// begin expression
IsIn(matter.FileExtension, "XLS", "XLSX", "XLSM", "XLSB", "XLA", "XLB")
// end expression
);
}
Example: Find documents whose names start with a particular string
Use the following expression to isolate documents with names that start with a particular string.
public override bool IsMatch(Job job, Matter matter)
{
return (
// begin expression
IsIn(matter.FileName.StartsWith("image")
// end expression
);
}
Example: Find documents whose names end with a particular string
Use the following expression to isolate documents with names that end with a particular string. This is useful for finding files with a specific literal extension instead of the identified extension.
public override bool IsMatch(Job job, Matter matter)
{
return (
// begin expression
IsIn(matter.FileName.EndsWith("emf")
// end expression
);
}
Full text search filter
You can use the Full Text Search filter to run keyword searches on data indexes built for specific import jobs. The RPC uses the dtSearch engine to run these filters. However, it executes the search for each term in parallel using a separate thread, and then combines the results of these searches.
A common use for a full text search filter is the removal of extraneous documents from a data set. For example, you could run the filter on a group of documents before importing them into Relativity for review. You could also use this filter to tag documents that are potentially privileged. See Exporting data.
Note: You can run the Comprehensive Hits Report to display a list of statistics about the number of documents that match a search term and other data. See Running standard reports.
- Select Full Text Search in the New Filter menu.
- Enter a name in the New Filter box and press Tab.
- Click the Custodian checkbox for one or more jobs that you want included in the full text search.
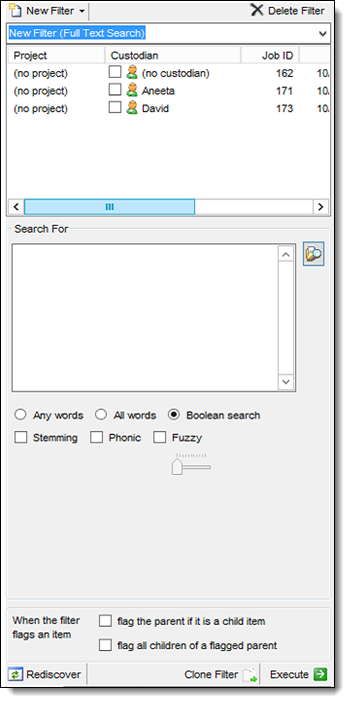
- Either click
 next to the Search For window to browse for a file containing your search terms, or enter then in the following format: "relativity","processing"
- When you import a list of terms through the browse option, the RPC automatically sets the search to use the Boolean option.
- If you manually enter your own terms, the search defaults to Any words, and you must remember to switch to Boolean if this is the option you want.
- You can also add operators used by the dtSearch engine, such as Boolean operators AND, OR, NOT.
- You can manually resize the Search For window.
- Select any of the searching options that you want to use. These options follow the searching conventions used by the dtSearch engine.
- To run the filter, continue with Step 5 in Creating a filter.
Boolean filter
To create and execute a boolean filter:
- Click New Filter and select Full Text Filter.
- Name the filter at the top of the custodian window.
- Select the data sets to which you want to apply the filter. Note that each data set has its own index and each index records those noise words that were used when that index was built. Note also that noise words aren’t configurable in the RPC.
- Enter the terms you’d like to include in the filter. Each line is its own search, and each line will be executed in its own thread. These will be joined together by an OR statement, in that the entire search string is an implicit OR since you've selected the Boolean. The fact that they’re on separate lines allows you to search for them in parallel across multiple threads.
- Select Boolean search.
- Click Execute. Note that the RPC now displays which threads it’s currently searching, as well as the fact that it's currently populating the search results.
Retrying imaging or text extraction errors through a filter
There are many ways to isolate documents that you may want the system to retry, depending on your needs. For example, in the matter inspector you may want to sort on the Message column to group all items with an error message together. You can also de-select the Exclude the following checkbox and check the Placeholder checkbox and then refresh the screen to display only items that received a placeholder image. Alternatively, you could sort on the Page Count column to sort anything with a page count of -1 to the top.
To retry a group of errors through a filter in the RPC, perform the following steps:
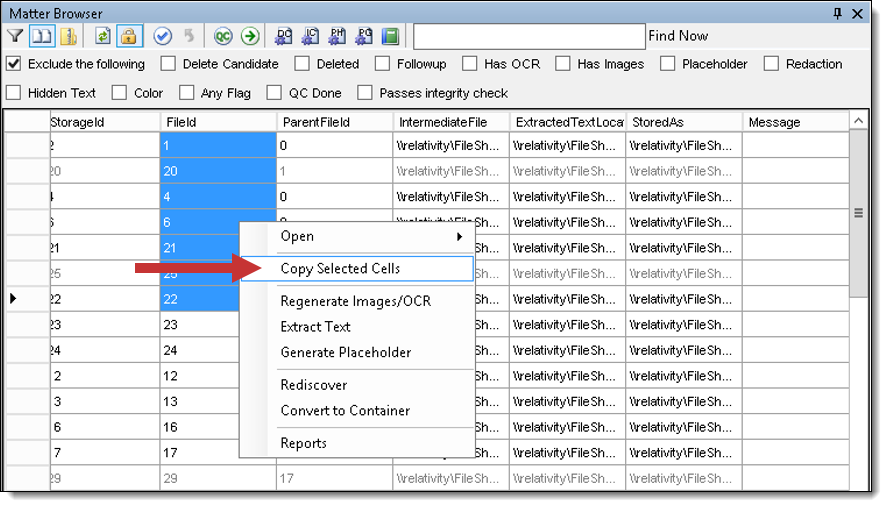
- Open the matter inspector for the job that contains the errors.
- Select the File Ids of all the files that you want to retry.
- Right-click and select Copy Selected Cells.
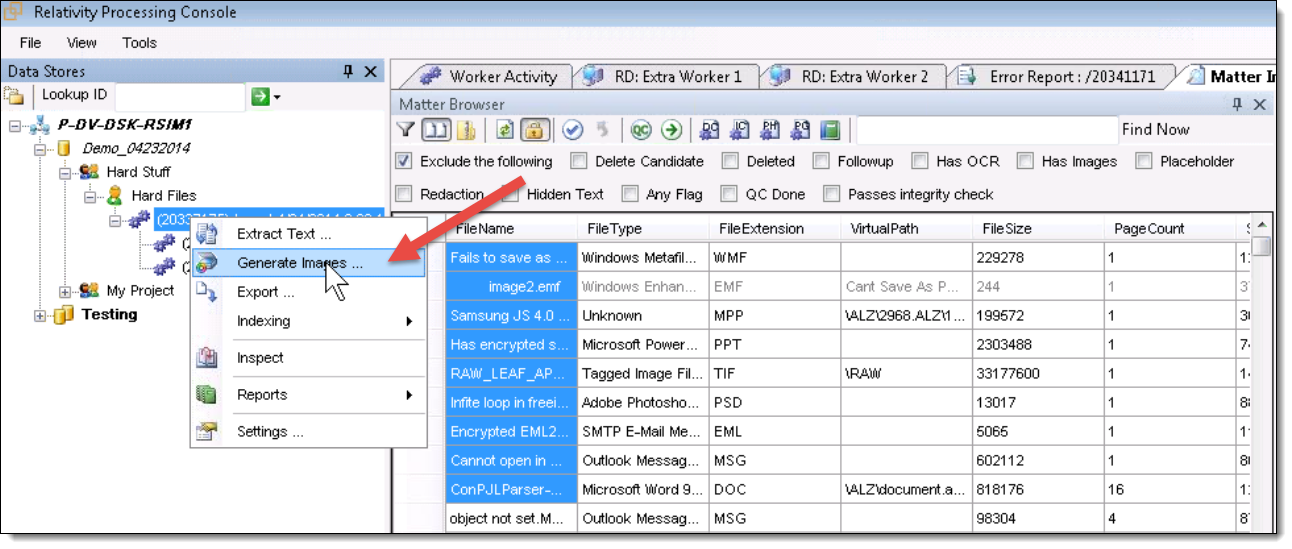
- Use the File IDs that you copied to the clipboard to create a cross reference import filter. See Cross reference import filter for more information.
- Right-click on the import job and select Generate Images or Extract Text, as appropriate.
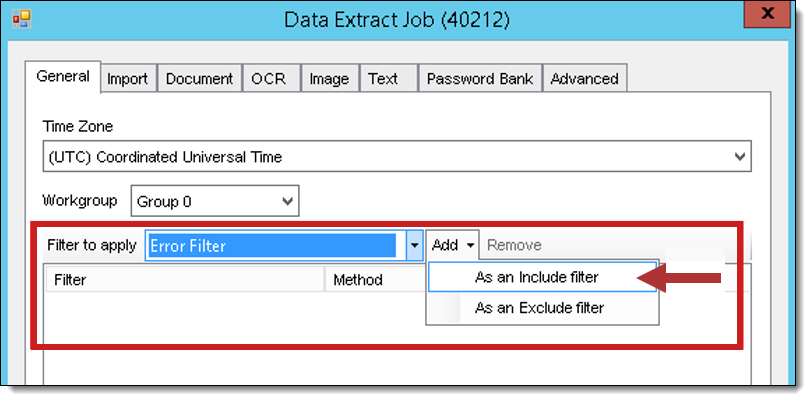
- In the Generate Images or Data Extract Job window, select the filter you just created from the Filter to apply drop-down list and select As an Include filter from the Add drop-down list.
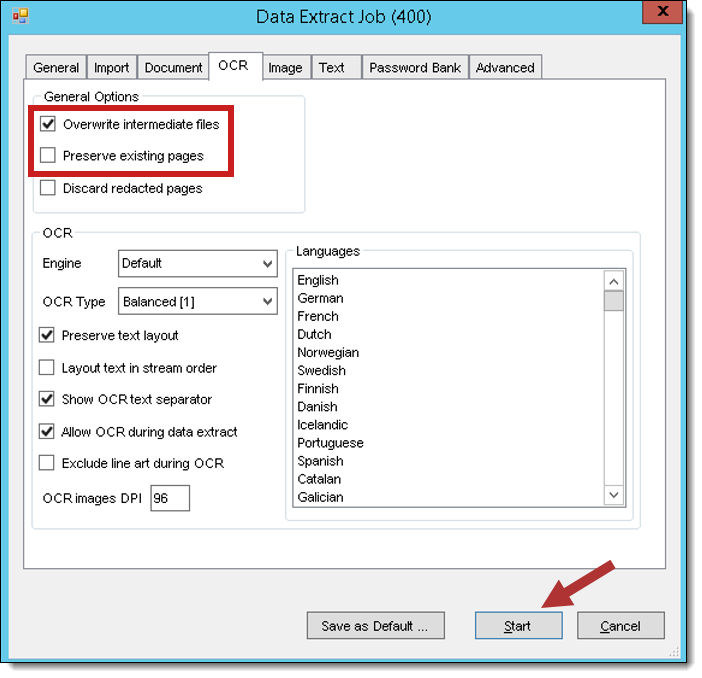
- Select the OCR tab, check the box next to the Overwrite intermediate files option, and un-check the Preserve existing pages box. Then click Start to retry all of the errors you filtered for.
Note: Sometimes documents that error on a data extract job are handled without error on an image generation job. You can try generating images for data extract errors prior to indexing. When you index the job, the software uses page-level text derived from the image generation job if the doc level extracted text doesn't exist. Additionally, during the indexing process the system copies the page-level text files into a single document-level text file and saves it where the document-level text file would have been created had the file not thrown an error during data extraction.