


When you are ready, you can export files for review, production or any other purpose you may have. Use the steps provided in the following sections to run your exports.
Note: For more information on how to export through the RPC, see the Using the RPC Exporter video webinar on the Relativity Training site.
Creating an export job
- In the Data Stores window either right click on a data store or drill down to a specific import job, right click on either, and click Export to open the Export Wizard.
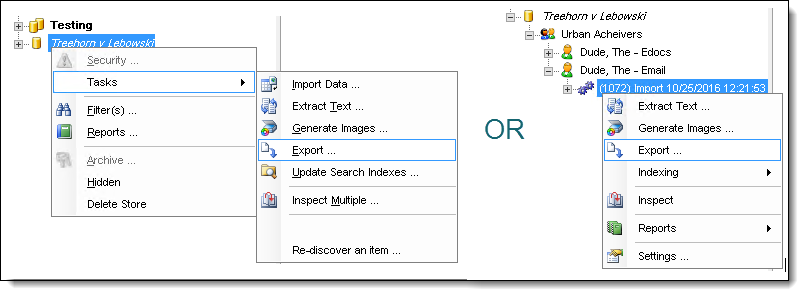
- When the Export Wizard is opened either no import jobs are checked (if opened by clicking on the data store) or a single import job is checked (if opened by clicking on a specific import. Regardless of which option was chosen, you can check or un-check import jobs as needed for your export. If you want to use a saved export file (.EXF) from a previous job, click Load Export to select it before you pick which jobs to export. There are no adverse effects of selecting the jobs first, but loading an export un-checks all import jobs automatically and you’ll need to reselect the jobs again.
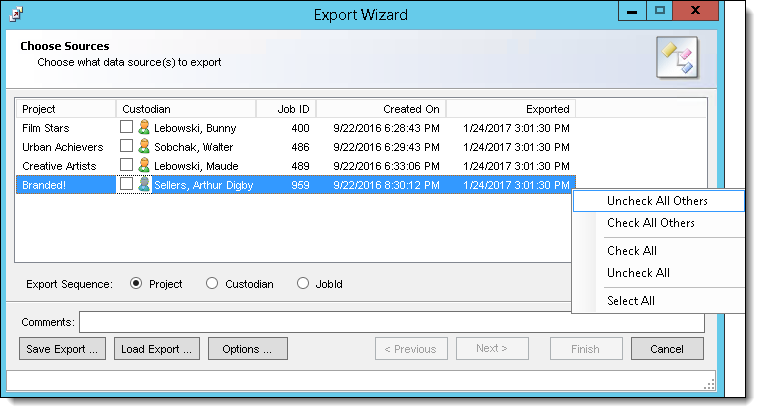
- When choosing which import jobs to export you can right click on any of them and make use of the options displayed in the image above. They are all self-explanatory except for ‘Select All’ which highlights all the import jobs but doesn’t check or un-check any of them. You can also left-click and drag to highlight a number of jobs then press the space bar to select or deselect them.
- The default export sequence is by Project. If one or more import jobs have no value entered for the Project, as soon as an import is checked a pop-up window will inform you of that the export sequence is automatically being changed to JobId.
- If you are selecting multiple imports you can choose which export sequence to be used. The sequence setting dictates the order in which the exporter exports the selected items.
- The Export Sequence is relevant when you export multiple custodians in a single export job. The sequence setting dictates the order in which the exporter exports those sources.
- Project - exports alphabetically by project name.
- Custodian - exports alphabetically by custodian name.
- JobId - exports by the JobId value in ascending order.
Note: The Comments window serves no purpose at this time.
- The Export Sequence is relevant when you export multiple custodians in a single export job. The sequence setting dictates the order in which the exporter exports those sources.
- If needed, click Options to display the Export Options dialog box. None of these are required to run an export
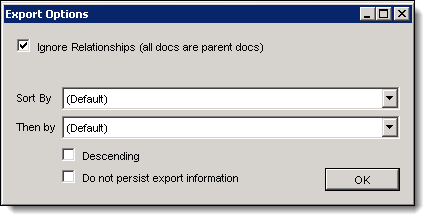
- Ignore Relationships - select this option to treat all documents like parents. For example, you might want to export only the documents with keyword hits, so you may need to export a child without a parent. You can use this option to flatten all family relationships.
- Sort By - performs primary sort based on FileId, FileName, ImportSource, ParentFileId, RootFileId, or Virtual Path.
- Then By - performs secondary sort using selected metadata field.
- Descending - select to perform a descending sort. For example, you may want to use a descending sort on the creation date of e-mail messages, so that you list the messages from newest to oldest.
- Do not persist export information - enabling this prevents any export information such as completion time and assigned Bates numbers from being tracked in an export table in the Store database. This is useful for cases in which you want to run a test export and you don't want that job's data permanently tracked.
- Click OK to redisplay the Choose Sources window of the Export Wizard.
- Click Next to display the Select Filters window.
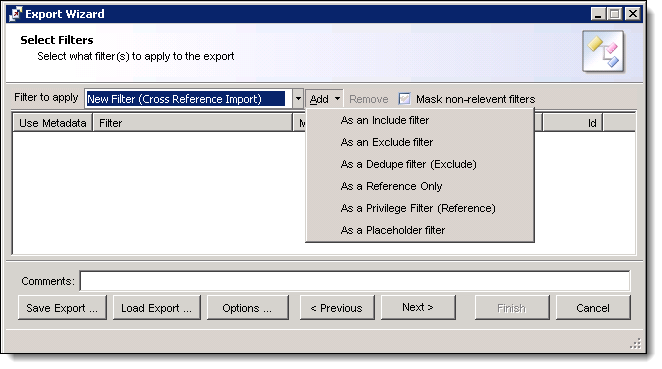
- (Optional) Select a filter from the Filter to apply drop-down list.
- Click Add, and select one of following options to control the filter behavior.
Option Description As an Include filter
Includes any document that matches the criteria set in this filter. For example, you could add a keyword search as an include filter, so that all documents with this keyword are exported.
Note: Select the checkbox under Use Metadata to export keyword, and its frequency in a document. This functionality is available because metadata is actually stored in filters. New columns with the metadata are added.
As an Exclude filter
Excludes any document that matches the criteria set in this filter.
As a Dedupe filter (Exclude)
Same as an Exclude filter, except that the RPC uses a different logging code for deduplication. You can run a report on this code to identify files excluded due to deduplication.
As a Reference Only
References the criteria in the filter and may perform an action based on a match. For example, tagging information obtained from Relativity could be used to apply tags to documents that match the metadata in the filter criteria. All documents are exported and tagged as required.
As a Privilege Filter (Reference)
Similar to a Reference Only filter. The Potentially Privileged column is updated to Y for any document that matches the filter criteria. All documents are exported.
As a Placeholder filter
Inserts a placeholder for any document that meets the criteria set in this filter. For example, you could use this filter to substitute a placeholder for all Excel/Power Point or large text files in a production. When you select this filter, the RPC runs the export job and substitutes the placeholder for these files without modifying the PDFs already generated. This eliminates the need for you to image these files, since you can leave them as-is.
- When multiple include/exclude filters are used, the logic used to combine them is an AND statement only. Reference, Privilege and Placeholder filters do nothing to limit any documents from being exported.
- If any filters were added incorrectly, highlight them and click Remove. The Mask non-relevant filters checkbox will hide any filters that do not apply to the import jobs selected for export. This button also can be used to refresh the filters in the drop-down list if you created new ones while the export wizard was open.
- Select Next to display the Export Type window.
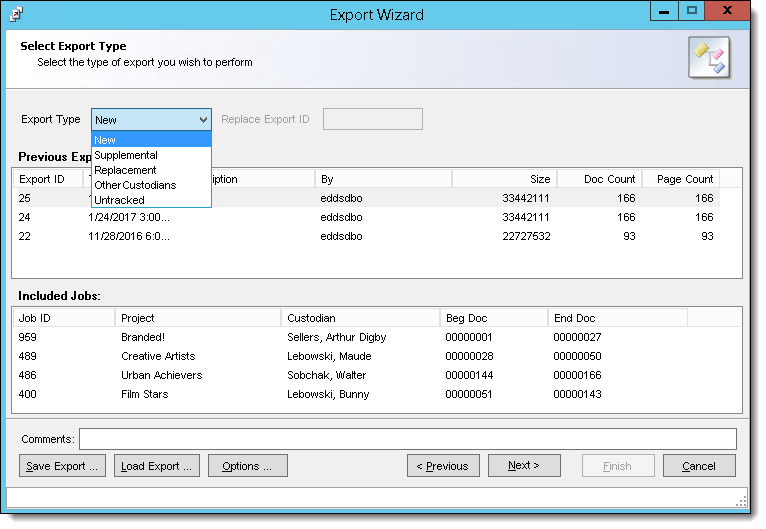
- Select an Export Type:
- New - this is typically used for a first-time export. The tracking status for the export is updated and tracked in the database. The RPC tracks bates numbers, page counts, and other information so that you know where to begin numbering for your next export with the same custodian. This information is displayed in the Previous Exports and Included Jobs panes of the export wizard on future exports.
- Supplemental - is intended for partial exports for the same data set in sequence. In other words, use this option if you want to add documents to an export job that already exists. Note that you still need to specify a starting number for the supplemental documents, as the RPC won't automatically number them.
- Replacement - replace an entire export job with a completely different export job. When you select this option, you must specify a valid export ID value in the Replace Export ID field to the right, which is only enabled when you select Replacement as the export type. Simply highlight the job you want to replace in the Previous Exports pane to populate the field.
Note: You can't modify filters used in an export that uses a setting of New, Replacement or Supplemental. If you need to alter a locked filter, you must first clone the filter and then edit the clone.
- OtherCustodians - export the DeDuped Custodian and Deduped Path information via Relativity (the front end). You can't export either of these fields if you don't choose this option. As a result, standard practice is to export all other metadata using one of the other dropdown settings and to export these two fields to a separate overlay metadata file using this option.
- Untracked - no tracking information for the export is added to the database. You may want to select this option if you are doing some experimental export jobs that you do not want tracked in the database. If you are building a new export file definition, you may run several test exports to see how the data is displayed with the current settings.
- Click Next to display Select Tasks window.
- Click New. Point to Page Tasks or Document Tasks, and click on one or more export tasks. Each of these options will have a variety of task parameters that can be set. For details, see Updating task parameters.
- Page Tasks - available options are Copy Images and Copy Text.
- Copy Images - writes TIF and/or JPG image files to a desired location. An image generation job must have been performed first. The exporter will throw an error for each document exported that was not previously imaged.
- Copy Text - writes page level text files to a desired location. An image generation job must have been performed first. The exporter will throw an error for each document exported that was not previously imaged.
- Document Tasks - available options are Copy Native files, Copy PDF Files, Write cross-reference file, Write extracted text, Write metadata, and Write Summation metadata.
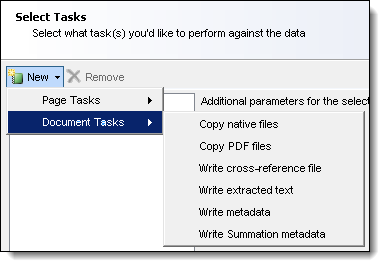
- Copy native files - copies the native file for an exported document to a desired location.
- Copy PDF files - copies a PDF file for an exported document to a desired location. An image generation job must have been performed first. The exporter will throw an error for each document exported that was not previously imaged.
- Write cross-reference file - writes a stock-formatted cross-reference file. It is recommended to include this task on ALL exports. It frequently is a very handy file to have.
- Write extracted text - writes document level extracted text to a desired location. A text extraction or image generation job must have been performed first. If an image generation job was run but not a text extraction job, the page level text files will be copied together to form a doc level text file automatically during the export. The exporter will throw an error for each document exported that was not previously imaged or text extracted.
- Write metadata - writes custom metadata to a desired location. Alternatively, this task can be used to write a file that contains no metadata. For example, you could write a readme.txt file to include reminders about a customer’s preferences for their deliverables.
- Write Summation metadata - currently inoperative.
Note: You can add the same task multiple times to an export job. Depending on the task, you can assign a different file name or folder location to each copy of the task. For example, you could export a set of metadata for a client and another for opposing counsel by adding the Write metadata task twice. You would then modify the name of the task added under Document Tasks, and the name of file output for each task. If the export job needs to be repeated, you do not need to redo each of the document or page tasks. You can clear the checkboxes for the tasks that do not need to be redone, and then perform the export. For example, you may want to add new fields to the metadata file, so you can select only Write metadata under Document Tasks.
- Page Tasks - available options are Copy Images and Copy Text.
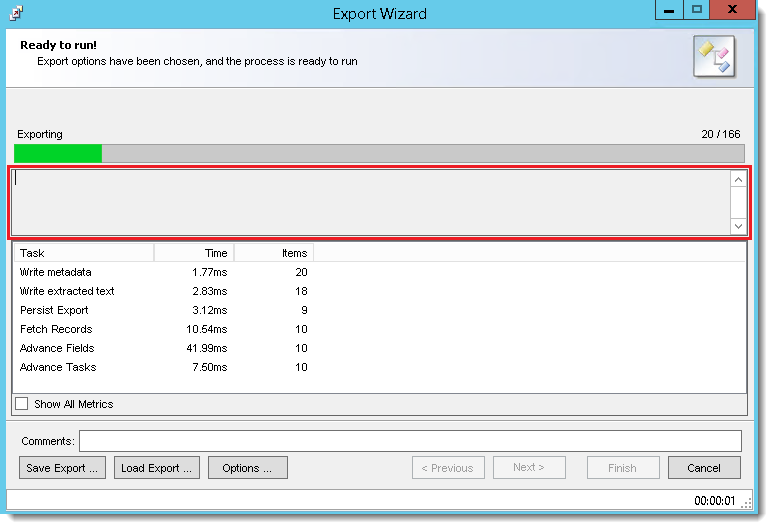
- Click Next and then Finish to run the export job. The Finished box contains any errors that occurred along with the File ID for troubleshooting purposes. The window outlined in red below will contain any errors that occurred along with the File ID for troubleshooting purposes.
- (Optional) Click Save Export to save your current settings as a reusable export file (.EXF). You can select this load file for use with another export job by clicking Load Export. You can save your export at any point during the export process, you do not have to actually export anything before saving. If you are creating a complicated export, you may want to consider saving your export periodically as you add tasks.
Updating task parameters
In the export wizard, each document and page task has multiple parameters that you can update to meet the requirements of a specific export job. Some of these parameters are universal to all export tasks while others are specific to that task. The table below outlines the various parameters, what tasks utilize them and if they are universal or specific.
|
Parameter |
Associated Tasks |
Universal or Specific |
Notes |
|---|---|---|---|
|
Bates Number |
All |
Universal |
Also serves as control number for document level exports. Should be left as {BatesBeginDoc}, expand this section to format the bates/control number. |
|
DocLevel |
All |
Universal |
If True, numbers are incremented at the doc level. |
|
Ignore Number |
All |
Universal |
If True, the value in the StartAt field will be disregarded and only the prefix and suffix will be used. |
|
Prefix |
All |
Universal |
The prefix to prepend each bates/control number. |
|
Reset Condition |
All |
Universal |
When the value entered here changes, the control/bates number will reset to the StartAt number. Typically used with {Custodian} |
|
Reset Counters |
All |
Universal |
When set to true, any generic or file counters will reset when the reset condition is met. |
|
StartAt |
All |
Universal |
The starting number to assign. |
|
Suffix |
All |
Universal |
The suffix to append to each bates/control number. |
|
CopyMode |
Copy Images |
Specific |
Normal = export images and create image load files, BuildNoCopy = create image load files but don't actually export the images. This setting is rarely changed from Normal. |
|
Custom Foldering |
Copy Images & Copy Text (page level) |
Specific |
When set to False the system will automatically the standard 00\00 folder structure after the Image Sub-Folder. When True the system will use the value in the Image Sub-Folder field only, allowing the user to enter custom counters if desired. |
|
Distributed |
Copy Images, Copy Text, Copy Natives & Copy PDFs |
Universal |
True = all copying and branding is performed by the workers. False = these tasks are performed by the machine running the export. |
|
Endorsement |
Copy Images, Copy Text & Copy PDFs |
Semi-Universal* |
Settings for what to brand on images, page level text and PDFs. |
|
Bottom Left |
Copy Images, Copy Text & Copy PDFs |
Semi-Universal* |
What to endorse in the bottom left corner. |
|
Bottom Right |
Copy Images, Copy Text & Copy PDFs |
Semi-Universal* |
What to endorse in the bottom right corner. |
|
Gap |
Copy Images, Copy Text & Copy PDFs |
Semi-Universal* |
Space between endorsement and image in inches. |
|
Margin |
Copy Images, Copy Text & Copy PDFs |
Semi-Universal* |
The distance between the edge of the page and the endorsement. |
|
Top Left |
Copy Images, Copy Text & Copy PDFs |
Semi-Universal* |
What to endorse in the top left corner. |
|
Top Right |
Copy Images, Copy Text & Copy PDFs |
Semi-Universal* |
What to endorse in the top right corner. |
|
Image / Text / PDF / Extracted Sub-Folder |
Copy Images, Copy Text, Write extracted text & Copy PDFs |
Specific |
The subfolder to write the files to. Will be a subfolder of the value entered in the Working Folder field. |
|
Jpeg Natives |
Copy Images |
Universal |
True = use the native file if the native is a jpeg. False = use the imaged version of the native. Setting is ignored if endorsing is enabled. |
|
LFP Filename |
Copy Images, Copy PDFs |
Specific |
LFP file name to use. An OPT is also automatically created and will have the same name. |
|
Overwrite Images / Files |
All |
Specific |
Overwrite existing files in the destination folder. |
|
Production Name |
Copy Images, Copy PDFs |
Universal |
The export volume name. This is the default value used for the LFP name. This value is used to populate the volume column in the LFP & OPT. |
|
Working Folder |
All |
Univeral |
The base folder to write all output to. If the export work is to be distributed to the workers it needs to be a location they have write access to. UNC pathing is strongly recommended. |
|
Compress Text |
Copy Text, Write extracted text |
Specific |
When set to true, all blank lines and leading or trailing spaces are removed from the text. |
|
Default Text |
Copy Text, Write extracted text |
Specific |
If a document has no extractable text, this text is used instead of nothing. |
|
Multipage |
Copy Text |
Specific |
Specifies whether to combine single page text files into a doc level text file or not. |
|
Page Separator |
Copy Text |
Specific |
Specifies what separator to use between each page of text if Multipage is set to True. |
|
Strip Non-ASCII |
Copy Text, Write extracted text, Write cross-reference file, Write metadata |
Specific |
Strips non-ASCII characters from the data or text before writing. |
|
Text Encoding |
Copy Text, Write extracted text, Write cross-reference file, Write metadata |
Universal |
Specifies the type of encoding to use when writing to the file. |
|
Wrap Lines |
Copy Text, Write extracted text |
Specific |
Word-wrap lines so they do not exceed the specified length. Use 0 to disable. |
|
Copy Condition |
Copy native file, Copy PDFs |
Specific |
The condition to evaluate to determine whether or not to copy the file. 0 or False means do not copy the file, 1 or True means copy the file. |
|
Default Extension |
Copy native file, Copy PDFs |
Specific |
The extension to use if the file doesn't have an extension. |
|
Filename |
All document level tasks |
Specific |
The file name to use. |
|
MaxExtLength |
Copy native file, Copy PDFs |
Specific |
The maximum number of characters in the file extension, 0 for no limit. |
|
MaxNameLength |
Copy native file, Copy PDFs |
Specific |
The maximum number of characters in the file name, 0 for no limit. |
|
Placeholders Only |
Copy native file, Copy PDFs |
Specific |
True = File will only be copied if the image for the document is a placeholder. |
|
Source File |
Copy native file, Copy PDFs |
Specific |
You won't need to change this. Ever. We promise. |
|
UnicodeFilenames |
Copy native file, Copy PDFs |
Specific |
If set to False, filenames are converted to ANSI and unconvertable characters are replaced with an underscore. If True, the original Unicode file name is used. |
|
Highlight |
Write extracted text |
Specific |
Highlight search hits from the filters applied to the export. Requires Text Format to be set to Rich Text |
|
Text Format |
Write extracted text |
Specific |
Specifies to use Text or Rich Text as the format. |
|
Metadata Content |
Write Metadata |
Specific |
The metadata to write to the file. Can include any number of metadata fields in just about any format. Can also have no metadata if desired. |
* Semi-universal items only apply to other tasks of the same type. For example, if you made endorsement settings to one image export task, those settings would also apply to any other image export task but they won’t apply to endorsements on a Copy PDF task.
Note: You can rename any of the tasks if desired, just left click once on the name to highlight and a second time to edit it. For instance, if you are exporting two different metadata files, you may want to name one ‘Opposing Metadata’ and the other ‘Our Metadata.'
Using the field editor
Any parameters that aren't accessible via a drop-down option, with the exception of Working Folder, have an ellipsis button providing access to a Field Editor for that setting.

Note: You aren’t required to use the field editor; you can enter simple data directly in the window.
The field editor is a powerful tool that provides access to all metadata captured so far in the instance, as well as numerous ways to manipulate that data.
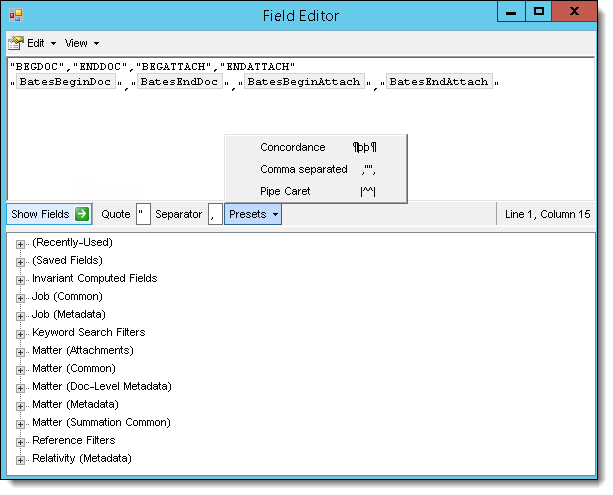
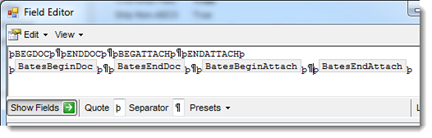
The upper pane displays what will be returned for a given parameter. In the view above you see the default fields for Metadata Content. The top line represents the header and the second line the fields of metadata.
The Show Fields button opens the lower pane which provides access to the various fields of metadata. The presets option lets you quickly change between three common delimiter settings but you aren’t limited to these.
You can enter any values you want in the Quote and Separator fields to the left. To add a field of metadata, find what metadata you want to include in your export in the lower pane and do one of three things:
- Ctrl-Left Click will add both the field of metadata to the second line as well as adding the field name to the header.
- Left Click only will only add the metadata without adding anything to the header.
- Shift-Click will add the name of the field but not the actual metadata.
Once a field is added, if it’s an editable field, you can edit it by double clicking on the field in the upper pane. Fields that are editable include dates and multi-value fields.
There are a multitude of advanced functions available under the Edit dropdown. Some are only available if you have a field of metadata highlighted. The more common features are detailed below but all of them provide a brief description if you mouse-over them. If you have questions about any of the ones not listed (or listed for that matter), contact support.
- Save this field - used to save a customized field of metadata or switch statement for use in other exports. Saving the field also allows the field to be mapped through the Relativity front end.
- Apply Formatting > Child Values - the exporter will return the corresponding metadata values of a given document’s children instead of its own. For child documents it will return its own value only.
- Apply Formatting > Parent Values - the exporter will return the corresponding metadata value of a given document’s parent instead of its own. For parent documents it will return its own value only.
- Remove Formatting - removes any applied formatting.
- File Counter - enter a customized counter that increments with every document. Double clicking on this allows you to customize the format of the number returned. This is typically used for creating subfolder names for native file and extracted text exports.
- Generic Counter - similar to the File Counter but can used to increment on any field of metadata rather than just with every document.
- Control Flow > Switch Statement - see below for information on creating a Switch Statement.
Editing dates
Use the following settings to edit dates in the field editor:
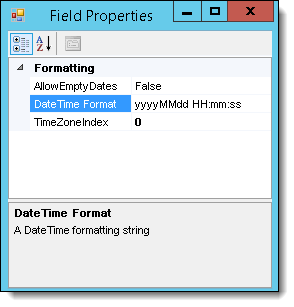
- Allow Empty Dates - True = Invalid or missing dates will return null (empty). False = Invalid or missing dates will return 1/1/1900.
- Date Time Format - you have the full Microsoft custom date and time formatting options available.
- Time Zone Index - 0 uses the time zone entered in the Job Settings. To use a different time zone on the export, enter the appropriate index number (GMT = 831169467). It may be easier to keep this at 0 and change the Job Settings instead.
Editing multi-value fields
Use the following settings to edit multi-value fields in the field editor:
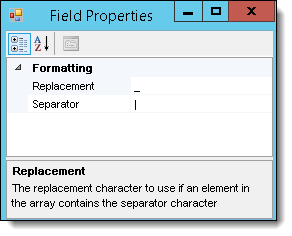
- Replacement - if the designated separator character exists in the metadata, it will be replaced with this character.
- Separator - the character to be used between each value being exported.
Note: Unlike the preset field separator values, there is no function to change all multi-value separators. If you are changing them from the default | character, be sure to change them on all multi-value fields.
Endorsing PDFs
This example illustrates how to endorse a PDF by adding a Bates number to it.
- Under Document Tasks, highlight Copy PDF files to display a list of parameters that you can set for this task.
- Expand Bates Number and Endorsement in the Parameters box.
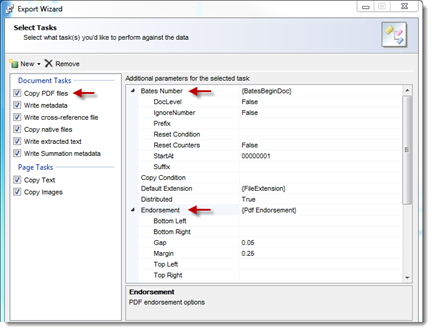
Note: The Distributed parameter is set to True by default in the previous illustration. This export job will queue up a task to the workers. The workers can then do the branding, imaging, generating PDFs and other tasks. You do need to ensure that the destination location is visible to these worker machines. When this parameter is set to False, the job will run only on the machine that you are using, but it will be multithreaded. You might disable this parameter if you were exporting to a USB drive that other machines cannot see, or if you were debugging.
- Under Bates Number, highlight Prefix. Enter text or a metadata field from the document, job settings, custodian information, or other source. In the following illustration, a variable substitution (requiring curly braces) for custodian metadata has been added to the Prefix field.
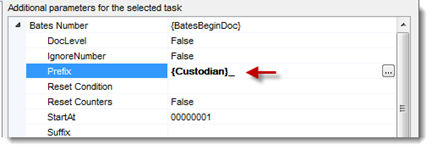
You can also edit this field by clicking the Browse button. In the Field Editor dialog box, click Show Fields to display a list of available metadata. Expand a metadata group, and double-click on a field to add it to list box.

Some fields also include statistics about the document, such as the ClientSubmitTime under Matter (Metadata). The occurrence value for this field lists how frequently it appears in the collection. You can use this occurrence information to determine if a metadata field is relevant to the current data set.
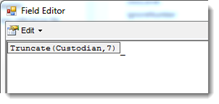
- To apply formatting, select the metadata (such as Custodian), and click Edit to display a list of formatting options.
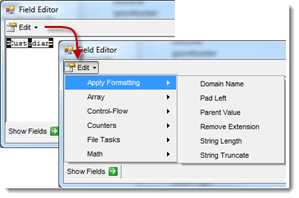
If you want to truncate the string, click String Truncate to display the Field Properties pop-up where you can define the maximum length.
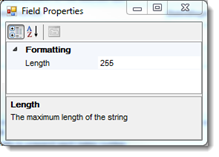
Change the default value and close the pop-up to display the Field Editor with the updated formatting information.
- Close the Field Properties and Field Editor pop-ups.
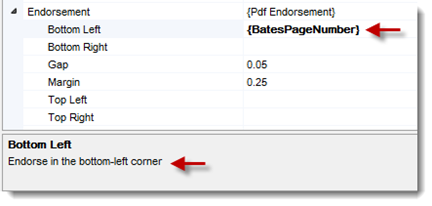
- In the Parameters box, locate Endorsement. Use the Browse button to select the metadata BatesPageNumber in Bottom Left field.
Switch statements
A switch statement is an IF/THEN/ELSE statement. A simple IF/THEN/ELSE statement might look like the following:
if (X = 1)
print “Hello”
else
print “Good Bye”
The colored text above and throughout this section corresponds to these parts of the switch statement:
A switch statement can make multiple checks against the source and return different values depending on the condition met.
The creation of a switch statement involves using two windows, the field properties window above and the Switch Comparer Collection Editor.
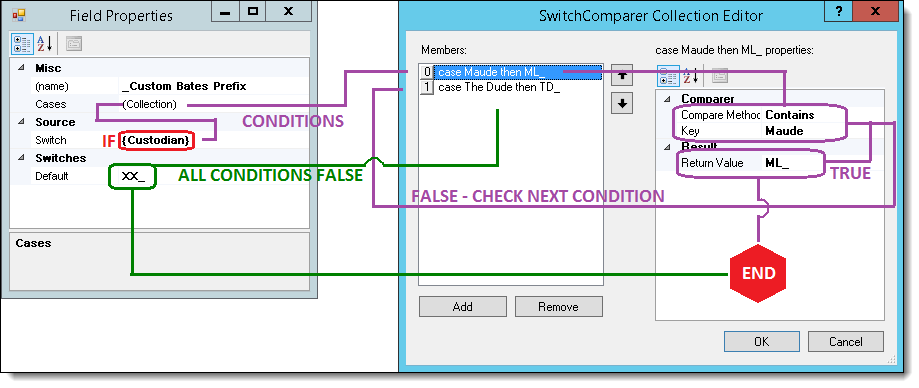
- If the Custodian contains Maude return ML_ and close the switch statement.
- If the Custodian contains The Dude return TD_ and close the switch statement.
- Else return XX_ and close the switch statement.
- You can have as many conditions as you want in your switch statement but remember that they are checked in order and the switch statement terminates on the first true condition. Because of this you must make certain that your logic for the conditions accurately covers all possibilities. Let’s say we have two custodians named John Smith and Sara Smith. Our first condition checks if the custodian name contained Smith then returns JS_ and the second condition looks for Sara and returns SS_. In this case, none of Sara’s documents would get a return value of SS_ because they all met condition 1 first, returned JS_, and the switch statement ended looking at no further logic.
- You can use switch statements inside of switch statements. It is perfectly acceptable to use another switch statement for the Key value, Return value, Default value or even the Switch value itself – or any combination of those – or use more switch statements inside those switches. This of course adds a great deal of complexity but in return the user can perform very in-depth logic calculations on the data to return exactly what is needed for the situation.
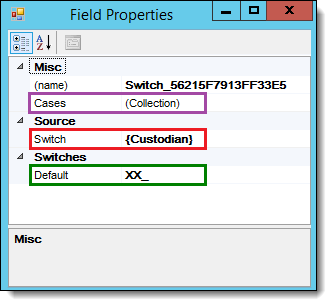
The field properties contains the following settings:
- Name - the system will automatically give a new switch statement a name consisting of a random string of letters and numbers. You can change this to fit your needs however the name of the switch must not match the name of an existing field of metadata. A simple way to avoid accidentally doing this is to precede the name of your switch with an underscore (_).
- Cases - the various checks that will be made against the entry in the switch field.
- Switch - the field of metadata or fixed value that the collection of cases is compared to.
- Default - the value to return if none of the collection of cases is true.
The Switch Comparer Collection Editor contains the following settings:
- Members pane - list of cases that will be checked
- Properties Pane - displays the definition of the highlighted case in the Members pane
- Compare Method - how the Switch value will be compared the Key. The available options are:
- Equal To
- Less Than
- Less or Equal
- Not Equal
- Contains
- Not Contains
- Greater Than
- Greater or Equal
- Key -the value the Switch is compared against.
- Return Value - the value returned if the comparison is true.
Using a switch statement for custom logic
This example illustrates how to define a switch statement used to determine the prefix applied to a Bates number.
- Under Document Tasks, highlight Copy PDF files to display a list of parameters that you can set for this task.
- Expand Bates Number, and highlight Prefix. Click the Browse button to display the Field Editor.
- Click Edit to display a list of options.
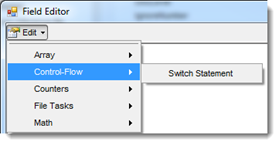
- Point to Control-Flow, and click Switch Statement.
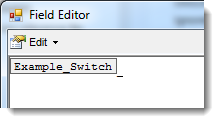
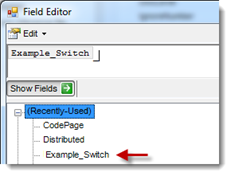
- Enter a name for the switch and a metadata field used in the Switch box. In this example, the name is Example_Switch, and a variable {Custodian} is used for the switch.
- Highlight Cases and click the Browse button.
- In the SwitchComparer Collection Editor, click Add.
- In Compare Method, select an option. This example uses Contains.
- Enter a value in the Key and Return Value fields. Click Add. As illustrated below, the first key-value pair are Doe and DOE_, while the second is Smith and SMITH_. When the custodian contains one of these names, the associated prefix will be added to the Bates number.
- Click OK to display the Field Properties dialog box. For this example, the default switch is UNK_.
- Close the dialog box to display the Field Editor with the new switch.
- Highlight the switch, and click Edit. Select Save this Field from the menu.
- In the Save Field As dialog box, enter a name for the switch. This field is now added to the Recently_ Used list under Show Fields, and be reused as necessary.
- Close the dialog box.
Setting metadata content and folder path
This example illustrates how you can set the metadata fields written to a file, and how to set a Working Folder path.
- Under Document Tasks, highlight Write metadata to display a list of parameters that you can set for this task.
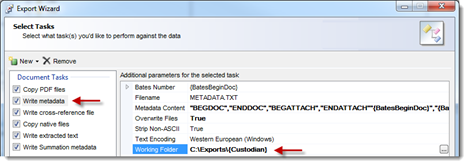
- Highlight Working Folder. Enter a folder path or click the Browse button to select one.
Consider the following when defining a Working Folder path:
- This is a shared field among the Document and Page tasks. For example, when you use this field for one task, it populates for all tasks with the Working Folder field specified.
- You can't specify a separate folder for separate tasks.
- You can also use variables in the folder path.
- This example uses metadata as a variable, so that each custodian has an individual folder: c:\Exports\{Custodian}
- Highlight Metadata Content, and click the Browse button to select the metadata fields to include in the file as described in the previous section.
- Click Presets to select a delimiter for use in the file.
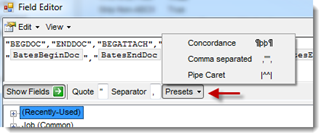
For example, select Concordance to separate the metadata fields as illustrated below:
- Close the dialog boxes.
Defining a copy condition
You can set up a copy condition that permits the file to be copied only when the given expression returns true. In this example, a copy condition is defined for native files.
- Under Document Tasks, highlight Copy native files to display a list of parameters that you can set for this task.
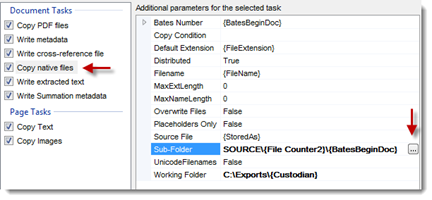
- Click Copy Condition to display the Field Editor.
- Enter your own custom fields or click Show Fields to select them.
- Close the dialog boxes.