


Feedback
Importing entities via Integration Points
Importing data via Microsoft Azure AD and a CSV file is important to the legal hold process.
For more information, see Integration Points.
Importing from Microsoft Azure AD
Use the Integration Points application with Azure AD Provider to import Custodians directly into your workspace.
For testing purposes, limit the number of custodians to be imported. If using the User Principal Name as authentication verification information, map the field during setup of Integration Points AAD integration. We recommend mapping it to an existing column UserName. If UserName is already mapped to some other field, it is necessary to create a new Entity field prior to setting up Integration Points AAD integration.
We recommend you import the custodian which corresponds to you, matching your corporate account by email to help with troubleshooting process.
The Integration Points Azure AD Provider is a separate and standalone application that is not in the Relativity Application Library. For assistance in getting the Azure AD Provider installed into your workspace, contact Relativity Support. For more information, see Integrating Azure AD for Importing Custodians.
You will need the following to complete the setup in Integration Points:
- Application ID from Microsoft Azure
- Application Secret from Microsoft Azure
- Domain address of Microsoft Azure instance
- Any filtering requirements that will be used to filter imported data
- Field Mappings to map fields between Relativity and Microsoft Azure AD
To create an integration point for importing from Azure AD, follow the steps below.
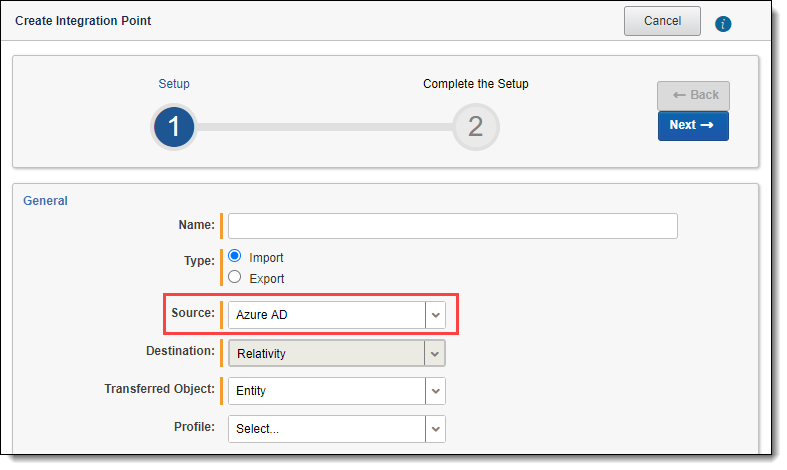
- Complete the following fields in the Set Integration Details layout:
- Name - the name of your integration for reference purposes.
- Name the application in Integration Points the same as you did in Azure AD for easy location of application when needing to make updates.
- Type - select Import to designate the job as a data import. Selecting Import makes all the possible import sources available for selection in the Source field below.
- Source - all possible third-party systems that you can import data from. Select Azure AD.
- Destination - by default, this is set to Relativity and isn't editable when you select Import as the type, since you've already designated that you want to import into a Relativity workspace. You'll select the specific workspace on a subsequent layout.
- Transferred Object - the Relativity Dynamic Object (RDO) to which you want to import the data. Select the Entity object.
- Profile - complete the remaining Integration Points settings based on the settings of a saved profile. This includes all of the fields in the Connect to Source layout, as well as field mappings. If no profiles exist in the workspace, you don't have the option of selecting them. To apply a profile that you've already created, select it from the drop-down list.
- Email notifications - the email address(es) to which Integration Points sends a notification detailing whether the sync succeeded or failed. Use semicolons between addresses.
- Log errors - select Yes or No to denote whether Integration Points tracks item level errors.
- If you select Yes, each job also logs any item level errors. For example, a fixed length text field not being large enough to contain an imported value.
- If you select No, Integration Points doesn't log item level errors.
- Regardless of your selection, job-level errors are always recorded in Relativity.
- Enable Scheduler - gives you the option of scheduling additional imports. Selecting Yes makes the following fields available:
- Frequency - the interval at which Relativity syncs once every day.
- Daily - select this option to sync once every day.
- Weekly - select this option to sync on a weekly basis. You can specify how often in the Reoccur field, in which you'll provide a number value in Every # week(s) choice. You can then specify on which day of the week the sync will take place by checking any of the days of the week listed.
- Monthly - select the day of the month that you want this integration point to sync once every month.
- Reoccur - enter the number of months in which this integration point recurrently syncs.
- Send on
- Day _ the month - select the day of the month that you want this integration point to sync.
- The __ of the Month - select this option for this integration point to sync on the chosen day of every month. For example, The Second Friday of the month."
- Start Date - the date you want Integration Points to start syncing the data.
- End Date - (Optional) the date you want Integration Points to stop syncing the data. Leaving the End Date blank causes the integration point to run indefinitely at the scheduled interval.
- Scheduled Time - the time at which this integration point syncs. This time is local to your PC, not the server.
- Frequency - the interval at which Relativity syncs once every day.
- Name - the name of your integration for reference purposes.
- Click Next to continue to the Connect to Source layout.
Connect to source
Continue to create your import integration point by connecting Relativity to your Microsoft Azure AD data source. You can select to import from your commercial or government Azure AD profile. Follow the steps below.
- Complete the following fields in the Connect to Source layout:
- Version - You can select either a Commercial or Government Azure AD version to import from.
- Application ID – The ID of the application was created in the Azure Portal. For more information, see the Finding Azure credentials.
- Password – The associated Application Secret is the password for the application that was created in the Azure Portal. For more information, see the Finding Azure credentials.
- Directory ID – The Azure AD tenant domain the Azure application resides in.
- Filter By – You can limit the records imported by limiting import to specific users or groups.
- Filter – The filter condition used to identify Users or Groups that should be imported. Filters must be written using the Graph query syntax (e.g. department eq ‘Engineering’).
- MS-Graph Version – Determines which version of the Graph API Integration Points will use when interfacing with Azure AD. Defaults to version 1.0 of the Graph API if left blank. Another available option is Beta.
- Click Next to continue to the Map Fields layout.
- A warning message appears at top of page if not validated. Can’t move to next step until error is resolved.
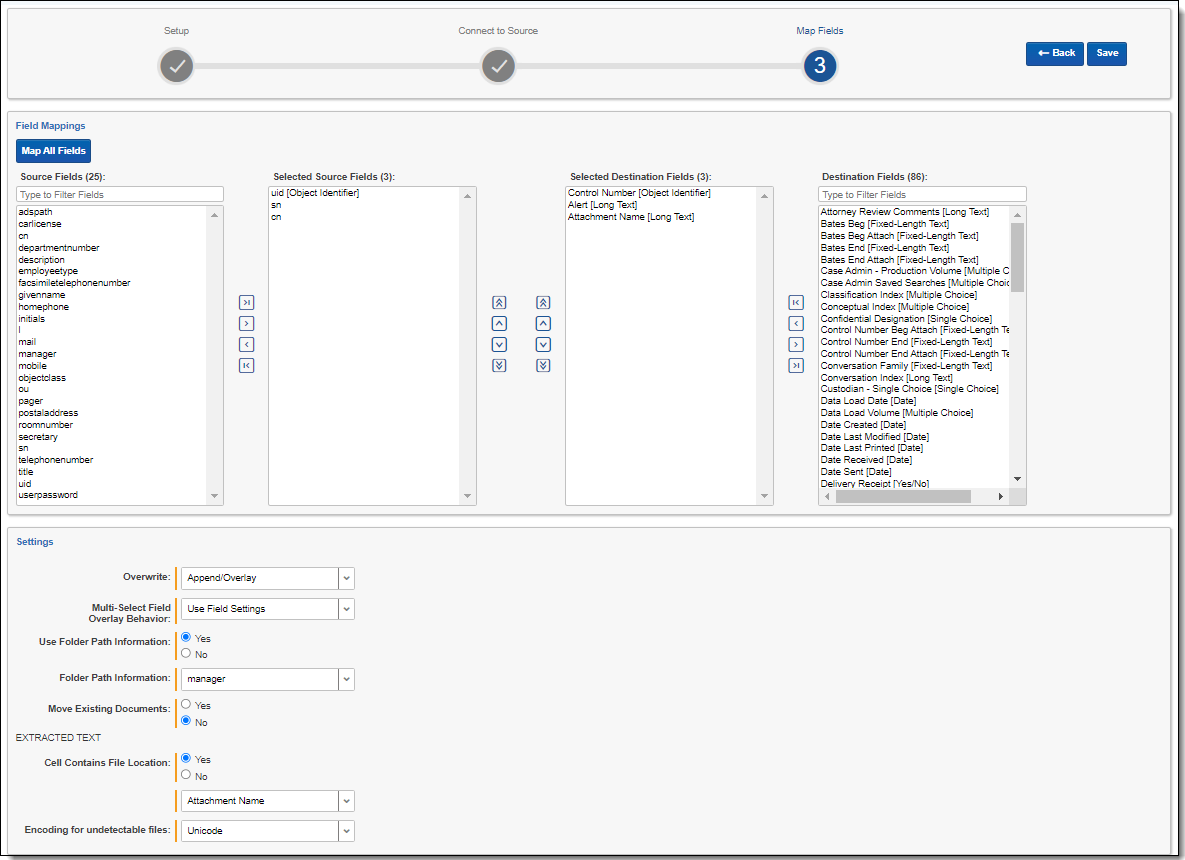
Map the fields
Map the attributes or fields so that Integration Points imports the targeted data into specific Relativity fields.
- Map the fields from the Destination (workspace) to the Source (load file) so that Integration Points imports the targeted data into specific Relativity fields. Microsoft Azure AD software integration contains the following default Source mapped fields. The Destination fields are dependent on what fields currently exist in your workspace.
- If Relativity can't locate fields in your workspace for the default mapping, Relativity moves these fields to the bottom of the Source list. You can either map these fields to other workspace fields, or remove them from the list.
- (Optional) Add or remove any fields from the field mapping based on your preferences. Click Map Fields to map default selections.
- Rename Relativity fields to match Microsoft to increase the number of auto-mapped fields. You still may have to manually update fields after auto-mapping.
- Complete the following fields in the Settings card:
- Overwrite - includes options to Append Only, Overlay Only, or Append/Overlay. By default, the application selects Append Only.
- Multi-Select Field Overlay Behavior - only available if Overlay Only or Append/Overlay are selected in the Overwrite field. This field determines how the system will overlay records when you push documents to the review workspace. This field provides the following choices:
Merge Values - merges all values for multi-choice and multi-object fields in the source data with corresponding multi-choice and multi-option fields in the workspace, regardless of the overlay behavior settings in the environment.
- Replace Values - replaces all values for multi-choice and multi-object fields in the source data with corresponding multi-choice and multi-option fields in the workspace, regardless of the overlay behavior settings in the environment.
Use Field Settings - merges or replaces all values for multi-choice and multi-object fields in the source data with corresponding multi-choice and multi-option fields in the workspace according to the overlay behavior settings in the environment.
- Unique Identifier – includes the options from the mapped fields. Use the default UniqueID option. In Azure AD, map the UniqueID to the ID field to guarantee future custodian updates.
- Entity Manager Contains Link – this Yes/No field is only visible when you select the Entity RDO from the LDAP source provider, and lets you indicate if Legal Hold should expect a linked value in the manager field from LDAP.
- Click Save.
Once all of the settings have been entered the Integration Points job will run according to the schedule that was set. If you would like to run the job ahead of that time. For more information, see Running the import job.
Reporting on Azure AD imports
Reporting on Azure AD imports can be done in Integration Points. For more information, see Monitoring job history and errors.
Importing a CSV file
See the steps for importing a CSV file
Setup
To create an integration point for importing an FTP (CSV file), perform the following steps:
- Complete the fields in the Setup layout:
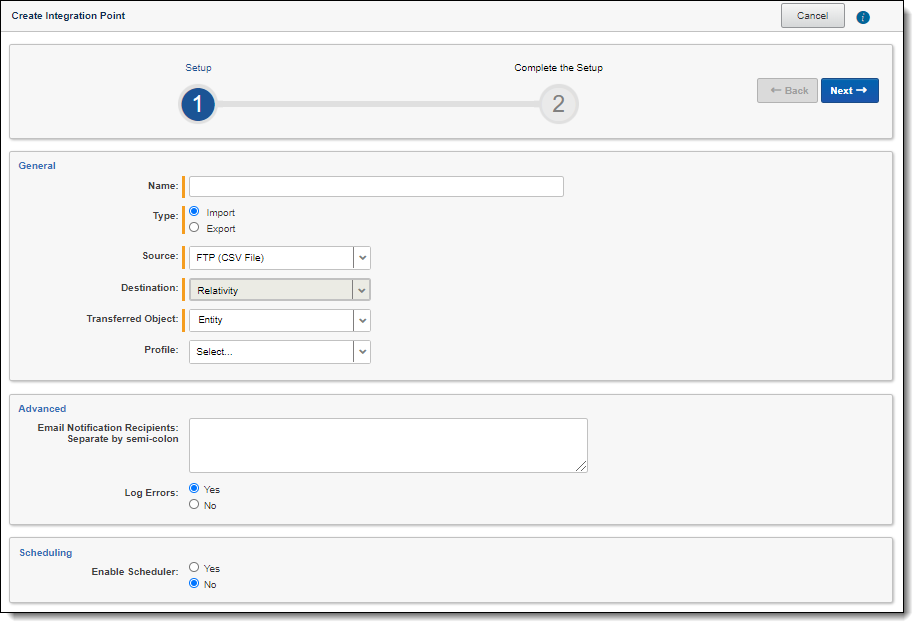
- Name - the name of your integration for reference purposes.
- Type - select Import to designate the job as a data import. Selecting Import makes all of the possible import sources available for selection in the Source field below.
- Source - select FTP (CSV File) to sync to a Custodian list on an FTP Server to automatically update custodian information in your workspace. We strongly recommend using a secured FTP server and not using anonymous authentication.
- Destination - by default, this is set to Relativity and is uneditable when you select Import as the type, since you've already designated that you want to import into a Relativity workspace. You'll select the specific workspace on a subsequent layout.
- Transferred Object - select the specific Relativity Dynamic Object to which you want to import the data. If you're importing the entity object, select Entity here.
- Profile - complete the remaining Integration Points settings based on the settings of a saved profile. This includes all of the fields in the Connect to Source layout, as well as field mappings. If no profiles exist in the workspace, you don't have the option of selecting them. To apply a profile that you've already created, select it from the drop-down list. For more information on profiles, see Integration Points profiles.
- Email Notification Recipients - enter the email addresses of those who should receive notifications of whether the integration point export succeeded or failed. Use semi colons between addresses.
- Log Errors - select Yes or No to denote whether Relativity tracks item level errors.
- If you select Yes, each job also logs any item level errors.
- If you select No, Relativity doesn't log these item level errors.
- Regardless of your selection, job-level errors are always recorded in Relativity.
- Enable Scheduler - gives you the option of scheduling additional imports. Selecting Yes makes the following fields available:
- Frequency - the interval at which Relativity syncs this integration point.
- Daily - select this option to sync once every day.
- Weekly - select this option to sync on a weekly basis. You can specify how often in the Reoccur field, in which you'll provide a number value in the Every # week(s) choice. You can then specify on which day of the week the sync will take place by checking any of the days of the week listed.
- Monthly - select the day of the month that you want this integration point to sync once every month.
- Reoccur - enter the number of month(s) in which this integration point recurrently syncs.
- Send On
- Day _ the month - select the day of the month that you want this integration point to sync.
- The _ _ of the Month - select this option for this integration point to sync on the chosen day of every month. For example, "The Second Friday of the month."
- Start Date - the date that you want Integration Points to start syncing the data.
- End Date - (Optional) the date that you want Integration Points to stop syncing the data. Leaving the End Date blank causes the Integration Point to run indefinitely at the scheduled interval.
- Scheduled Time - the time at which this integration point syncs. This time is local to your PC, not to the server.
- Frequency - the interval at which Relativity syncs this integration point.
- Click Next to advance to the Connect to Source layout.
Connect to source
Continue create your import integration point by connecting Relativity to the data source. Follow the steps below.
- In the Connect to Source layout complete the following fields:

- Connection Information
- Host - the FTP (File Transfer Protocol) or SFTP (SSH File Transfer Protocol) server address. For example, filetransfer.example.com. If Relativity can't locate this address, you will receive an error stating that the remote couldn't be resolved, and you won't be able to proceed.
- Protocol - select the FTP or SFTP protocol.
- Port - the server port to which you want to connect. The FTP protocol default Port number is 21. The SFTP protocol default Port number is 22. The standard network ports 21 or 22 should be open on both Relativity and FTP server for outgoing connections from Relativity's Web and Agent servers and for listening (FTP server). Some firewall solutions may impact the connectivity between Relativity and the FTP server.
- If you need to open any port, please contact Relativity Support and allow at least three days to respond. Opening a new port for your Relativity instance requires a Security assessment. To successfully import an FTP (CSV file), the standard network ports should be open on both Relativity and FTP server for outgoing connections from Relativity's Web and Agent servers and for listening (FTP server). Note that the firewall solutions may impact the connectivity between Relativity and the FTP server.
- Username - (Optional) the username to use for authentication. If left blank, Integration Points will use "anonymous."
- Password - (Optional) the associated password to use for authentication. If left blank, Integration Points will use "anonymous."
- File Information
- CSV Filepath - the location of the CSV file that Integration Points imports from the FTP/SFTP server. If you set the generated CSV file to always include the date, you can specify this file path value to use date wildcards so that Integration Points always imports the latest file. For example, the following file path will import the most recently dated file:
/export/nightlyexport/*yyyy*-*MM*-*dd*_HRIS_export.csv- Wildcards are case sensitive.
- The wildcard feature only pulls data from a file name with the current date.
- You can also use hh:MM:ss for hours, minutes, and seconds, with capital M's for minutes. When using times, only file names within the last hour are found.
- CSV Filepath - the location of the CSV file that Integration Points imports from the FTP/SFTP server. If you set the generated CSV file to always include the date, you can specify this file path value to use date wildcards so that Integration Points always imports the latest file. For example, the following file path will import the most recently dated file:
- Click Next to advance to the Map Fields layout, which contains a list of Relativity fields from their destination RDO as well as attributes that the source provider pulled back.
Map fields
Map the attributes or fields so that Integration Points imports the targeted data into specific Relativity fields.
- In the Map Fields wizard, you have the following options for mapping fields:
- Use the Shift + click and Ctrl + click method to select multiple fields at a time, similar to field mapping in the Relativity Desktop Client.
- Use the single and double arrows or double-click a field to move selected fields between columns.
- The field names in the Destination column include the type of each field listed.
- Click the Map Fields button between the Source and Destination columns to automatically map all fields with matching names. If you have Destination fields that are mapped to Fields in the Field Catalog, Relativity tries to find name matches between these Catalog Fields, as well.
When mapping fields there are items to note:
If the WebAPIPath instance setting in the kCura.IntegrationPoints section isn't configured correctly after upgrade or installation, the Source field list is empty because it can't return any attributes, and you aren't able to map fields.
You don’t need to map all attributes or fields. Only the Unique Identifier and Object Identifier are required. The Unique Identifier should contain a value that no other item in the workspace contains. For example, use the GUID or Unique Name. The Object Identifier is the specific field on the object that holds the displayed identifier, which might not be unique. For example, the Full Name field is the Object Identifier of the Entity RDO but it might not be unique. These two identifier values can be the same.
The Full Name field is not available as an option for mapping. If you need to update the entity object, please use the LDAP provider. The LDAP provider allows the addition of new records with a field other than Full Name as the identifier. Alternatively, you may consider using Relativity Desktop Client for entity updates.
- Complete the following Import Settings on the Map Fields layout:
- Overwrite - determines how the system overwrites records once you promote data to the review workspace. This field provides the following choices:
- Append Only - promote only new records into the review workspace.
- Overlay Only - update existing records only in the review workspace. Any documents with the same workspace identifier are overlaid. This field acts as a link indicating to Relativity where to import the data. When you select this or Append/Overlay, you must complete the Multi-Select Field Overlay Behavior field described below.
- Append/Overlay - adds new records to the review workspace and overlays data on existing records. When you select this or Overlay Only, you must complete the Multi-Select Field Overlay Behavior field described below. You aren't able to create folders or re-folder documents when you select Append/Overlay.
- Multi-Select Field Overlay Behavior - determines how the system overlays records when you promote documents to the review workspace. This field is only available if you've selected either Overlay Only or Append/Overlay above. This field provides the following choices:
- Merge Values - merges all values for multi-choice and multi-object fields in the source data with corresponding multi-choice and multi-option fields in the workspace, regardless of the overlay behavior settings in the environment.
- Replace Values - replaces all values for multi-choice and multi-object fields in the source data with corresponding multi-choice and multi-option fields in the workspace, regardless of the overlay behavior settings in the environment.
- Use Field Settings - merges or replaces all values for multi-choice and multi-object fields in the source data with corresponding multi-choice and multi-option fields in the workspace according to the overlay behavior settings in the environment.
- Copy Native File - indicate whether Integration Points copies any native files while syncing data between the source and destination workspaces.
- Select No to not create additional copies of your natives. Doing this maintains a single copy of that data file no matter how many times you use the document in your workspace.
- You have the option of selecting No for an initial run of an integration point and then Yes for a subsequent run. Doing this saves you time on the initial job while then retaining copies of the native files on the final job.
- The benefit of selecting No for this field is that you save on storage and speed, as it tells the system to look for a file path in the source workspace.
- If you delete the source workspace, you also delete your source files. If you need to eventually delete the source workspace, then select Yes for this field.
When you copy natives, Relativity makes a copy of all the files in the source folder on the hard drive or network share, adds those copies to the EDDS repository, sets the InRepository column on the File database table to 1(true) to indicate that a copy exists, and updates the Location column on the File table to list the new copied location. Relativity then refers to the new location when facilitating integration points or processing jobs.
- Use Folder Path Information - use a metadata field to build the folder structure for the documents that you promote to the review workspace.
- Select Yes to use a metadata field to build the folder structure for the documents that you promote to the review workspace. Selecting Yes makes the Folder Path Information field required below.
- Select No if you don't want to build a folder structure based on metadata. In this case, Relativity loads all documents directly into the folder indicated by the promote destination, and you create no new folders in the destination workspace.
- Folder Path Information - specify a metadata field to build the folder structure for the documents that you promote to the review workspace. For the purposes of ECA and Investigation, select the Processing Folder Path option.
- Unique Identifier - for every import, you must select a field that contains the unique identifier, a field with a primary key such as a Control Number or an ArtifactID, for the specific import. If you select an Overlay or Append/Overlay to run, Integration Points uses this field as the key to determine which records already exist in the Relativity workspace.
- Use Folder Path Information - select a source field in the drop down that contains a folder path structure that you want to be created in the workspace for your documents to be placed into.
- Extracted Text - select the destination field that is mapped to a path to Extracted Text files. The content of these files will be read into the selected field. Note that only Long Text destination fields that are mapped will show up as options in the Extracted Text dropdown. You can select an encoding type for the extracted text files as well.
- Import Native Files - this Yes/No field is only visible when you select the Documents RDO, and lets you indicate whether Integration Points should import any native files in the sync.
- Native File Path - this field appears if you select Yes to import the native files. From the drop-down menu, select the source provider attribute containing the file path links to the natives that you want to import.
- Custodian Manager Contains Link - this Yes/No field is only visible when you select the Entity RDO from the LDAP source provider, and lets you indicate if Legal Hold should expect a linked value in the manager field from LDAP.
- Overwrite - determines how the system overwrites records once you promote data to the review workspace. This field provides the following choices:
- Click Save to save the Integration Point.
(Click to expand)
Once you save the Integration Point, you can run the import job. For more information, see Running the import job.