


Feedback
Authentication
Relativity uses several industry-standard technologies, enabling versatile authentication options. It supports local, such as password related, or external, such as external identification providers, authentication methods. You can add and enable each type individually, as well as assigning at least one, and in some instances multiple methods, for each user.
If you are upgrading from a prior version of Relativity, there are some important differences to be aware of. See the following page:
Authentication overview
Review the following sections to learn more about the authentication methods, the object model, and the permissions model supported by Relativity:
Relativity supports the following authentication mechanisms.
- Password—a method that includes a username, the user's email address, and a password.
- RSA—a method using an RSA SecurID token, a third party security solution, and validates credentials from an RSA server.
- Active Directory—a method using an email address and user's Active Directory password.
- Integrated Authentication—previously called Windows authentication. A method using a directory service, such as Kerberos or NTLM (NT LAN Manager). The authentication attempt is automatically initiated if the user logs in from a specific IP address range.
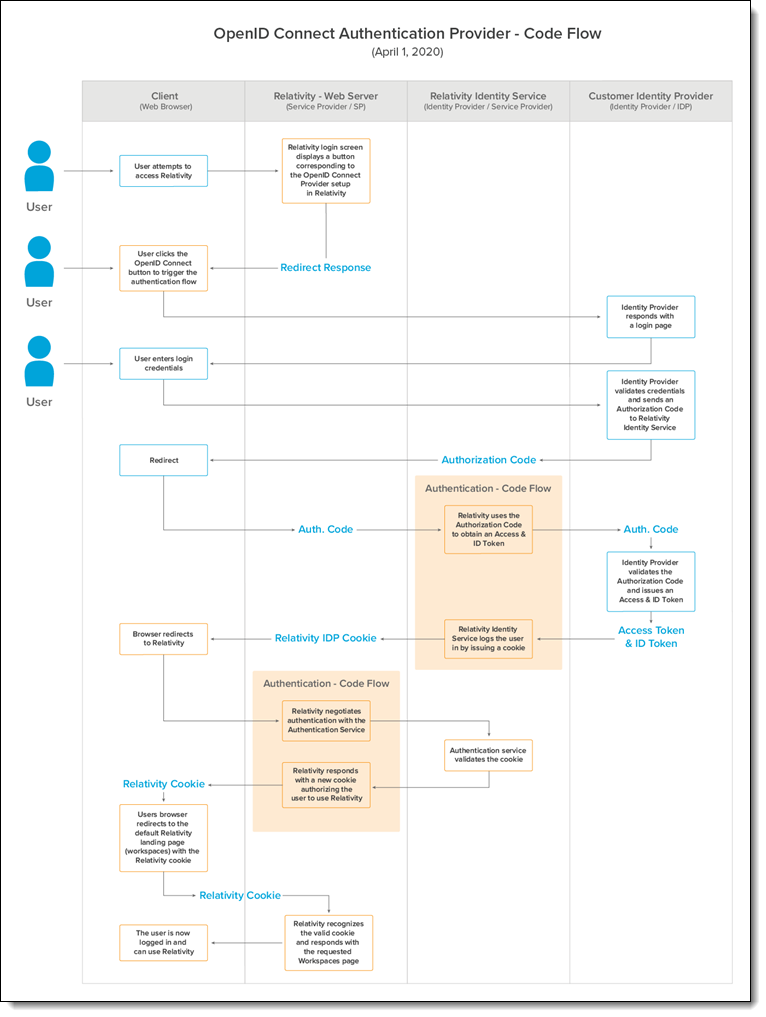
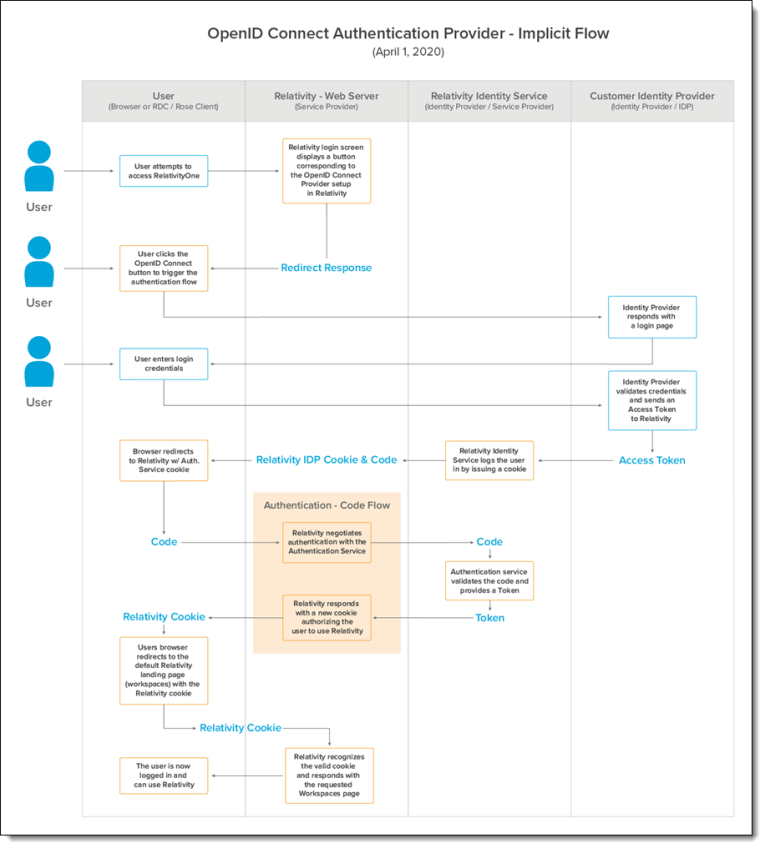
- OpenID Connect—a protocol for an external identity provider, authenticating against an external identity provider using the OpenID Connect protocol. OpenID Connect is a modern authentication protocol can be used to connect to providers such as Azure Active Directory. See OpenID Connect for more information.
- SAML 2.0—a method that authenticates against an external identity provider using the SAML 2.0 protocol. SAML 2.0 is an older authentication protocol that is still in widespread use. See SAML 2.0 for more information.
- When implementing single sign-on (SSO) across Relativity instances, the following scenarios are supported:
- Identity Provider-initiated SSO using SAML 2.0
- ID provider and service provider-initiated SSO with OpenID Connect
In addition to the above protocols, Relativity has the following additional authentication features:
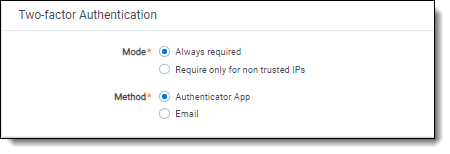
- Two-factor Authentication—when logging in with the Password method, you can require the user to pass an additional two-factor check based on an email or message sent to the user's phone through a mobile email gateway.
- Mode—always required or require only for non-trusted IPs
- Method—authenticator app or email. For more information, see the authenticator app's documentation.
- Trusted IP Range—limit access to the Relativity application based on the user's source IP address.
Relativity provides several tabs or object types that are used to configure authentication. By combining these object types, the system admin is able to control the Relativity login page and authentication options for the users in the environment.
Authentication Provider Type. Each authentication protocol is represented by an Authentication Provider Type object. You can navigate to the Authentication Provider Type tab in Home mode to see all of the environment's protocols and whether they are enabled or not. In Relativity you can disable specific Provider Types that you do not intend to use in your environment. As a best practice you should disable any Provider Types that will not be used.
Users log in to the Relativity Desktop Client (RDC) with the same provider method as they have with Relativity. The RDC supports most Relativity authentication providers, such as password, Integrated Authentication, and OpenID Connect, by displaying the Relativity login page within the RDC as a dialog window. The only provider that does not work with the RDC is SAML because the Relativity’s IdP-initiated SAML does not display the Relativity login page directly.
Authentication Provider. Authentication Providers allow you to configure the specific settings for a login protocol. For example, you can add the Password Provider to your environment to set minimum and maximum password length, password history settings, and more. Some protocols have multiple configuration options, while others have very few. Every instance of Relativity has Default Password
You can add OpenID Connect and SAML 2.0 external identity providers. Unlike the previous five protocols, you can have as many of these Providers as you wish in an environment.
Login Method. The AuthenticationData field on the User page has been replaced with the Login Method associated list. Users can have one or more Login method objects that binds that user to a particular Authentication Provider. For example, if you have a Password Authentication Provider in the environment, the Password Login Method contains the specific password for a given user. If you have Azure Active Directory configured as a Provider, each user's AAD subject identifier would be stored in an associated Login method.
User. The User object still holds the TrustedIPs setting. By setting a TrustedIP for a user, that user will only be able to authenticate with Relativity from that IP range. All other authentication-related fields have been moved from the User object to the Provider and Method objects.
These default object permissions are recommended for managing user authentication:
- System admins only—full permissions, including view, update, delete, secure, add
- Authentication Provider Type
- Authentication Provider
- Login Method
- OAuth2 Clients
- Anyone with the ability to view a user—view
- Authentication Provider Type
- Authentication Provider
- Login Method
- Anyone with the ability to edit a user—update, delete, add
- Login Method
Configuring Relativity authentication
System admins must assign users at least one authentication method in order for users to log in. To create and to assign methods, follow these steps.
Authentication Provider Types are Relativity dynamic object (RDOs) types that permit authentication methods for users to log in with. You cannot add or delete provider types, only enable or disable them. By default, provider types are enabled. You enable methods in two places: the authentication provider type tab and the authentication providers tab. To be enabled, the method has to be enabled in both places.
To enable or disable an authentication provider type:
- Select Authentication Provider Type tab.
- Click on a provider type name. The Authentication Provider Information section appears.
- Click Edit.
- Select Enabled status Yes or No. Yes enables those methods, and No disables them throughout the Relativity instance.
- Click Save.
Authentication providers are instances of authentication provider types. You create only the instances of the provider types you need. For example, if you plan to support only password methods, you only have to create an authentication provider for passwords, and not for any other provider types.
Adding a new authentication provider of the same type overwrites the existing ones of the same type.
You may only have one instance of each provider type. The exceptions are for OpenID Provider and SAML 2.0 provided types. You can have multiple instances of those if they have different names.
To create an Authentication Provider:
- Select the Authentication Provider tab.
- Click the New Authentication Provider button.
- Enter a Name. This is the friendly name of the provider instance.
- Optionally select the Enabled status. By default, each authentication provider is enabled. If not enabled, then users cannot log in with that method.
- Select a Provider Type from among the authentication provider types. You can select OpenID Connect or SAML2.
The Authentication Provider Settings section appears. - Set the Authentication Provider Settings, if any. See Authentication provider settings for the specific method.
- Click Save.
You assign an authentication method to each user for them to log in with. Each user must have at least one authentication method in order for them to log in but you may assign multiple methods. See Managing user authentication methods.
Authentication provider settings
Authentication providers may have associated settings that you can configure and applies to all instances of that authentication provider.
Each provider instance has at least one setting: Enabled. If set to Yes, this authentication provider is available. If No, you cannot use this method to log in with. To enable an instance both this setting and the Enabled for the Authentication Provider must be set to Yes. If either one is set to No, that method is not available for the user.
Authentication providers that do not require additional settings:
- Default Integrated Authentication provider
- Default Active Directory provider
- Default RSA provider
You may need to set RSA configuration files to the web server prior to users logging in with this method.
Authentication providers that require additional settings:
- Default Password provider
 View additional settings for the Default Password provider
- Minimum Password Length—sets the minimum number of characters for a password.
- Maximum Password Length—sets the maximum number of characters for a password.
- Maximum Password Attempts Before Reset Required—sets the maximum number of consecutive unsuccessful login attempts before being locked out. You must send the user a password reset request before they can attempt to log in again.
- Maximum Password Age (in days)—sets the maximum number of days a password remains valid. The user will be prompted for a new password on a log on at the expiration date. If set to zero, the password does not expire.
- Users Can Change Password Default—enables the user to change their password.
- Allow Password Recovery via Email—enables the user to use email to recover a forgotten password. Yes displays the Forgot Password link on the user's login screen.
- Password Recovery Request Limit—sets the maximum number of password resets before Relativity locks out the user. You must send the user a password reset request before they can attempt to log in again. This value resets to zero on each successful log in.
- Maximum Password History—sets the maximum number of previous passwords that users cannot use for a new password. The default value of zero enables any previous password.
- Additional Work Factor—increases the number of encryption hashes. Relativity already provides several built in hash levels represented by the default zero value. Changing this value to 1, 2, or 3 adds additional encryption protection but may significantly increase login time.
The following non-alpha-numeric characters are not allowed: \, ", <, >, £ in passwords.
- Default smart card provider
View additional settings for the Default smart card provider
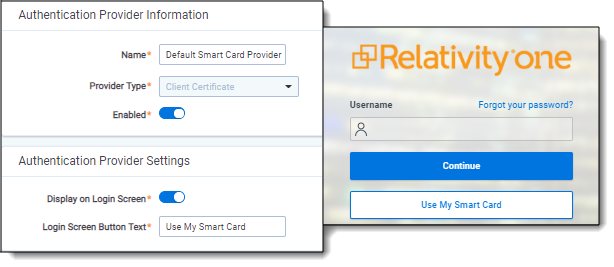
- Display on Login Page—determines if the client certificate button displays in the login screen.
- Login Screen Button Text—sets the client certificate button text.
The example below illustrates the relationship between the two settings and the login screen.
- OpenID Connect with Microsoft Azure AD—see OpenID Connect with Microsoft Azure AD.
- SAML 2.0 provider—see SAML 2.0 provider.
OpenID Connect with Microsoft Azure AD
OpenID Connect 1.0 is a simple identity layer on top of the OAuth 2.0 protocol. Clients can verify the identity of the end-user based on the authentication performed by an authorization server, as well as to obtain basic profile information about the end-user. You can use any provider that supports the OpenID Connect protocol. The examples here use Microsoft Azure AD.
OpenID Connect 1.0 authentication providers are not compatible with Relativity User Load Balancing (RULB).
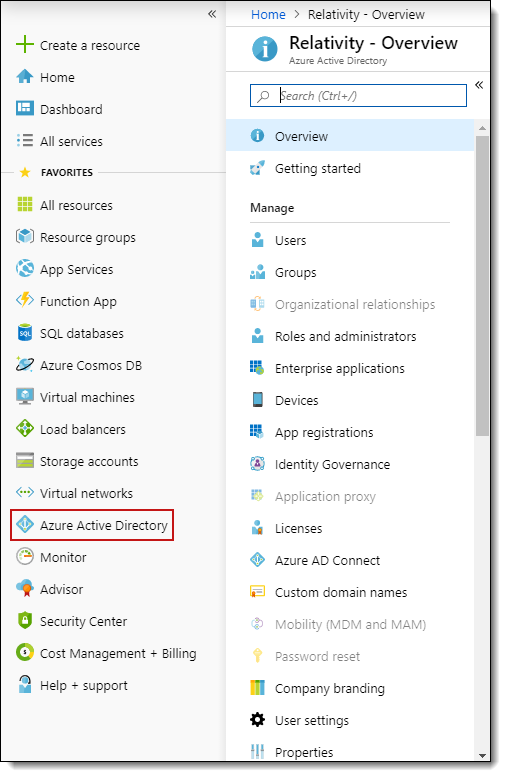
- Log in to Azure Portal.
- Click Azure Active Directory.
(Click to expand.)
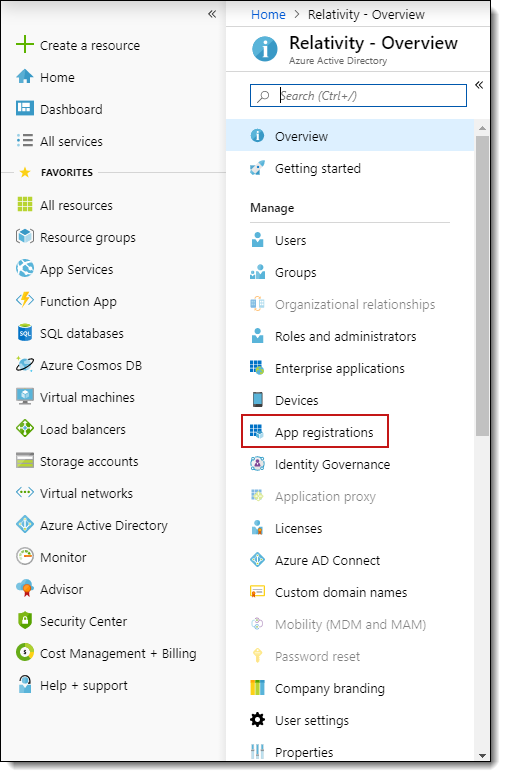
-
Click App registrations.
(Click to expand.)
- Click New registration.
- Give the application a name.
(Click to expand.)
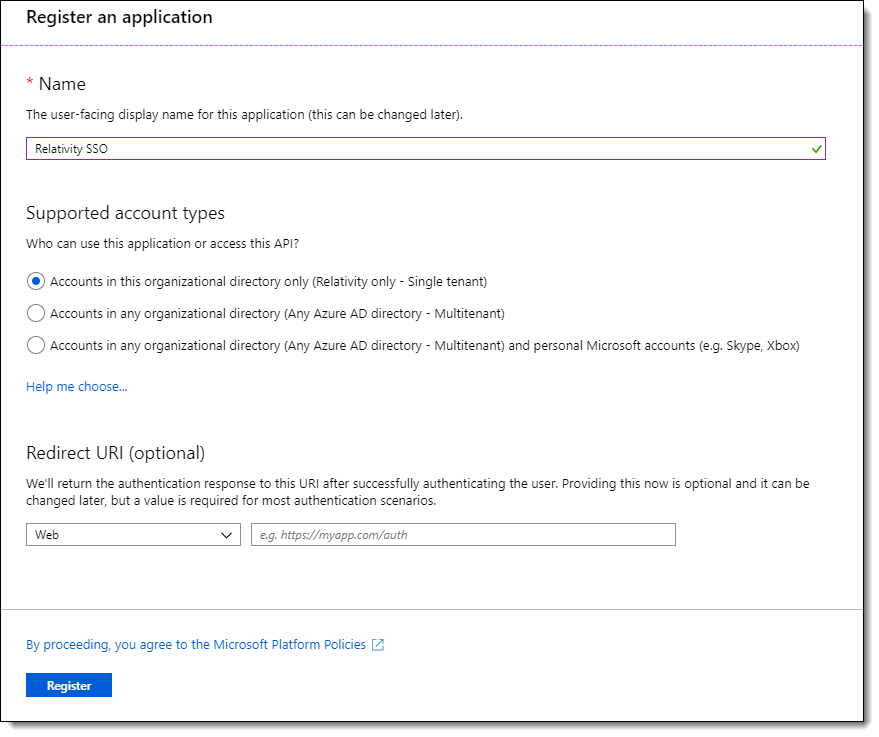
- Click Register.
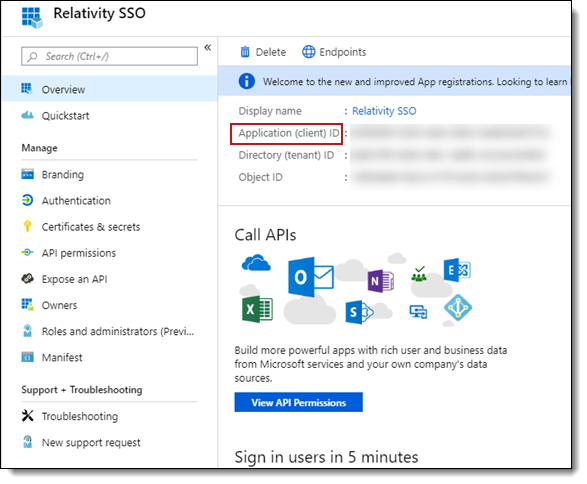
-
Copy the Application (client) ID.
(Click to expand.)
- Click the Endpoints button.
(Click to expand.)
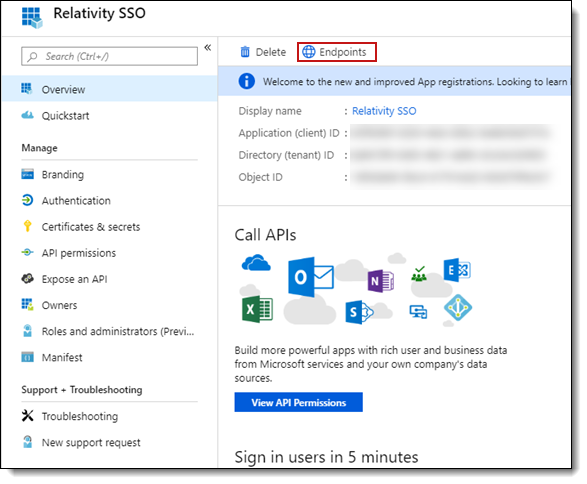
- Copy the OAuth 2.0 authorization endpoint (v2) URL.
-
Trim the oauth2/v2.0/authorize from the URL. For example:
https://login.microsoftonline.com/8a3fa923-3223-4978-9d4d-fa012e19898b/oauth2/authorize
https://login.microsoftonline.com/8a3fa923-3223-4978-9d4d-fa012e19898b/
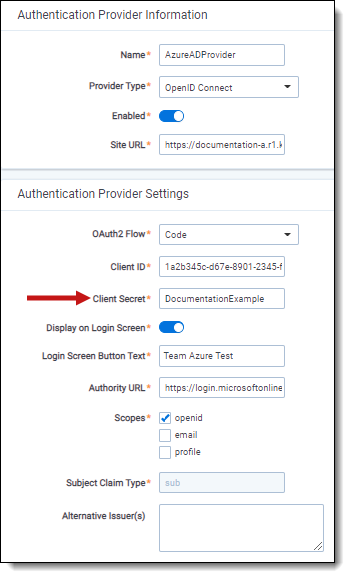
Review the following list of settings that display on the Authentication Provider form. You can configure or update these settings based on your authentication needs.
Authentication Provider Information
- Name—enter a user-friendly name for the authentication provider.
- Provider Type—select OpenID Connect.
- Enabled—the provider is enabled by default. However, you can disable it.
- Site URL—set the URL that users enter in the browser to access an instance of Relativity.
Authentication Provider Settings
- OAuth2 Flow—select either Implicit or Code.
- Client ID—enter the Azure AD's Application ID.
- Display on Login Screen—determines if the OpenID Connect button displays on the login page.
- Login Screen Button Text—determines the text that appears on the button displayed on the login page.
- Authority URL—enter the Authority from the trimmed OAUTH 2.0 AUTHORIZATIONENDPOINT from step 9 in Configuring your external identity provider.
- Scopes—the default value for this field is openid. The openid checkbox must be selected because it is a required setting. However, you can also select the email or profile option.
The identity provider responds with the claims associated with the scopes that you request. In other words, the scopes translate into claims that you can use.
- Subject Claim Type—the default value for this field is sub. Enter one of the following values based on the scopes that you set:
- If you selected only OpenID in the Scopes field, this field must be set to sub.
- If you selected OpenID and email in the Scopes field, set this field to upn.
- If you selected OpenID and profile in the Scopes field, set this field to a property available from the identity provider. These properties differ for each provider.
The identity provider sends an identity token to you, which contains the claims for your selected scopes. When you request only the OpenID scope, then sub is used as the claim type. It often represents a unique identifier for the user within your system. If you are using Azure AD, then see Microsoft identity platform ID tokens for a full list of token identifiers.
-
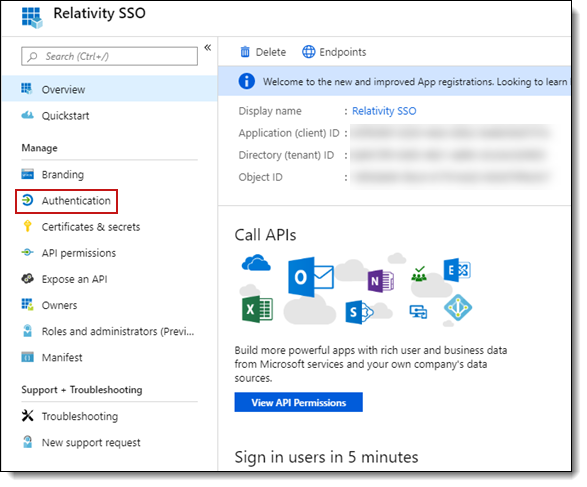
Log in to Azure AD and navigate to the application you created earlier, if you have closed the window.
-
Click Authentication.
(Click to expand.)
-
Add your Redirect URL from the Relativity Authentication Provider.
Leave the Type as Web.
-
Complete the scenario that matches the value you selected for OAuth2 Flow.
- Scenario: you selected Implicit for OAuth2 Flow.
- Check the ID Tokens box.
(Click to expand.)
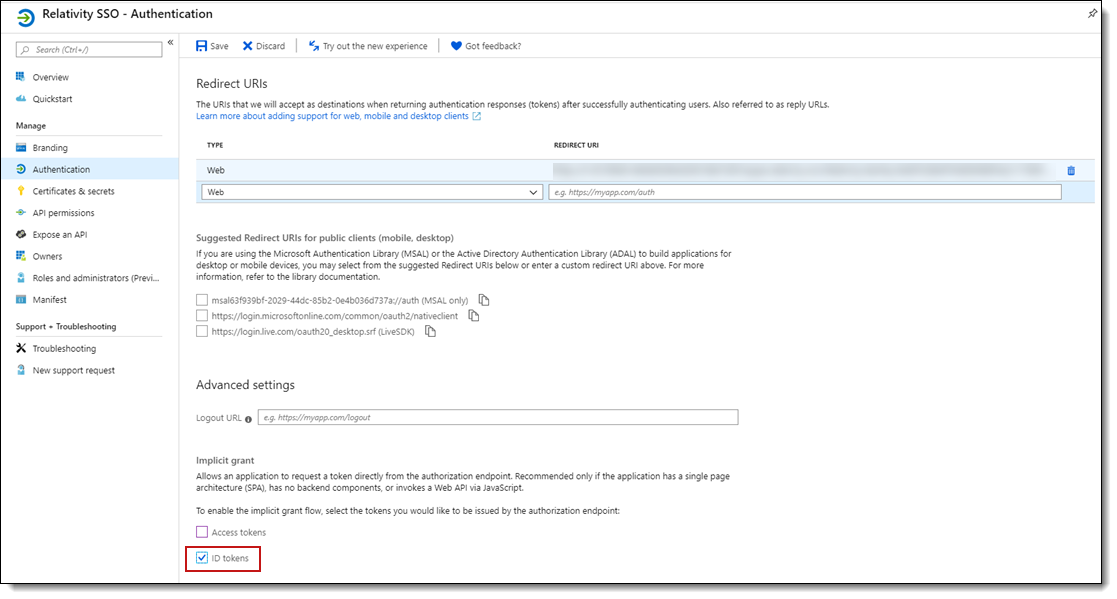
- Click Save.
- Check the ID Tokens box.
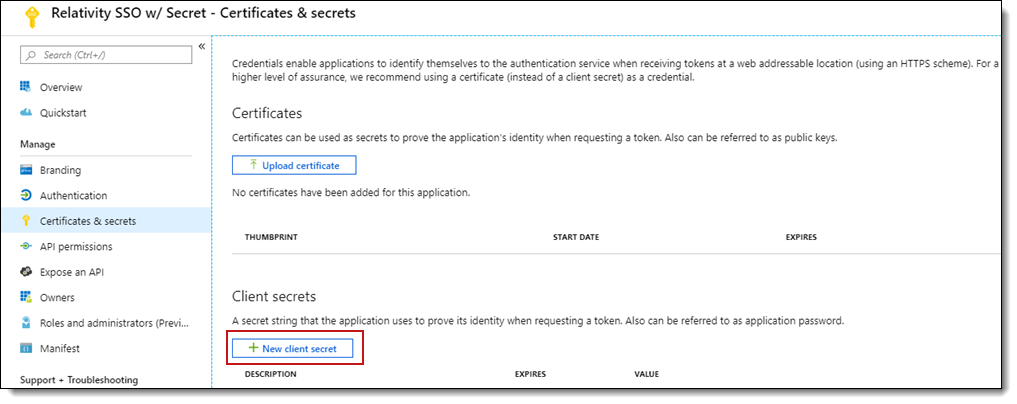
- Scenario: you selected Code for OAuth2 Flow.
Click Certificates & Secrets.
Click New client secret.
Click Add.
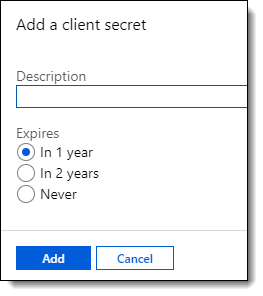
Copy the client secret value.
Navigate back to the Authentication Provider in Relativity.
Click Edit.
Paste the value for Client Secret with the value from step 4.
Click Save.
- Scenario: you selected Implicit for OAuth2 Flow.
- Click Azure Active Directory.
- Click Enterprise Applications.
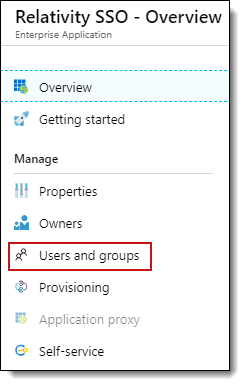
- Click into the application that you have created for Relativity authentication.
- Click Users and groups.
- Click Add user.
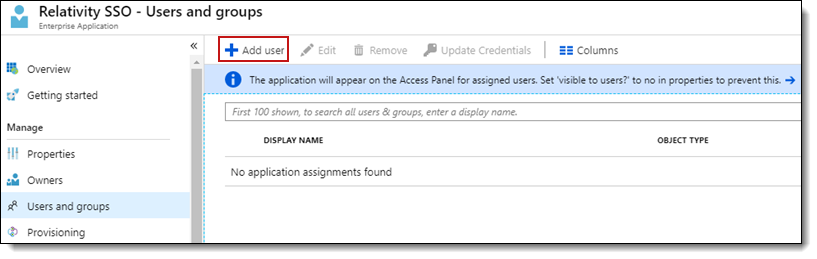
- Select your users.
- Click Assign.
Using Relativity as an OpenID Connect Provider
Relativity can be set up as an OpenID Connect authentication provider to log users into a different Relativity instance. For example you can set up a Relativity Server environment, primary instance, to act as authentication provider for a RelativityOne cloud instance, secondary instance.
Before you begin:
- Ensure that the primary instance is set up to use HTTPS.
- Verify that the secondary instance can resolve the host address of the primary instance.
- Confirm that the authenticated users are defined in both systems.
To configure an OpenID Connect provider for Relativity:
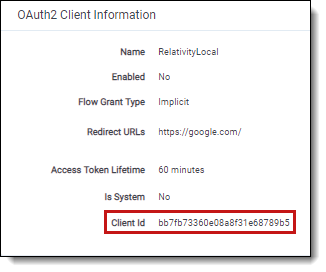
- Navigate to the primary instance and set up an OAuth2 client. You must specify Implicit as the OAuth2 Flow.
Initially, you do not have the redirect URL value. You get it when you set up the Authentication Provider on the secondary instance. Specify any placeholder URL instead. For more information, see OAuth2 clients. -
After you save the OAuth2 client, note the generated value of the Client Id. This is required to set up the authentication provider in the secondary instance.
- Navigate to the secondary instance and configure a new OpenID Connect authentication provider using the Client Id value from the previous step.
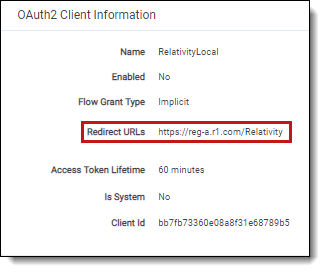
The OAuth2 Flow values must also be Implicit, and the Authority URL must point to the Relativity Identity service of the primary instance. An example of a Redirect URL is https://mycompany.relativity.one/Relativity/Identity. - After you save the provider, note the generated value of the Redirect URL. It is required to complete the OAuth2 client setup in the primary instance.
- Set up the users to use the Authentication Provider as the Login Method, specifying the user's email, Relativity user ID, as the OpenID Connect Subject field value. For more information, see Managing user authentication methods.
- Navigate back to the primary instance and update the OAuth2 provider with the Redirect URL.
- In the primary instance, set up a federated instance pointing to the secondary Relativity instance.
Note the use of the Home Realm Discovery (HRD) URL parameter to provide a single sign-on experience. The Home Realm discovery URL is generated when the Authentication Provider is created and can be found in the Authentication Provider Information section of the Authentication Provider page. For more information, see Federated instances. - Navigate back to the secondary instance and set up a federated instance pointing to the primary Relativity instance. Do not set up the HRD redirect for that federated instance.
- Log out of the secondary instance.
- Use the federated instance link to log in to the secondary instance from the primary instance.
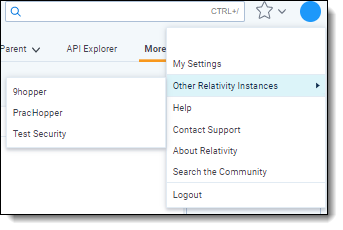
- Use the federated instance link in the secondary instance to return to primary instance.
You have now configured a Relativity environment to serve as an authentication provider for another Relativity instance.
SAML 2.0 provider
SAML is an open-standard format for exchanging authentication and authorization data between an identity provider (IdP) and a service provider (SP). Relativity uses SAML assertions (tokens) to verify the users mapped to the identity provider.
Considerations
- As a service provider, Relativity supports SAML IdP-initiated single sign-on (SSO). However, it does not support SP-initiated SSO.
- SAML assertions must be cryptographically signed for Relativity to verify their authenticity. Make sure your SAML IdP is configured accordingly.
- SAML 2.0 authentication providers are not compatible with Relativity User Load Balancing (RULB).
-
You can use Relativity with any SAML 2.0-compliant IdP, such as Centrify, Okta, Microsoft Active Directory Federation Service (ADFS), or OneLogin.
SAML assertions contain information on the identity of the individual who has logged in. Assertions also contain the identity provider issuing the assertion, known in Relativity as the Issuer URL. Each assertion is typically prepared for a specific receiver, known as the Audience. Assertion protects this information by cryptography signing it. An assertion is only valid if it is from a known Issuer URL to the expected Audience and correctly signed.
The following sections provides the guidelines for integrating Relativity with Okta and ADFS.
This is an example of configuring Okta.
Initial configuration:
- In Okta admin console, create a SAML 2.0 application:
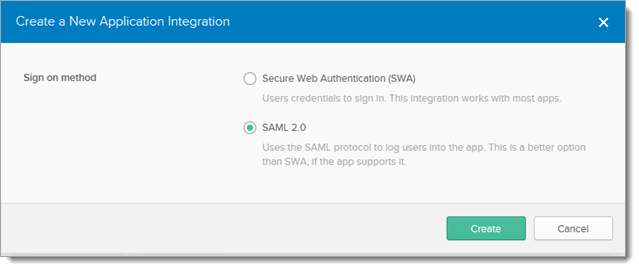
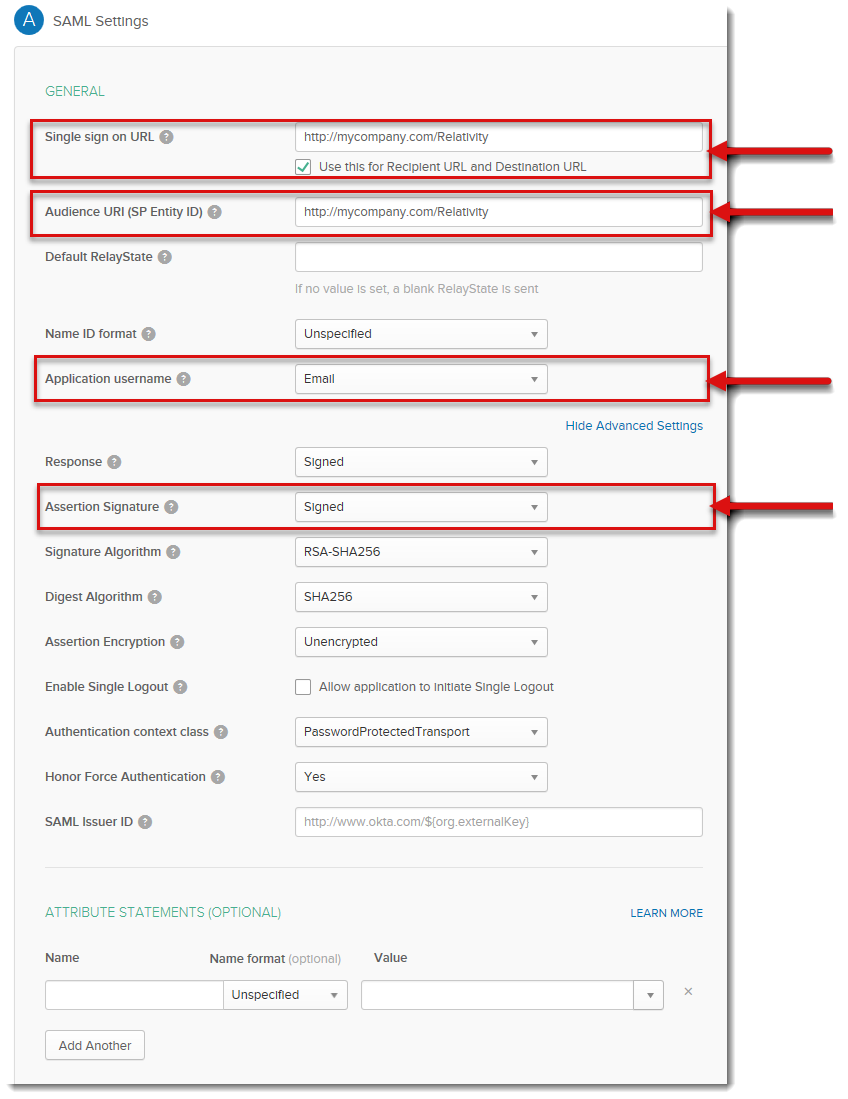
- Specify these SAML settings:
- For the single sign-on URL, for enter your Relativity Instance URL. This is the URL that is used for public access to go to your web servers.
- For Audience URI (SP Entity ID) put in a unique identifier, such as the URL for your instance. Note this value for later.
Audience URI is case-sensitive. Specifying /relativity instead of /Relativity can break your authentication.
- Application user name you would like to use for logging in. In this use case, select Email.
- For Assertion Signature, select Signed.
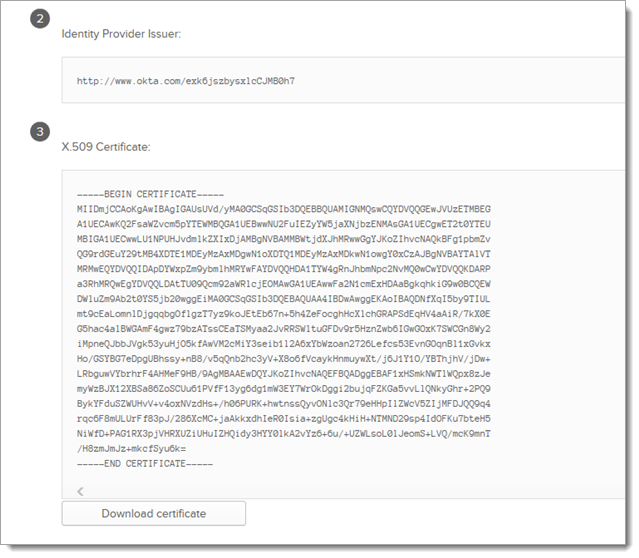
- You have now partially configured you application in Okta to set up logging in to Relativity. You must now configure the SAML provider in Relativity. You need these Okta values:
- The Audience URI. SP Entity ID, from the previous step.
- The Identity Provider Issuer. In Okta, click View Setup Instructions on the Sign On tab.
- The X.509 Certificate. Also in Setup instructions.
Next, set up the SAML 2.0 authentication provider in Relativity:
- Log in to Relativity with system admin credentials.
- Open the Authentication Provider tab.
- Click New Authentication Provider. The Authentication Provider Information form opens.
- Enter a name for your provider.
- Select SAML2 from the Provider Type drop-down menu.

- Enter the site URL. This is the URL users enter into the browser to access this instances of Relativity.
- Enter the Audience URI (SP Entity ID) from Okta in the Audience field.
- Enter the Identity Provider Issuer from Okta in the Issuer URL with.
- Enter the X.509 certificate from in Okta in the Certificate field.
- (Optional) If you are using a specific user identifier claim that is not the default claim, enter it as the Subject Claim Type.
- Click Save.
- Note the Redirect URL on your new authentication provider.
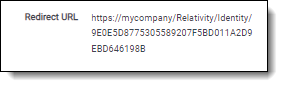
You have now set up your Relativity instance to list for SAML 2.0 assertions at a given endpoint on your server, the Redirect URL.
Next, finish setting up the SAML IdP in Okta:
- Log in to Okta and navigate to the application you created earlier.
- Update the single sign-on URL to be the Redirect URL given to us by Relativity on the authentication provider you have created.
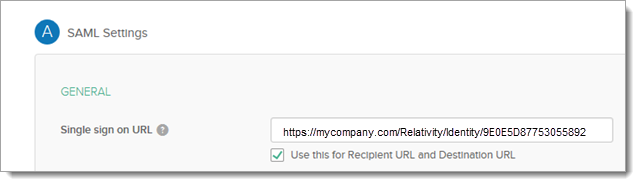
You have now configured Okta to send SAML 2.0 assertions to your Relativity instance, and Relativity is set up to verify the SAML assertions.
You must also assign Okta users to the SAML application, and then map the users to SAML login method in Relativity. When configuring the login method, you must specify the user's email in the SAML2 Subject field, if you select Email as the application user name in Okta. For more information, see Managing user authentication methods.
You can also configure ADFS as a SAML 2.0 authentication provider for Relativity.
Note these terminology difference between Relativity and ADFS:
| ADFS | ||
|---|---|---|
| Audience | Relying Party Identifiers | https://relativity.example.com/Relativity |
| Redirect URL | End-Point URL | https://relativity.example.com/Relativity/Identity/<random string> |
| Issuer URL | Services Trust End-Point (SAML) | http://<adfs-service>/adfs/services/trust |
| SAML Subject Name | Claim Type | Name ID, E-Mail Address, UPN. Leave blank in Relativity SAML Provider configuration. |
| n/a | Claim Rules | Incoming, Transformation, Outgoing Claim Rules. See below. |
When setting up claim rules, you must send Name ID as default claim type for Relativity. Use these guidelines:
- Add Send LDAP Attributes As Claims: Select Email Addresses or User-Principal-Name to E-Mail Address from the AD store.
- Add Pass Thru Claim for E-Mail Address or a Transforming claim.
- Add Transforming Claim, from E-Mail Address to Name ID.