


Instance settings
Access instance settings, formerly known as configuration table values, from the Instance Settings tab in the Relativity user interface. Instance settings are now objects that you can create and update using the Instance Settings tab or via SQL Server in the EDDSDBO.InstanceSetting database table.
This page contains the following sections:
- Using the Instance Settings tab
- Creating and editing a new instance setting
- Deleting an instance setting
- Viewing an instance setting's history
Using the Instance Settings tab
You’re a system admin. One of your clients is reporting an issue where one of their searches against a dtSearch index in a large workspace times out. You check it out it and see that it’s a complex multi-term query with a couple of wild cards. Using the Instance Settings tab, you navigate to the SearchIndexerLongRunningQueryTimeout instance setting and decide to increase the default value so that this long running query will complete.
Creating and editing a new instance setting
Note: You must have system admin-level access to view the Instance Settings tab. Control access using item-level security permissions and admin groups. See Setting instance permissions.
To create a new instance setting:
- From the Instance Settings tab, click New Instance Setting.
- Complete the fields on the Instance Setting Information layout. See Instance Setting Information layout fields.
- Click Save. A Record History section appears on the Instance setting layout. See Record History.
- Relativity adds the new instance setting to the Instance setting list.
Editing an instance setting
To limit accidental changes and their scope of impact, you can only edit an instance setting's Value and Machine Name fields.
To edit an instance setting:
- From the Instance Settings tab, locate and click the instance setting you wish to edit.
- Click Edit.
- Edit the Value and/or Machine Name field(s).
- Click Save.
Instance Setting Information layout fields
The Instance Setting Information layout contains the following fields:
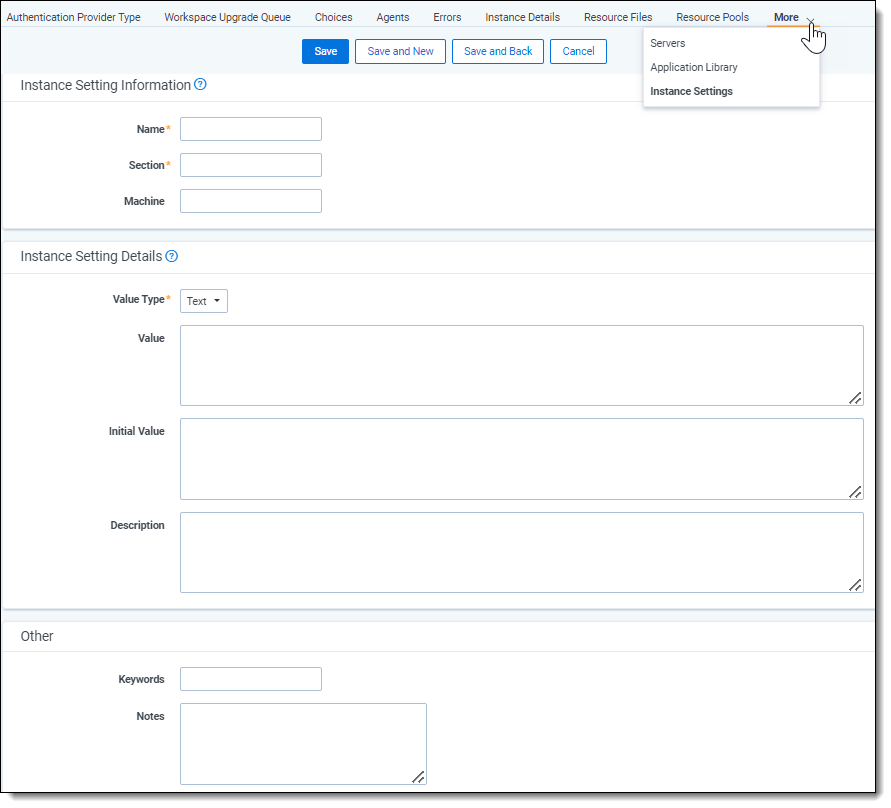
Instance Setting Information
- Name - the instance setting name. We recommend the following when creating a new instance setting name:
- Use CamelCase style without spaces, capitalizing the first letter of each word or abbreviation. For example, NewInstanceSetting.
- Choose a name that is as concise and descriptive as possible.
- Section - the section of the EDDSDBO.InstanceSetting table used to categorize the functionality to which the instance setting belongs.
- Machine Name - the default value for all machines or a certain machine in the Relativity instance. If this value is null, the instance setting applies to all machines. If this value is populated, the instance setting applies for the specified machine.
Instance Setting Details
- Value Type - specify the instance setting value type that Relativity uses for validation.
Note: Instance settings support up to 64-bit values.
- Integer 32-bit - a 32-bit integer value. For example, -2,000,000,000.
- Integer 64-bit - a 64-bit integer value. For example, -8,000,000,000,000,000,000.
- Nonnegative Integer 32-bit - a 32-bit integer value constrained to be above -1. For example, 0.
- Nonnegative Integer 64-bit - a 64-bit integer value constrained to be above -1. For example, 0.
- Positive Integer 32-bit - a 32-bit integer value constrained to be above 0. For example, 1.
- Positive Integer 64-bit - a 64-bit integer value constrained to be above 0. For example, 1.
- Text - text that includes any ASCII (American Standard Code for Information Interchange) strings. For example, .exe, .com, .bat.
- True/False - a Boolean value of True or False. If you select this value type, a Value field appears. Select True or False to set the value for this instance setting.
Note: Relativity provides several instance settings that enable you to customize email notifications, for example, user invitation and password reset emails. These instance settings include system variables enclosed in braces, such as {LOGINLINK}, {LINKTEXT}, and {LOGINTEXT}. Their values are generated by Relativity and cannot be changed. For more information, contact Customer Support.
- Encrypt - this field specifies whether the settings for the Value field is stored in the Secret Store. You can only encrypt text and integer values. When you create a new instance setting and set the Encrypt field to Yes, its value doesn't display in the Relativity UI, audit history, and the database. For an existing instance setting, you should change its value when you update the Encrypted field to Yes. You should make this update because the original value still appears unencrypted in the audit history.
If you select Yes, a message displays asking you to confirm your choice by clicking OK. The Value and Initial Value fields now display "***Secured Value***" rather than the actual value entered for the setting. By default, the Encrypt field is set to No, which means that settings for the Value field is visible in the Relativity UI, audit history, and the database.
- Notes:
- Applications and integration scripts that use standard SQL statements won't be able to access encrypted instance settings. For more information about helper classes for use with these encrypted values, see the Developers documentation site.
- Value - specify a value that Relativity uses for validation.
- Initial Value - the value that comes with a new Relativity installation. Use this field as a guide for system admins. You may leave this value may blank when creating new instance settings.
- Description - describes what the instance setting controls. The description should explain all possible use case scenarios, and include any recommendations or warnings when using the instance setting.
Other
- Keywords - include any key words to be associated with the instance setting.
- Notes - contains any notes regarding the instance setting.
Once you create a new instance setting, a Record History section appears on the Instance Setting layout. For a more detailed history, see Viewing an instance setting's history.
- Created - specifies the user login name that created the instance setting, with the associated date and time.
- Last Modified - specifies the user login name that last modified the instance setting, with the associated date and time.
Deleting an instance setting
Consider the following when deleting an instance setting:
- You can't delete an instance setting that is a system artifact.
- Not all instance settings are system artifacts.
To delete an instance setting:
- From the Instance Settings tab, locate and click the instance setting you wish to delete.
- Click Delete.
- From the confirmation dialog, click Ok. The instance setting is removed.
Viewing an instance setting's history
Use the instance setting's audit history to view all actions taken on an instance setting. Use this information to view what the values were prior to a change.
To view an instance setting's audit:
- From the Instance Settings tab, locate and click the instance setting for which you wish to view its history.
- Click View Audit. A dialog appears, listing all actions taken on that instance setting.
- (Optional) Using the Export to File drop-down option at the bottom of the dialog, click Go to export the following audit history details in a .CSV file:
- User Name
- Action
- Timestamp
- Details
- Close the dialog when finished viewing the audit.