


Reviewing documents with Case Dynamics
When reviewing documents in the Review Interface, you can link the active document to Case Dynamics objects, which store information related to your case.
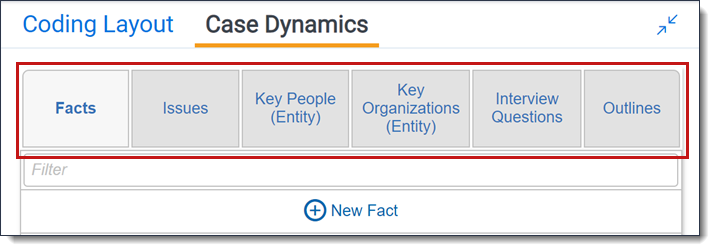
Object types include:
- Facts
- Issues
- Entities
- Interview Questions
- Outlines
Case Dynamics coding pane
Click  in the coding layout to access the Case Dynamics coding pane. You can also access this functionality from the Transcripts layout when working with transcripts in the Transcripts application.
- Notes:
- To use the coding pane, you must have the Case Dynamics - coding pane security permission assigned. Without this permission, you can only view the coding pane and cannot make edits.
- If you want to see the full document while using Case Dynamics, you can open the document in the pop-out viewer and still use the coding panel.

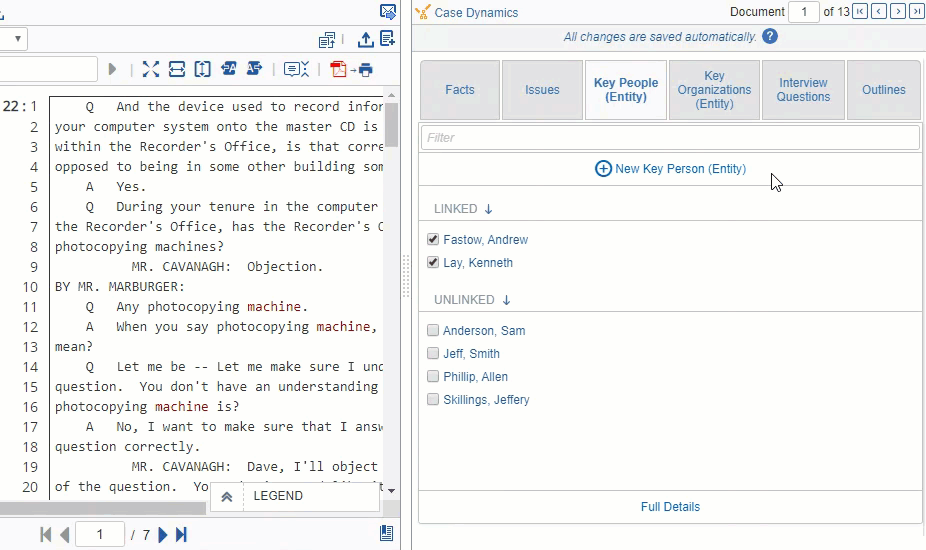
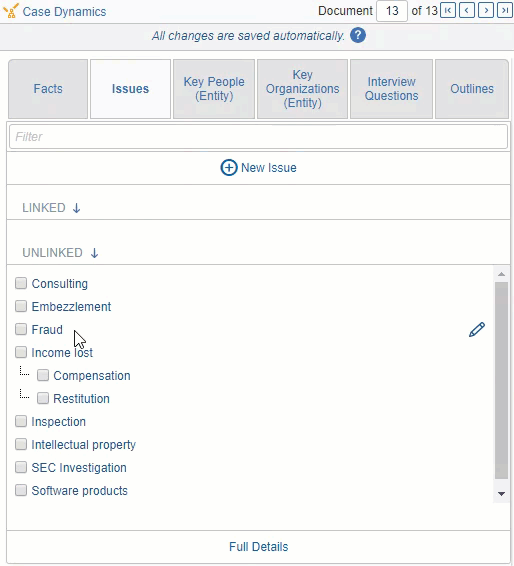
On every tab of the Case Dynamics coding pane, the Linked section contains objects that are linked to the active document, and the Unlinked section contains objects that are not linked to the active document. You can search for objects in the filter box and sort objects alphabetically by clicking  .
.
By default, objects appear in descending alphabetical order, and the arrow on the icon points down. To sort in ascending alphabetical order, click the icon. The arrow on the icon points up when objects are sorted in ascending alphabetical order.
If you click on a checkbox next to an object in the coding pane, that object moves to the top of either the Linked or Unlinked section and is automatically saved. Saved objects will be highlighted in blue until you move to the next document or leave the coding pane.
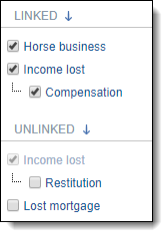
If a parent object is linked but the child object is unlinked, the text of parent object is light gray in the Unlinked section of the coding pane. This helps maintain family relationships while also noting that the parent object is linked. In the example below, Restitution, a child of Income lost, is not linked; however, Income lost is linked. This enables you to see that Restitution is a child of Income lost, which is unlinked.
Creating a new object
Select one of these methods to create a new object in the Review Interface:
Creating a new object in the Case Dynamics coding pane
To create a new object in the Case Dynamics coding pane:
- Click the tab in the coding pane where you want to add a new object.
- Click
 . A pop-up window opens.
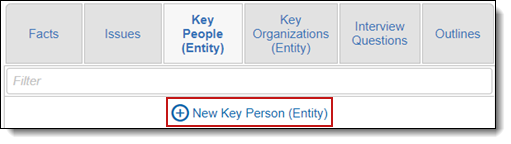
-
Fill out the details for the new object in the pop-up window. Objects are automatically linked to the document, and you can link to a description, excerpt, or comment by editing the object.
(Optional) If you selected Key Person (Entity) or Key Organization (Entity) as your object type in the first step, the Create New Entity pop-up opens. When you start typing the entity name that you want to add in the Create New Entity pop-up, the auto-complete feature returns a list of existing entities that match what you typed. Select the entity you want from the list or finish typing the name of the new entity that you want to create. If the entity you select is not classified as Key - Case Dynamics, it becomes classified as Key - Case Dynamics once you save it.
Note: For an entity to appear in Case Dynamics, it must be classified as Key - Case Dynamics and required fields must be set.
If an existing entity option displays
 , go to the Entities tab, and edit the entity with the warning icon. Be sure to fill out all required fields.
Creating a new object in the Viewer
Note: Case Dynamics objects can be created in the Native, Extracted Text, Transcripts, and Short Message Viewer. Case Dynamics objects cannot be created in the Image, PDF, Productions, Pop Out, and Standalone Viewer.
To create a new object in the Viewer:
- Highlight text in the active document and right click.
- Select Add Case Dynamics Item. A list of objects that you can add opens.
- Select the object that you want to add.
A pop-up window opens.
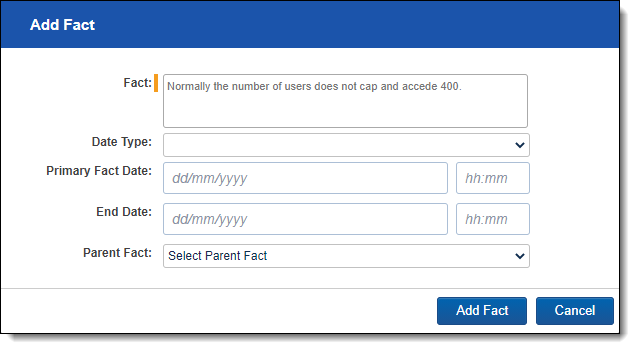
- Fill out the details for the new object in the pop-up window. Objects are automatically linked to the document, and you can link to a description, excerpt, or comment by editing the object.
Optionally, type the @ symbol followed by one or more letters to bring up the type ahead feature. Case Dynamics presents a pop-up list of Entities based on the letters you type. Click the name of the Key Person or Key Organization to add them to the details of your Fact.Optionally, if you selected Key Person (Entity) or Key Organization (Entity) as your object type, Relativity compares the highlighted text to existing entities in the workspace to see if there is a possible match. The table below lists the possible match types and the actions available to you based on the match type.
Note: For an entity to appear in Case Dynamics, it must be classified as Key - Case Dynamics and required fields must be set.
 Match types table
Match type Pop-up name Options Key entity match Key Entity Match 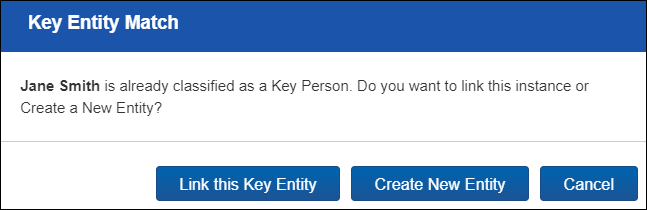
- Link this Key Entity - the key entity becomes linked to the document.
- Create New Entity - creates a new key entity and links the key entity to the document.
- Cancel - closes the pop-up and does not link the highlighted text to an existing entity or create a new entity.
Entity match Possible Match 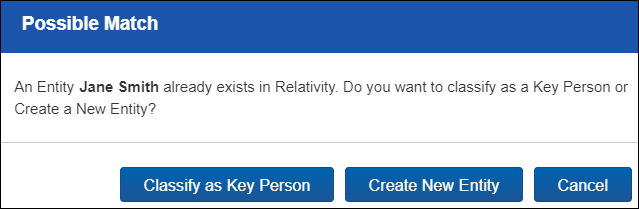
- Classify as Key Person or Classify as Key Organization - classifies the existing entity as key and links the key entity to the document.
- Create New Entity - creates a new key entity and links the key entity to the document.
- Cancel - closes the pop-up and does not classify an existing entity as key or create a new entity.
No match found Create New Entity 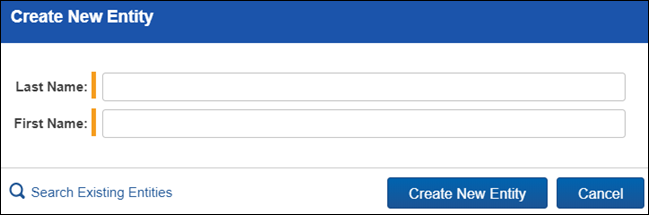
- Create New Entity - creates a new key entity and links the key entity to the document.
- Cancel - closes the pop-up and does not create a new entity.
Search Existing Entities - enables you to search existing entities to see if the entity already exists under a different spelling variation. Through the view that opens, you can search and filter on fields.
Linking Case Dynamics objects from the Case Dynamics coding pane
You can link two Case Dynamics objects such as a fact and an issue while reviewing documents in the Viewer. To link two Case Dynamics objects:
-
Navigate to the Documents tab and select a document from the list.
-
Select the Case Dynamics coding pane.
-
Select the desired Case Dynamics object tab in the coding pane.
-
Select a linked object in the Case Dynamics coding pane.
The View Case Dynamics object pop-up displays. -
Select a layout that includes Case Dynamics object sections such as the Case Dynamics object Basic or Extended layout.

-
Click the Link button in the Case Dynamics object section that you wish to link.
-
Select the checkbox next to the object that you wish to link and click Add.
-
Click Set.
The two selected Case Dynamics objects are linked.

Linking the active document to an existing object
To link the active document to existing objects, use one of the following methods:
- In the applicable tab of the coding pane, check the box of the object that you want to link. The object moves to the top of the Linked objects list and is automatically saved. Saved objects will be highlighted in blue until you move to the next document or leave the coding pane.
-
You can also link objects from the Full Details link found along the bottom of the coding pane. The Full Details pop-up window provides more information on linked and available objects.
To link facts:
- Click Full Fact Details. A pop-up appears.
- Select objects in the Available Items section.
- Click Set. The linked fact is automatically saved and will be highlighted in blue until you move to the next document or leave the coding pane.
- Highlight text in the document, right click, and then select Link Case Dynamics Item. Use this method to link objects one at a time. The changes are automatically saved and will be highlighted in blue until you move to the next document or leave the coding pane.