


Active Learning is a technology assisted review tool that helps you quickly organize your data and predict which documents are most likely to be relevant to reviewers. With very little training needed to see documents of interest, Active Learning can be used for cases of all sizes, even those as small as 1,000 documents. By using Active Learning, you can reduce the total time to review.
Active Learning works by using a technology called Support Vector Machine learning to continuously learn from your reviewers' coding decisions. Reviewers code documents using a binary classification system (for example, Relevant and Not Relevant). These coding decisions are ingested by the Active Learning model where machine learning takes place. As reviewers code, the model gets better at discerning what makes a document Relevant or Not Relevant and serves the best documents to reviewers. Active Learning provides two methods of review, making it flexible to your case needs:
- Prioritized Review—finds the documents most likely to be relevant to reviewers.
- Coverage Review—quickly separates your document into your two categories.
There are a number of tools available to help you monitor the progress of your review and eventually validate the success of Active Learning.
Note: For details on estimating recall in an Active Learning project, see Project Validation and Elusion Testing.
See these related pages:
- Creating an Active Learning project
- Choosing an Active Learning review queue
- Reviewer access
- Monitoring an Active Learning project
- Project Validation and Elusion Testing
- Security permissions
- Active Learning performance baselines
- Scaling Active Learning
Installing the Active Learning application
To use Active Learning, you must first install the Active Learning application from the Application Library to your workspace.
Note: Once you install the Active Learning application, you can't uninstall it.
- Navigate to a workspace where you want to install Active Learning.
- Click the Relativity Applications tab.
- Click New Relativity Application.
- Next to Application Type, select Select from Application Library.
- Click the ellipsis button in the Choose from Application Library field.
- Select the Active Learning application, and then click Ok.
- Click Import.
- Review the import status of the application. Verify that the install was successful or resolve errors. For more information, see
Active Learning agents and instance settings
Ensure the following agents are installed and configured:
- Relativity Analytics Index Manager
- Active Learning Worker
For more information, see Agents.
Active Learning uses the following instance settings:
Basic Active Learning workflow
The following graphic and corresponding steps depict a typical Active Learning workflow that integrates with other Analytics features. Note that each user's workflow may vary. You may not be required to follow all of these steps for every Active Learning project you run.
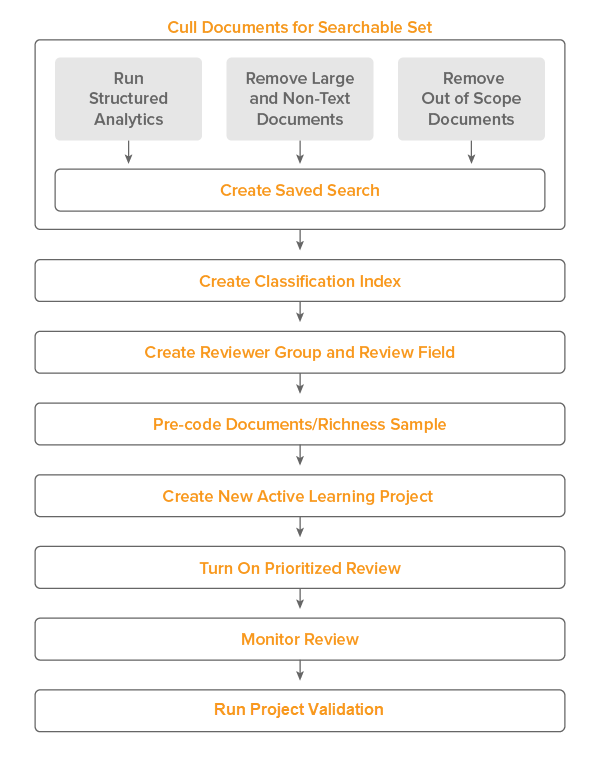
- Cull the documents you plan on using in the data source for your Active Learning project. This may include:
- Running the following
- Email Threading
- Textual Near Duplicate Identification
- (Optional) Language Identification
- Removing large and non-text documents
- Removing documents that are out-of-scope for your case
- Running the following
- Create a saved search using the documents you identified.
Note: Return only extracted text in the search.
- Create an Analytics classification index using this saved search as the data source.
- Create a review field with two choices available on the coding layout to be used by the reviewer group accessing the Active Learning project.
- Pre-code documents in the data source on the review field by taking a richness sample. Aim for a balance of documents coded on the positive designation and the negative designation. Pre-coding documents by estimating richness helps speed up the Active Learning process and gives you a starting metric to gauge the progress of your Active Learning project later.
- Create a new Active Learning project.
- Turn on the Prioritized Review queue or Coverage Review queue, depending on your workflow. Have reviewers begin coding documents in the review queue.
- Monitor the review queue.
- Run Project Validation to validate the results of your project.
Note: For information on creating dashboards to help monitor your queue, see Quality checks and checking for conflicts.