


You can use the Workspace Upgrade queue to monitor the progress of scripts as they update workspace database schemas. In addition, you can also monitor upgrades to applications currently installed in workspaces. It also provides you with the ability to view detailed error messages when a script or application upgrade fails. You can use the advanced mass operations on the queue to edit the priority and order of workspace upgrades, as well as retry failed upgrades, and cancel upgrades.
Monitoring upgrades with the Workspace Upgrade queue
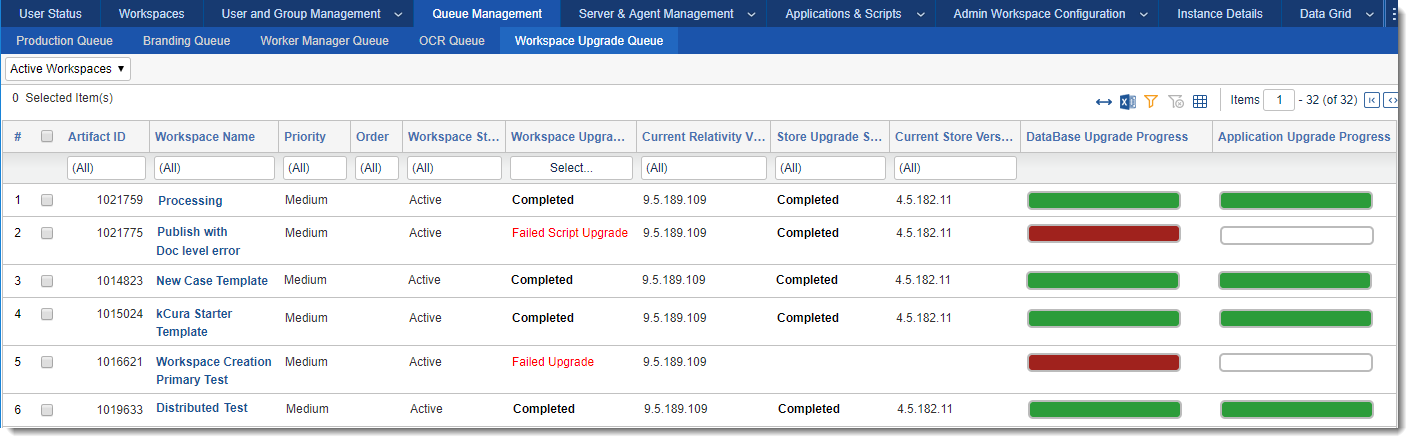
You can view the Workspace Upgrade queue from Home. Select the Queue Management tab, and click Workspace Upgrade Queue. The Workspace Upgrade queue displays the current status and the progress of the upgrade for each workspaces.
Beginning in Relativity 9.4.398.62, the Workspace Upgrade Queue also displays the current status and version of the processing store upgrade process, which the Workspace Upgrade Worker agent completes in addition to upgrading the workspace.
For descriptions of the columns, see Workspace Upgrade queue columns.
(Click to expand)
Procuro is a utility used to upgrade the schema for all Relativity databases using scripts. As part of the database upgrade process, the Procuro utility automatically runs on your database server. It is also known as the Database Upgrade tool. Procuro makes updates to database schemas by adding, and removing columns in tables, creating new tables, re-naming table /columns, changing the types of data; adding or removing indexes and statistics to ensure functionality with Relativity. It is also required so Relativity can perform upgrades for future iterations created.
Procuro automatically sets the Upgrade Status of the workspaces to Pending in the Workspace Upgrade queue. This status indicates to the upgrade agents running in your environment that they can begin upgrading the workspaces immediately. You can use the advanced mass operation options to change the upgrade priority and order of workspaces or to prevent workspaces from upgrading. For more information, see Editing upgrade priority and order for a workspace.
The workspace upgrader uses agents that run jobs for upgrading the workspace database schemas and installing applications. You must configure these agents through the Agents tab in Relativity. See Populating the Workspace Upgrade queue.
If you don't see any activity in the Workspace Upgrade queue, these agents haven't been configured. An alert message lists the agents that you need to configure.
Populating the Workspace Upgrade queue
The Workspace Upgrade queue continually populates with status information by the upgrade agents as they run scripts to update workspace databases and installed applications. The following agents run the scripts and the application upgrades:
- Workspace Upgrade Worker - picks up pending jobs in the queue for script updates.
Note: On an SQL Server profile, you can edit the Workspace Upgrade Limit field, which controls the number of agents accessing the server during an upgrade. The setting entered in this field can’t exceed the setting in the GlobalWorkspaceUpgradeLimit instance setting value. If you enter a number that exceeds this instance setting value, an error occurs that cancels your update.
- Workspace Upgrade Manager - queues applications required for installation in workspaces.
- Application Installation Manager - installs required applications to workspaces. In Relativity 10.0.318.5 and above, you can use the WorkspaceUpgradeCountForGCFullCollect instance setting to specify the number of workspace upgrades performed by all Application Installer Manager agents on an agent server before a full garbage collection is initiated.
During a Relativity upgrade, the agents complete the following tasks and then update the statuses displayed on the Workspace Upgrade queue:
- Set upgrade status to Pending. Procuro runs and sets the status on workspaces in the Workspace Upgrade queue to Pending.
- Pick up pending jobs. The Workspace Upgrade Worker sees a pending job in the queue, picks it up, and begins upgrading the workspace.
- Run upgrade scripts. The Workspace Upgrade Worker sets the status of the workspace to Upgrading scripts and runs the SQL scripts to update the workspace database schema. When the scripts complete, the upgrade status on the workspace is set to Pending Application Upgrade.
- Set upgrade status to Upgrading Applications. The Workspace Upgrade Manager queues applications required for installation in workspaces in the Application Install table, and it sets the upgrade status to Upgrading Applications.
- Install applications. The Application Installation Manager installs the required applications.
- Complete installation. When the application upgrades have installed successfully, the Workspace Upgrade Manager checks the application status, and then sets the status of the workspace to Completed.
During an Invariant upgrade, the agents complete the following tasks and then update the statuses displayed on the Workspace Upgrade queue:
- Set store upgrade status to Pending.The Invariant.DBUpdater runs and sets the store status on workspaces in the Workspace Upgrade queue to Pending.
- Pick up pending store upgrade jobs. The Workspace Upgrade Worker sees a pending store upgrade job in the queue, picks it up, and begins upgrading the store.
- Run upgrade scripts. The Workspace Upgrade Worker sets the status of the workspace to Upgrading scripts and runs the SQL scripts to update the store database schema.
Workspace Upgrade queue columns
The Workspace Upgrade queue displays the following columns:
- Artifact ID - the Artifact ID of a workspace undergoing an upgrade.
- Workspace Name - the name of a workspace undergoing an upgrade. Click the name to display the document list in the workspace.
- Priority - the upgrade order assigned to the workspace. Priorities include Low, Medium, and High. See Editing upgrade priority and order for a workspace.
- Upgrade Status - the status of the workspace upgrade as determined by the current Procuro stage. See Upgrade statuses descriptions.
- Workspace UpgradeStatus - the value assigned to the Status field on the workspace details page. See Upgrade statuses descriptions.
- Current Relativity Version - the workspace is currently updated to this version of Relativity.
- Store Upgrade Status - the status of the upgrade of the Invariant store, as completed by the Workspace Upgrade Worker agent. The possible values in this column are the same as for the workspace upgrade. This field is empty if you don't have processing installed. You could see any of the following status values:
| Status | What it means |
|---|---|
| Pending | The Invariant store have been added to the Workspace Upgrade queue, but the Workspace Upgrade Worker hasn’t picked it up yet. |
| Upgrading Scripts | The Workspace Upgrade Worker agent is running scripts against the Invariant store. |
| Completed | The store is fully upgraded and ready for use. |
| Failed Script Upgrade | An error occurred while upgrading SQL scripts for the Invariant store, the upgrade failed, and Relativity Processing is disabled in the workspace. |
| Canceled | The user canceled the upgrade when it had the status of Pending, Pending Application Upgrade, Upgrading Scripts, or Upgrading Applications. See Canceling or retrying workspace upgrades. |
| NULL | A Store has not been created on this workspace |
- Current Store Version - the version of Invariant you are upgrading to. This field always displays the most current version of Invariant available. This is because if the upgrade fails, it displays the version of Invariant you were attempting to upgrade to, and if the upgrade was successful, it displays the version you just upgraded to, which is the most current.
- Database Upgrade Progress - the percentage of the upgrade process completed for the workspace database and the Invariant database if the Processing application is installed. It uses the following colors to indicate the upgrade status:
- Blue - indicates the upgrade is in progress.
- Green - indicates a completed upgrade.
- Red - indicates an error or failure occurred.
- Application Upgrade Progress - the percentage of the upgrade process completed for the application. It uses the same colors to indicate the upgrade status as the Database Upgrade Progress bar.
Upgrade statuses descriptions
The following table contains descriptions for the statuses displayed in the Upgrade Status column on the Workspace Upgrade queue:
| Status | Description |
|---|---|
| Canceled | The user canceled the upgrade when it had the status of Pending, Pending Application Upgrade, Upgrading Scripts, or Upgrading Applications. See Canceling or retrying workspace upgrades. |
| Completed | The upgrade of the workspace completed successfully. |
| Failed Application Upgrade | An error occurred while upgrading applications in the workspace. See Troubleshooting upgrades. |
| Failed Script Upgrade | An error occurred while upgrading SQL scripts for the workspace. See Troubleshooting upgrades. |
| Pending | The workspace has been added to the Workspace Upgrade queue, but the Workspace Upgrade Worker hasn’t picked it up yet. |
| Pending Application Upgrade | The Workspace Upgrade Manager populates the application installation queue with any required applications. |
| Upgrading Applications | The Application Installation Manager upgrades the applications in the workspace. |
| Upgrading Scripts | The Workspace Upgrade Worker runs Procuro scripts against the workspace database. |
Editing upgrade priority and order for a workspace
You can set order and priority on workspaces for upgrades. Relativity always upgrades ordered workspaces before unordered workspaces regardless of their priority. Relativity uses priority to determine which of the workspaces to upgrade first when you don’t assign an order.
In addition, if you assign the same order to a group of workspaces, Relativity uses their Artifact ID to determine the upgrade order. It follows a similar process if you assign the same priority to a group of workspaces.
The priority and order options provide you with the flexibility needed to control the workspaces that Relativity upgrades first and those that are upgraded later. For example, you might upgrade workspaces in high demand, so that they are available to users sooner than those less frequently accessed workspaces. The default priority for workspaces is Medium and the default order is blank.
Note: Your users may notice decreased Relativity performance if they are using a workspace on the same SQL Server where you are upgrading other workspaces. However, if you are upgrading workspaces on another server in a distributed environment, users shouldn't notice any change in performance.
Use this procedure to change the priority and order:
- Perform one of these tasks to select the workspaces:
- To set the priority for only a specific group of workspaces, select their checkboxes. In the mass operations bar, choose Checked.
- To set the priority for all workspaces, choose All Items in the mass operations bar.
- Select Edit Priority in the mass operations bar.
- Click Go to display the Edit Upgrade Priority dialog.
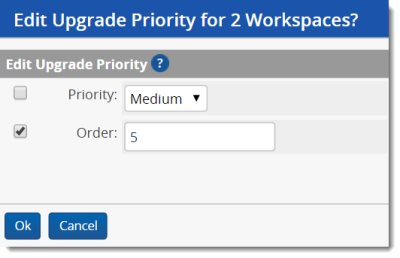
- Perform one or both of the following tasks:
- Select the Priority checkbox. Choose Low, Medium, or High from the drop-down menu.
- Select the Order checkbox. Enter a value in the text box. You use this value to specify the order that you want used for workspace upgrades. Relativity upgrades workspaces with a smaller order values before those with a larger values. The default value for Order is blank.
- Click Ok to save your changes.
If you want to revert from and ordered priority to an unordered priority, use this procedure:
- Select the Priority checkbox. Choose Low, Medium, or High from the drop-down menu.
- Select the Order checkbox. Leave the value blank.
- Click Ok to save your changes.
Troubleshooting upgrades
From the Workspace Upgrade queue, you can view script and application errors, which may have occurred during an upgrade. You can also use the mass operations for retrying a workspace upgrade from the queue or canceling an upgrade. For more information, see the following sections:
- Viewing upgrade errors
- Canceling or retrying workspace upgrades
- Retrying upgrade failures for system secured applications
Viewing upgrade errors
When an application or script fails to upgrade properly, the Upgrade Status column displays a link that you can use to view additional information about the error that occurred.
Note: You can also view errors, upgrade status, script details, and other information on the History of Workspace dialog. To display this information, click the Workspace Details tab, and then click the View Audit button.
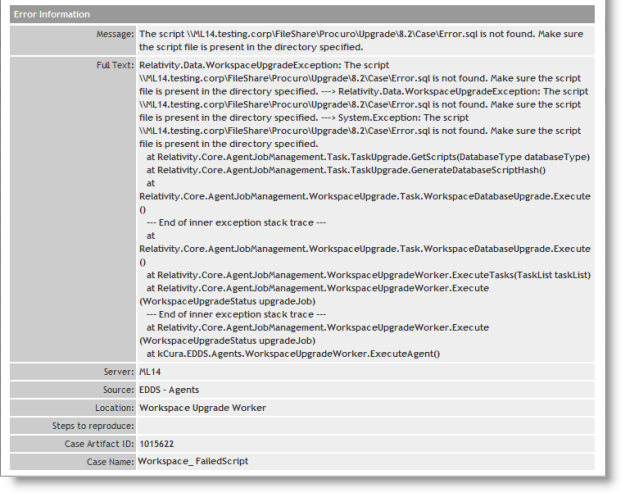
Script or other non-application upgrade fails
When a script upgrade fails, click the Failed Script Upgrade link to display the Error Information dialog, which includes a detailed error message, server, source, and other information.
You can't access a workspace when a script or other upgrade non-application error occurs. If you attempt to open a workspace with these upgrade errors, you receive a message indicating that the workspace is inaccessible. Click the Return to Home link to display the default Home tab.
Note: If you only want to display workspaces that are fully upgraded and accessible, add a condition on the workspace view where the Workspace Accessibility field is set to Enabled. This setting filters only upgrade accessible workspaces, and hides any workspaces that users can't interact with.
When a script error occurs during an upgrade, review the details of the failure in the error message available from the Failed Script Upgrade link. You may also want to rerun the upgrade using the Retry Upgrade option. See Canceling or retrying workspace upgrades.
Application upgrade fails in a workspace
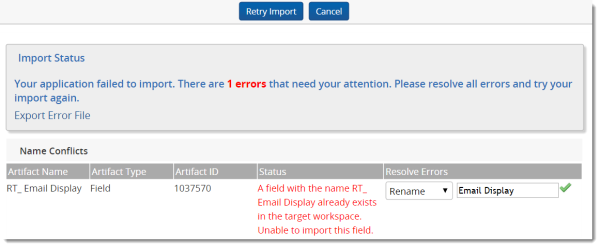
When an application upgrade fails, click the Failed Application Upgrade link to display the Application Errors dialog. If multiple applications failed to upgrade, click this link to display a pop-up with links to the error pages for these applications.
When an application error occurs, review the details of the failure in the error message available from the Failed Application Upgrade link. You can resolve locking conflicts that occur when a locked application prevents an upgrade, and naming conflicts that occur when an object type in an application shares the same name as another object type in the workspace. To resolve these errors, perform one of the following tasks:
- Locking conflicts - Click the Failed Application Upgrade link to display the detailed error message. Select the Unlock <Application Name> checkbox, and click Retry Import on the error message.
- Naming conflicts - Click the Failed Application Upgrade link to display the detailed error message. Select Rename from the drop-down box, enter a new name for the object in the text box, and click Retry Import on the error message.
In addition, you can perform these tasks for resolving locking and naming conflicts through the Application Library tab.
You can continue accessing a workspace when an application that it contains fails to upgrade successfully for additional troubleshooting. From the Relativity Applications tab, you can view the application details to resolve application errors. When a workspace contains an application in this failed upgrade state, Relativity displays an orange message bar across most of its pages, which contains with a warning indicating that workspace upgrade isn’t complete.
Canceling or retrying workspace upgrades
You can cancel an upgrade job on a workspace or retry an upgrade job as necessary. After you cancel a job, the workspace remains in a partially upgraded state so it is no longer accessible. You must attempt to complete a successful upgrade in order to access the workspace.
Use this procedure to cancel or retry an upgrade job:
- Perform one of these tasks to select the workspaces:
- To retry or cancel the upgrade jobs for only a specific group of workspaces, select their checkboxes. In the mass operations bar, choose Checked.
- To retry or cancel the upgrade jobs for all workspaces, choose All Items in the mass operations bar.
- Select Retry Upgrade or Cancel Upgrade in the mass operations bar.
- Click Go to display a confirmation dialog.
- Click OK if you want to continue with your selected action.
Retrying upgrade failures for system secured applications
System secured applications are installed in the Application Library and hosted at the instance level. You can resolve upgrade failures for system secured applications by manually retrying them through the Application library tab. Alternatively, for Relativity 10.0.318.5 and above, you can retry them through the Workspace upgrade queue by clicking the Retry Admin App Upgrades link displayed when a failure occurs.
Retrying system secured application upgrade failures in the Application Library
You can manually retry upgrading system secured applications through the Application Library tab.
- Navigate to the Application Library tab.
- Click the name of the failed application to display its detail view.
- Click Install in the Workspace Installed section.
- Click and select the Admin Case workspace in the pop-up picker.
- Click Save. If the application fails to install, contact the Customer Support team for additional help.
Retrying system secured application upgrade failures in Workspace upgrade queue
In Relativity 10.0.318.5 and above, the upgrade installer updates system secured applications through the Application Library tab.
When a required application upgrade fails in the Application Library, Relativity handles the failure as follows:
- The Application Installation Manager agent won't attempt to install a failed application in any workspaces until the application is upgraded without errors in the Application Library. Instead, it skips the failed application, and continues installing other applications and scripts in the workspaces. After the application is successfully upgraded in the Application Library, the agent automatically completes the workspace upgrade.
- In the Workspace Upgrade queue, a warning message displays a list of any applications that failed to install in the Application Library, and the Retry Admin App Upgrades link. A separate warning message may appear with a list of any agents that haven't been configured properly.
- In the Workspace Upgrade queue, the grid displays the Workspace Upgrade Status column with a status of Upgrading Applications, and the Application Upgrade Progress column with an incomplete progress bar for each failed application.
To resolve a failed application upgrade, click the Retry Admin App Upgrades link. You can click this link at any time to retry the upgrade. The next available agent then runs the job for upgrading the failed application in the Application Library. After successfully upgrading, the application is installed in workspaces, and the status columns in the Workspace Upgrade queue are updated.

Note: If you click the Retry Admin App Upgrades link, and the application installation fails again, don’t retry installing all of the applications. Review the Errors tab, check for database errors, and perform other troubleshooting. Application installation failures may be caused by an improperly configured service bus, an unavailable SQL server, and other issues. Contact Customer Support if you need additional help.