


Feedback
Last date modified: 2026-Feb-25
Files tab
In 2026, Relativity will begin using Metadata Store (MDS) for data storage, eventually replacing Microsoft SQL Server (SQL Server). MDS is a cloud native storage solution that increases throughput and scalability for data storage, specifically with processing in mind. Initially, Relativity will adjust the user interface in preparation for MDS. The underlining data storage will still be on SQL. Once in 2026, Relativity will begin enabling customers for MDS. Initially, Relativity will use both MDS and SQL Server side by side in a phased roll-out. The phased roll-out means some customers will see changes before others. The roll-out process is expected to last 6-9 months.
What this means for you
The most significant changes are to the Files tab user interface, the datasets returned, and the sorting functionality. Throughout this documentation, content specific to the new Files tab format will be labeled Files tab (MDS). If you have any questions about MDS or your environment, contact Customer Support.
The Files tab in Relativity Processing allows you to view and analyze a list of all discovered documents and their metadata before deduplication and publishing.

Files tab (MDS)
The Files tab (using MDS storage) differs slightly from the current interface. Details on these changes are described in the All Files view (MDS) section.

Views on the Files tab
The Files tab contains the following views:
- All files—lists all the files in your workspace.
- Current files with exceptions—lists the documents that yielded exceptions in your workspace that currently have an Exception Status value of Not Resolved.
- All files with exceptions—lists the documents that yielded exceptions in your workspace, including those with a current Exception Status value of Resolved and Unresolved.
- Deleted files—lists the documents you deleted from your workspace.
You can export any file list as a CSV file, which includes the total set of filtered results.
All Files view
The All Files view contains all the discovered files in your workspace. This view does not contain documents that have been deleted and have a Yes value for the Processing Deletion? field. Those documents can only be found in the Deleted Documents view described in the next section.

All Files view (MDS)

The Files tab has the following sections:
- Views—select from predefined views or create a custom view.
- Dashboard widgets—select from predefined dashboards or create a custom dashboard. Selecting No Dashboard Widgets hides the widgets from the current view so that only the list is displayed.
Widgets display the results from the full data set, not just the sample set. They can give you an excellent overview of your processing status, for example, errors and exceptions.
 Using dashboard widgetsYou can change the widgets displayed in your view by selecting from a predefined dashboard or adding new widgets to a custom dashboard. If you prefer, you can hide all of the widgets as well. For information on how to add creating custom dashboards and widgets, see
Examples of widgets:- All Discovered Files—displays widgets showing custodians, data sources, file extensions, and a summary of the container files discovered.
- Errors—displays widgets showing exception categories, file extensions, and a summary of the container files discovered.
- Container Files—displays widgets showing a summary of the container files discovered.
- No Dashboard Widgets—hides all widgets from the view, so that you only see the document list.
- Widget display area—displays the dashboard's widgets.
- Document list—displays the files returned after discovery.
- Search Conditions—after creating a saved filter, any conditions applied appear in the Search Condition pane. To change a filter condition, first clear the conditions, then add one or more new conditions.
- Saved Filters—displays a list of saved filters. See Saved Filters for information on managing saved filters.
Files tab considerations
There are a few considerations when viewing documents on the Files tab. Some of the considerations differ from Relativity's default Documents list layout and functionality.
The following considerations apply to the Files tab list and navigation:
- The number of browsable documents (viewing sample) is limited to the Viewing sample setting. This number represents a sample of the data set. A banner just above the list lets you know the sample size and the total number of documents in the data set.

To change the viewing sample size, use the viewing sample selector in the lower right corner of your screen.
- The total record count is displayed in the lower right corner.

- The mass actions count displays the number of documents selected for a mass action. Mass actions apply to the full data set and not just the sample set.

- Sorting is limited, depending on the number of documents in the sample. If the viewing sample exceeds the sorting threshold, sorting is disabled and a banner appears at the top of the list indicating the sample size exceeds the sorting threshold. You will also see a message when you attempt to apply sorting to a column.
 You can export the file and sort the contents outside of Relativity, then reimport. Another workaround is to add additional filters to achieve the results you need.
Documents list default fields
The documents list contains the following fields by default:
- Details—the details view of all fields, including compressed metadata, of the discovered file selected.
- File ID—the number value associated with the discovered file in the database.
- File Name—the original name of the discovered file.
- File Type—the file type of the discovered file.
- File Extension - Text—allows file extensions to be filtered by text.
- Custodian—the custodian associated with the discovered file.
- Data Source—the data source containing the discovered file.
- Dedupe Status—the deduplication status of a file. The Dedupe Status field is active after publishing completes and is useful for determining which files are duplicates and, therefore, not published. The Dedupe Status field is empty for container files, discovered files, and any other files previously processed (such as files published prior to the field being available.) If you republish files, the Dedupe Status field updates with the status of the republished files. Child documents inherit their dedupe status from their parent.
Dedupe Status field values include:- Primary—a file that has one or more duplicates after publication.
- Duplicate—a duplicate of a primary file.
- Unique—a primary file that does not have any duplicates.
- File Size (KB)—the size of the discovered file. To specify KB or MB, this field needs to be recreated as a fixed-length text field.
- Is Published—the yes/no value indicates if a discovered file is published.
- Sender Domain—the domain of the sender of an email.
- Sort Date—the date taken from the file's Sent Date, Received Date, and Last Modified Date fields in that order of precedence.
- Virtual Path - Text—the complete folder structure and path from the original folder or file chosen for processing to the discovered file.
Deleted Documents view
The Deleted Documents view contains the files you deleted from the Documents tab after the files were published.

This view contains the following fields:
- File ID—the number value associated with the discovered file in the database.
- File Name—the original name of the discovered file.
- Custodian—the custodian associated with the discovered file.
- Data Source—the data source containing the discovered file.
- Processing Deletion?—the yes/no value indicating if a discovered file or partial family file is deleted.
- Is Published?—the yes/no value indicating if a discovered file is published.
- Error Message—the message that details the error, cause, and suggested resolution of the error prioritized by the following processing phases:
- Delete
- Publish
- Discover
- Text Extraction
Current Files with Exceptions
The Current Files with Exceptions view contains all the documents that yielded exceptions in your workspace that currently have an Exception Status value of Not Resolved. By default, this view does not contain files with an Exception Status of Resolved, as those can be found in the All Files with Exceptions view.

- Details—the details view of all fields, including compressed metadata, of the discovered file selected.
- File ID—the unique identifier assigned to an instance of a file.
- Storage ID—the unique identifier assigned to a file.
Differentiating between the File ID and the Storage ID. Every file is assigned a unique Storage ID. Every instance of a file is assigned a unique File ID. For example, you may have a Word document with a unique Storage ID. If that document is attached to two different emails, then each instance of the document attachments is assigned a unique File ID. Therefore, a single file with a Storage ID, may have multiple instances, each with their own unique File ID.
- File Name—the original name of the discovered file.
- Exception Level—this field displays the
type of exception Relativity encountered. There are two levels:
- Warning—the job continues; however, metadata may be incomplete.
- Error—the job is blocked from completing. You must address the error and retry the job.
- Exception Message—the message that details the exception, cause, and suggested resolution of the exception.
- Exception Phase—the phase of processing in which the exception occurred. This field will display any of the following values, as dictated by the phases' precedence. For example, if a file has both Text Extraction and Publish exceptions associated with it, this field will display a value of Publish.
- Delete
- Publish
- Discover
- Text Extraction
- Exception Category—provides insight into the nature of the exceptions that have occurred on your processed files. For details, see Exception categories and their probability of retry success.
- Exception Status—the current status of the exception. The Current Files with Exceptions view only displays files with an Exception Status of Not Resolved.
- File Type—the file type of the discovered file.
- File Extension - Text—allows file extensions to be filtered by text.
- File Size (KB)—the size of the discovered file. To specify KB or MB, this field needs to be recreated as a fixed-length text field.
- Custodian—the custodian associated with the discovered file.
- Data Source—the data source containing the discovered file.
- Is Published—the yes/no value indicating if a discovered file is published.
All Files with Exceptions
The All Files with Exceptions view contains all the documents that yielded exceptions in your workspace, including those with a current Exception Status value of Resolved and Unresolved. These files are sorted by descending file size starting with the largest containers and ending with the smallest loose files.

This view contains the following fields:
- Details—the details view of all fields, including compressed metadata, of the discovered file selected.
- File ID—the unique identifier assigned to an instance of a file.
- Storage ID—the unique identifier assigned to a file.
Differentiating between the File ID and the Storage ID. Every file is assigned a unique Storage ID. Every instance of a file is assigned a unique File ID. For example, you may have a Word document with a unique Storage ID. If that document is attached to two different emails, then each instance of the document attachments is assigned a unique File ID. Therefore, a single file with a Storage ID, may have multiple instances, each with their own unique File ID.
- File Name—the original name of the discovered file.
- Exception Level—this field displays the
type of exception Relativity encountered. There are two levels:
- Warning—the job continues; however, metadata may be incomplete.
- Error—the job is blocked from completing. You must address the error and retry the job.
- Exception Message—the message that details the exception, cause, and suggested resolution of the exception.
- Exception Phase—the phase of processing in which the exception occurred. This field will display any of the following values, as dictated by the phases' precedence. For example, if a file has both Text Extraction and Publish exceptions associated with it, this field will display a value of Publish.
- Delete
- Publish
- Discover
- Text Extraction
- Exception Category—provides insight into the nature of the exceptions that have occurred on your processed files. For details, see Exception categories and their probability of retry success.
- Exception Status—the current status of the exception. The Current Files with Exceptions view only displays files with an Exception Status of Not Resolved.
- File Type—the file type of the discovered file.
- File Extension - Text—allows file extensions to be filtered by text.
- File Size (KB)—the size of the discovered file. To specify KB or MB, this field needs to be recreated as a fixed-length text field.
- Custodian—the custodian associated with the discovered file.
- Data Source—the data source containing the discovered file.
- Is Published—the yes/no value indicating if a discovered file is published.
Details modal
You can view file details by clicking the Show details for this file icon. Details include file data, file metadata, and content metadata.

Click the Processing Exceptions tab to view a summary of errors, and the error history.

- The Exception History section represents all exceptions> that have ever occurred on a file. This acts as a timeline of the record’s exceptions, showing when they occurred, what they were about, and if any are still active. This includes exceptions resulting from retries of previous exceptions and contains category, phase, date/time, and message information. All times are kept in UTC format.
- The Exception Summary section displays a count of all active exceptions along with their associated category and phase. This is especially important when investigating exceptions> relating to container files, as there can be many associated to the parent container during file extraction. This helps determine the level of impact the issue has as it may affect many files originating from it.
Retrying delete exceptions
Navigate to the Deleted Documents view to see a record of all deleted documents. The Processing Deletion? field is the yes/no indicator for deleted documents. You can filter by Exception Message to see the exceptions that occurred during deletion. Exceptions can be retried using the >Retry Exceptions mass operations option. Once deleted, documents are excluded from further processing operations (for example, deduplication, retry, and republish) and the next duplicate is published as the new primary document, if available. To see a summary of primary documents that have been replaced, see the Master Document Replacement Summary report in

Republishing files from the Files tab
The following information is specific to republishing files at the file level via the Files tab and is distinct from republishing files via the processing set console. For details on republishing via the processing set console, see Republishing a processing set on the Publishing files topic.
The Republish mass operation provides the ability to publish specific documents on a more granular level compared to the processing set page. For example, you can select specific files and re-publish only that subset. In case only a few members of a family are selected, then this mass operation will automatically republish the whole family of documents.
Republish will overlay all metadata fields mapped at the time you started the operation. If fields are unmapped, Relativity will not remove the data from the field that was already published. The Extracted Text and Native file fields will be overwritten if they are different than the initially published document.
Navigate to the All Files view to see a list of discovered files. Use the Is Published? field filter to display published files. You can only republish files that have been previously published.

Use the Republish mass action to republish files at the file level.

When you click Republish, a confirmation modal appears containing the following information about the job you are about to submit:
- Selected republish count of eligible files
- Total number of files to be republished, including families
- Total number of mapped fields
- Number of documents per batch when importing documents during processing
If you have selected files ineligible for republish, the confirmation message reflects this by stating that there are 0 files to be republished. Ineligible files include files from unpublished processing sets or data sources, containers (for example, PST, ZIP), duplicate files, and files where the Processing Deletion? field status is Yes.

If you have selected eligible files, click Republish to proceed or Cancel to return to the All Files view.
Once you republish, you cannot cancel this job.
Republishing files where job errors are present
If you attempt to republish files with job errors, you will see a confirmation message indicating you must first resolve the errors before republishing.
To resolve job errors before republishing:
- Click Resolve job errors.
Relativity attempts to fix the job errors and republish the files. For more information on unresolved job errors, see Processing error resolution.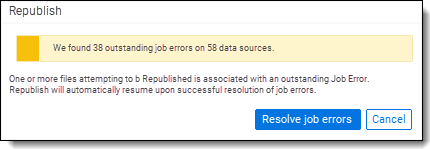
Common use cases for using the Republish mass operation
The following are common situations in which you would opt to use the Republish mass operation:
- Additional metadata fields were mapped after the initial publish of the processing set/data source completed. For example, you did not map the File Name field during the initial publish, which resulted in no metadata being populated for the documents. Now, you can map the File Name fields, go to the Files tab, filter for that data source, select the returned files and republish them, which will result the File name field getting populated.
- Files that did not get published because of document or job level publish errors.
- Newly discovered files came from a retry discovery operation after the initial publish on the set. After the initial publish completes, you can still retry discovery errors, which could result in more files to be discovered. You can select unpublished files and republish only that subset.
Retrying exceptions
Navigate to the All Files view to see a record of all discovered files, including files with exceptions found during Discovery via the Discover Error field. The files that have ready to retry exceptions can be retried at file level using the Retry Exceptions mass operations option. When you click Retry Exceptions, you see a confirmation modal confirming the number of files you are about to submit for retry.

Click Retry on the confirmation modal.

Navigate to the All Files with Exceptions view to see a record of all files with exceptions.
Saved filters
You can save any filters you set on any of the views in the Files tab and reuse them in future workflows. To do this:
- Filter on any of the fields in the view and click Save Filters at the bottom of the view.

- In the Saved Filter modal, complete the Name, Notes (optional), and Conditions fields, and click Save.

- Name—the name you want these saved filters to appear under in the saved filters browser.
- Notes—any notes you want to enter to clarify the purpose of these saved filters.
- Conditions—displays the filters applied to the list. To add additional condition, click + Condition. The Add Condition - Select Field modal appears, where you can select addition fields and apply conditions.

Once you select the additional fields you want to add to the saved filters set, specify the conditions you want to apply to those fields and click Apply.
The new field(s) and condition(s) are visible in the Saved Filter modal. Click Save to save the filter set.
- The saved filter is added to the list of Saved Filters.

Files tab (MDS)
Saved filters (MDS)
You can save any filters you set on any of the views in the Files tab and reuse them in future workflows. To do this:
- Filter the list using the filter boxes at the top of each column.

- Click Save Filter at the bottom of the screen.
- In the Saved Filter modal, complete the Name and (optional) Notes fields, and click Save.

- Name—the filter name that is displayed in the Saved filters browser.
- Notes—any notes you want to enter to clarify the purpose of these saved filters.
- The saved filter is added to the Saved Search > Saved Filters browser.

- You cannot edit conditions in the Search Conditions browser. To edit a saved filter condition, clear the condition in the Search Conditions browser, then add a new condition, or create a new saved filter with the updated conditions.

- To create a new filter from an existing filter, right-click the filter name, then select Copy. The copied condition appears in the Saved Filters browser.
- To edit a filter, right-click the filter name, then select Edit.
- To delete a filter, right-click the filter name, then select Delete.
- To stop filtering the list, click Clear All Conditions in the Search Conditions browser, then click Run Search. To reapply the filter, click the filter name in the Saved Filters browser. You can enable the Auto Run option to run automatically commands whenever you make a change.

- You cannot edit conditions in the Search Conditions browser. To edit a saved filter condition, clear the condition in the Search Conditions browser, then add a new condition, or create a new saved filter with the updated conditions.
Right-click options
You can right-click any saved filter and choose to Edit, Copy, or Delete it.

Edit
Clicking Edit opens the Saved Filter modal. You can add, remove, or modify fields and conditions, then click Save.

Copy
To make a copy of an existing filter set, right-click and select Copy.

Use the Copy option when you need a new filter with similar fields and conditions. When you copy a filter set and save it, the new set name has a (1) appended to the file name. To rename the filter set, edit the filter, then change the name on the Saved Filter modal.
Delete
To remove a filter set from the saved filter browser entirely, right-click and select Delete .

Single Download / Replace
Single Download / Replace provides the ability to download a file to your local machine for investigation. It will also provide the ability to replace and retry an original file with a new version that has been fixed during error remediation. You can only replace and retry files with errors of a status of Not Resolved.
To perform the Single Download / Replace mass action, perform the following steps:
- To take action on a specific file, select it, and then select the Single Download / Replace mass action.
If you select multiple files, you will see an error as this action is meant for one file at a time. Similarly, you will see an error message if you do not select a file.

The Single Download / Replace dialog box opens allowing you to browse for or drop a replacement file. - Once you select or browse and drop the replacement file, click Download.

- Once the file downloads, resolve the error, and drag the resolved file back into the Single Download / Replace modal. A message displays that the file is ready for replace and retry. If the file extensions do not match and/or if the new file is larger than the original, you can still proceed with the replace and retry action.
- Click Replace & Retry.

To see if the action was successful, you can check the Error History by going into the Details modal. If the retry was successful, the error displays a Resolved status.
Mass download and replacement of errored files
The Download mass action works in conjunction with the Upload Replacement(s) control to move errored files from Relativity to your local drive and then back again after error remediation. After selecting files with an exception status of Not Resolved, the Download mass action bundles the files in a .zip container and then saves the container to your local drive.
Relativity renames each file using the Storage ID metadata from the original file. The file extension remains intact. The Storage ID ensures that the downloaded file names are unique.
The Upload Replacement(s) control moves the remediated files from your local drive and replaces the original errored files. Relativity automatically retries the errors as part of the upload process.
During the upload process, Relativity matches the remediated file's name (now the Storage ID) with the Storage ID metadata from the original file. After replacement, the original file name and extension remain intact.
Differentiating between the File ID and the Storage ID. Every file is assigned a unique Storage ID. Every instance of a file is assigned a unique File ID. For example, you may have a Word document with a unique Storage ID. If that document is attached to two different emails, then each instance of the document attachments is assigned a unique File ID. Therefore, a single file with a Storage ID, may have multiple instances, each with their own unique File ID.
Mass download of errored files
Use the steps below to download errored files to your local drive. You can only use the Download mass action on files that have an exception status of Not Resolved.
To mass download files:
- Use the search bar to navigate to the Files tab.
- Select Current Files with Exceptions from the Views drop-down menu.
- Select individual files to include in the download package or use the Select All option to mark all files for downloading.
Files must be in the Discover phase for mass download. You will see an error message if you attempt to download files in other phases, such as Publish or Text Extraction.

- Select Download from the mass action drop-down menu.

A confirmation message displays the number of files you are downloading.Relativity downloads unique files from each selection. The number of files selected may differ from the number of files downloaded if duplicates exist.
- Click Download.
- A status message displays the overall progress.

When complete, files are packaged in a. zip container and saved to your local drive.During the download process, Relativity changes the file name of downloaded files to the Storage ID. The file extension remains the same as the original. This results in each file having a unique file name, which is used later when replacing the original files on Relativity.
Mass replacement of errored files
Use the steps below to upload remediated files from your local drive back into Relativity. You must place the files in a .zip container before uploading. There is a 1 GB file size limit for each .zip container.
- Use the search bar to navigate to the Files tab.
- Click the Replace button on the Files tab.
 While the Replace action is a mass action, meaning multiple files are affected, it is not a part of the mass actions menu (at the bottom of the screen). Action items in the mass actions menu require selecting target files from the Files list. Since you are moving files from your local drive back into Relativity, there are no files from the list to preselect.
 - The Replace modal opens. Either drag and drop or browse for the .zip container holding your replacement files.

- Click Upload.
When you upload the replacement file, Relativity performs the following checks:- The replacement files are contained in a .zip file, which has a file size limit of 1 GB. If you exceed the file size limit, you will see an error. To resolve this error, redistribute the replacement files so the .zip container is within the file size limit.
- The replacement file's Storage ID matches the original file's Storage ID.
- The replacement file size is within 10% of the original (larger or smaller) file size.
- The replacement file extension matches the original file extension.
- The original file has an exception status of Not Resolved.
- The Replace modal updates with the number of successful files, successful files with warnings, and unsuccessful files.

- Successful—the number of files successfully replaced.
- Successful with warning—files where the candidate file name minus extension has a Storage ID match in the Files tab and has an Exception Status of Not Resolved. In addition, these files may have a different extension or exceed the 10% deviation in file size.
- Unsuccessful—files where the candidate has a Files tab match but no outstanding exception, the candidate does not have a Files tab match, or Relativity could not extract the file from the .zip container.
You can view a log of the files, along with their status, by clicking the Replace log link on the modal.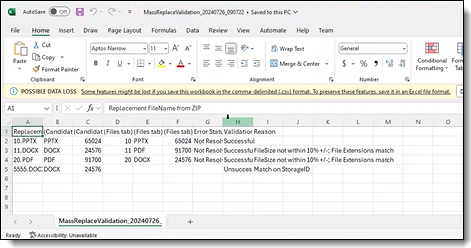
The log displays the following information:- Replacement file name
- Candidate file extension
- Candidate file size
- Files tab Storage ID
- File tab file extension
- File tab file size
- Exception (error) status
- Validation status
- Reason for warning or failure.
- Click Replace & Retry.
- A final confirmation message indicates the completion of the replacement process. Click Close.

- The last step is to republish your files so that Relativity updates metadata and extracted text fields.