


Use the following guidelines to configure the SQL Server(s) for optimum performance with Relativity. Some of these configuration options are one-time settings, while others require intermittent updating as your hardware or database sizes change.
Note: These guidelines are applicable to all SQL Servers in the environment, including the Worker Manager SQL Server.
The following topics are covered:
- Optimize for ad hoc workloads option
- Max degree of parallelism option
- Cost threshold for parallelism
- Optimize the TempDB database
- SQL maximum server memory
- Instant file initialization
- File allocation unit size
- Microsoft SQL Server service packs
- Autogrowth settings
Optimize for ad hoc workloads option
On the SQL Server, the optimize for ad hoc workloads option improves the efficiency of the plan cache for workloads that contain many single-use ad hoc batches. When this option is set to on (true), the Database Engine stores a small compiled plan stub in the plan cache when a batch is compiled for the first time. (This step is performed instead of the full compiled plan.) It relieves memory pressure by preventing the plan cache to fill with compiled plans that are not reused.
The compiled plan stub allows the Database Engine to recognize that this ad hoc batch has been previously compiled, but has only stored a compiled plan stub. When this batch is invoked (compiled or executed) again, the Database Engine compiles the batch, removes the compiled plan stub from the plan cache, and adds the full compiled plan to the plan cache.
Note: This information was obtained from the following Microsoft article: http://msdn.microsoft.com/en-us/library/cc645587.aspx.
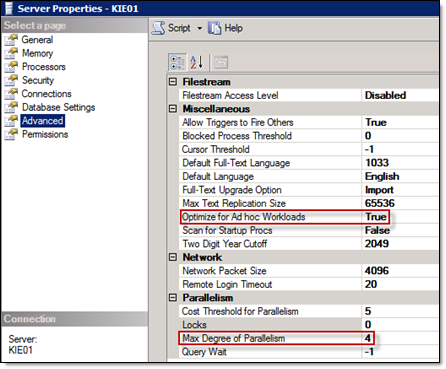
We recommend enabling the optimize for ad hoc workloads option on each SQL instance.
Execute the following statement to enable this option:
SP_CONFIGURE 'show advanced options',1
RECONFIGURE
GO
SP_CONFIGURE 'optimize for ad hoc workloads',1
RECONFIGURE
GO
Max degree of parallelism option
SQL Server detects the best degree of parallelism. Parallelism is the number of processor cores employed to run a single statement for each parallel plan execution. You can use the max degree of parallelism option to limit the number of processor cores to use in parallel plan execution. To enable the server to determine the maximum degree of parallelism, set this option to 0 (this is the default value). Setting maximum degree of parallelism to 0 ensures SQL Server uses all available processors (up to 64 processors).
Note: This information was obtained from the following Microsoft article: https://msdn.microsoft.com/en-us/library/ms189094(v=sql.120).aspx.
When it comes to servers with more than one NUMA node, refer to the following: https://support.microsoft.com/en-us/kb/2806535.
We recommend the following MaxDOP settings:
- Server with single NUMA node - If the total number of logical processor cores is greater than or equal to 16, set the MaxDOP to a value of 8.
- Server with single NUMA node - If the total number of logical processor cores is less than 16, set the MaxDOP to a value equal to half the number of available cores.
- Server with multiple NUMA nodes - If the total number of logical processor cores per NUMA node is 8 or more, set MaxDOP to 8.
- Server with multiple NUMA nodes - If the total number of logical processor cores per NUMA node is less than 8, set MaxDOP to a value equal to the number logical processor cores per NUMA node.
Another way to determine the optimal setting is to understand the amount of simultaneous long running queries that will be executed at any given time. For instance, in an 16-core system that has 100 simultaneous users logged in executing queries, it might make sense to set MaxDop to a value of 4 instead of 8 to more efficiently support many simultaneous long running queries. Analysis of the SQL Server Dynamic Management Views can assist in making this determination.
This setting takes effect immediately, without restarting the MSSQLSERVER service.
Execute the following statement to set this value.
sp_configure 'show advanced options', 1;
GO
RECONFIGURE WITH OVERRIDE;
GO
sp_configure 'max degree of parallelism', 8;
GO
RECONFIGURE WITH OVERRIDE;
GO
The Optimize for Ad hoc Workloads and Max Degree of Parallelism options can also be viewed and adjusted in the properties of the SQL Server instance within SQL Server Management Studio.
To view and adjust these options:
- Launch SQL MGMT Studio.
- Right-click on the Relativity SQL instance.
- Select Properties.
- Select Advanced.
Cost threshold for parallelism
Use the cost of threshold for parallelism option to specify the threshold at which Microsoft SQL Server creates and runs parallel plans for queries. SQL Server creates and runs a parallel plan for a query only when the estimated cost to run a serial plan for the same query is higher than the value set in cost threshold for parallelism. The cost refers to an estimated elapsed time required to run the serial plan on a specific hardware configuration. The default value is 5.
Note: This information was obtained from the following Microsoft article: http://msdn.microsoft.com/en-us/library/ms188603%28v=sql.105%29.aspx.
We recommend increasing this option to a value of 50 on each SQL instance.
Execute the following statement to set this option:
sp_configure 'show advanced options', 1;
GO
reconfigure;
GO
sp_configure 'cost threshold for parallelism', 50;
GO
reconfigure;
GO
Optimize the TempDB database
The tempdb is a database for temporary user and internal objects created by SQL Server. For optimal system performance and stability, ensure the tempdb database is configured correctly.
Use the following guidelines to configure the tempdb database:
- Create one temporary database file per each processor core. Multiple files provide better I/O performance and less contention on the global allocation structures. For higher end systems with more than 8 cores, Microsoft suggests beginning with 8 database files, and adding more if there is still contention. There are scripts available to measure contention; most Relativity environments work well with 8 data files.
- Refer to the following article on Tempdb contention: http://sqlblog.com/blogs/adam_machanic/archive/2011/04/21/analyzing-tempdb-contention-a-month-of-activity-monitoring-part-21-of-30.aspx.
- Set the initial size of each file to 10 GB or higher (to limit any autogrowth) and either set autogrowth to 10 percent or disable it. To set file sizes, right-click on the tempdb system database, select Files, and make additions. Set all files to the same initial size. It's important that all data files are set to the same initial size and autogrowth settings. As the environment grows, in an optimized setup, the Tempdb system database should be larger than your biggest, active Relativity workspace eddsdbo.Document table.
- Store these files on a fast RAID array and not the OS partition. RAID 10 is ideal. Some partners have opted to store these data files on PCIe-flash or SSDs. Read the vendor specific instructions for these newer technologies, as they might require free memory for drivers or free disk space for performance.
- Store the log file (.ldf) for this database on the same array as the other database log files. Set the initial size of the log file to 25% of the total of all tempdb data files. For example, if there are 8 tempdb data files set to an initial size of 10 GB each, set the initial size of the tempdb log file to 20 GB. Do not create additional log files – only one is necessary.
Additions can be made while the system is live, but you need to restart the SQL instance for changes to take effect. Make this change on all Relativity SQL Servers.
Note: For more information about the tempdb, see http://msdn.microsoft.com/en-us/library/ms190768.aspx.
Don't install the default tempdb data and log files on the C (OS) partition. Moving the default tempdev and templog files to another partition is important, even though it may not be easy to change their location using SQL Server Management Studio (SSMS). To move these files to a different location, you have to execute some SQL statements in SSMS.
For more information, see http://msdn.microsoft.com/en-us/library/ms345408.aspx.
SQL maximum server memory
Use maximum server memory to prevent the SQL Server buffer pool from using more than the specified amount of memory. The remaining memory is available to the operating system and other installed applications.
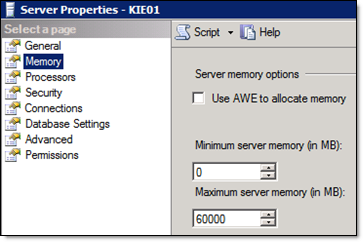
The suggested configuration involves leaving at least 10% of the total amount of RAM available to the OS and other applications. For example, set the SQL Server maximum server memory to a value of 58GB or lower if there is 64GB RAM available. This assumes that the server is dedicated to SQL and there are no other applications installed that require a significant amount of memory. Some servers benefit from leaving more than 10% available to the OS and other applications.
To set the max server memory option, adjust the max server memory value below, and then execute in SSMS.
sp_configure 'show advanced options', 1;
GO
RECONFIGURE;
GO
sp_configure 'max server memory', 1024;
GO
RECONFIGURE;
GO
You can also view the maximum server memory option and adjust this option in the properties of the SQL Server instance within SQL Server Management Studio.
To view and adjust the maximum server memory option:
- Launch SQL MGMT Studio.
- Right-click on the Relativity SQL instance.
- Select Properties.
- Select Memory.
In the event of a failover in an active/active SQL cluster, reduce the maximum server memory value for each instance to half, so they aren't competing for resources (which can severely slow down or crash the server). For example, with 32 GB installed on each node, set the max server memory on each instance to 14 GB (so together they total 28 GB). This leaves 4 GB of memory available for the OS and other installed applications on the active node. This is only recommended if both instances are running on the same box at the same time. Customized startup scripts can dynamically detect whether or not multiple instances are running on the same node and adjust the maximum server memory value for each instance accordingly. Contact Relativity support for more information.
Note: For more information on max server memory, see http://msdn.microsoft.com/en-us/library/ms178067.aspx.
Instant file initialization
Data and log files are initialized to overwrite any existing data left on the disk from previously deleted files. Data and log files are first initialized by populating the files with zeros when you perform one of the following operations:
- Create a database
- Add log or data file to an existing database
- Increase the size of an existing file (including autogrow operations)
- Restore a database or filegroup
File initialization causes these operations to take longer. However, when data is written to the files for the first time, the operating system doesn't have to populate the files with zeros.
In the SQL Server, data files can be initialized instantaneously. This process creates fast execution of file operations listed above. Instant file initialization reclaims used disk space without populating that space with zeros. Instead, disk content is overwritten as new data is written to the files. Log files cannot be initialized instantaneously.
Note: This information was obtained from the following Microsoft article: http://technet.microsoft.com/en-us/library/ms175935.aspx.
To enable instant file initialization:
- Click Run on the Start menu, and then enter secpol.msc.
- Expand Local Policies.
- Select the User Rights Assignment folder. The policies display in the details pane.
- Double-click Perform Volume Maintenance Tasks in the pane.
- Click Addin the Local Security Policy Setting dialog.
- Add your SQL Server service account (or a domain group) in the Select Users or Groups dialog.
- Restart the SQL service or server.
Comparison of zero and instant initialization
The following sample performance tests compare zero initialization and instant initialization .
| Performance test | Zero initialization | Instant initialization |
|---|---|---|
| Hardware | Dell Precision 670 Dual Proc (x64) with Dual Core, 4 GB Memory, RAID 1+0 array w/4-142 GB, 15000rpm disks. | Dell Precision 670 Dual Proc (x64) with Dual Core, 4 GB Memory, RAID 1+0 array w/4-142 GB, 15000rpm disks. |
| Create Database with 20 GB Data file | 14:02 minutes | 1.3 seconds |
| Alter database by 10 GB | 7:01 minutes | 4 seconds |
| Restore 30 GB database (empty backup) | 21:07 minutes | 5 seconds |
| Restore 30 GB database (11GB backup) | 38:28 minutes | 19:42 minutes |
File allocation unit size
File Allocation unit size is also called the Cluster size. Windows NTFS formatted drives support sizes of 512, 1024, 2048, 4096, 8192, 16K, 32K and 64K. The allocation unit is the smallest amount of space that a file can consume. Windows uses a default allocation unit size of 4096 bytes if this isn't set during the format. Unfortunately, this is usually not ideal for SQL Server performance. In most scenarios, the Data and Tempdb drives should be formatted with a 64K Allocation Unit Size. Configure this early in the SQL Server setup process as the allocation unit size is set during a drive format operation.
Run the following command for each drive to see the file allocation unit size reported in bytes per cluster. The Bytes Per Cluster value, which contains the file allocation unit size, is highlighted here.
For example, to run the command for E: drive:
fsutil fsinfo ntfsinfo e:
To run the command for F: drive:
fsutil fsinfo ntfsinfo f:
An appropriate value for most installations is 65,536 bytes (that is, 64 KB) for partitions on which SQL Server data files reside. If necessary, consult your storage vendor for their recommendation or assistance with this configuration. This significantly impacts SQL Server performance.
Always use the storage vendor's recommended setting. If your storage vendor doesn't have a recommended setting, use 64 KB.
Note: This information was obtained from the following article: http://msdn.microsoft.com/en-us/library/dd758814.aspx.
Microsoft SQL Server service packs
Ensure you have the latest Microsoft SQL Server Service Pack installed on all Relativity SQL Servers. Microsoft uses service packs to distribute hotfixes and software updates for the SQL Server. In addition, these service packs may include system admin tools, drivers, and additional components. These updates and components are conveniently bundled for easy downloading.
Since service packs are cumulative, each new one contains any recent fixes as well as any previous updates already released. You don't have to install a previous service pack before you install the latest one.
Determining the version of SQL Server
To determine which version of Microsoft SQL Server is running in your environment:
- Connect to the SQL Server with SQL Server Management Studio.
- Run either of the following Transact-SQL statements:
SELECT SERVERPROPERTY('productversion'), SERVERPROPERTY ('productlevel'), SERVERPROPERTY ('edition')
SELECT @@VERSION
Autogrowth settings
SQL Server automatically increases the size of database (.mdf) and transaction log (.ldf) files throughout the life of a workspace. It is important to set these auto growth variables appropriately.
If a transaction log is set to auto grow by the default 10% on a very large file, it takes time for the grow operation to complete. Other transactions that require a write to the transaction log have to wait until the grow operation finishes. Conversely, if these files are set to expand by too small increments, higher disk fragmentation occurs in addition to the server being continuously taxed by having to expand these files.
Relativity data files are by default set to autogrow by 10 percent and their logs by 512 MB as specified in the Autogrowth setting. Don't set the transaction logs (.ldf) to auto grow by more than 1024 MB, because log files can't be initialized instantaneously.
Note: Databases enabled for Transparent Data Encryption (TDE) cannot take advantage of Instant File Initialization. Therefore, you should set databases enabled for TDE to autogrow by 4096MB instead of the default 10%. This is because if a database is large and needs to autogrow by 10% without being able to take advantage of Instant File Initialization, it can result in application timeouts during each autogrow.
If possible, try to anticipate how large a database will become and set the "Initial Size" of the MDF file within the properties of that database to avoid or limit automatic growth.
RAID levels and SQL Server
There are many iSCSI and Fibre channel SAN, DAS and NAS solutions available. These devices often utilize RAID levels not discussed in this guide and include other unique technologies to provide the fastest I/O possible. Work with your storage unit provider to ensure the device is configured for optimal performance. Work with your storage unit provider or follow Microsoft best practices to determine where different SQL data should live.
- The tempdb data files should reside on the fastest disks available, separate from that of all other user databases. You must configure the tempdb database correctly for SQL Server performance. Many clients have opted to store these data files on PCIe-flash or SSDs as the data is temporary and doesn’t require shared storage in SQL Server Failover Cluster setups. Regardless of the type of SAN or DAS and any caching mechanisms or auto-tiering, storing these on local PCIe-flash or SSD RAID will result in reduced latency and take some of the load off of the primary storage device(s).
- Database log files should usually reside on their own disks. Isolating the database log files on their own spindles helps to ensure that nothing interferes with the sequential writes for each database log file.
- Solid state storage is an exception to the conventional wisdom. Hard drives perform very differently depending on whether you are doing random or sequential operations. Random operations are slower because of the moving parts included in typical hard drives. This is why you may want to avoid placing the log and data files on the same disks. Solid state disks, however, typically perform the same whether random or sequential operations are performed.
As mentioned above, many storage solutions include unique technologies to provide the fastest I/O possible that may go against the conventional wisdom. Many newer SAN devices are intelligent enough to automatically shift data across different types of available storage depending on activity levels of the stored data. These devices can help you maximize performance with minimal manual intervention, reducing IT related costs and getting as much possible out of the available storage.
Regardless, there are many different storage options available and we encourage you to research and decide which solution is best for your organization.
Below are some high-level suggestions for our smaller 25-50 user licensed instances that may not include a SAN and are looking for some guidance in configuring local SQL storage. RAID (Redundant Array of Independent Disks) levels 0, 1, 5 and 1+0 are typically implemented with SQL Server. Each RAID level below outlines the SQL data pieces they typically support.
Level 0
Use for: PageFile, TempDB
This level is also known as disk striping because it uses a disk file system called a stripe set. Data is divided into blocks and spread in a fixed order among all disks in an array. RAID 0 improves read and write performance by spreading operations across multiple disks. Operations can then be performed independently and at the same time.
We would never suggest RAID 0 for anything as it can introduce system or application specific outages. There is no fault tolerance with RAID 0. It improves performance, but doesn't provide redundancy.
Level 1
Use for: OS, Logs (.ldf)
This level is also known as disk mirroring because it uses a disk file system called a mirror set. Disk mirroring provides a redundant, identical copy of a selected disk. All data written to the primary disk is written to the mirror disk. RAID 1 provides fault tolerance and generally improves read performance but may degrade write performance.
Level 5
Use for: Databases (.mdf), Full Text Indexes (.ndf)
Also known as striping with parity, this level is the most popular strategy for new designs. RAID 5 is similar to RAID 4, because this level stripes the data in large blocks across the disks in an array. However, RAID 5 differs because it writes the parity across all the disks. Data redundancy is provided by the parity information.
The data and parity information are arranged on the disk array so that the two types of information are always on different disks. Striping with parity offers better performance than disk mirroring (RAID 1). However, when a stripe member is missing, read performance is decreased, for example, when a disk fails.
Level 10 (1+0)
Use for: Databases (.mdf), Full Text Indexes (.ndf), TempDB, Logs (.ldf)
This level is also known as mirroring with striping. RAID 10 uses a striped array of disks that are then mirrored to another identical set of striped disks. For example, a striped array can be created by using five disks. The striped array of disks is then mirrored using another set of five striped disks. RAID 10 provides the performance benefits of disk striping with the disk redundancy of mirroring. RAID 10 provides the highest read-and-write performance of any one of the other RAID levels but at the expense of using two times as many disks.
RAID levels higher than 10 (1 + 0) may offer additional fault tolerance or performance enhancements. These levels generally are proprietary systems. For more information about these types of RAID systems, contact the hardware vendor.
The following table breaks down the various RAID levels (source: http://technet.microsoft.com/en-us/library/cc966414.aspx#_RAID).
RAID Levels RAID 0 RAID 1 RAID 5 RAID 10 Reliability Lowest - Lack of fault tolerance results in data loss. Very good - Even better with duplexing. Good - Can tolerate single machine fault. Excellent Storage Efficiency 100 percent 50 percent >50 percent, <100 percent (#drives-1/#drives) 50 percent Random Read Excellent Fair - Worst of the RAID levels but better than a single drive. Excellent Excellent Random Write Excellent Fair - Worse than a single drive but better than some RAID levels. Fair - Generally better with larger stripe sizes. Very good Sequential Read Excellent Fair - Comparable to a single drive. Very good. Generally, better with smaller stripe sizes. Very good Sequential Write Excellent Good - Better than other RAID levels. Fair Very good Cost Lowest Moderate - Relatively high cost due to redundant drives; however, no expensive controller required. Moderate High Recommended use Good for non-critical data or stagnantly updated data that is backed up regularly or any data requiring fast write performance at very low cost. Great for testing. Good for data that requires high fault tolerance at relatively low hardware cost (redundancy using parity requires more expensive hardware). Best for log files. Very good for Read only data. Data requiring high performance for both read and write and excellent reliability while trading off storage efficiency and cost. The following table provides a summary of an example twelve disk RAID configuration.
Disk Qty RAID Example RAID-12 disk setup 0 2 1 Windows 1 2 1 System Databases (tempdb) 2 2 1 Transaction Logs (ldf) 3 4 5 Relativity Databases (mdf), Full Text Catalogs (ndf) 4 2 1 Backups