


Markups
Note: If two people edit a markup at the same time, an error occurs.
Permissions
The following permissions are required to use markups:
| Object Security | Tab Visibility |
|---|---|
|
Document: View, Edit
|
Documents |
Note: The Redact Document and Highlight Document allow a user to apply any redaction and any highlight respectively. For example, if the user has the Redact Document permission and not the Highlight Document permission, they can apply any type of redaction but they cannot apply any highlights.
Highlights
When you create a highlight, a colored box appears in the area you select, just like using a highlighter.
Creating highlights
To create a highlight, perform the following steps:
- Click
 . Blue is the default color. Click the drop-down menu to select a different color.
 - Draw the highlight across the section(s) of text you want to highlight.
When you create a highlight, it appears in the Markup Navigation Pane and updates the markup set field to include Has Highlights. If the highlight is created using a third party script or utility, this field may not be updated as expected.
Redactions
A redaction hides text on a page. In Relativity, you can create several different types of redactions:
- Creating basic redactions
- Creating inverse redactions
- Creating full-page redactions
- Creating mass redactions
When you create a redaction, it appears in the Markup Navigation Pane and updates the markup set field to include Has Redactions. If the redaction is created using a third party script or utility, this field may not be updated as expected.
Creating basic redactions
To apply a basic redaction to a document, perform the following steps:
- Click
 . The black redaction tool is the default. Click the drop-down menu to select a different tool. You can select from the following:
- Black Redaction
 —creates a solid black box, like using a black marker. While you draw the box, a gray translucent fill appears.
 - Cross Redaction
 —creates a white redaction box black border and a black X from corner to corner.
 - Text Redaction
 —creates a white redaction box with black text. The text will fill the box by default. To change the font size, keep the redaction box selected and click
  , and then select a new font size from the drop-down menu. You can right-click a text box redaction to apply different text. See Editing redaction text. The system admin determines which text options are available.
 - White Redaction
 —creates a solid white box with a gray border. The gray border won't be printed or produced.
- Black Redaction
- Draw the redaction box(es) across the section(s) of the page you want to redact. You can draw in any direction.
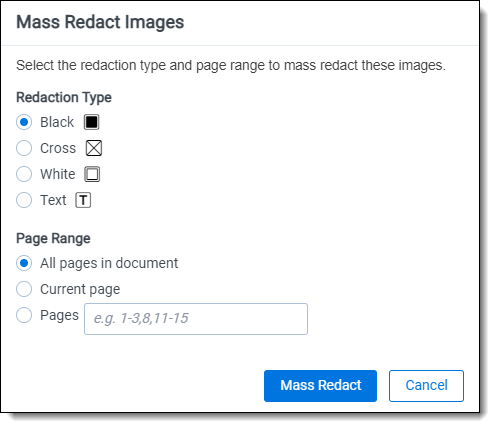
Creating inverse redactions
An inverse redaction creates a black redaction across the full page except on the locations where you draw boxes. To create an inverse redaction, perform the following steps:
- Click the Redaction Mode
 icon and select Inverse Redact from the drop-down menu.
 - Draw the inverse redaction box(es) across the section(s) of the page you do not want to redact. A blue cast indicates where the black redaction is created, and the white box indicates the area that is not redacted. You can move or resize the white box using the controls. You can also highlight text that is not redacted.
Creating full-page redactions
A full-page redaction creates a redaction across the entire page. To apply a full-page redaction, click the Redaction Mode ![]() icon and select Full-Page Redact from the drop-down menu. The black full page redaction tool is the default. Click the Redaction Type drop-down menu to select a different tool. You can select from the following:
icon and select Full-Page Redact from the drop-down menu. The black full page redaction tool is the default. Click the Redaction Type drop-down menu to select a different tool. You can select from the following:
- Black Redaction —creates a solid black box, like using a black marker.
- Cross Redaction —creates a white redaction box with a black border and a black X from corner to corner.
- Text Redaction —creates a white redaction box with black text. You can right-click a text box redaction to apply different text. See Editing redaction text. The system admin determines which text options are available.
- White Redaction —creates a solid white box with a gray border. The gray border won't be printed or produced.
You can also create a keyboard shortcut to apply a full-page redaction. See
After you apply a full-page redaction, you can resize it to make it smaller than the full page and then work with it like a normal redaction. Additionally, you can create new redactions on top of a full-page redaction if desired.
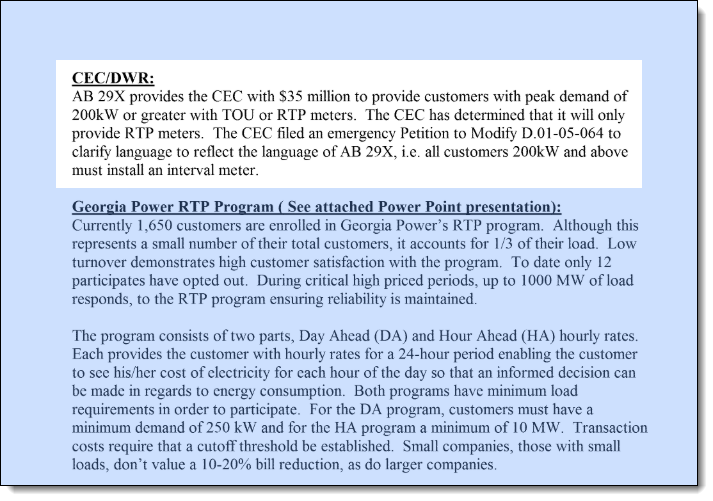
Creating mass redactions
You can use the mass redact option to apply full-page redactions of any type to a set of pages in your document. To apply mass redactions, perform the following steps:
- Click the Redaction Mode icon and select Mass Redact from the drop-down menu. . The Mass Redact Options pop-up appears.
- Select the type of redaction to apply. You can select from the following:
- Black—creates a solid black box, like using a black marker.
- Cross—creates a white redaction box with a black border and a black X from corner to corner.
- Text—creates a white redaction box with black text. In the Text Options section, you can select the font size and text to apply to the redactions. To apply custom text, select <Enter Custom Text> from the Text drop-down menu, then enter the text in the Text field.
- White—creates a solid white box with a gray border. The gray border won't be printed or produced.
- Specify a range of images to apply the redaction to. Select Pages and enter a set of pages or select All pages in document to apply the full-page redactions to the entire document.
- Click OK. The redactions apply to the set of pages you specify.
Editing markups
To re-size a single markup, click inside the markup shape. Blue dot controls appear on the corners and edges of the markup. Select any control and drag to re-size the markup. You can also re-size markups using the arrow keys. To re-size a markup in a larger increment, press Shift + the arrow key on your keyboard that points in the direction you would like to expand the markup. To re-size a markup in a smaller increment, press Ctrl + Shift + the arrow key on your keyboard that points in the direction you would like to expand the markup.
You can move markups individually or as a set. To select multiple markups on a page, click the selector tool ![]() and drag across the markups. Alternatively, press Shift or Ctrl and click to select individual markups, or click Ctrl + A to select all markups on an image. Controls appear on the corners and edges of all selected markups.
and drag across the markups. Alternatively, press Shift or Ctrl and click to select individual markups, or click Ctrl + A to select all markups on an image. Controls appear on the corners and edges of all selected markups.
To move, click and drag the selected markups to a new location. You can also move selected markups using the arrow keys. To move a markup in a larger increment, press the arrow key on your keyboard that points in the direction you would like to move the markup. To move a markup in a smaller increment, press Ctrl + the arrow key on your keyboard that points in the direction you would like to move the markup.
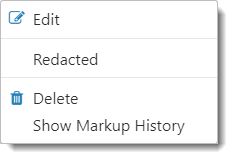
Deleting markups
You can delete markups individually or as a set. To delete a single markup, right-click a markup and click Delete. You can also press the Delete key with a markup selected and click Yes on the Confirm Delete pop-up. For Mac users, press Fn + Delete.
To delete multiple markups, do the following:
-
You can use any of the following methods to select markups for deletion:
-
Left-click and drag the selection box over the markups you wish to delete.
-
Hold down on Ctrl on your keyboard, and left-click on each markup you wish to delete.
-
Right-click on a markup after selecting any other markups you would like to delete.
-
-
Select Delete from the right-click menu.
The Delete Markups modal displays. -
Verify that you wish to delete the number of markups displayed in the modal and click the Delete X Markups button.
The selected markups are deleted.
Note: If you have a full-page redaction applied to an image, then you apply an additional full-page redaction, the most recently applied full-page redaction appears on top. If you then delete the second redaction, the first full-page redaction persists.
Working with overlapping markups
If you have multiple markups on a page that overlap each other, when you hover over the markups, translucent controls appear. Click the markup you want to work with, and the controls become active to indicate which markup is active. In the following example, the black box redaction is active.
Working with markups outside of page boundaries
If you have markups that exist outside the boundaries of an image, such as those created by custom applications, they will render in their currently saved coordinates in the Viewer. Interacting with the markup by attempting to move or select it will move the markup within the page boundaries. This change is saved and audited in the workspace.
(Click to expand)
Editing redaction text with a markup set
When you create a text redaction, it will display the most recent word or phrase you entered while editing a redaction. If you have never edited or created a text redaction before, it will display Redacted instead.
To perform this task you need the permissions for the markup sets object as well as the individual markup set you wish to use.
To edit the text in a text box redaction using the default text for a markup set, perform the following steps:
- Choose the desired markup set from the drop-down list in the bottom-left corner of the Viewer.
- Right-click the redaction and select the default redaction text from the markup set.
 The new text appears in the redaction.
Editing redaction text
To edit the text in a text box redaction, perform the following steps:
- Right-click the redaction and select Edit.
- Enter the new redaction text in the field and click Edit Redaction.
The Edit Redaction Text pop-up opens.
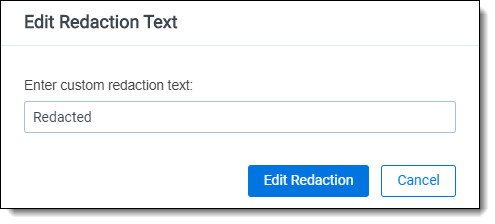
The new text appears in the redaction. Any new redactions you create will display the same text until you edit a redaction or use the default Redacted option.
Editing font size in text box redactions
The font size for text box redactions defaults to fill the entire text box. To edit the font size, perform the following steps:
- Select the text box redaction(s). You can press Ctrl or Shift and click to select multiple text box redactions.
- Click the Font Size drop-down menu and select a font size. The font size applies to the text in all selected text box redactions.
When you create a new text box redaction, the last selected font size automatically applies to the text.
Mass deleting markups
You can mass delete markups from a single page, from a range of pages, or from your entire document at once using the delete redactions and highlights option. To mass delete markups, perform the following steps:
- Click
 . The Mass Delete Markup pop-up appears.
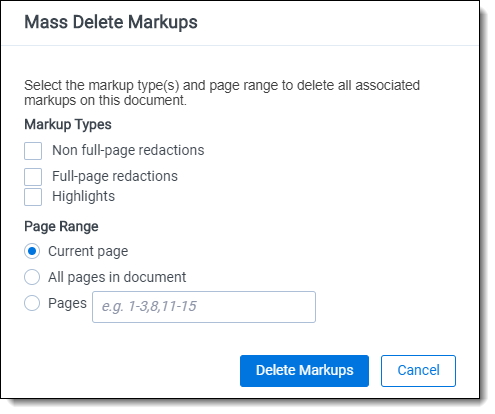
- Select the markup types you want to delete. You can select Non full-page redactions, Full-page redactions, Highlights, or any combination of these.
- Select the range of pages from which to delete the selected markups. You can select Current page, Pages (enter a set of pages), or All pages in document.
- Click Delete Markups. The selected markup types are deleted from the range of pages you selected.
Controlling markup visibility
You can toggle redaction visibility between visible, transparent, and invisible. Use the Change Markup Visibility button ![]() to change the setting.
to change the setting.
- Click once to set the markups to transparent.
- Click a second time to set the markups to invisible. The redactions are not deleted, just temporarily hidden.
- Click a third time to return the markups to full visibility.
Viewing markup history
To view the history of any highlight or redaction, right-click it and select Show Markup History. The Markup Information pop-up appears with information identifying each action, the user who performed the action, and the date and time at which the action was performed.
Using the Markup Navigation pane
In the viewer, you can locate markups in a document using the Markup Navigation pane. To open this pane, click ![]() in the lower left corner of the viewer. The Markup Navigation pane displays a list of all redactions and highlights that reviewers created in the document, as well as references to their page numbers and parent markup sets.
in the lower left corner of the viewer. The Markup Navigation pane displays a list of all redactions and highlights that reviewers created in the document, as well as references to their page numbers and parent markup sets.
(Click to expand)

You can click anywhere on the markup row to jump to the page where the markup occurs. In addition, Relativity updates the active markup set to the one associated with your row selection in the Markup Navigation pane.
Reviewing markups using Redact
You can review markups that were placed manually or by an automated project using the Redact Navigation Pane. To learn more visit, Reviewing markups to ensure accuracy.
Note: To use this feature, install Redact into the workspace where you wish to review markups. To learn more about this application, visit Redact.