


Tab Sync
Tab Sync allows system administrators to specify a source template (e.g., an existing workspace) for their tab navigation structure, and then apply that template across multiple destination workspaces quickly and efficiently.
See Tabs.
Tab Sync considerations
Tab Sync will only modify tabs that Relativity can confirm are functionally identical in both the source and destination workspaces. This includes tabs that are installed with applications, static Object Type Tabs, External Link tabs with identical URLs, and parent tabs with exact name matches. All other tabs, such as custom Object Types, will not be able to be moved using Tab Sync at this time.
- Notes:
- Parent tabs with no children will be moved to the All Menu in destination workspaces.
- New parent tabs will not be created in the destination if they do not have existing child tabs.
- Relativity will always maintain parent tab to child tab relationships in destination workspaces, but may disrupt parent tab to parent tab relationships.
- No permissions are altered, no new applications are installed, and no content tabs are created. The exception to this rule is that permissions to new parent tabs are granted to any group that has permissions to its children.
Tab Sync will update the following properties for tabs in destination workspaces if they differ from the values in the source:
- Parent
- Order
- Icon
- IsShownInSidebar
- IsDefault - only if user selects Override Default Tab in the user options.
Tab Sync will never modify the following properties in destination workspaces:
- Name
- IsVisible
- LinkType
- ObjectType
- ExternalLink
Tab Sync limitations
The following are limitations of Tab Sync to be aware of:
- Running tab sync while there are users active in a workspace - logged in users will experience updates happening immediately in their workspace upon refresh. It is recommended to run Tab Sync during off hours or to alert your end users if they are active in workspaces.
- Security permissions - only Relativity System Admins can see or use Tab Sync. If a system admin does not have access to a workspace they will not be able to run a Tab Sync job on it.
Note: Client Domains Admins cannot use Tab Sync.
- System admins can only run one Tab Sync at a time - after submitting a Tab Sync job, a view of the job you previously ran provided is displayed, provided you did not log out.
Installing Tab Sync
To use Tab Sync functionality in your workspace, you need to install the Tab Sync application from the Application Library.
To do this, perform the following steps:
- Navigate to the Application Library.
- Filter for Tab Sync on the Name field in the applications list and select it.
- On the Workspaces Installed object click Select.

- Select the workspace to which you want to install the application by selecting it and moving it to the right-side pane. Click Apply.
Once the installation is successful, you can use Tab Sync in your workspace.
For more details on using the Application Library, see Installing applications.
Running a Tab Sync job workflow
To run a tab sync job:
- Select a Source Type. See Selecting a source template
- Choose your sync settings. See Choosing sync settings.
- Select a destination workspace by checking the checkbox to the left of the workspace name. See Selecting a destination workspace.
- For certain workspaces you may want to preview what the changes will be before running the tab sync operation. See Previewing changes to each destination workspace.
Note: At any point when setting up a tab sync job, you can click Clear at the bottom of the page to clear all selections on the page out and start over.
- Click Submit Tab Sync to begin the tab sync batch operation on all the selected workspaces. A confirmation dialog window displays.
- Click Continue to submit the tab sync job to be completed.
The job will then run and a progress bar will be displayed showing the jobs progress as it migrates changes to the selected workspaces.

Note: You can click Cancel Tab Sync to cancel the operation, which will stop the progress after the current batch is complete, but will not revert any changes that have already been made. Batches are executed in groups of 10 tabs at a time. Estimated time for a job to run varies depending on workspace complexity. Tab Sync averages 5-60 seconds per workspace.
Note: Destination workspaces listed in the Selected Destination Workspace section are hyperlinked so that you can visually inspect workspaces that the operation has run on.
The job will then either complete successfully or it will fail. If a job fails, an error code will be displayed and you must resolve the relevant issue and then re-run the Tab Sync job. See Tab Sync errors and troubleshooting. In addition, an email report will be sent to the logged in account containing details about the completed, failed, or canceled job. See Email summary report.
Selecting a source template
The source template for your tab changes can be either one the following:
- An existing workspace – this can be any workspace in your Relativity instance that the admin has access to. See Workspace source template.
- Tab Profile JSON file– this specifies a given workspace's tab structure. This is rarely used; and only if you have a need to restore a former tab profile in a destination workspace you have already synced to. See Tab Profile source template.
Workspace source template
To select a workspace in your instance as your source template:
- Select the Workspace radio button.
- Click Select for the Workspace field. The Select Source Workspace dialog displays.
- Select the radio button to the left of one of the displayed workspaces to select it as the template.
- Click Select to choose the workspace that you selected as the source template.
Tab Profile source template
Tab profiles are only used in special circumstances where you need to restore a workspace's tab structure to a previous version.
To restore a workspace tab structure, the following requirements must be met:
- Tab Sync has run and completed on the workspace
- You are an admin and have access to that workspace
To download a tab profile source template (JSON file):
- Navigate to the Tabs tab in the workspace that you want to restore to the previous state.
- Create a new tab.
- Name - Tab Sync Backup
- Tab Type - Object
- Object Type - Tab Sync Backup
- Navigate to the Tab Sync Backup tab and you'll see one or more instances of an object called "Auto Created (#)".
- Select the RDO created around the date and time when Tab Sync was run on this workspace.
- Click on the link next to Tab Profile to download the JSON file. This file will be used as the source template for the workspace.
The file will be formatted as:
- Workspace <workspace Artifact ID> (<tab profile version>)
To select a tab profile file (JSON format) to upload as your source template:
- Navigate back to the Tab Sync page at the instance level.
- Select the Tab Profile radio button at the top of the screen.
- Click Select for the Tab Profile field. A Windows file explorer dialog displays.
- Select the JSON file you downloaded earlier in step 5 of the 1) Downloading a tab profile JSON file section to select it as the template.
- Click Select to set the file as the source template.
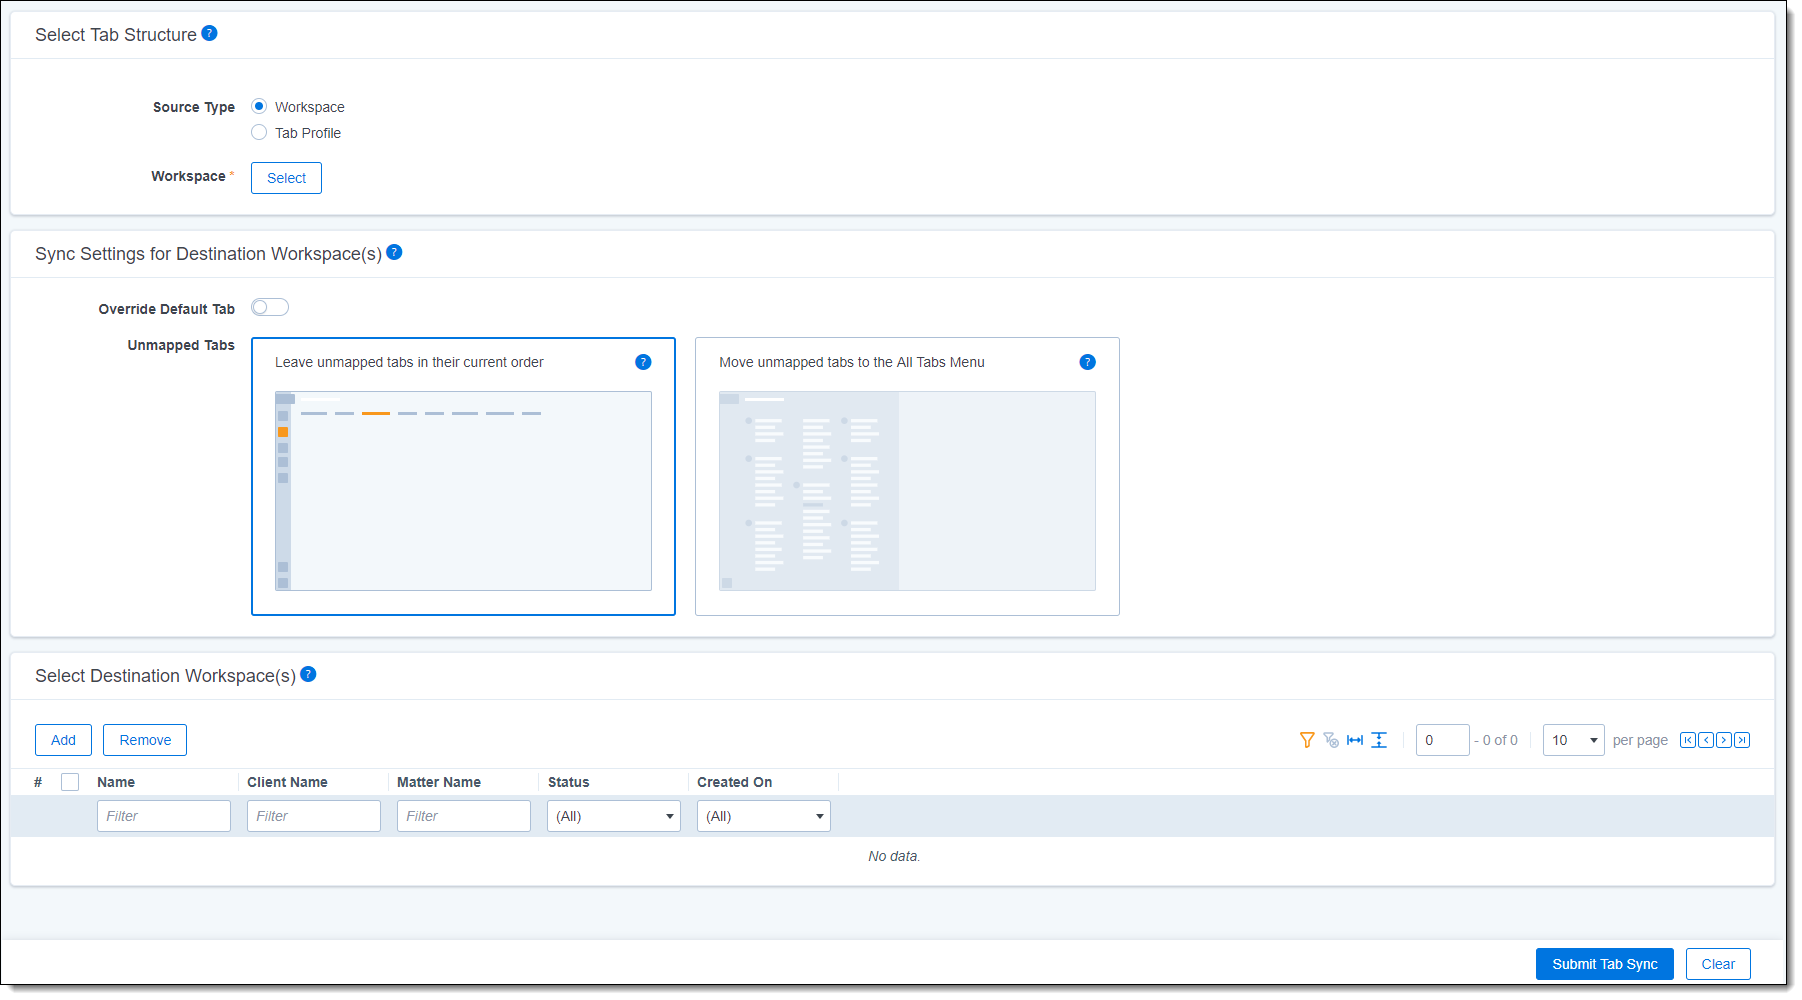
Choosing sync settings
Within the Sync Settings for Destination Workspaces section, do the following:
- Select Override Default Tab if you want the source template's default tab to override the default tab set in any destination workspaces or leave it unselected if you want the default tab for the destination workspaces to stay the same as they were.
- Choose one of the following to decide how Tab Sync will behave when it encounters unmapped tabs in any of the destination workspaces.
- Leave unmapped tabs in their current order - Unmapped tabs in the destination workspace will remain in their current order and maintain the relationship with their current parent.
- Move unmapped tabs to the All Tabs menu - Unmapped tabs in the destination workspace will be viewable only through All Tabs Menu and Quick Nav.
Note: When you are using a JSON tab profile file as the source template, you should select Override Default Tab and Move Unmapped Tabs to the All Tabs Menu.
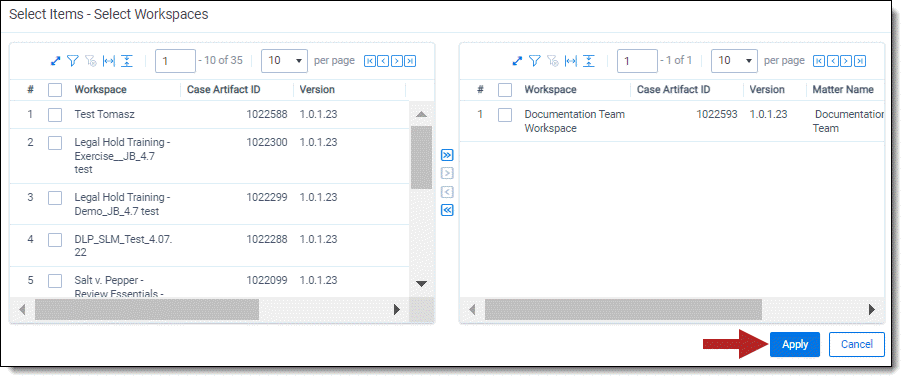
Selecting a destination workspace
In the Select Destination Workspaces section, perform the following steps:
- Click Add. The Select Destination Workspaces dialog displays.
- Select the checkbox to the left of any of the displayed workspaces in the list on the left pane, and then click one of the arrow buttons to move selected workspaces to the right pane.
Note: To move any of the selected workspaces back to the pane on the left, use the relevant arrow buttons. The double arrow icons move ALL workspaces in one pane to the other pane.
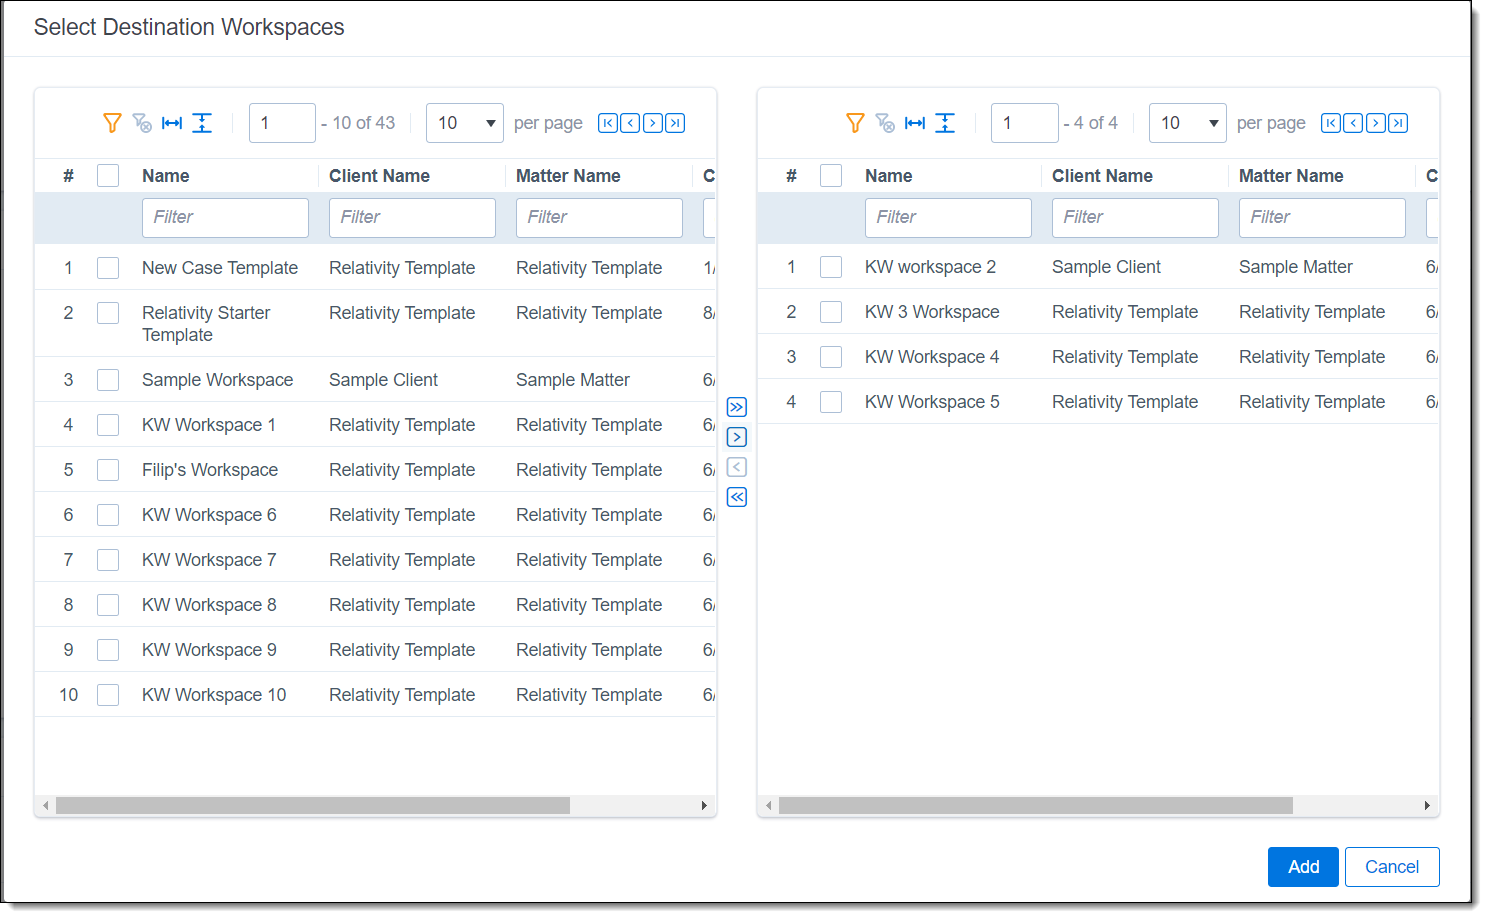
- Click Add to populate the selected workspaces in the Select Destination Workspaces section.
Removing a destination workspace
To remove a destination workspace from the Select Destination Workspaces list:
- Check the checkbox to the left of the workspace(s) you want to remove.
- Click Remove.
A confirmation window will display. - Click Remove again to remove the selected workspaces from the list.
Previewing changes to each destination workspace
Once workspaces are populated in the Select Destination Workspaces section, you can preview the changes that the selected source template will make to the destination workspace.
To preview changes for a workspace:
- Click Preview in the Select Destination Workspaces section to the right of all the displayed field columns.
The Previewing Workspace window displays.
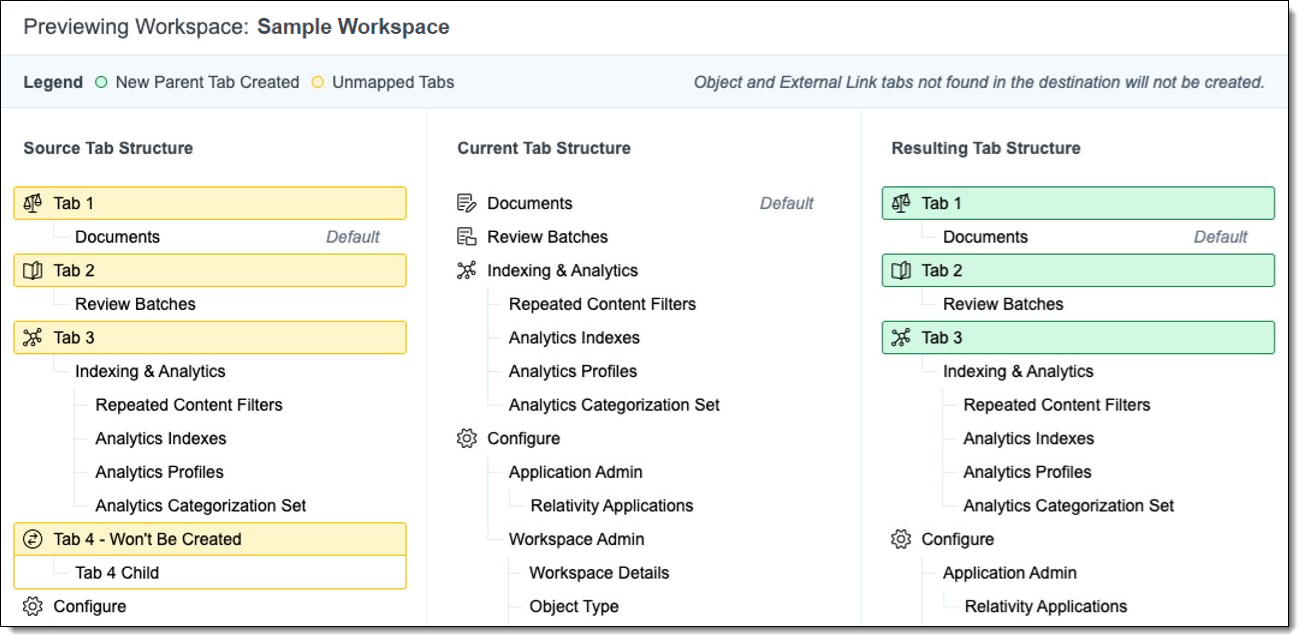
Note: Unmapped tabs that don't exist in both the destination and source workspace are shown in yellow, new parent tabs that will be created in the destination workspace are shown in green. Hidden tabs (e.g., IsVisible set to False) will display in gray with the "not visible" icon next to it ( ).
).
- Click Close to close the Previewing Workspace window.
Email summary report
After Tab Sync has finished running (either completed, failed, or canceled), the user who is logged in and running the Tab Sync operation will receive an email summary report at the address associated with their user name. The email contains information about each workspace that was synced. For more granular details, use the workspace Audit tool.
The email subject indicates whether the Tab Sync job:
- Completed successfully - all workspaces finished with no errors.
- Completed with errors - 1 or more workspaces were not fully synced. This could mean an entire workspace was not synced, or that there were errors encountered.
- Was canceled - 1 or more workspaces were not synced.
- Failed - no workspaces were synced.
The email contains the following information:
- Total Destination Workspaces - number of destination workspaces
- Completed - number of completed workspaces
- Failed - number of failed workspaces
- Not Synced - number of workspaces not synced
- Override Default Tab - user selected option
- Unmapped Tabs - user selected option
- Started - time in UTC
- Ended - time in UTC
- Time Elapsed - x hrs y mins z secs
In all cases except Failed workspaces, a table is displayed at the bottom that contains the following details for each destination workspace:
- Workspace Name
- Client
- Matter
- Sync Status - Completed, Completed with Errors, Failed, Not Synced
- Tabs Created
- Tabs Moved
- Unresolved Errors - see Tab Sync errors and troubleshooting
Tab Sync errors and troubleshooting
Tab Sync will notify you of the following errors it encounters at the workspace level:
- Workspace upgrading - when a workspace is in the midst of an upgrade
- Permissions denied - when you do not have permissions to a certain workspace
Tab Sync will also notify you of the following errors it encounters at the tab level:
- No default tab
- Multiple default tabs
- Invalid parent
- Invalid Object Type
- Non external tab type has an URL set
If a synced workspace does not look like you would expect it to, consider the following:
- Did the tabs in the source have matches in the destination?
- If you created custom tabs, they may not have exact matches in the destination
- Do the tabs in the destination have IsVisible set to False?
- Tab Sync will sync tabs that have this property set to false, but will not modify it to be visible.
- Does your user have permission to the tab in the workspace?