


You can export the contents of a production set created in Relativity through the RDC.
Exporting RDC Permissions
The following permissions are required to use the exporting feature in Relativity Desktop Client:
| Object Security | Admin Operations |
|---|---|
Note: This is required when exporting long-text cells greater than the value defined by the MaximumLongTextSizeForExportInCell instance setting, the default value of which is 1048576.
|
|
Exporting a production set
To export a production set:
- Open the RDC and select a workspace.
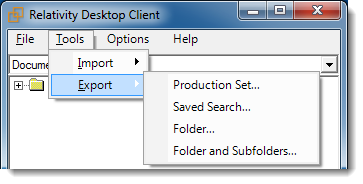
- On the Tools menu, point to Export and then click Production Set.
- (Optional) To use settings in an existing export file, use these steps:
- Click the File menu, and select Load Export Settings.
- Browse for your export settings file (.kwx) in the Open dialog.
- Select a production set, and click OK. Your production set appears on the Data Source tab, and the settings from the file populate the Destination Files tab. (You can also modify any settings on the Data Source and Destination Files tab as necessary.)
Note: On the Destination Files tab, you may want to select Overwrite Files if you're re-exporting the same group of files to the previously used location.
- Continue with step 7.
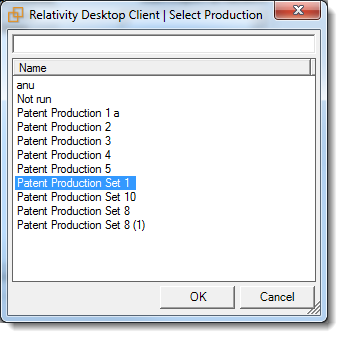
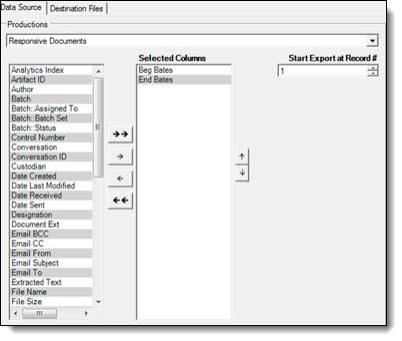
- On the Data Source, select a production set in the Productions box. Update the remaining options as necessary.
- Views - select a view for the data that you want to export.
- Selected Columns - choose the fields that you want to export by moving them to the Selected Columns box. The box on the right displays all available fields, but the RDC only exports the fields in the Selected Columns box.
- Start Export at Record # select a record number that identifies the initial document for export. The RDC begins by exporting the document with this record number and continues by exporting documents with subsequent record numbers.
- (Available only for Saved Searches, Folders, and Subfolders) Production Precedence - click
 to display the Pick Production Precedence dialog where you can select a group of produced documents for export instead of the original images.
 - Select the images that you want to export:
- Original Images - only the original, non-produced images.
- Produced Images - a produced version of the images.
- Include original images… - original images for the documents that are not in a specified production.
- Move the productions that you want to exported to the Selected Productions box. To move productions between columns, highlight them and click the Right or Left single or double arrows. Use the Up and Down arrows to order the precedence of the fields.
- Select the Destination Files tab.
On the Destination tab, you can set options that control how the files in folders, searches, and production sets are exported. The Export dialog displays this tab when you select an Export option from the Tools menu, or when you right-click on a folder or workspace in the RDC. The Destination tab displays the same options when you export files in folders, searches, or production sets.
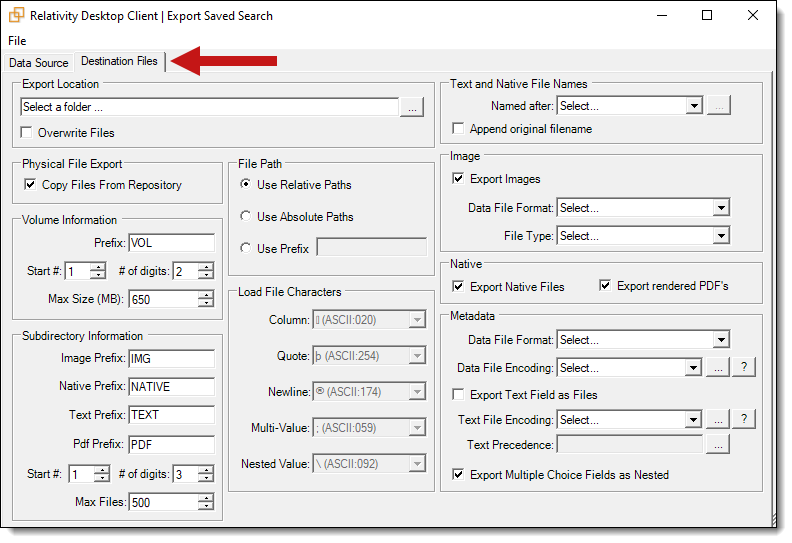
Note: In the Text and Native File Name section, the Named after option is available only for Production Sets.
- Complete the fields on the Destination Files tab. See Fields on the Destination Files tab.
- After you select your export settings, select File and click Run.
Note: A warning message appears if you are missing information required to run the export. Update the settings for the required options, and click Run again.
-
You can view the progress of an export through the RDC. Select the following tabs to display specific information:
- Summary - displays general information about the number of records, processing warnings, and errors. The following screen shot displays file progress for an export job.
- Errors - lists any errors encountered during the load. The Errors tab displays any errors that occur when you export content with the RDC.
- Progress - displays a detailed view of the load progress.
- Warnings - displays information about loading or connection issues.
- Report - includes the following files that you can export:
- Export Error Report - exports a .csv file with a summary of errors.
- Export Error File - exports a .dat file, which is a document-level load file containing only records with errors.
- File Transfer Mode - displays the following information:
- Web mode - this mode uses the web server and it is the standard.
- Direct mode - this mode provides faster performance, but requires a connection to the network hosting the data, as well as specific Windows group permissions.
- Summary - displays general information about the number of records, processing warnings, and errors. The following screen shot displays file progress for an export job.
- (Optional) To save your export settings, point to the File menu, and click Save Export Settings. Choose a location for the export settings file (.kwx).
The Data Source tab in the Export Production window appears.
The Data Source tab appears when you select the option to export production sets, saved searches, folders, and subfolders. Each of these actions have similar actions, but you may want to select different settings for them.
Note: The Production:: Begin Bates and Production:: End Bates reflective fields automatically populate in the Selected Columns.
On the Data Source tab, you can set the following options for the data that you want to export:
Note: If you select any reflected fields the only value for the production you select displays.
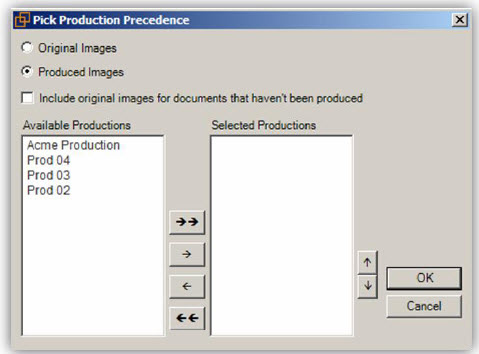
Note: The RDC only produces one version of each document. The version of the document in the topmost production exports first. If the document doesn't exist in the topmost production, Relativity checks for the document in the second production and so on. If the document is not a part of any of the selected productions, and Include original images ... is enabled, then the original document produces.
Fields on the Destination Files tab
The Destination Files tab contains the following sections with their respective fields:
- Export Location - select a target directory for exporting folders, searches, and production sets. Click
 to browse for a location. Select Overwrite Files to overwrite any existing files of the same name in the target export directory.
- Physical File Export - select the Copy Files From Repository option. This is the default option and copies files from the file server to the specified export location. If you don't select Copy Files From Repository, Relativity doesn't copy the files to the export location. Instead, the exported load files reference the repository location of the files.
- Volume Information - controls the naming and size of the volume identifier. Set the following options in this section:
- Prefix - enter the alpha prefix for the volume identifier.
- Start # - select the first number used for the numeric section of the volume identifier. Multiple volumes increment numbers during export creating unique volume identifiers.
- # of Digits - select the number of digits attached to the prefix. (For example, if you select 3, the output is VOL001, VOL002, and so on.)
- Max size - select the maximum size allowed for each volume in MBs.
- Subdirectory Information - controls the naming and size of volume subfolders. Set the following options in this section:
- Image Prefix - enter the alpha prefix for the subdirectory that stores exported images.
- Native Prefix - enter the alpha prefix for the subdirectory that stores exported native files.
- Text Prefix - enter the alpha prefix for the subdirectory that stores exported extracted text files.
- Pdf Prefix - enter the alpha prefix for the subdirectory that stores exported extracted PDF files.
- Start # - select the starting number for the subdirectories.
- # of Digits - select the number of digits of the subdirectory prefix (For example, if you select 3, the output is IMG001, IMG002, and so on.)
- Max Files - select the number of files to store in each subdirectory.
- File Path - controls how the export path for the files is referenced. Select one of the following options:
- Use absolute paths - paths to exported files are represented as absolute paths.
C:\ Desktop\VOL001\NATIVE001\AS000001.msg
- Use relative paths - paths to exported files are represented as relative paths.
.\VOL001\NATIVE001\AS000001.msg
- Use prefix - a prefix is added to the relative path, such as a CD drive letter.
D:\VOL001\NATIVE001\AS000001.msg
- Use absolute paths - paths to exported files are represented as absolute paths.
- Load File Characters - select the delimiters to use in a document-level load file when Data File Format in the Metadata section is set to Custom. Select the following options as necessary:
- Column - this delimiter separates columns in the load file.
- Quote - this delimiter qualifies the text in each field of the load file.
- Newline - this delimiter signifies the end of any extracted text or long text field in the load file.
- Multi-Value - this delimiter separates different choices within a choice field.
- Nested Value - this delimiter indicates the hierarchy of choices within a choice field.
- Text and Native File Names - select the following options for naming exported native and extracted text files:
Note: The following field types are supported by this feature: Date, Decimal, Fixed-Length Text, Single Choice, Whole Number, and Yes/No.
- (Available Only for Production Sets) Named after - select one of the following naming convention for exported files:
- Identifier - select this option to name the files after the identifier for your workspace.
- Beginning production number - select this option to name the files after the production number. (This number may be the Bates number for a production.)
- Custom - select this option to name the native and text files in an export by appending them with either a control number or production begin bates and optionally, a field of your choice.
To select custom naming options for your exported native and text files, do the following:- Select Custom from the Named after drop-down menu.
- Click
 to the right of the Named after drop-down menu.
 - Select either the control number or production begin bates naming option from the drop-down menu.
- Optionally, to append a field or custom text to the file name, click
 .
. - Select the desired spacing option from the _ (underscore) drop-down menu.
- To either add custom text to the name or to add a field to the name, do the following:
- To include custom text as part of the name, choose the Custom Text... option in the drop-down menu and enter the desired custom text in the textbox underneath the Custom Text... drop-down menu.
- To include a field as part of the file names, select the desired field option from the Custom Text... drop-down menu. If a field is empty in a workspace it will not display as part of the file name even if selected from the Custom Text... drop-down menu.
Note: If a boolean field is selected, the name of the field will be displayed and not the value. For example: JWOLFE_009_confidential-HAS IMAGES.
- Optionally, to add an additional field or custom text after the previously selected options, click .
- Select the desired spacing option from the _ (underscore) drop-down menu.
- To either add additional custom text to the name or to add an additional field to the name, do the following:
- To include additional custom text as part of the name before a field, choose the Custom Text... option in the drop-down menu and enter the desired custom text in the textbox underneath the Custom Text... drop-down menu.
- To include an additional field as part of the name, select the desired field option from the Custom Text... drop-down menu. If a field is empty in a workspace it will not display as part of the file name even if selected from the Custom Text... drop-down menu.
Note: If a boolean field is selected, the name of the field will be displayed and not the value. For example: JWOLFE_009_confidential-HAS IMAGES.
- Click Apply to save the current naming options.
Note: If a file is not found in any of the production sets, the name will revert to the control number or production begin bates regardless of which naming options you have selected.
- Append original file - Select this option to append the original file name which is defined as the file name as it was on disk to the end of the exported file name.
- Image - determines whether to include images in an export and sets the format of the load file. Set the following options:
- Check Export Images - select this option to include images in the export. (You must set the Data File Format and the File Type when you export images.)
- Data File Format - select one of these formats for image-level load file:
- Opticon
- IPRO
- File Type - select one of these file types:
- Black-and-White Group IV Single-page TIFs
- SIngle-page TIF/JPG
- Multi-page TIF
Note: If you import a production, the page numbering is set by the Imported Opticon file. Any markup set selection, branding or other settings on the Production Set form are not applied to the imported production. The images produce exactly as they were imported.
- Native - controls which files are exported by Relativity Desktop Client.
- Export Native Files - select to export native files.
- Export rendered PDF's - select to export PDF files. This option is not available when exporting a Production set.
- Metadata - use the following options to control the export of the document-level load file and extracted text:
- Data File Format - select a the format for the document-level load file you're exporting:
- Comma separated (.csv)
- Concordance (.dat) - load file exports with the standard Concordance delimiters.
- Custom (.txt) - load file exports with the custom delimiters that you select in the Load File Characters section.
- HTML (.html) - load file is in HTML and contains hyperlinks to launch any exported files.
- Data File Encoding - select an encoding for the document-level load file from the drop-down box. Click for additional options.
- Export Text Field as Files - determines the export of the extracted text or OCR. Select this option if you want to export files as individual document-level text files, with one file per document. The RDC includes text as part of your load file if you deselect this option.
- Text File Encoding - select the encoding for the document-level text files. Click for additional options.
- Text Precedence - select and assign an order to long text fields that Relativity checks for text when performing an export. You must select one or more long text fields to use this functionality. Click to display the Pick Text Precedence pop-up. To move fields between columns, highlight them and click the Right or Left single or double arrows. Use the Up and Down arrows to order the precedence of the fields.
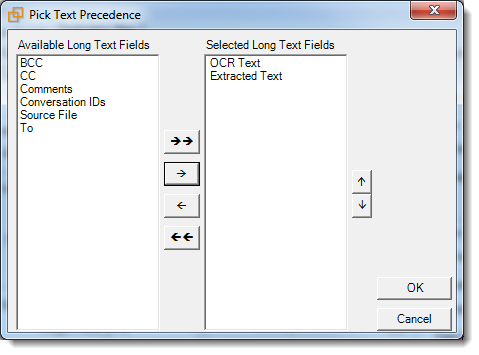
If you add any fields to the Selected Long Text Fields column, Relativity adds the Text Precedence column as the last column in the load file. During an export, Relativity checks the topmost field in the Selected Long Text Fields column for text, and if the field is null, it checks the next field in order of precedence for text. When it finds a field that contains text, Relativity adds the contents of that field to the Text Precedence column in the document load file, and then continues checking the fields for the next document.
For example, you want the Text Precedence column in the load file to contain the contents of the OCR Text field when it is available for a document and the contents of the Extracted Text field when the OCR Text for a document is null. In the Pick Text Precedence pop-up, you add the OCR Text as the first field in the Selected Long Text Fields column followed by the Extracted Text field.
Note: If you want to improve export performance, you don't need to add all of the long text fields you select in the Pick Text Precedence pop-up to the Selected Columns option on the Data Source tab. When you don't select these fields on the Data Source tab, but you add them to Selected Long Text Fields column, the RDC adds the content of these fields to the Text Precedence column as described above. When you add the long text fields on the Data Source tab, Relativity adds these columns to the document level load file.
The Precedence Text column displays the file path to the exported files if you select the Export Text Field as Files checkbox.
- Export Multiple-Choice Fields as Nested - select this option to maintain the hierarchy of Relativity multiple-choice lists, when applicable. The nested value delimiter, a backslash, separates child choices.
- Data File Format - select a the format for the document-level load file you're exporting: