With the Mass PDF operation you can create PDF files from natives, images, and produced documents, and save those PDFs on your computer. The Mass PDF operation also allows you to store PDFs created from native files or original images in Relativity and review them in the PDF Viewer. The Mass PDF application is available from the mass operations bar on the document list.
- Notes: In Server 2022, an integrated PDF application has been introduced to replace the Save as PDF functionality that was previously part of Relativity, including the Save as PDF mass operation and the Save as PDF on-the-fly operations on the Viewer. This new application brings several advantages, including:
- This is an agent-based based application. This resolves many of the stability, performance, and scalability limitations of the Save as PDF functionality that comes out of the box in Relativity Sever 2021.
- By having its own agents, it has dedicated resources. The previous version shared resources with Imaging and Processing. This eliminates the problem of having PDF jobs queued behind a Processing or Imaging job.
- Maximum supported mass PDF jobs size is now 10,000 documents or 1,000,000 images.
- If a single document errors during a mass PDF jobs, the new application will skip that document and work on the next one. In the previous version, that job would had failed.
- It has new features such as a new PDF profile, a new progress and status bar, error reports, enhancement to production order, and new naming and content options.
- PDFs created from the viewer are named with a unique ID instead of the document control number.
- The options defined on the PDF profile cannot be modified from the mass operation or from the Viewer.
- If you install this application, the Save as PDF mass operation is not available in the related items pane in the review interface.
- You cannot use mass operations on Data Grid-enabled fields.
- PDF does not integrate with the Password bank. If you try to convert a native document that is password protected, an error occurs.
Limitations:
Prerequisites
Before using the PDF application, complete the following prerequisites:
- The PDF application needs to be installed in the Relativity instance before the PDF agents are created.
- The new agents associated with the PDF application, PDF manager, and the PDF worker, utilize the message broker for resilience and scalability. Thus, the message broker needs to be set up in the Relativity instance before agents are created.
- For more information on the new PDF agents, see What's new in the infrastructure.
Download PDF application
The PDF application is available on the Relativity Community. To obtain the .rap file, please visit the Server 2022 Installation Files file inventory. Download the Server 2022 Release .rap files, for more information click here.
Note: You must have valid Relativity Community credentials in order to download any Community file linked to from the documentation site. You will need to enter those credentials on the Community login screen if you are not already logged in. If you are already logged in to the Community at the time you click a link, the file is automatically downloaded in the bottom left corner of your screen. If you get an error message stating "URL No Longer Exists" after clicking a Community link, it may be due to a single sign-on error related to the SAML Assertion Validator, and you should contact your IT department.
Install PDF application
Perform the following steps to install the PDF application:
- Navigate to the Application Library.
- Click Upload Application.
- Under the Application Information section, select the Choose File button.
- From the dialog, select the PDF application, then click Open.
- Click Save.
- Install the PDF application on the required workspaces. Relativity recommends installing it on all workspaces.
Add PDF application agent
Customers should only have one PDF manager per Relativity instance and at least one PDF worker agent per Relativity instance. To handle larger quantities of documents in a single mass PDF job or multiple concurrent mass PDF jobs, PDF worker agents can be added as needed. The PDF manager and the PDF worker agents can be added to an existing agent server once the PDF application is uploaded and installed.
Additionally, the following should be taken into consideration when adding more PDF worker agents:
-
A PDF worker on a shared agent server can only utilize at most 50% of the CPU.
-
PDF workers on a dedicated agent server are multi-threaded. The number of threads are determined by the number of processors on the VM divided by two. For example, an eight core VM results in a PDF worker with four threads.
For optimal performance Relativity recommends that dedicated agent VMs are created with a maximum of two PDF worker agents per machine. This will allow the worker agents to maximize resource usage without performance degradation. If PDF worker agents are added to a shared agent server, only one should be added to limit the impact to other agents on the server.
Note: If users have a dedicated Invariant worker for Save As PDF jobs they can either decommission it, or convert it to an agent server following the recommendation of two PDF Worker agents per VM.
Perform the following steps to install these agents:
- From the Home menu, navigate to the Agents tab, and then click New Agent.
- Click Browse next to Agent Type, and then click PDF Manager Agent and PDF Worker Agent.
- Click OK.
- Leave all other settings at their default values, and then click Save.
Relativity service account
The Relativity service account must be enabled with an integrated authentication provider correctly setup for the PDF application to log into the WebAPIPath and run PDF application jobs.
- First, you must create a login method for the Relativity Service Account user.
- When adding the login method to the Relativity Service Account user, select the integrated authentication provider and set the Windows account to the Relativity service account user's Windows user name. For example, domain\username or .\username.
Upgrade PDF application
Perform the following steps to upgrade the PDF application:
- The PDF application is available for download through the Relativity Community or contact Support to request the newest version of the PDF application that is compatible with your version of Relativity.
- Navigate to the Application Library.
- Click on the currently installed version of the PDF application. The Application page appears.
- Click Edit.
- Click Clear in the Application File field. The original file is cleared.
- Click Choose File in the Application File field.
- From the dialog, select the newest version of the PDF application, then click Open.
- Click Save.
PDF permissions
The PDF application has the following associated permissions:
- A new Tab Visibility permission, PDF, controls access to the PDF and PDF Profile tabs.
- A new Object Security permission, PDF Profile, controls access and operations over the PDF Profile object.
- The previous Save as PDF permission is replaced with the new PDF permission.
- Notes:
- If installing the new PDF application on 10.3 before upgrading to Relativity 2022, the Save as PDF permissions will be applied to the new PDF application. The new PDF application has to be installed in all workspaces for this to occur and this application needs to be installed as a part of the upgrade workflow. If installing the new PDF application while still active in 10.3, the Save as PDF permissions will not be carried over. The client must re-add the permissions.
- If upgrading from Relativity Server 2021 and above, when the new PDF application is first installed on a workspace, it applies the previous Save as PDF permission settings to all groups.
- System administrators with the correct permissions setup for Save as PDF, are unable to test this in Preview Security mode. This is done to prevent downloading documents that haven't been authorized.
PDF profile
Use the PDF profile to customize how to create and save your PDFs.
To create a new PDF profile, go to the PDF Profile tab or use the quick search to find this tab.

General options
The options under this section apply to every file type: natives, original images, and produced images.
- Name—provide a name for your PDF Profile.
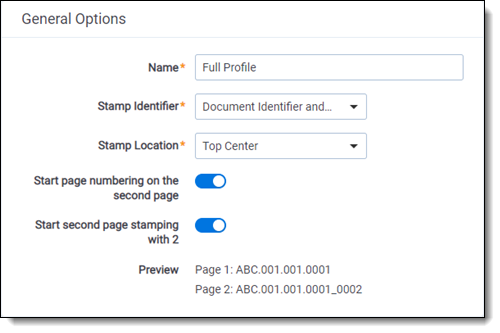
- Stamp Identifier—select this option to add branding on each page of the resulting PDF in a specific page location. You can choose to brand your PDFs after one of the following options:
- Document Identifier—choose this option to stamp each page of the PDF with the document identifier. For example, REL_00001.
- Document Identifier and Page Number—this option will stamp [Document Identifier]-[page number]. You can choose among three options:
- Add the page number to every page of the PDF
- Page 1: REL_00001-0001
- Page 2: REL_00001-0002
- Start the page numbering on the second page
- Page 1: REL_00001
- Page 2: REL_00001-0001
- Start the page numbering on the second page with 2
- Page 1: REL_00001
- Page 2: REL_00001-0002
- Add the page number to every page of the PDF
- Field—choose this option to stamp the PDFs with a field value.
- Free Text—choose this option to stamp the PDFs with the a text of your choice.
- Stamp Location—select the area of the page where you want to add your stamping.
Native options
Enter values for the following fields:
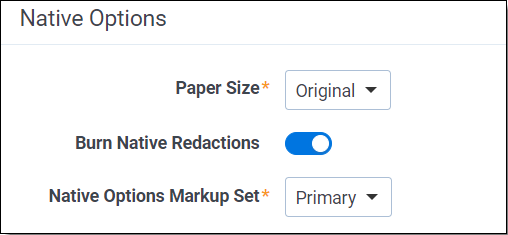
- Paper Size—select the size for both the PDFs that you create to download and to the PDFs you store in Relativity. The paper size option only applies when the source file type of the PDF job is natives. The paper sizes available are: Letter, Legal, A5, A4, A3, and original. The original option will maintain both the original paper size and orientation of each page on the native file. The Letter, Legal, A5, A4, and A3 options will create a PDF with portrait orientation in the selected paper size.
-
Burn Native Redactions—indicates that you want to include redacted natives as part of the PDF job. Toggling this field on makes the Native Options Markup Set field required below.
-
Native Options Markup Set—indicates which markup set is used to apply native redactions to the documents you are about to convert to PDF. This field is only visible if you selected to burn native redactions above. Select the desired markup set from the dropdown.
You can apply a paper size option to both the PDFs that you create to download and to the PDFs you store in Relativity. The paper size option only applies when the source file type of the PDF job is natives. The paper sizes available are: Letter, Legal, A5, A4, A3, and original. The original option will maintain both the original paper size and orientation of each page on the native file. The Letter, Legal, A5, A4, and A3 options will create a PDF with portrait orientation in the selected paper size.
Image options
When converting original images or produced images to PDFs, the following options can be configure in the PDF Profile:
- Make Text Searchable- select this option to translates images of text, such as scanned and redacted documents, into actual searchable text characters in the resulting PDF.
- OCR Profile- Select the OCR profile to be used to translate images of text into actual searchable text characters.
- Include highlights-select this option to include persistent highlights in the resulting PDFs. This option applies only when converting original images to PDF, and is only for highlights which are associated with a markup set. You will be required to specify the markup set profile to use.
- Include redactions- select this option to include redactions in the resulting PDFs. This option applies only when converting original images to PDF, and is only for redactions which are associated with a markup set. You will be required to specify the markup set profile to use.
Note: If there are not OCR profiles created in the workspace, Relativity will use a default OCR profile.
- Include Slip Sheet—select this option to include a slip sheet on the first page of the generated PDF. Available options are:
- Blank page
- Identifier only
- Coding layouts
Microsoft Word Options
When converting native file types that are Microsoft Word documents into PDFs, the following options can be configure in the PDF Profile:
- Show Track Changes- if the native MS Word document has track changes, this option will include those track changes in the resulting PDF.
- Show Comments- if the native MS Word document has comments, this option will include those comments in the resulting PDF.
Microsoft PowerPoint Options
When converting native file types that are Microsoft PowerPoint documents into PDFs, the following options can be configure in the PDF Profile:
- Show Speaker Notes—if the native Microsoft PowerPoint document has track speaker notes, this option will include those speaker notes in the resulting PDF.
- Show Presentation Comments— if the native Microsoft PowerPoint document has presentation comments, this option will include those comments in the resulting PDF.
Creating PDFs via mass operation
Note: If you are creating PDFs to open in the Viewer, it is important to note that the Viewer displays PDF text by mapping the character codes to Unicode in most cases. To check whether PDF text has been properly encoded and will display correctly in the Viewer, copy the text in the original PDF file and paste it into another application like Microsoft Word or Notepad. If the pasted text does not display correctly, the PDF is not properly encoded. If the pasted text displays correctly in another application but not in the Viewer, contact Support for assistance.
To convert multiple documents into PDFs:
- From the mass operations bar on the document list, choose whether to print Checked items or All items in the current returned set.
- Select PDF in the mass operations drop-down menu. The PDF options window displays.
- Select the appropriate settings:
- The settings available depend on the file type selected—natives, original images, or produced images. For example, production options are available if you select Produced Images. Likewise, if you are going to save all your documents in a single PDF, then there are no options on how to name the individual PDF.
- When saving your PDF as a zip or PDF portfolio you can choose to name your individual PDFs using just the control number or the control number plus a field.
- You also have the option to decide whether to include a numbering prefix on the file name. In the past that prefix was always added.
- Notes:
- Download PDF—download your PDFs.
- Store in Relativity—creates a PDF from the native or imaged version of the documents. Those PDFs will be stored in Relativity and can be reviewed using Relativity's PDF Viewer.
- Delete Relativity—deletes the stored PDFs associated with the selected natives.
Action
- Natives—saves the native of the documents.
- Original Images—saves the imaged versions of the documents.
- Produced Images—saves the produced versions of the documents.
- Individual PDFs In A Zip—saves resulting PDFs as a zipped file.
- Single PDF—creates one PDF with all documents.
- PDF Portfolio—creates one PDF Portfolio with all documents.
- When you Mass Save as PDF a group of documents, the documents retain their sort order based on the order in which they appear within your document list.
- When saving a PDF as a zip or PDF portfolio you can choose to name your individual PDFs using the control number, the control number plus a field, or just a field.
- When saving a PDF as a zip or PDF portfolio you can decide whether to include a numbering prefix on the file name. In the past, that prefix was always added.
File Types
PDF Options
- Notes:
Naming Options
This option defines the name of the individual PDFs created when documents are saved as Individual PDFs In A Zip or PDF Portfolio. The zip file or the portfolio file itself that contains the PDF files is always named result.[extension].
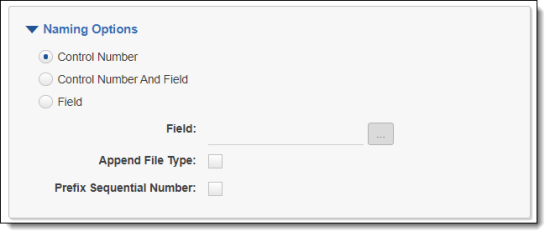
- Control Number—choose this option to name the PDFs after the control number of the original document.
- Control Number And Field—this option appends value of a field to the original control number name. When using this option, the resulting name of the document is [control number]_[field value].
- Field—choose this option to name the PDFs after a field value.
- Append File Type—appends _native, image, or _production at the end of the file name based on the type of documents used to create the PDF.
- Prefix Sequential Number—this option appends a numeric prefix based on the sort order in which they appear within your document list. For example, 01_FirstDocument.pdf.
- Include original images for documents that haven’t been produced—if a document has not been produced, you can check this option to create PDFs from the images associated with that document instead.
- Modify Production Order—select which produced version of the document to include in the PDF set.
- The save job first looks at the production set at the top of the list. If the document is included in this production that version is saved. If not, the save job checks if the document is in the next production. Only one production per document is saved.
- The list includes only the productions related to the documents selected, those productions are sorted by recent to oldest. For example, if there are 8000 productions in your workspace, but the selected documents are produced across only 100 productions, the list will show only those 100 productions.
Note: If the length of file name is longer than 251 characters, the system will use the first 251 characters.
Production Options
-
Click Create PDF. The system submits your PDF job. Once completed, the browser automatically downloads the resulting file. You also receive a confirmation email with a link to your PDFs to download.
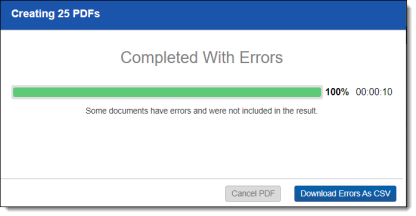
Mass PDF progress bar
The PDF application has a progress bar where you can see the status of your job, the number of documents completed, percentage completed, and the total duration of the job from start to completion. The progress bar will show the following status:
- Creating—your PDF job is being created and added to the queue.
- Picked up—your PDF has been picked up from the queue.
- In Progress—your PDFs are being created.
- Packaging—all PDF were created and now the zip file, or the portfolio file is being created.
- Completed—job is complete.
If the job completes with errors, you have the option to download a CSV file with the list of errors. For example, if you try to create a PDF for a native file that is password protected, or if you try to create a PDF from images and a document does not have images, those PDFs will not be created and those documents are included in the CSV error file.