


Instance Details tab
In the Instance Details tab you can monitor some of the most basic information about your instance of Relativity.
You can view, edit, and enable the Message of the Day (MotD), monitor all users within Relativity, check your license expiration date, view alerts and queue statuses, and view or edit group admin security settings.
This page contains the following sections:
- Monitoring Relativity Environments from the Instance Details tab
- Adding and editing a Message of the Day
Using the Instance Details tab
Scenario 1:
Scenario 2:
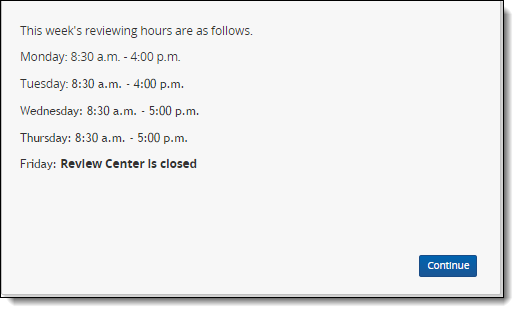
As a system admin who needs to communicate the reviewing schedule for the week to a team of reviewers, you decide to show a message of the day to users when they log in to Relativity as a reminder. You click the Instance Details tab, and then click Edit in the Message of the Day section to begin writing your review schedule message.
Using the Message of the Day editor, you create your message and select Show Message of the Day to enable the notification. With your message of the day enabled, your review team now sees the reviewing schedule reminder every time they log in to Relativity.
Monitoring Relativity environments from the Instance Details tab
The following sections on the Instance Details tab display important information about your instance of Relativity.
License information
The first section displays your Relativity license's Version, Expiration Date, and Type. Click View Details to navigate to the License tab.

Alerts
The Alerts section displays information about anything that might require attention or reduce performance for your instance of Relativity. If an agent is disabled, the agents link in the Alerts section directs you to the Agents tab. You can also click on the server name or the servers link to navigate to the Servers tab if you have one or more unresponsive servers in your environment.

The following table provides all of the possible alerts you could see in the Alerts section of the Instance Details page and under the Alerts link on the Relativity homepage. It also provides a basic description of the solution for each alert. Note that the solutions provided here may not always work, depending on the root cause, and you may need to contact Support for further assistance.
| Alert | Solution |
|---|---|
|
One or more agents are disabled. |
Go to the Agents tab and identify any agents for which the Enabled value is No. Enable them, if necessary. |
|
One or more agent servers are not assigned to any active resource pools. |
Navigate to the Resource Pools tab, select the resource pool associated with the workspace, click Add on the Agent and Worker Servers category and add the appropriate agent server to the resource pool. |
|
The {server name} agent server has not been responding for {#}. |
Go to the Errors tab, filter for the name of the agent server in the Error Source field, and review any messages associated with it. Or go the event viewer on the agent server and review recent messages. |
|
The Billing Agent has been disabled for more than {#} hours. You have less than {#} days to enable the agent before Relativity access will be disabled. |
Go to the Agents tab, locate the Billing Agent, and enable it. Note that the alert should be gone the next morning after the process has been allowed to complete during off hours. For more info please see Troubleshooting Billing Agent. |
|
Telemetry metrics have not been transmitted for more than {#} hours. You have less than {#} days to correct the issue before Relativity access is disabled. |
See Telemetry lockout for troubleshooting details. |
|
This offline instance of Relativity requires that billing metrics be collected. This has not been done for {#} days. To resolve this, ensure the Telemetry Host Agent is running. |
Go to the Agents tab, locate the Telemetry Host agent, and enable it. |
|
The Relativity Web Processing Windows Service has been stopped on the following servers: {server names}. Please restart. |
Go to the Servers tab, select the appropriate server containing the Windows Service, and click Restart Windows Service. |
|
The server {server name} could not install the custom pages for the application {application name}. |
Try to re-install the application. |
|
Your Relativity Processing license has expired. |
Contact support to obtain a new license. |
|
Your Relativity Processing license will expire in less than {#} days. Users will be unable to process data in Relativity after the expiration date. Please contact support to obtain a new license. |
Contact support to obtain a new license. |
|
Your Relativity trial license will soon expire. You have less than {#} days before access to your Relativity environment is disabled. |
Contact support to obtain a new license. |
|
Your Relativity license has expired. You have less than {#} days before access to your Relativity environment is disabled. |
Contact support to obtain a new license. |
|
Your Relativity license will expire in less than {#} days. Users will be unable to access Relativity after the expiration date. Please contact {support} to obtain a new license. |
Contact support to obtain a new license. |
|
The cache {#}, {#} is above its upper threshold. |
Go to the Servers tab, select the Cache Location Server and review the cache details. Then go to the Instance Settings tab, select the CacheLocationUpperThreshold setting, and increase the value. |
|
One or more {#} servers are inactive. |
Go to the Servers tab, locate any server that has a status of Inactive, open it, and edit the Status field to be Active. |
Security
The Security section is where you can manage admin group permission settings and generate a Group Permissions Report.
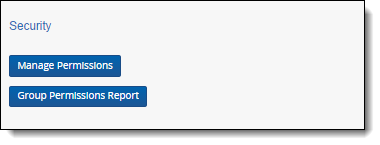
Manage Permissions
Click Manage Permissions to edit admin permission settings. See Instance security for more information about managing admin permission settings.
Group Permissions Report
Click the Group Permissions Report button to open the Script: Admin Group Permissions console. See Instance security for more information on Group Permissions Reports.
User Information
The User Information section displays the total number of Logged In Users, Total Users, and Enabled Users. Enabled users are users whose Relativity Access setting is set to Enabled. You can enable or disable users from the Users admin tab. See Users for more information about managing users.

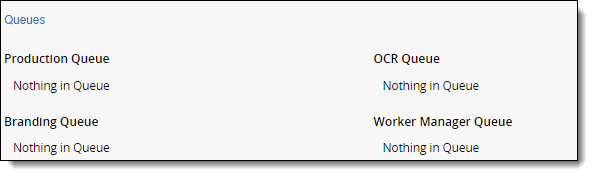
Queues
The Queues section displays the current status of your Production Queue, Branding Queue, OCR Queue, and Imaging Queue so that you can easily determine the status of your environment's current behavior.
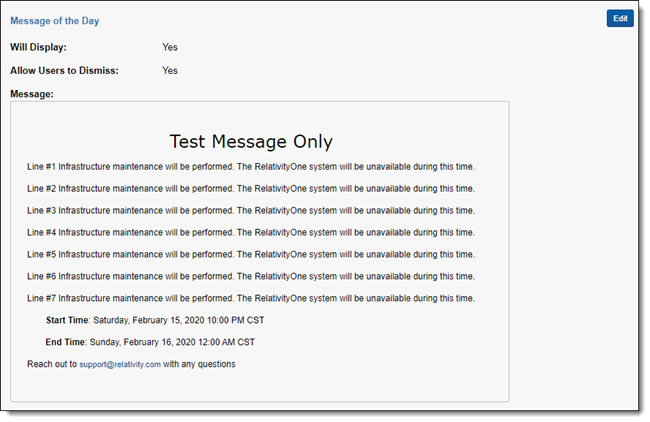
Adding and editing a Message of the Day
The Message of the Day is a message that appears to all users when they log in to Relativity. This is most commonly used to inform users of planned system maintenance, but you can use this feature to display any content you want. Only System Administrators can modify the Message of the Day.
Note: The Sanitizer object controls whether HTML attributes are sanitized and how specific HTML content is sanitized from fields on page render. You can modify the sanitizer object to add HTML alerts and links. We recommend not modifying the default setting.
(Click to expand)

To activate or change the Message of the Day:
- Click the user drop-down menu in the upper right corner of Relativity, and then click Home.
- Click the Instance Details tab.
- Click Edit to add or edit the text of the message.
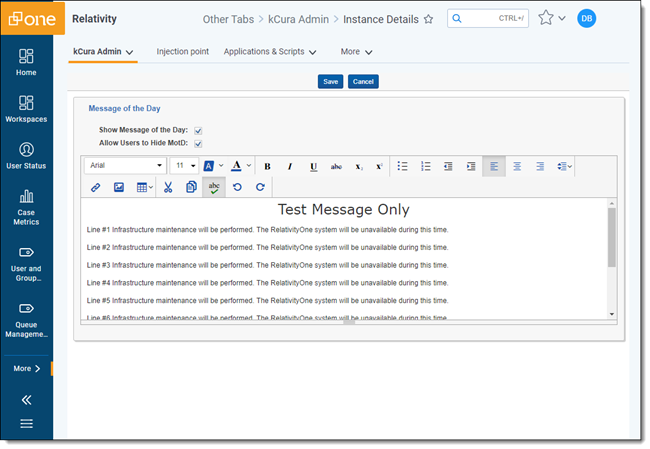
- Enter or edit your message.
- Select the Show Message of the Day checkbox to activate the MotD.
-
- Click Save.
Note: If the Allow Users to Hide MotD checkbox was selected the user can select the Do not show me this message next time checkbox in the MotD. If selected, the user will not see the MotD the next time they log into Relativity, unless the Admin changes the MotD content.