


You create a new event handler entering or selecting basic information, such as a name, object type, description, and layouts that trigger it. To each event handler, you can add one or more condition groups, which contain individual conditions used for field validation. You can then deploy your new event handler for execution on layouts in the current workspace.
Note: Event handlers created by Event Handler Express cannot be added to custom applications because the resource files are tied to the "Default" application.
Compatibility matrix
Use the following matrix to determine the appropriate version of Event Handler Express for your Relativity environment.
|
Event Handler Express version |
Supported Relativity version |
|---|---|
| Event Handler Express 4.2.1.1 | Server 2022 and forward, RelativityOne |
| Event Handler Express 3.0.5.1 | Server 2021 |
Deploying and configuring Event Handler Express
To deploy this solution, you start by adding it to the Application Library as a Relativity application. How you deploy and configure it depends on whether you are installing the solution for the first time or upgrading an earlier version of the solution. Follow the appropriate set of steps below to install or upgrade the solution in your Relativity instance.
Installing the solution for the first time
To begin using this solution, download and add it to the Application Library as a Relativity application.
To download the application:
-
Log in to the Relativity Community and click on the Relativity Applications folder.
-
Locate the newest Event Handler Express .rap file that is compatible with your Relativity version and select it.
Note: The solutions in the Relativity Applications folder are sorted from most recently modified to oldest. As a result, solutions at the top of the page are normally the newest versions of the respective solutions. If you see more than one version of the solution, select the .rap with the higher version number to ensure you're deploying the most up-to-date solution.
-
Click Download.
To add the solution to the Application Library:
- Navigate to the Application Library tab.
- Click Upload Application.
- Click Select File.
- Navigate to and select the application file included in the solution, and then click Open.
- Click Save to upload the file to the Application Library.
To add the solution to a workspace:
- In the Workspaces Installed section, click Select to install the application to one or more workspaces.
- Select the workspaces where you want to install the application, and then click the Move selected left to right icon.
- Click Apply.
The application is installed to the selected workspaces. A list of workspaces where the application has been installed displays in the Workspaces Installed section.
Upgrading an earlier version of the solution
To upgrade from an earlier version:
- Navigate to the Application Library tab.
- Click the name of the Event Handler Express application.
- Click Edit.
- Click Clear to clear the application file for the earlier version of the solution.
- Click Select File, select the Event Handler Express file, and then click Open.
- Click Save.
- If you receive a message asking if you want to update workspaces automatically, click Yes.
- Using the Workspaces Installed section of the application page, ensure that the upgrade is applied to every workspace where the application has already been installed.
Prerequisites for Event Handler Express
You must complete the following prerequisites before using Event Handler Express.
Setting security permissions
After installing Event Handler Express, you can provide advanced users with access to the application by using the default security settings on its components. To deny access to other users, set the following permissions on its components:
- Workspace-level security - In the Workspace Security window, update items on the following tabs:
- Tab Visibility tab - locate Relativity Event Handler Express in the list. Click Deselect all (2) to remove view permissions on the Relativity Event Handler Express and Event Handler Express tabs.
- Object Security tab - deny access to the Event Handler Express object by setting its permissions to None.
- Tab Visibility tab - locate Relativity Event Handler Express in the list. Click Deselect all (2) to remove view permissions on the Relativity Event Handler Express and Event Handler Express tabs.
- Object-level security - In the workspace where you deployed Event Handler Express, navigate to the following tabs and remove the groups don't require access to these objects:
- Object Type tab - Select the All Object Types view, and filter on Event Handler Express in the Name column. Remove one or more groups from the Event Handler Express object type.
- View tab - Select All Views, and filter on Event Handler Express in the Name column. Remove one or more groups from the following views:
- All Relativity Event Handler Express
- Relativity Event Handler Express - All Fields
- Relativity Event Handler Express - All Layouts
- Relativity Event Handler Express - All Objects
- Object Type tab - Select the All Object Types view, and filter on Event Handler Express in the Name column. Remove one or more groups from the Event Handler Express object type.
Note: If you send an email with a link to Event Handler Express, the recipient needs the required permissions to access the application. Copying and pasting the link in the browser after logging in to Relativity doesn't automatically provide the recipient with access to Event Handler Express.
Making design decisions
Before you begin building your event handlers, consider the following design decisions:
- Identify the conditions that you want to include in your event handler. In general, these conditions determine the coding rules that Relativity applies when a reviewer makes a selection in a layout.
- List the layouts, fields, and choices that you want to reference when building your event handler and adding conditions. For additional information, see Special considerations for building event handlers.
Defining basic information for an event handler
Use the following procedure to add basic information for an event handler:
- In Relativity, navigate to the workspace where Event Handler Express is installed.
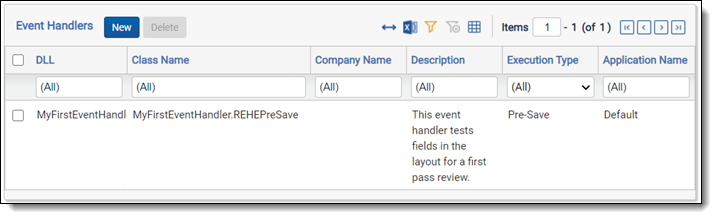
- Click the Event Handler Express tab.
Note: You can use the Delete mass operation to remove an event handler from the list view, and the Export to File operation to download a copy of it. The Copy or Edit mass operations aren't available on this view. You must manually create a new event handler rather than copying and modifying an existing one. For more information, see Editing an event handler.
- Click New Event Handler Express.
- Complete the fields in the Event Handler Express layout. See Fields for an event handler express.
- Perform one or more of the following tasks:
- Add validation logic to your event handler. See Building condition groups and conditions.
- To save your changes to the form, click Save. You can save your updates to the event handler and continue editing it later. However, your changes aren't deployed to the workspace.
- To remove your updates to the form, click Clear. You can now start creating a new event handler. Event Handler Express deletes all the entries in the Basic Information and Condition Group sections, and displays a blank form. If you want to remove a specific condition group or condition, use
 to remove the appropriate item. See Building condition groups and conditions.
Fields for Event Handler Express
The Event Handler Express layout contains the following fields in the Basic Information section:
(Click to expand)
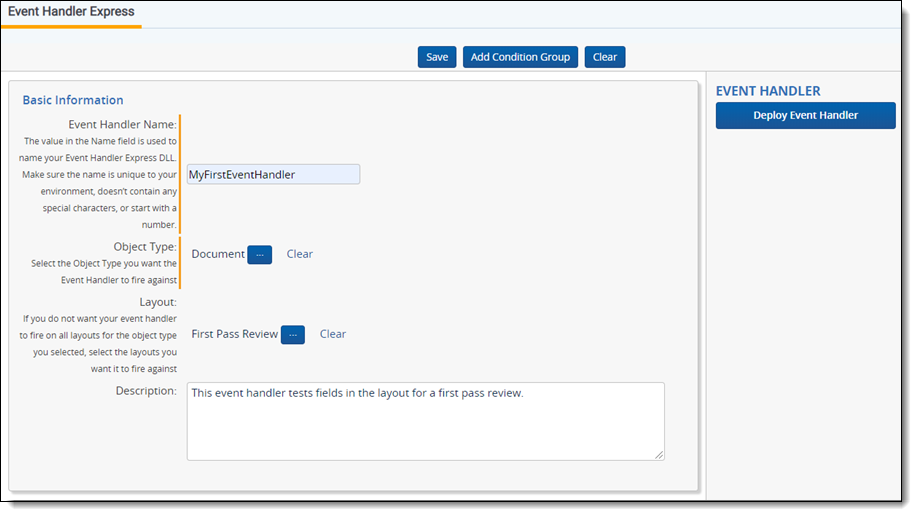
- Name - the name of the .dll file. Ensure that you enter a name, which is unique to your Relativity environment. On the Event Handler Express tab, the item list displays this name appended with additional text used to identify the .dll for your event handler. For example, if you entered MyEventHandler in the Name field then the item list displays your event handler as MyEventHandler.REHEPreSave.
Note: Don't use special characters, wildcards, or spaces in the Name field. In addition, don't use a number as the first character in your event handler name.
-
 to select a Relativity object, and then click Set. Event Handler Express supports attaching event handlers to document objects and RDOs. For example, you would select the document object if you want the event handler to execute when a reviewer selects choices on a layout during a review. We don't support attaching event handlers to system objects.
- Layouts - click to select one or more layouts that you want to trigger this new event handler. These layouts must be associated with a document object or an RDO. When a user performs a task on one of these layouts, it raises an event that triggers your event handler to validate the user's responses. If you don't select an option, the event handler runs across all layouts associated with the object type. For more information, see Executing an event handler across all layouts.
Note: Ensure that you select layouts that contain the fields used in the conditions defined for the event handler. Relativity displays an error message when an event handler attempts to execute on a layout that doesn’t contain the fields included in its conditions. Additionally, if you want to deploy all layouts, then each layout must include the fields used in the conditions.
- Description - information about the event handler. This information appears in the Description column of the Event Handler Express tab. It also appears in the Event Handlers section of the object type details view. The source code for the event handler includes the description as a code comment. The maximum number of characters for this field is 100.
Building condition groups and conditions
In Event Handler Express, you can build a series of validation rules by adding condition groups and conditions. A condition group contains one or more conditions. When you add multiple condition groups, Event Handler Express evaluates them as a series of expressions connected by the AND operator. You can choose to evaluate a series of conditions within a condition group with the AND or OR operators. Event Handler Express initially displays Condition Group - 1 and Condition - 1, so you can begin defining your validation rules.
After you add the required conditions, you can deploy the event handler in the current workspace. Event Handler Express performs the following operations:
- It compiles a .dll.
- It adds the .dll file to Relativity as a resource file.
- It attaches it to an object in the workspace where you created the event handler.
If the .dll handler already exists in the workspace, Event Handler Express overrides the existing file, and attaches it to the object if necessary. If an event handler with the same name already exists, Event Handler Express displays an error message asking you to rename the new event handler.
Use the following procedure to build condition groups and add conditions:
- Click Add Condition Group at the top of the page. A condition group appears below the Basic Information section.
- Complete the fields for a condition group. See Fields for condition groups and conditions.
- Click
 to create a condition.
 - Complete the fields for a condition. See Fields for condition groups and conditions.
- To add multiple conditions to a condition group, click for each new condition that you need.
- Repeat steps 1 through 5 until you have added all the condition groups and conditions required for the event handler.
Note: To copy an existing condition group or condition, click
 . You also click on a condition's name to hide or show its details.
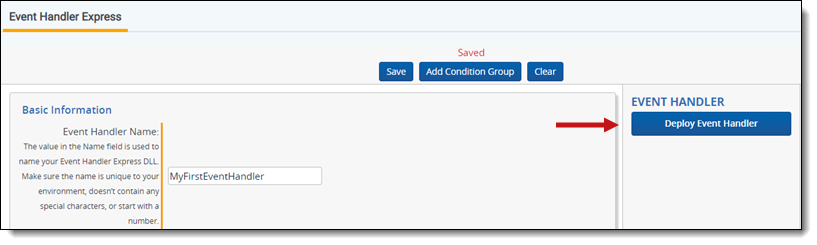
- Perform one or more of the following tasks:
- To associate your event handler with one or more layouts, click Deploy Event Handler in the Event Handler console. Your event handler now executes against layouts associated with it in your workspace.
(Click to expand)

- To save your changes to the form, click Save. You can save your updates to the event handler and continue editing it later, but your changes aren't deployed to the workspace.
- To remove your updates to the form, click Clear. Event Handler Express deletes all the entries in the Basic Information and Condition Group sections, and displays a blank form. If you want to remove a specific condition group or condition, use to remove the appropriate item. See Building condition groups and conditions.
- To associate your event handler with one or more layouts, click Deploy Event Handler in the Event Handler console. Your event handler now executes against layouts associated with it in your workspace.
Fields for condition groups and conditions
A condition group contains the following fields:
(Click to expand)
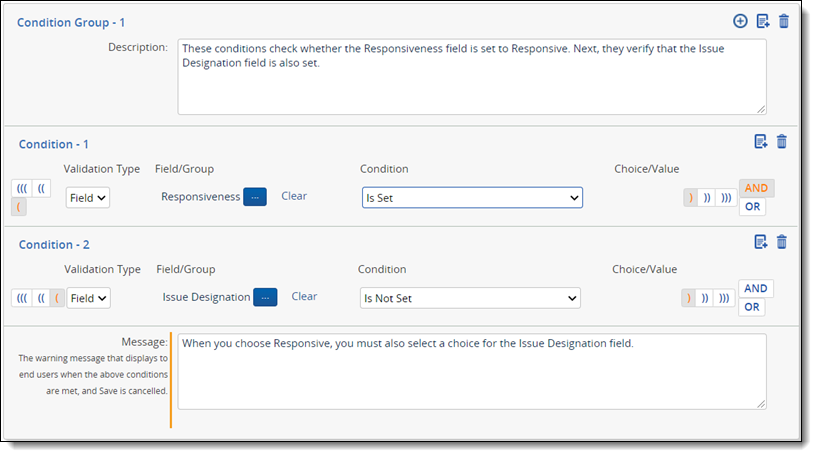
- Description - information about the validation that this condition group performs. If you enter double quotation marks (") in this field, Event Handler Express removes them from the text.
-
 - click the option with the appropriate number of parentheses to group your conditions.
 - Validation Type - select the Field or User as the type that you want to validate. Supported field types include Current User, Fixed-length Text, Single Choice, Multiple Choice, and Yes/No fields. For the Current User field, Event Handler Express only validates conditions for the user currently logged in to Relativity.
- Field/Group - the name of the field that you want to validate. If you set the Validation Type to Group, then you don't need to select an option for this field.
- Condition - select an operator that you want to use for validation. The field type that you selected in the Validation Type drop-down box must support the operator. See Supported conditions by field type.
- Choice/Value - select a choice that you want to use for validating your condition.
-
 - click the option with the appropriate number of parentheses to group your conditions.
 -
 - click the AND or OR operator to determine if both or only one condition needs to be met respectively. The operator that you selected appears in a red font.
 - Message - an error message that users see when they have met all conditions in the condition group. You can add your message after you have added conditions. The maximum number of characters for this field is 255.
Supported conditions by field type
When building a condition, you must use only the operators supported by the field type selected in the Validation Type drop-down box. The following table displays ü for each operator supported by a specific field type.
| Operator | Current User | Fixed Length Text | Multiple Choice | Single Choice | Yes/No |
|---|---|---|---|---|---|
| Is | ü | ü | |||
| Is Not | ü | ||||
| Is Set | ü | ü | ü | ||
| Is Not Set | ü | ü | ü | ü | |
| Contains | ü | ||||
| Has Changed Do Not Include Initially Set | ü | ü | ü | ||
| Has Changed Include Initially Set | ü | ü | ü | ||
| Is In Groups | ü | ||||
| Is Not In Groups | ü |
Additional information about operators
Event Handler Express provides operators that you can use to control whether an event handler fires on a layout that doesn’t contain any initial values. In general, you create a new layout in a workspace and then deploy the event handler that you want associated with it. The fields on the layout won’t contain any values when a user first begins to code with it. You may not want your event handler to fire when initial updates are made. You could use the operator called Has Changed Do Not Include Initially Set to add a condition on the event handler. When you set this condition, the event handler executes as follows:
- When the user sets the initial values on a layout, the event handler doesn’t fire.
- When the user sets or updates any subsequent values, the event handler fires.
For example, the layout contains a required Responsiveness field that isn’t set when the user initially accesses the layout. You wouldn’t want the event handler to fire and display an error message the first time that a user updates the field, but only on subsequent changes.
In addition, you may want to add a condition that ensures the event handler fires when the user changes an existing value on a layout. You could use the Has Changed Include Initially Set operator to add this condition. When you set this condition, the event handler executes as follows:
- When the user sets the initial values on a layout, the event handler fires.
- When the user sets or updates any subsequent values, the event handler fires.
For example, you may want the event handler to fire only after the Responsiveness field on a layout has been updated to a new value. When a user changes the value from Not Responsive to Responsive, or from unset to Responsive, you may want to execute the event handler to ensure that the Issue Designation field is also set.
Editing or deleting an event handler
You can edit and delete the event handlers that you create through Event Handler Express. This section explains how editing or deleting an event handler affects your Relativity environment.
Editing event handlers
You can update an event handler by clicking the Edit link appearing next to its name on the Event Handler Express tab. When you click this link, Event Handler Express displays the basic information and condition groups used to create the event handler. You can update these sections as necessary.
Deploying your updates affects all workspaces in your environment where you have added the event handler. Event Handler Express recompiles the .dll file and overwrites the existing version. All copies of the event handler in your environment now reference the updated file. Consequently, any changes made to this file immediately modify the behavior of the event handler throughout your Relativity environment.
Deleting event handlers
When you deploy an event handler, Event Handler Express creates a resource file of type .dll that contains your source code. It attaches this .dll file to the object that you selected when you created the event handler. You need to remove the event handler from the Event Handler Express and the object associated with it. Additionally, you need to remove its resource file.
To delete an event handler, complete the following steps:
- Remove the event handler from Event Handler Express. You can use the Delete mass operation on the Event Handler Express tab to remove the event handler from this list view. You can't edit the source code for the event handler after you delete it from this list.
- Remove the event handler from the object that the event handler was created on. For example, you may have created the event handler on the Document object, so you now need to remove it from this object.
- Remove the resource file created for the event handler. You can completely remove the event handler from your Relativity environment by deleting its resource file.
Note: Deleting the resource file affects all workspaces in your environment, where you may have added the event handler. The functionality provided by the deleted event handler isn't available in any workspace after this action.
Uploading an event handler to another Relativity instance
You can reuse your custom event handlers built with Event Handler Express by uploading them to other Relativity instances. When you associate the event handler with an object type, ensure that the workspace contains layouts, objects, fields, and choices with the same names as those used to create the event handler.
Use the following procedure to upload an event handler to another environment:
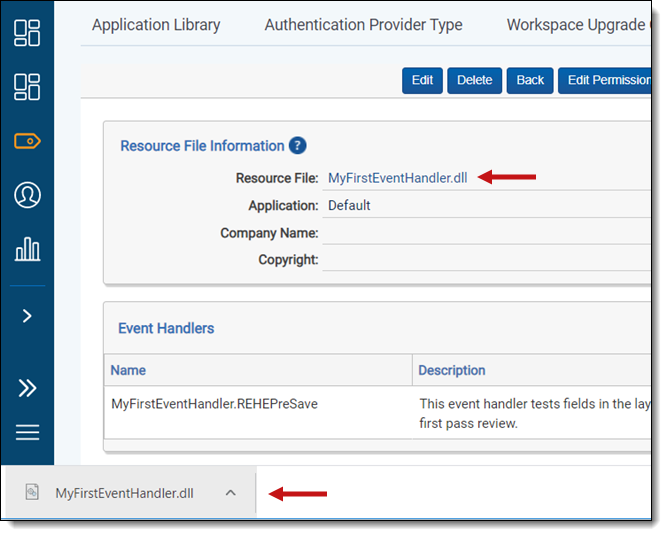
- From Home, click the Applications & Scripts > Resource Files tabs.
- On the Resource Files tab, locate your event handler and double-click on its name.
- On the details view, double-click on your event handler's name in the Resource Files field. After your browser downloads the .dll file, save it to a location of your choice.
(Click to expand)

- Log in to another Relativity instance.
- On the Resource Files tab, upload the .dll for your event handler.
- Navigate to a workspace where you want to add the event handler.
- Click the Workspace Admin > Object Type tabs.
- On the Object Type tab, locate the object type that you want to associate with the event handler. Event Handler Express supports attaching event handlers to document objects and RDOs.
- Click on the name of object type to display its detail view.
- In the Event Handlers section, click New to display the Select Event Handler dialog.
(Click to expand)

- Select your event handler .dll, and click OK to add it to the Event Handlers section of the object type. The event handler now executes when a user performs a task on the layouts selected when you initially built the event handler.
(Click to expand)


Special considerations for building event handlers
Review these guidelines to ensure that your event handlers function properly after you deploy them to a workspace.
Executing an event handler across all layouts
Your event handler executes across all layouts if you don't select one or more items in the Layouts option when building the event handler. If you want your event handler to run across all layouts in a workspace, ensure that they contain the fields required for the event handle to execute properly. Relativity displays an error message when an event handler attempts to execute on a layout that doesn’t contain a required field. Any field that you add to a condition is a required field. See Defining basic information for an event handler.
Backslashes in field and choice names
When adding conditions, ensure that the names of choices and fields don’t contain a character string containing a backslash preceded and followed by a space. For example, you don’t want to use a multiple choice field in a condition that contains a choice with the following name:
Choice B \ 1
However, you can use choices and fields that contain a backslash preceded and followed by text. See the following choice name:
Choice B\1
Wildcards in field and choice names
When adding single or multiple choice fields to a condition group, you may select fields or the choices with names that contain wildcards. Ensure that fields or choices have unique names if you omitted the wildcard characters.
Event Handler Express ignores the wildcards in the field and choice names when it compiles the .dll. The generation of the .dll fails when multiple choices have the same name. For example, you could have a multiple choice field called Choice B with the following sub-choices:
- Choice A
- Choice B
- Choice B\1
- Choice B \ 1
- Choice B \\ 1
Because Event Handler Express ignores the wildcard characters, it sees the same name for three sub-choices, causing the compiling event to fail.
Troubleshooting your event handler
You can use the following list to troubleshoot your event handlers and resolve common errors that prevent them from executing:
- Verify that you have associated the event handler with the correct object type.
- Ensure that the workspace where you want to use the event handler contains all the objects that it requires. These objects include layouts, fields, or choices.
- If you experience errors after adding your event handler to different workspace, compare the names of layouts, fields, and choices added to Event Handler Express with those used in the workspace where you created the event handler.
- Ensure that the conjunction operators are properly set on your event handler.