


Clients
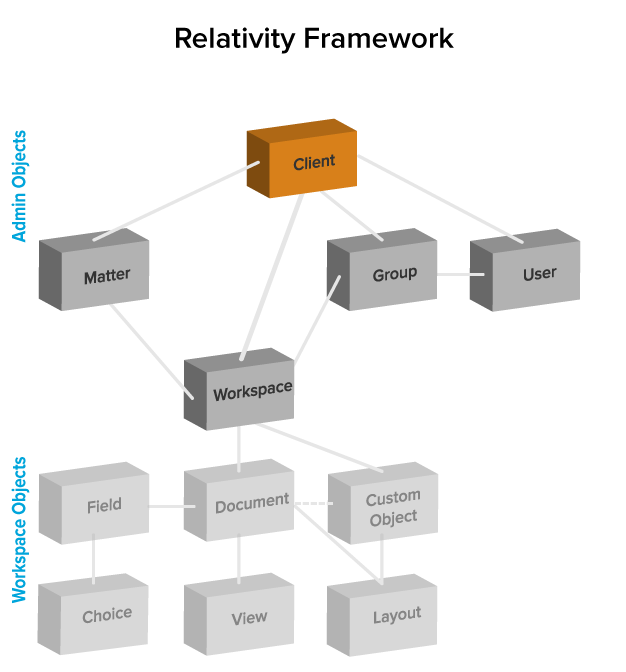
Clients are companies or organizations. In Relativity, link clients with associated users, matters, groups, and workspaces.
This page contains the following sections:
Using clients
Cloud Gate's case is just one of many your firm is in the process of handling, so you also track the status of the case with the Status field. When Cloud Gate's casework is complete, you switch the client's status to "Inactive" so you can focus your attention on other cases that are currently in progress.
Creating or editing a client
To create a client or edit information for an existing client, perform the following steps:
- Select the Clients tab and then click New Client to create a new client, or click Edit next to the client whose information you want to edit. The New Client form appears.
- Complete the fields on the form. See Fields.
- Click Save. You can optionally enable tenancy on the client.
Note: If your Clients tab view list does not contain the Edit field, you can add it.
Fields
The following fields display on the Client Information form. Fields in orange are required.
- Name - the name of the client. The name must be between 1 and 50 characters.
- Client Number - the billing number for the client. This value must be between 1 and 50 characters.
- Status - the current status of the client. The default options are active or inactive, but you can add any status value. Use the status value to organize and display lists of clients using Relativity views. See Views.
Watch the Creating Clients, Matters and Workspaces video for more information.
Enabling client domains on a client
Note: This feature was formerly referred to as multi-tenancy
The following things occur automatically after client domains are enabled:
- The system creates a new Everyone - [Client's Name] group and adds that group to the client domain. Only users whose client field is set to the client domain are included in the client domain everyone group. The system also removes those users from the default Relativity Everyone group. A system admin can add any users to any group regardless of client domain status.
Note: The Everyone - [Client's Name] group should not be assigned as the workspace administrator group for a given workspace that is part of a Client Domain.
- The system creates a unique copy of all resource pools associated with any workspaces under the client domain.
Note: Permissions assigned to groups override client domain isolation. If a non-client domain group has permissions to see a client domain's workspace or users, then those non-client domain users in the non-client domain group can still access client domain items. Enabling client domains does not change previously configured item level security settings applied to any objects within the client domain.
- The system creates a client domain admin group that permits its members to perform admin operations within the client domain.
- The
Note: After enabling client domains, system administrators needing to make group or permission changes should be extra cautious and thoroughly investigate the potential impact to client domain separation before implementing any new group/permission changes.
Generating a client domain request
To enable client domain on a client, you first generate a client domain request key in Relativity.
- Create a new client or click the name of a client on the Client tab. The details view of the client appears.
- Click Create Client Domain Request Key and then the Client Domain Request Key window appears.
- Copy the Client Domain Request Key text and paste it into an email to Customer Support.
- Close the Client Domain Request Key window.
Applying the activation key
After you receive an activation key from us, you enable client domains by applying it to the client.
- Navigate to the Client tab.
- Click the name of a client associated with the client domain request.
Note: You must select the client that you originally used to generate the request key. If you attempt to apply the activation key to a different client, Relativity displays an error message.
- Click Submit Client Domain Activation Key and then the Apply Client Domain Activation Key window appears.
- Copy the client domain activation key received in the email message that Customer Support sent. Paste it into Client Domain Key field in the Apply Client Domain Activation Key window.
- Click Apply.
Note: If Relativity displays an error message, verify that you copied the activation key correctly. Contact Customer Support if you have any questions about applying your activation key.
- Verify that the Client Domain Status field in the Client Information section displays the word Client Domain.