


As a system admin, you must assign at least one authentication method to each user in order for them to log in. A user can have multiple login methods but only one
Invitation workflow
A significant security improvement to the Relativity authentication process is that the system admin no longer knows or can set user passwords. The invitation workflow, called that because you invite users to log in to Relativity, is the new mechanism for them to set and to manage their own passwords. Now, a system admin (when creating a new user), or a user (if they forget their password) initiates an email sent to them at their specified address, and they create or reset their password directly within Relativity.
Note: For Relativity 9.4.378.21 and above, you must set the
The invitation workflow applies to the following methods:
Password
The password option requires the user to enter only a password for authentication. It does not require an additional check or two-factor criterion.
To assign and to configure this option for a user:
- After creating a new user, edit their profile (Users tab, and click their full name).
- In the Login Method (User) section, click New.
- In the Login Method Information pop-up window, select the password provider method from the Provider drop-down list.
The Default Password Settings section appears. - Disable the Enable Two-factor Authentication toggle. For more information, see Two-factor authentication.
- Set the Default Password Settings.
- Can Change Password - enable to let user change the password at any point.
- Require Change Password on Next Login - enable to have user change given password.
- Maximum Password Age - enable to set number of days a password can work. Set the number of days in the text box.
- Set Password for User - enable to create a password for the user.
- Click Save.
-
Click Send Invitation Email.

This sends an invitation email to the user at the email address listed in their profile’s User Information section. By default, the link in the email is valid for one week (10080 minutes).
Note: You can use the
If the email can't be sent because your system email SMTP settings are not configured properly, a warning is displayed.
You can also use the Invite mass action on the Users tab to send invitation email to multiple users.
To customize the invitation email, use the following instance settings:
- InvitationEmailRequestBody (Relativity.Authentication section) - the invitation email message text. The email text must be formatted as HTML.
- InvitationEmailRequestFrom (Relativity.Authentication section) – the invitation email message sender's email address.
- InvitationEmailRequestSubject (Relativity.Authentication section) – the invitation email message subject.
- InvitationLinkLifetimeInMin (Relativity.Authentication section) – the number of minutes the link sent in the invitation email remains valid.
Two-factor authentication
The two-factor authentication is a variation of the Password method that requires a passcode in addition to a password.
To assign and configure this option for a user,
- Edit their profile (Users tab, and click their full name).
- In the Login Method (User) section, click New.
- In the Login Method Information pop-up window, select the password provider method from the Provider drop-down list.
The Default Password Settings section appears. - Enable the Enable Two-factor Authentication toggle.
- Select the Mode, "always provide passcode" or "ignore passcode for Trusted IPs."
- Select the Method, use an "authenticator app" or "email" address.
- Set the preferred Default Password Settings.
- Click Save.
For authenticator app, the user will follow the instructions on the app or enter the app's passcode. For email two-factor authentication, the system emails a passcode to the user during logon, and it's different each time.
Note: The link in the email is valid for 5 minutes, and only the most recently-sent email can be used. The link expiration time is not configurable.
Password Outside Trusted IP
The Outside Trusted IP is a variation of the Password method that requires a passcode only if the user logs in outside of a specified IP range. If the log on is inside the trusted range, then only a password is required.
To define a Trusted IP range:
- After creating a new user, edit their profile (Users tab, and click their full name).
- In the User Information section enter the IP range in the Trusted IPs field.
You can specify an individual address, a range of IP addresses, or multiple addresses. Each address must be on a separate line, and you can use wildcards. For more information on setting trusted IP addresses, see Setting IP address range. The default value of empty defines all IP addresses as untrusted. You can enter *.*.*.* to trust any IP address.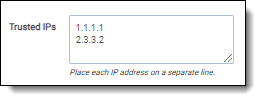
Note: Relativity only supports the IPV4 format for Trusted IP addresses. It doesn't support the IPV6 format.
- Click Save.
To assign and to configure this option for a user:
- After creating a new user, edit their profile (Users tab, and click their full name).
- In the Login Method (User) section, click New.
- In the Login Method Information section, select the password provider method from the Provider drop-down list.
- Select Require only for non Trusted IPs in the Two-factor Authentication section.
- Enter the user’s email address you want to send the password to in the Email Address field. This address can be different from the email in the user’s profile.
- Click Save and then Back.
-
Click Send User Invitation Email.
Password reset
Sometimes it may be necessary to reset a user's password. In Relativity, passwords are reset by sending the user an email with a reset link.
Note: If using a Relativity version earlier than 9.4.378.21, the Send Password Reset Email is also used to send out invitations for new users.
To reset a user's password:
- Click Send Password Reset Email.
The link within the email is valid for 15 minutes, and only the most recently sent email can be used.
Note: You can use the
Manually setting passwords
By default, system admins can't set or see user passwords. Instead, system admins can send a password reset email, and users create and manage their own passwords. However, there are some situations, such as for testing or project development, that may require system admins to explicitly and manually set passwords.
To set this option in your Relativity instance, add the AdminsCanSetPasswords instance setting to the Relativity.Authentication section and set it to True. You must manually enter this setting and value because it is not present from the default Relativity installation.
To set a password, use the following procedure.
- After creating a new user, open their profile (Click the Users tab, and then click their full name).
- In the Login Method (User) section, click New.
- In the Login Method Information section, select the password provider method from the Provider drop-down list.
- Select Set Password to True.
The password requirements appear. - Enter the password in the Password field.
- Re-enter the password in the Retype Password field.
- Click Save and then Back.
The password information doesn't appear except when you're editing it. If a current password exists, it doesn't appear either. Each new password overwrites the existing password.
Active Directory
The Active Directory method uses Windows Active Directory to authenticate the user.
To assign and to configure this option for a user.
- After creating a new user, edit their profile (Users tab, and click their full name).
- In the Login Method (User) section, click New.
- In the Login Method Information section, select the active directory provider method from the Provider drop-down list.
- Enter the user’s Windows domain and username in Active Directory Account.
An example of the domain\username format is if the user's email address is jsmith@example.com, you'd enter example\jsmith. Alternatively, you can use the user's email address without the domain ending, such as jsmith@example. If an LDAP server is installed, you can use the full email address, such as jsmith@example.com. - Click Save and then Back.
Integrated Authentication
Integrated Authentication (previously called Windows Authentication or Integrated Windows Authentication) uses Windows supported authentication protocols, such as Kerberos, to automatically log in users. Make sure the following instance settings are configured correctly.
- UseWindowsAuthentication - must be set to True to use Integrated Authentication. If False, Integrated Authentication isn't active.
- WindowsAuthIpRange - set this to the IP address or addresses for a trusted range of computers. If a user logs in within the trusted IP range, they will automatically be logged in with their integrated authentication credentials. If a user logs in outside of the trusted IP range, the user will be prompted with the login page. If the user has another assigned authentication method, they can use that to complete their login. The IP address can use wildcards.
To assign and to configure this option for a user:
- After creating a new user, edit their profile (Users tab, and click their full name).
- In the Login Method (User) section, click New.
- In the Login Method Information section, select the integrated authentication provider method from the Provider drop-down list.
- Enter the user’s Windows domain and username in Windows Account.
An example of the domain\username format is if someone's email address is jsmith@example.com, you'd enter example\jsmith. - Click Save and then Back.
OpenID Connect
- After creating a new user, edit their profile (Users tab, and click their full name).
- In the Login Method (User) section, click New.
- In the Login Method Information section, select the OpenID Connect provider method from the Provider drop-down list.
- Enter the subject identifier for the authentication provider as the OpenID Connect Subject.
- Click Save and then Back.
SAML 2.0
- After creating a new user, edit their profile (Users tab, and click their full name).
- In the Login Method (User) section, click New.
- In the Login Method Information section, select the SAML 2.0 provider method from the Provider drop-down list.
- Enter the subject identifier for the authentication provider as the SAML2 Subject. For example, if you select Email as the application username in Okta, you must enter the Relativity user's email here.
- Click Save and then Back.
Client Certificate
This client certificate authentication uses a smart card assigned to a user. Contact your smart card provider for card details.
To assign and to configure this option for a user:
- After creating a new user, edit their profile (Users tab, and click their full name).
- In the Login Method (User) section, click New.
- In the Login Method Information section, select the client certificate provider method from the Provider drop-down list.
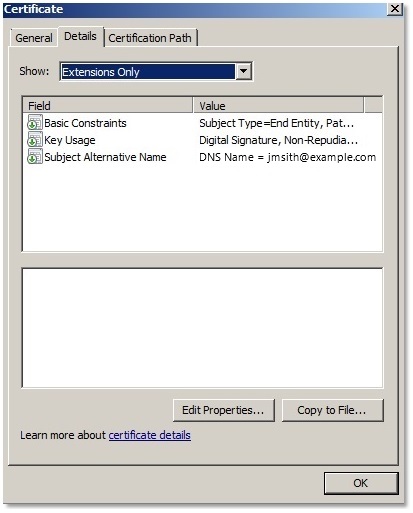
- Enter the subject alternate name in Certificate Subject in Certificate Subject. The subject alternate name is the value from the certificate's Subject Alternate Name. In the following example, use jsmith@example.com. However, your smart card vendor may provide a different specification and you should use that instead.
- Click Save and then Back.
RSA
This method requires a user to have an RSA SecurID token that is registered with your RSA Authentication provider.
-
- After creating a new user, edit their profile (Users tab, and click their full name).
- In the Login Method (User) section, click New.
- In the Login Method Information section, select the RSA provider method from the Provider drop-down list.
- Enter the subject identifier for the authentication provider as the RSA Subject.
- Click Save and then Back.