The Solution Snapshot application helps you identify compatibility issues with applications and scripts in your environment so you can resolve them prior to upgrade. Using the Solution Snapshot application, you can view a list of the applications and scripts currently installed in your Relativity instance and review the application/script owner's recommendation for upgrade. If desired, you can click a link on the analysis job, to open the Relativity online documentation page where you can locate the file needed to upgrade the application and then begin the upgrading process. Alternatively, you can create an upgrade job at the same time as the analysis job which allows you to upgrade any eligible applications to their latest version all while never leaving the Relativity interface.
Additionally, you can also connect remote instances to an analysis job to conveniently see the applications and scripts in multiple environments at once. Finally, you can also view the results of analysis jobs including which workspaces were skipped.
Note: Solution Snapshot is also a tool to help application developers distribute their applications. While it provides one way of upgrading applications in Relativity, there are other options available such as updating applications manually using the Application Deployment System.
Supported versions
This solution is supported in Server 2022.
Click here to download the Solution Snapshot 4.3.1.0 files from the Relativity Community.
Note: You must have valid Relativity Community credentials in order to download any Community file linked to the documentation site. You'll need to enter those credentials on the Community login screen if you're not already logged in. If you're already logged in to the Community at the time you click a link, the file is automatically downloaded in the bottom left corner of your screen. If you get an error message stating "URL No Longer Exists" after clicking a Community link, it may be due to a single sign-on error related to the SAML Assertion Validator, and you should contact your IT department.
Components
This solution consists of the following components:
- Relativity application
- Relativity dynamic objects with associated object rules
- Event handlers
- Manager and worker agents
- Custom pages
Permissions
The following Solution Snapshot permissions are available for users. The Solution Snapshot Access permission can only be granted by system admin users, including when assigning the permission to themselves.
| Object Security | Tab Visibility |
|---|---|
|
|
Deploying and configuring the solution
To deploy the solution, you first add it to the Application Library as a Relativity application. You can then install it from the Application Library to one workspace.
Note: There is no need to uninstall the prior version before installing Solution Snapshot 4.3.1.0.
To add the solution to the Application Library and a workspace:
- Log in to Relativity.
- Click the user drop-down menu in the upper right corner of Relativity, and then click Home.
- Navigate to the Applications & Scripts tab, and then select the Application Library tab.
- Click Upload Application.
- Next to Application File, click Choose File.
- Navigate to and select the RA_Solution_Snapshot.rap file, and then click Open.
- Click Save.
- Under Workspaces Installed, click Install.
- Next to Workspaces, click
 , and then check the box next to the workspace that you might want to run the solution from. Note that this application automatically collects and reports data for all the workspaces in the Relativity instance, regardless of which workspace you install it in. Therefore, you can choose to install the solution in any workspace within the Relativity instance and you don't need to install the solution in more than one workspace.
 - Click OK.
- Click Save.
Creating manager and worker agents
After you install the application to your environment, you must add the following manager and worker agents to your environment. Only one agent may be created at a time for the Solution Snapshot - Manager, Solution Snapshot - Relativity Version Sync, and Solution Snapshot - Upgrade - Manager agents.
- Solution Snapshot - Analysis - Worker
- Solution Snapshot - Manager
- Solution Snapshot - Relativity Version Sync
- Solution Snapshot - Upgrade - Manager
- Solution Snapshot - Workspace - Worker
To create manager and worker agents, perform the following steps:
- Click the user drop-down menu in the upper-right corner of Relativity, and then click Home.
- Navigate to the Server & Agent Management tab, and then select Agents.
- Click New Agent.
- Click next to Agent Type, and then filter in the Application Name column for Solution Snapshot.
- Select Solution Snapshot Analysis - Worker.
- Click Ok.
- Set the number of manager agents you want in the Number of Agents field.
Note: You can only create one instance of the manager agents. You can create multiple worker agents.
- Click next to Agent Server, and then select the agent server where you want to install the new agent.
- Click Ok.
- Set the appropriate interval. For Solution Snapshot - Relativity Version Sync, the interval should be set to 3600. All other agents can be set to 10.
- Leave all other settings at their default values, and then click Save and New.
- Repeat steps 1-11 for the remaining agents.
Note: To run instance-level local jobs or remote jobs, you must install at least one agent for Solution Snapshot - Manager, Solution Snapshot - Analysis - Worker, and Solution Snapshot - Workspace - Worker.
To run a workspace-level local job, you must install one Solution Snapshot - Manager. Additionally, all active cases should be assigned a resource pool with an active agent server and both a Solution Snapshot - Workspace - Worker and Solution Snapshot - Analysis - Worker assigned to that agent server.
Running the solution
Note: Before running the solution, it is recommended that you run the Solution Snapshot - Relativity Version Sync agent at least once to ensure maximum functionality in Solution Snapshot.
Running an analysis job will only check cases that either have an active or inactive status. To run the solution, complete the following:
- Navigate to the workspace where you installed the solution application.
- Navigate to the Solution Snapshot tab, and then select Analysis Job.
- Click New Solution Snapshot Analysis Job.
(Click to expand)
- Complete the following fields:
- Job Name - enter a name for your analysis job.
- Relativity Upgrade Version - If you are performing an online analysis job, click to select the Relativity version that matches the one you are currently using. If you are performing an offline analysis job, do not select a Relativity version option and instead, enter the version number in the Offline Relativity Upgrade Version field.
- Level - select Instance to receive information about custom applications and scripts in this instance and/or select Workspace to receive information about custom applications and scripts in this workspace.
- Create Upgrade Job - Select Yes if you would like to find any applications and scripts that need to be upgraded as part of this job. You can then view the results on the Upgrade Results tab and conveniently upgrade applications that are installed in a local instance and have a newer version. The upgrade job will create a Relativity Dynamic Object for each application that can be updated. To only perform an analysis job or if you are performing an offline job, select No.
Note: An active Solution Snapshot - Upgrade - Manager agent is required to run an update job. To learn more about Solution Snapshot agents, visit Creating manager and worker agents.
- Email address - if you are using
Note: To receive an email confirmation, you will need to have the following instance settings populated with information: SMTPServer, SMTPPort, SMTPUserName, SMTPPassword, and EmailFrom.
- Offline Relativity Upgrade Version - Optionally, if you do not have internet access and would like to run an analysis job, enter the version of Relativity that you are currently using.
Note: If you are performing an offline analysis job, you cannot select to Yes for Creating Upgrade Job. Additionally, you cannot select to Yes for Creating Upgrade Job.
- Compatibility Info File - If you are running an offline analysis job, click Choose File and select a JSON file that contains the compatibility information provided to Relativity by third-party application developers. To download a copy of the JSON for usage with this option, please visit https://api.solutionsnapshot.relativity.com/api/external/DownloadCompatibilityInfoAsync.
- Click Save.
- If there are any instances which are not connected, click Validate Connections in the right sidebar to troubleshoot them.
- If you are performing an offline analysis job, click Validate Compatibility Info in the right sidebar to ensure the JSON file is compatible before proceeding with the analysis job.
- Click Perform Analysis in the right sidebar.
Once the analysis job begins, the results will display on this page if it is refreshed. To learn more about the results, see Fields.

Analysis Job
This tab displays analysis jobs, which can be accessed to view the Application Results, Script Results, and Skipped Workspaces. Alternatively, you can edit or delete an analysis job from this tab. You can also link a new remote instance or one that has already been created to an analysis job that has not been run yet.
Removing an analysis job
Deleting an analysis job does not delete the associated objects (Application Results, Script Results and Skipped Workspaces). If you would like to remove the associated objects, you must first delete the associated objects and then delete the job.
- Navigate to the Analysis Job tab.
- Select the analysis job or jobs you would like to delete.
- Click the Delete button in the bottom-left.
- (Optionally,) click the Dependencies button in the bottom-right to learn more about which objects will be affected by the analysis job removal.
- Click the Delete button to remove the analysis job.
Linking an analysis job to a remote instance
If you have created an analysis job and not yet run it, you can add another RelativityOne instance or an instance that is connected on the network to your analysis job without having to open it from the Analysis Job tab.
Note: Both Relativity instances require internet access in order to be successfully linked. Additionally, the Solution Snapshot application must be installed in the remote instance that you are connecting to. The version of Solution Snapshot should be the same in both locations as well.
- Navigate to the Analysis Job tab.
- Select the analysis job that has not yet been run that you would like to add a remote instance to.
- Click New in the Selected Instances section.
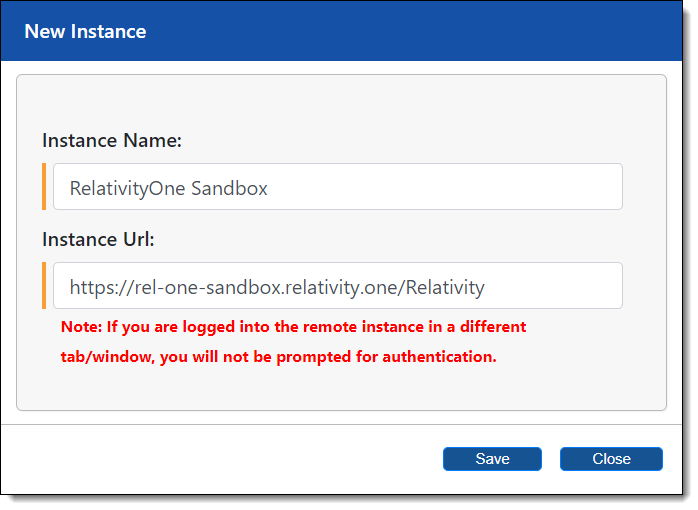
- Complete the following fields:
- Instance Name - enter a name for the instance.
- Instance Url - enter the web address of the instance you would like to be able to choose in future analysis jobs.
Note: If you enter the address of an instance that has a different version of Relativity installed than the instance you are running the analysis job from, the Core applications in the instance you are running the job on will be filtered out. New Core applications in the remote instance version that are not available in the local instance version you are running the analysis job from will show up as Application Results.
- Click Save.
- Optionally, if the remote instance you are adding is not open in another tab or window, enter your username and password when prompted.
The instance is added to the list in the Selected Instances section.
Linking selected instances
If you have created remote instances but have not already linked them to the analysis job in your current instance, you can do so with the Link button.
- Navigate to the Analysis Job tab.
- Select the analysis job that has not yet been run that you would like to link a remote instance to.
- Clink Link in the Selected Instance section.
The Select Items - Selected Instances pop-up will display. - Check the box on the left side of the row for any remote instances that you would like to link to your current instance.
- Click the Add button.
- Once the desired remote instances have been added, click Set in the bottom-left.
The selected remote instances are linked to your current instance for the analysis job.
Fields
Each of the fields that display in the Application Results, Script Results, and Skipped Workspaces sections are described below.
(Click to expand)
The Application Results section provides the following fields:
Application Name - displays the name of the application installed in your workspace or instance.
Level - displays Workspace if the application is installed on the workspace-level or Instance if the application is installed on the instance-level.
Instance Artifact ID - displays the Artifact ID number assigned to the instance where the analysis job is performed.
Instance Name - displays Local if an application is installed in the currently open workspace or instance or Remote if it was installed in a remote workspace or instance.
Workspace Artifact ID - displays the Artifact ID number assigned to each workspace or or -1 if the application is installed at the instance-level.
Workspace Name - displays the name of the workspace where the application has been installed. Admin displays for applications that are installed on the instance-level.
Version - displays the version number of Relativity that the currently installed application is compatible with.
Compatible Version - displays the Relativity version number that is compatible with the most recent version of an application.
Status - displays a message that describes the condition of the installed application. To learn more about the statuses, see the Application Statuses section in the right sidebar.
If Can Update or Must Update display as a result, you can click on the link for the desired application to open the Relativity documentation for that application in your internet browser. After verifying which file you need, you can then download the file needed to upgrade the application from that page.
If Contact Owner displays as a result, you can click on the link to visit the third-party application owner's website in your internet browser.
System Last Modified On - displays the most recent date and time when each application record was last accessed by Solution Snapshot.
(Click to expand)
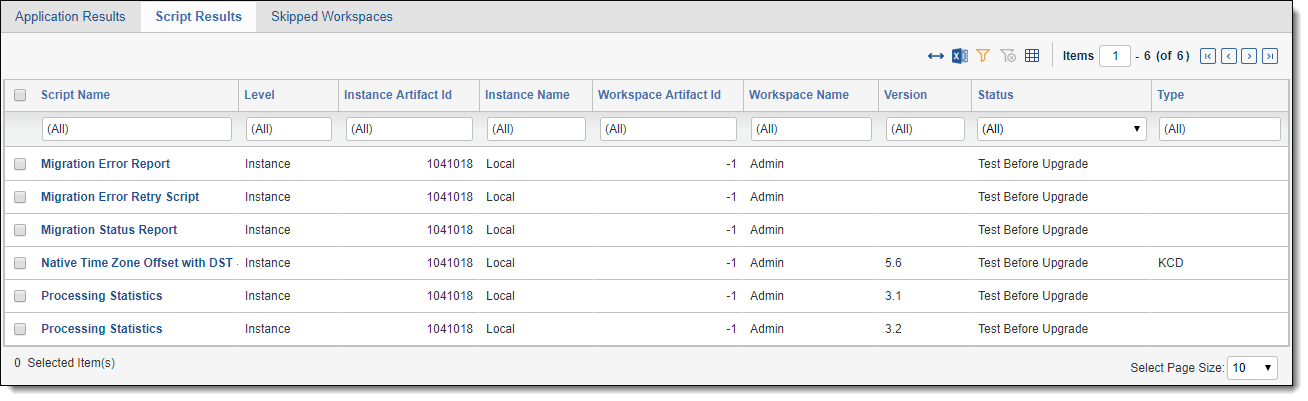
The Script Results section provides the following fields:
Note: The information that displays in the Script Results section varies depending on where you run the analysis job. If you are running an analysis job at the workspace-level, this section will display scripts that are not associated with an application. If you are running an analysis job at the instance-level, this section will display all scripts whether they are associated with an application or not.
Script Name - displays the name of the script installed in your workspace and/or instance.
Level - displays Workspace if the script is installed on the workspace-level or Instance if the script is installed on the instance-level.
Instance Artifact ID - displays the Artifact ID number assigned to the instance where the analysis job is performed.
Instance Name - displays Local if a script is installed in the instance where Solution Snapshot was originally installed or Remote if it was installed in a remote workspace or instance.
Workspace Artifact ID - displays the Artifact ID number assigned to each workspace or -1 if the script is installed at the instance-level.
Workspace Name - displays the name of the workspace where the script has been installed. Admin displays for scripts that are installed on the instance-level.
Version - displays the version number of each currently installed script in your workspace or instance.
Status - displays Test Before Upgrade as a reminder to always test a script before upgrading it.
Type - displays the type of each script. KCD displays for each one that is not a core script.
(Click to expand)
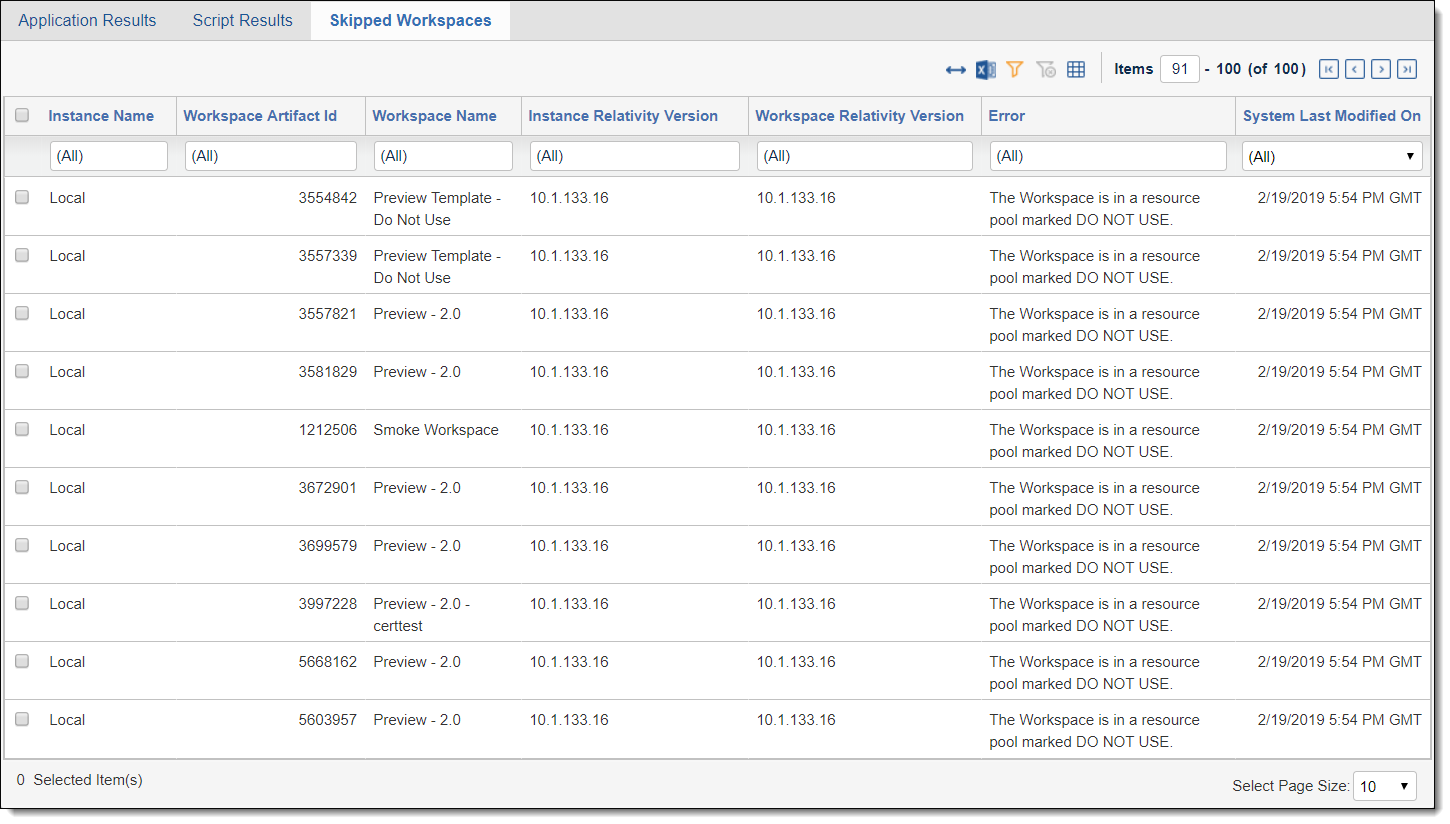
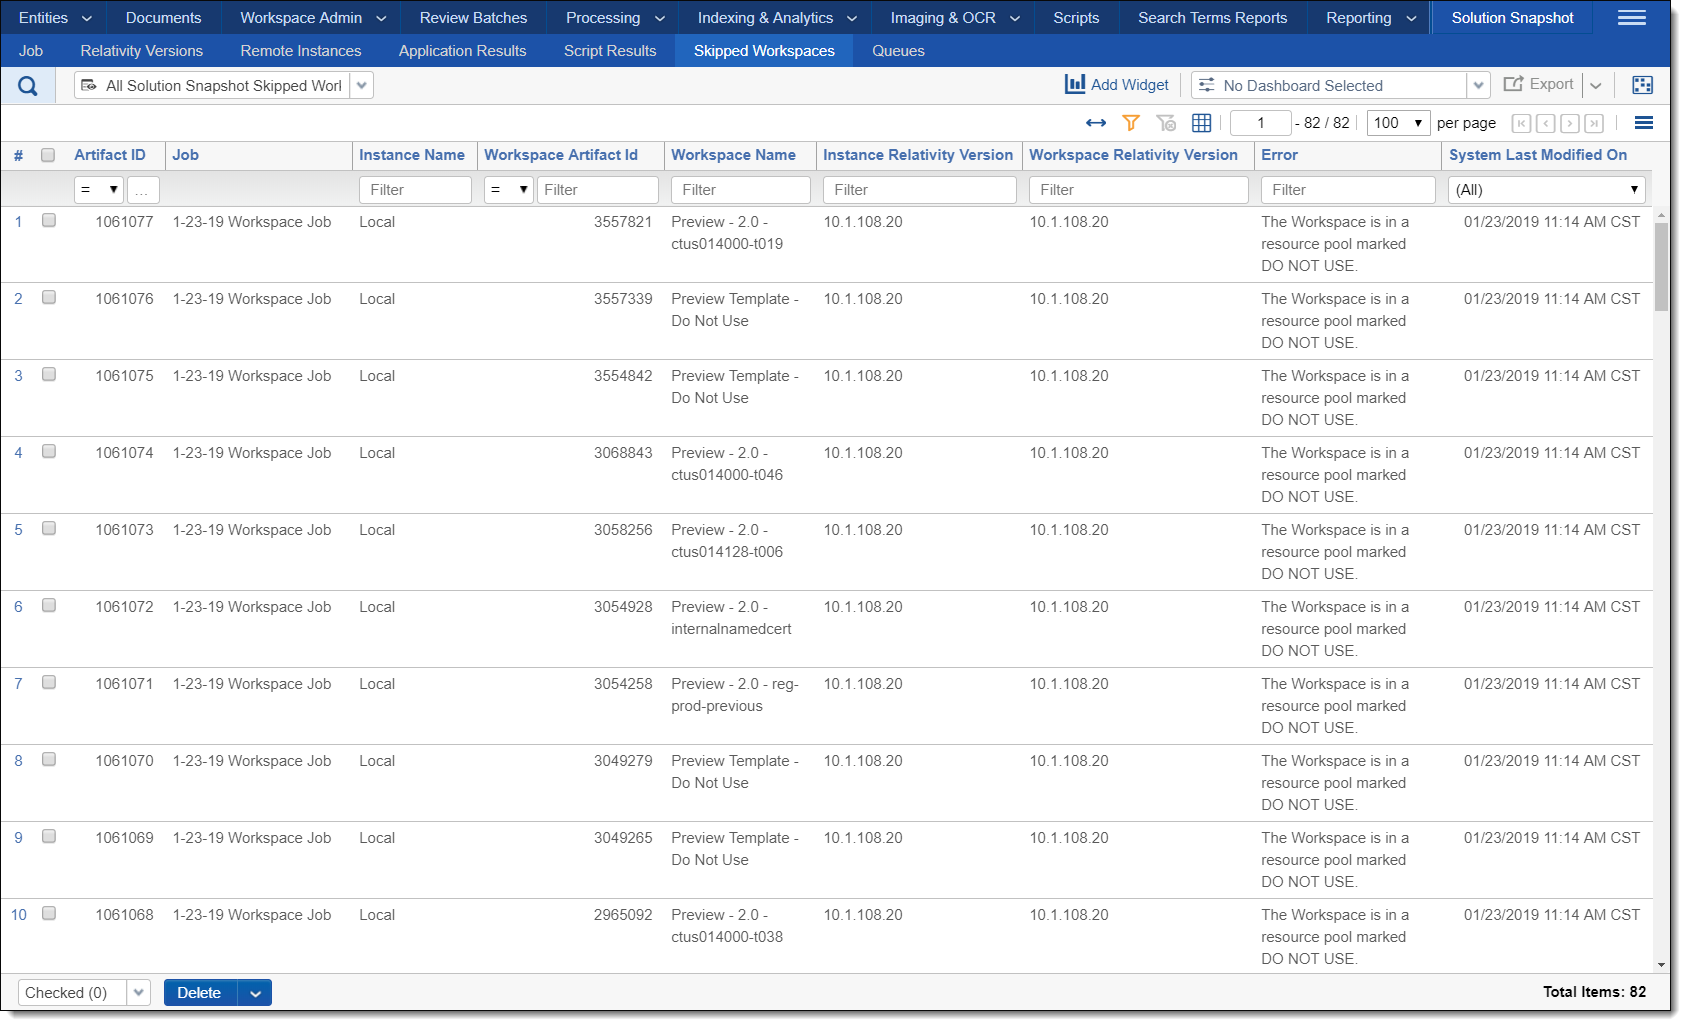
The Skipped Workspaces section provides the following fields:
Instance Name - displays Local if a skipped workspace is in the instance where Solution Snapshot was originally installed or Remote if the skipped workspace is in a remote instance.
Workspace Artifact ID - displays the Artifact ID number assigned to each skipped workspace.
Workspace Name - displays the name of each skipped workspace.
Instance Relativity Version - displays the version number of Relativity for the instance where each workspace is located.
Workspace Relativity Version - displays the version number of Relativity for each skipped workspace.
Error - displays a brief description of why each workspace was not included as part of the analysis job.
System Last Modified On - displays the most recent date and time when each workspace record was last accessed by Solution Snapshot.
Remote Instances
This tab allows you to add another RelativityOne instance or an instance that is connected on the network to your analysis job without having to open it. You can also remove any instances that are connected to an analysis job that you no longer need.
Note: Both Relativity instances require internet access in order to be successfully linked.
Add an Instance
- Navigate to the Remote Instances tab.
- Click New Solution Snapshot Remote Instance.
- Complete the following fields:
- Instance Name - enter a name for the instance.
- Instance Url - enter the web address of the instance you would like to be able to choose in future analysis jobs.
Note: If you enter the address of an instance that has a different version of Relativity installed than the instance you are running the analysis job from, the Core applications in the instance you are running the job on will be filtered out. New Core applications in the remote instance version that are not available in the local instance version you are running the analysis job from will show up as Application Results.
- Click Save.
- Optionally, if the remote instance you are adding is not open in another tab or window, enter your username and password when prompted.
The instance is added to the list of remote instances.
Removing an instance
- Navigate to the Remote Instances tab, and select the instance you would like to delete.
- Click the Delete button.
- Optionally, click the Dependencies button to learn more about which objects will be affected by the instance removal.
- Click the Delete button to remove the instance.
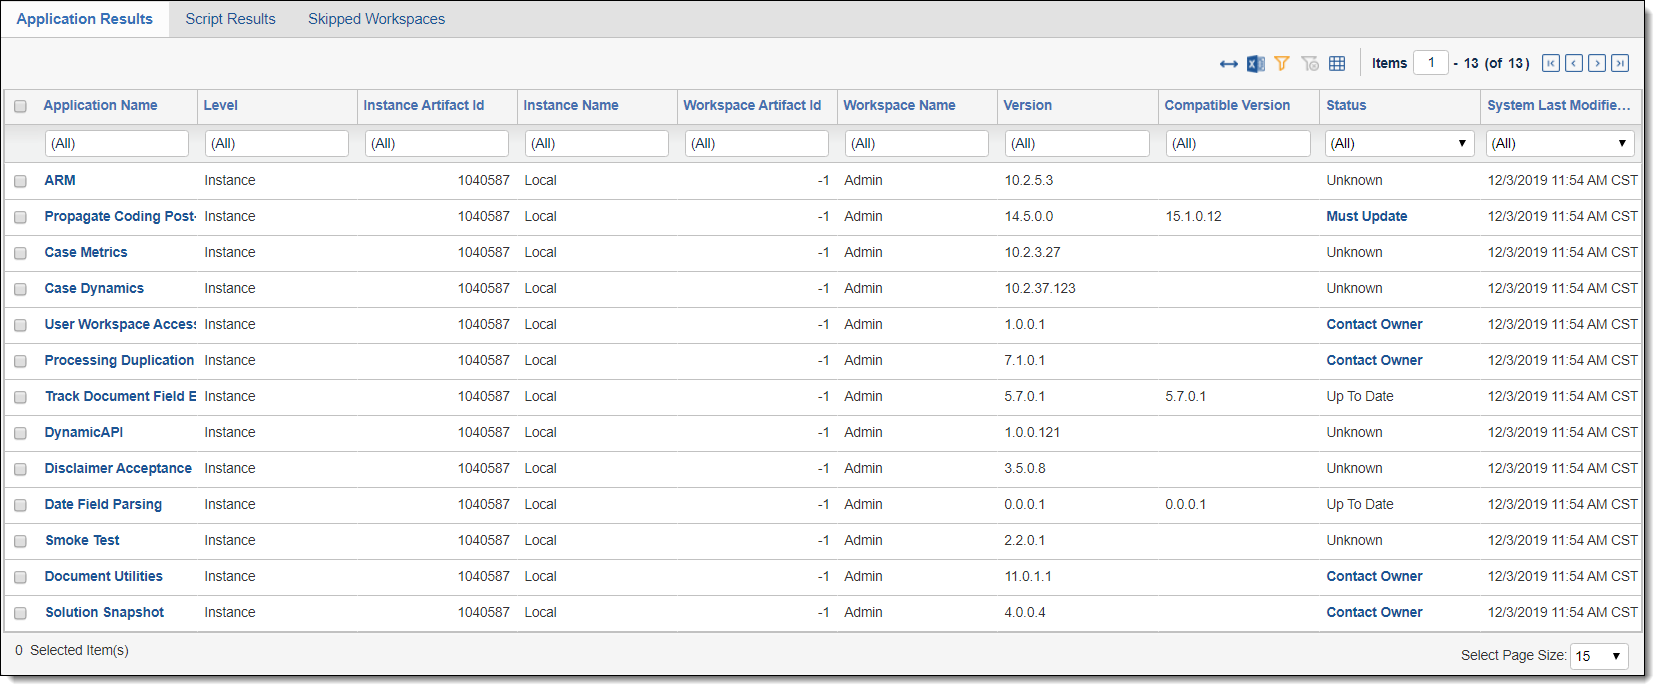
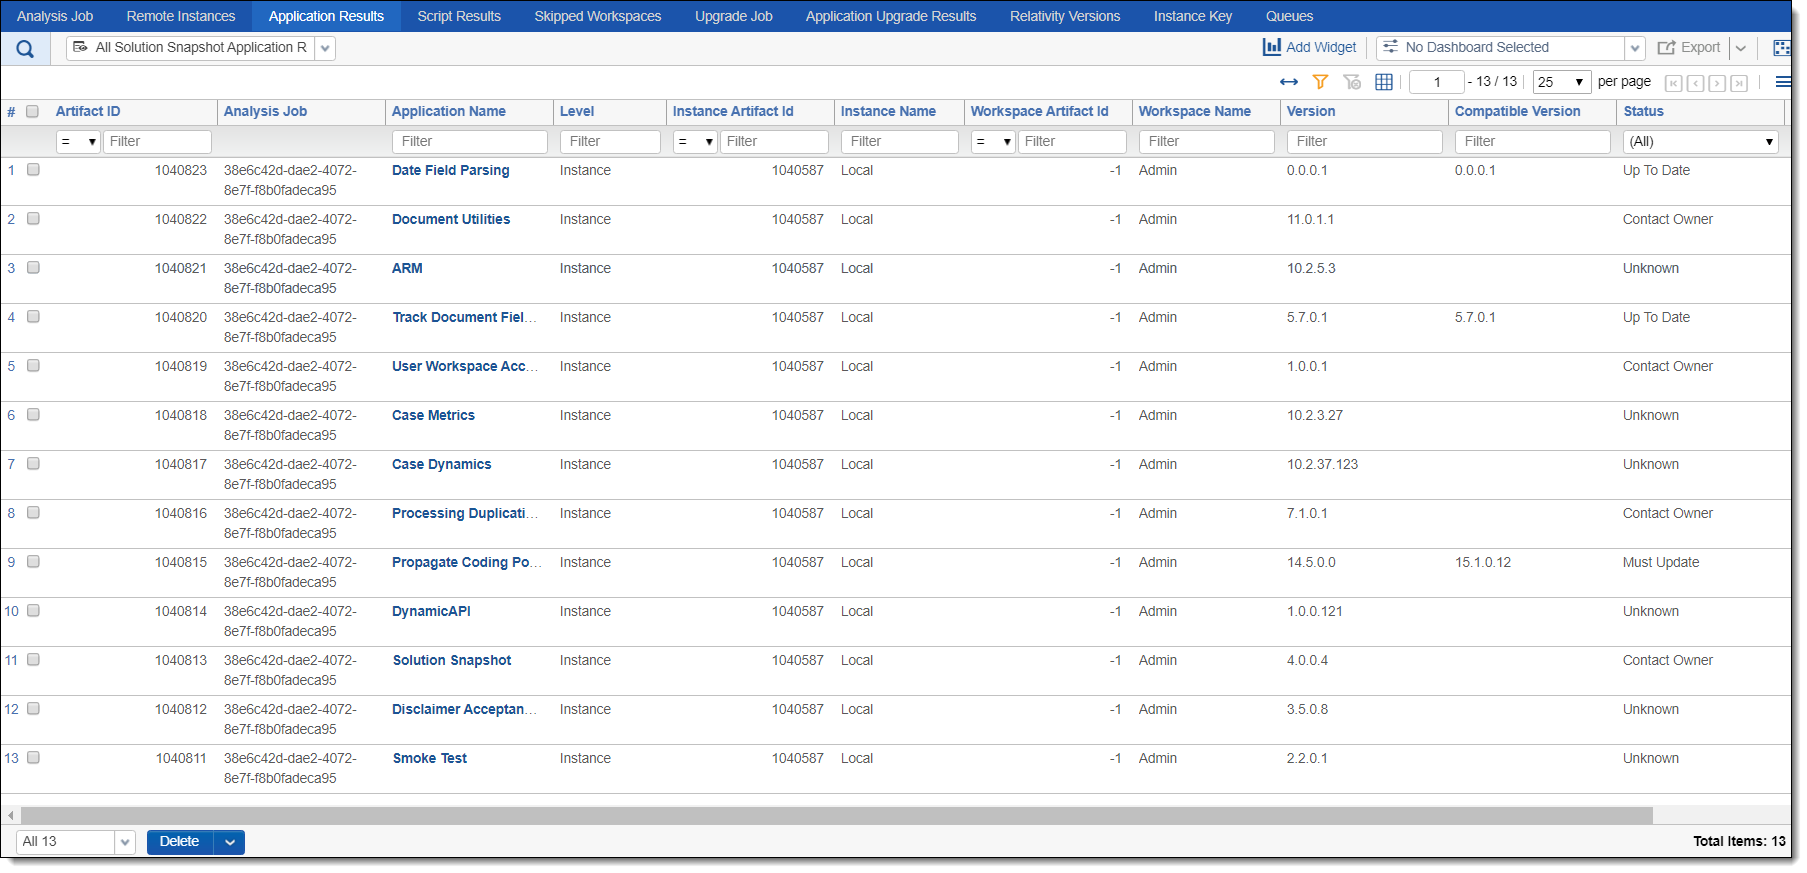
Application Results
This tab allows you to see all of the applications that have been installed in the instances and workspaces that have been included in past analysis jobs. If an application was created by Relativity, you can click on it in the Application Results list to see more about its status in an instance or workspace as well as find the URL to the application's documentation.
(Click to expand)
Fields
Artifact ID - displays the Artifact ID number for each application result which is a Relativity Dynamic Object.
Analysis Job - displays the name of the analysis job associated with each application result.
Application Name - displays the name of each application.
Level - displays Instance if the application is installed at instance-level or Workspace if application is installed on the workspace level.
Instance Artifact ID - displays the Artifact ID number assigned to the instance where the analysis job is performed.
Instance Name - displays Local if an application is installed in the currently open workspace or instance or Remote if it was installed in a remote workspace or instance.
Workspace Artifact ID - displays the Artifact ID number assigned to each workspace or or -1 if the application is installed at the instance-level.
Workspace Name - displays the name of the workspace where the application has been installed. Admin displays for applications that are installed on the instance-level.
Version - displays the version number of Relativity that the currently installed application is compatible with.
Compatible Version - displays the Relativity version number that is compatible with the most recent version of an application.
Status - displays a message that describes the condition of the installed application.
System Last Modified On - displays the most recent date and time when each application record was last accessed by Solution Snapshot.
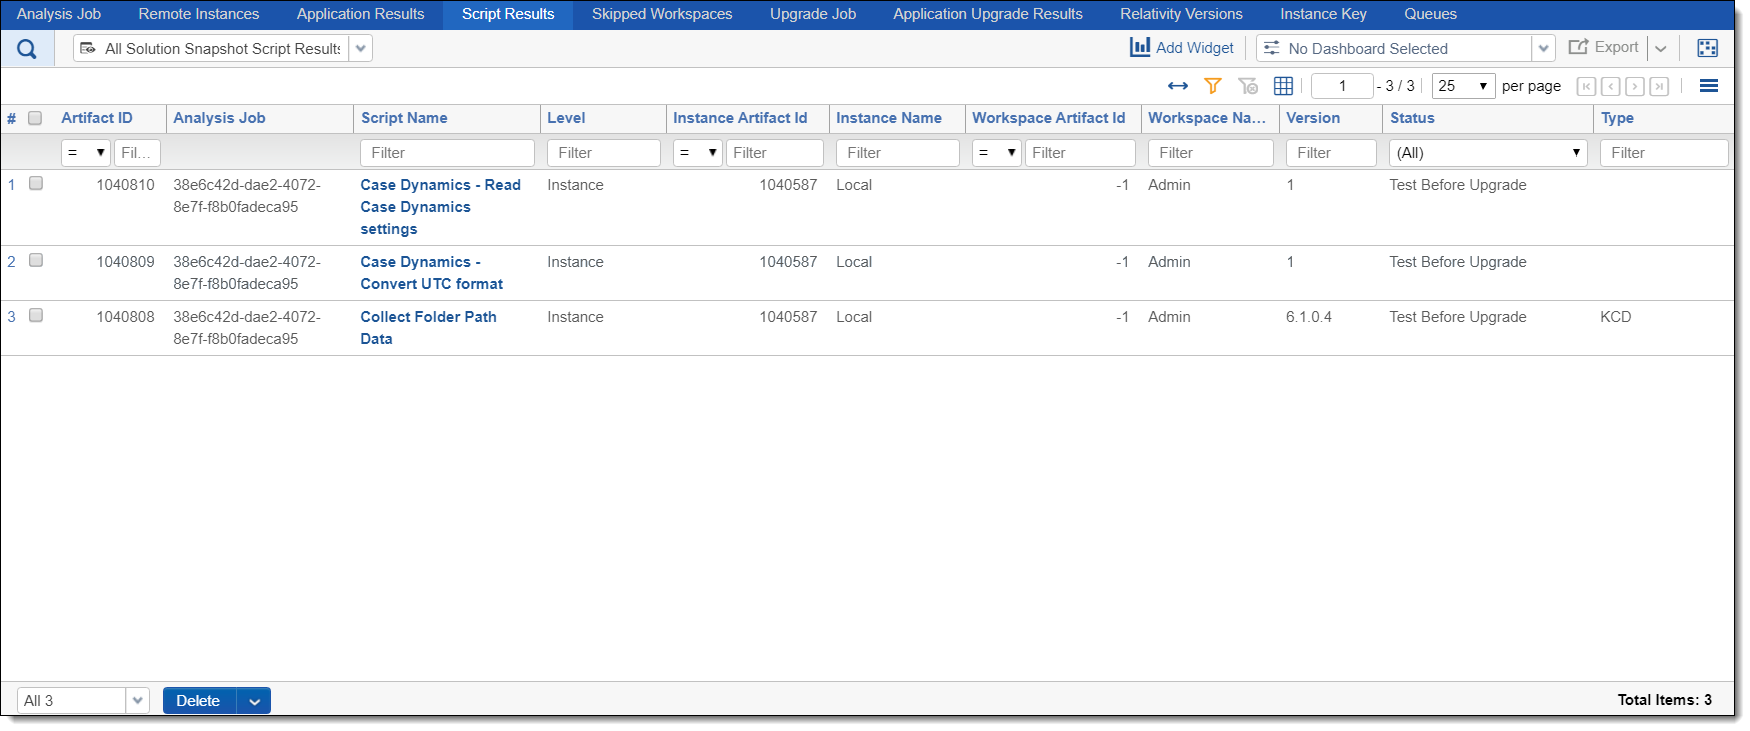
Script Results
This tab allows you to see the scripts that have been installed in the instances and workspaces that have been included in past analysis jobs. If you are running an analysis job at the workspace-level, this tab will display scripts that are not associated with an application. If you are running an analysis job at the instance-level, this tab will display all scripts whether they are associated with an application or not.
You can click on a script to see more about its status in an instance or workspace.
(Click to expand)
Fields
Artifact ID - displays the Artifact ID number for each script result which is a Relativity Dynamic Object.
Analysis Job - displays the name of the analysis job associated with each script result.
Script Name - displays the name of the script installed in your workspace and/or instance.
Level - displays Workspace if the script is installed on the workspace-level or Instance if the script is installed on the instance-level.
Instance Artifact ID - displays the Artifact ID number assigned to the instance where the analysis job is performed.
Instance Name - displays Local if a script is installed in the instance where Solution Snapshot was originally installed or Remote if it was installed in a remote workspace or instance.
Workspace Artifact ID - displays the Artifact ID number assigned to each workspace or -1 if the script is installed at the instance-level.
Workspace Name - displays the name of the workspace where the script has been installed. Admin displays for scripts that are installed on the instance-level.
Version - displays the version number of each currently installed script in your workspace or instance.
Status - displays Test Before Upgrade as a reminder to always test a script before upgrading it.
Type - displays the type of each application. KCD displays for each one that is not a core application.
Skipped Workspaces
This tab allows you to see which workspaces were not included in an analysis job and a brief explanation why they were not included.
(Click to expand)
Fields
Artifact ID - displays the Artifact ID number for each skipped workspace result which is a Relativity Dynamic Object.
Analysis Job - displays the name of the analysis job for each skipped workspace.
Instance Name - displays Local if an application is installed in the currently open workspace or instance or Remote if it was installed in a remote workspace or instance.
Workspace Artifact ID - displays the Workspace ID number assigned to each skipped workspace.
Workspace Name - displays Local if a skipped workspace is in the instance where Solution Snapshot was originally installed or Remote if the skipped workspace is in a remote instance.
Instance Relativity Version - displays the version number of Relativity for the instance where each skipped workspace is located.
Workspace Relativity Version - displays the version number of Relativity for each skipped workspace.
Error - displays a brief description of why each workspace was not included as part of the analysis job.
System Last Modified On - displays the date and time when each skipped workspace was last processed as part of the analysis job.
Upgrade Job
This tab allows you to see upgrade jobs that have been run. You can also perform any desired upgrades on instance-level applications that were detected as part of an upgrade job by doing the following:
- Navigate to the Upgrade Job tab and click on the desired upgrade job.
- Click on the Perform Upgrade button in the upper-right.
The application(s) that are eligible are upgraded. To see the progress of the update, click Refresh Page.
Unlinking an application from an upgrade job
Unlinking an application allows you to remove an application from an upgrade job. Once an application has been unlinked, the only way to add it back to an upgrade job is to create a new analysis and upgrade job.
To remove an application or applications that are eligible to be upgraded from an upgrade job, do the following:
- Navigate to the Upgrade Job tab and click on the desired upgrade job.
- Check the box or boxes on the left side of the row for each application you wish to remove from the upgrade job.
- Click the Unlink button.
- Click OK.
The selected application or applications are removed from the upgrade job.
Fields
Artifact ID - displays the Artifact ID for each application that can be upgraded.
Application Name - displays the name of each application.
Version - displays the application version for each currently installed application.
Upgrade Version - displays the application version that each currently installed application can be upgraded to.
Upgrade Status - displays the status of an application upgrade. To learn more about a status, see the Application Upgrade Statuses in the right sidebar.
System Created On - displays the date and time when the application was processed as part of an upgrade job.
System Last Modified On - displays the date and time when the application was last updated or processed as part of an upgrade job.
Application Upgrade Results
This tab displays the result from each attempt to upgrade an application using Solution Snapshot so you can conveniently check your progress.
Fields
Application Name - displays the name of each application.
Version - displays the application version for each currently installed application.
Analysis Status - Displays the status of the application as determined by the upgrade job.
Upgrade Version - displays the application version that each currently installed application can be upgraded to.
Upgrade Status - displays the status of an application upgrade. To learn more about a status, go to the Upgrade Job tab, click on the desired upgrade job, and see the Application Upgrade Statuses in the right sidebar.
System Created On - displays the date and time when the application was processed as part of an upgrade job.
System Last Modified On - displays the date and time when the application was last updated or processed as part of an upgrade job.
Relativity Versions
This tab allows you to see available versions of Relativity and the most recent date that they were modified.
(Click to expand)
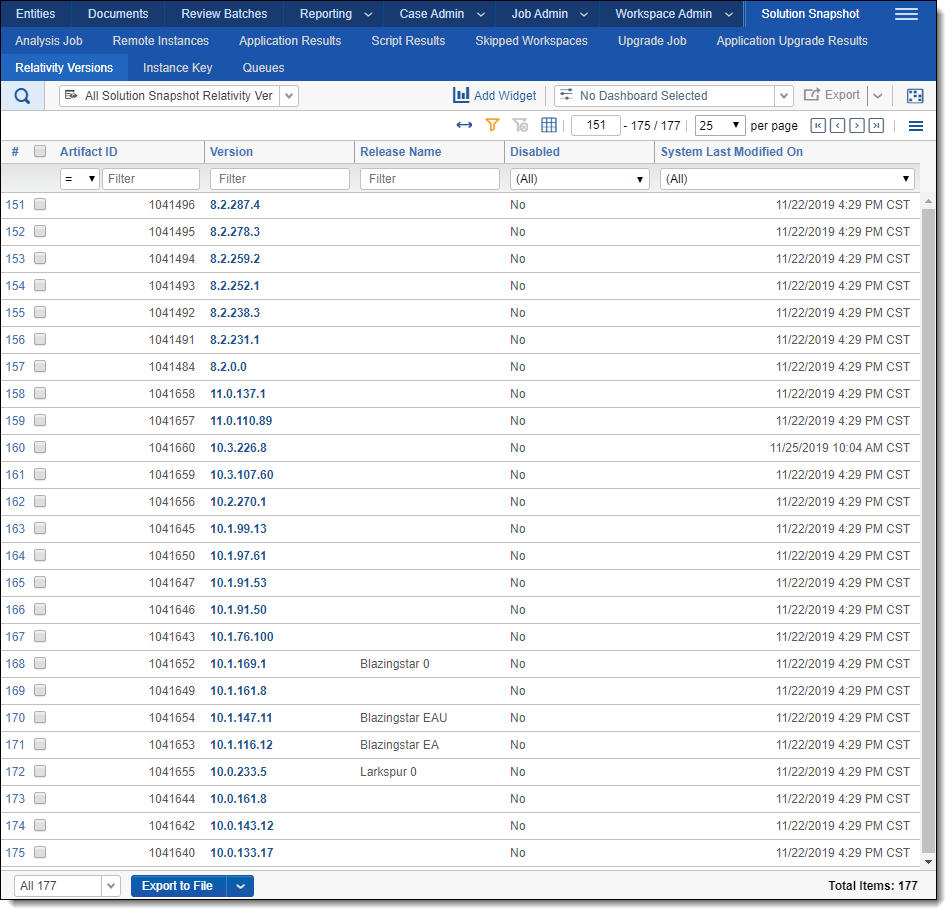
Fields
Artifact ID - displays the Artifact ID number for each version of Relativity.
Version - displays the version number for each Relativity release.
Release Name - if applicable, displays the name of the Relativity release for each version.
Disabled - displays Yes if a previous version of Relativity is detected in the database by the version sync agent. Otherwise, No displays for each version of Relativity.
System Last Modified On - displays the most recent date and time when each Relativity version record was last accessed by Solution Snapshot.
Instance Key
This tab displays the instance key for your Relativity environment. The instance key is a security measure to help you update third party applications safely. If you would like to update a third-party application, you should provide this key to the application owners as a verification before the update takes place.
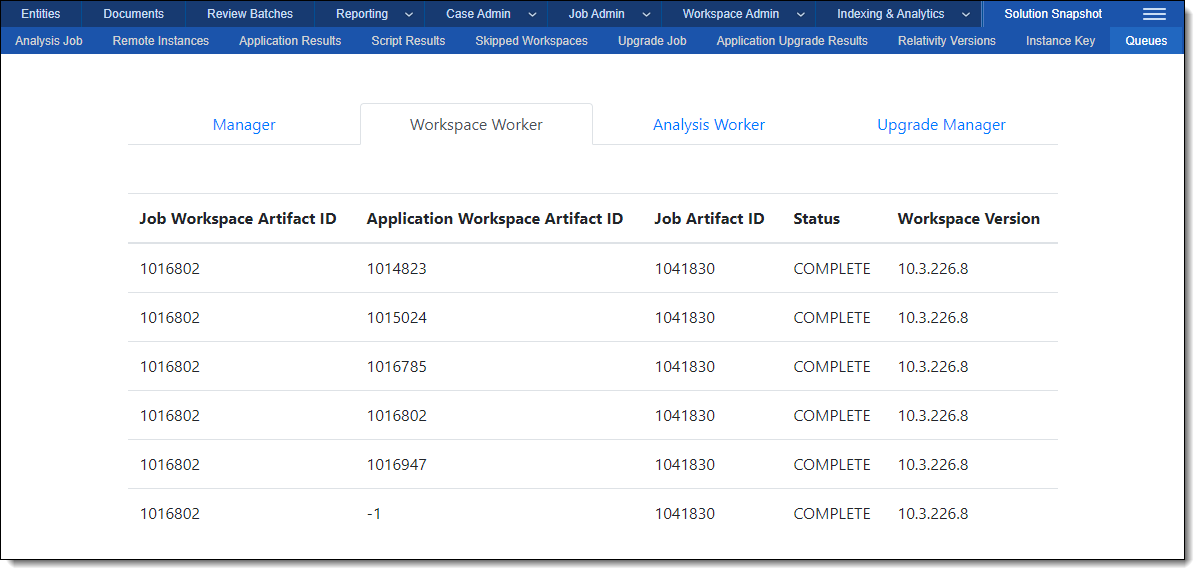
Queues
This tab allows you to view the progress of workers in your workspace and/or instance that are completing or have recently completed tasks as part of an analysis job.
(Click to expand)