


Note: You must have valid Relativity Community credentials in order to download any Community file linked to the documentation site. You'll need to enter those credentials on the Community login screen if you're not already logged in. If you're already logged in to the Community at the time you click a link, the file is automatically downloaded in the bottom left corner of your screen. If you get an error message stating "URL No Longer Exists" after clicking a Community link, it may be due to a single sign-on error related to the SAML Assertion Validator, and you should contact your IT department.
The Login History by User Report solution reports on login and logout times of users in a Relativity instance.
To download the solution files, visit the Relativity Community.
Before you begin
Supported versions
This solution is supported in the versions of Relativity listed in the following table.
| Solution version | Supported Relativity version |
|---|---|
| 5.0 | 8.2 and above |
Components
This solution consists of a Relativity application. The application is deployed to a workspace, but reports on the entire instance. We recommend only deploying this application to one workspace.
Special considerations
- This solution is now available as an application. If you are upgrading from a script version of the solution to an application version of the solution, you must delete the original script before adding the new application to your environment and installing it to a workspace.
- The accuracy of the duration of the session for this script is subject to the users utilizing the Log Out button for Relativity.
- This solution doesn't support the multi-tenancy and Data Grid features of Relativity.
- This script should only be run by a system admin. If you are not a system admin, we recommend you do not run this script.
- The accuracy of the duration of the session for this script is subject to the users utilizing the Log Out button for Relativity.
- This solution doesn't support the client domains (multi-tenancy) and Data Grid features of Relativity.
Deploying and configuring the solution
To deploy the solution, you first add it to the Application Library as a Relativity application. You can then install it from the Application Library to one or more workspaces.
Note: This script runs from the Admin level, you must install this application into a workspace for it to appear in the Script Library (at the instance level).
To add the solution to the Application Library:
- Log in to Relativity.
- Navigate to the Application Library tab.
- Click New Library Application.
- Either click Select File, or drag and drop the file into the Application.
- Navigate to and select the application file included in the solution, and then click Open.
- Click Save to upload the file to the Application Library.
To add the solution to a workspace:
- In the Workspaces Installed section, click Select to install the application to one or more workspaces.
- Select the workspace(s) where you want to install the application, and then click the Move selected left to right icon.
- Click Apply.
The application is installed to the selected workspace(s). A list of workspace(s) where the application has been installed displays in the Workspaces Installed section.
Preparing the workspace
Because this solution collects data for all the workspaces in a Relativity instance, there are no special requirements or steps to prepare a specific workspace to use the solution.
Running the Solution
To run the solution, you need to configure and run the Login History by User script from the workspace where you installed the application:
- In the workspace, navigate to the Scripts tab, and then click the name of the Login History by User script.
- In the console, click Run Script. The script inputs page appears.
- Complete the following fields
- Usage Period Year - YYYY format, for example ”2012”
- Usage Period Month - MM format, for example “02” for February
- Result Type - due to session timeouts, connectivity and other issues, there may be several login events in a row. There are two types of results.
Result type
Description
Example ALL
Returns the raw login and logout sessions.
User, Name
Feb 1 2012 8:41AM Login
Feb 1 2012 8:41AM Logout 00:00:01
Feb 1 2012 9:15AM Login
Feb 1 2012 9:25AM Logout 00:09:53
Feb 1 2012 10:17AM Login
Feb 1 2012 10:34AM Login
Feb 1 2012 10:34AM Login
Feb 1 2012 10:34AM Login
Feb 1 2012 11:44AM Login
Feb 1 2012 11:44AM Login
Feb 1 2012 1:49PM Logout 02:05:01
COMPACT
Returns the login and logout sessions while removing the duplicate entries.
The assumption here is that every login is followed by a logout and the duration is the time difference between those two events.
User, Name
Feb 1 2012 8:41AM Login
Feb 1 2012 8:41AM Logout 00:00:01
Feb 1 2012 9:15AM Login
Feb 1 2012 9:25AM Logout 00:09:53
Feb 1 2012 10:17AM Login
Feb 1 2012 1:49PM Logout 03:32:01
- Click Run.
Viewing the results
After you run the Login History by User script, the results appear as a report on the script layout. The report includes a list of the log in and log out times for the user along with the duration of their session.
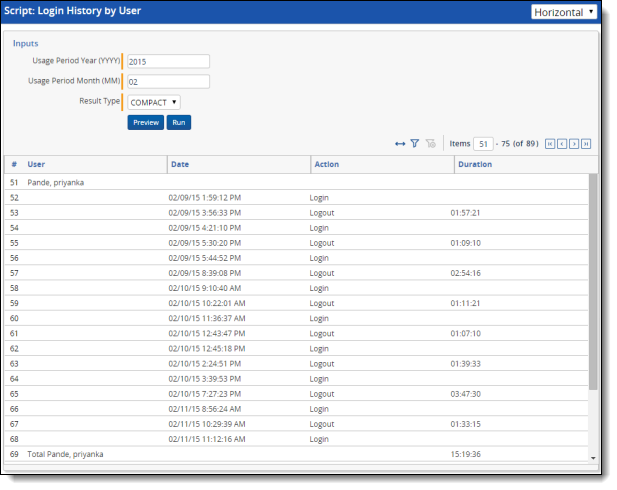
The following table lists and describes the columns in the report:
| Column | Definition |
|---|---|
| User | The user’s name. |
| Date | The date and time of the event. |
| Action | Login or logout |
| Duration | The length of the session. |