Note: You must have valid Relativity Community credentials in order to download any Community file linked to the documentation site. You'll need to enter those credentials on the Community login screen if you're not already logged in. If you're already logged in to the Community at the time you click a link, the file is automatically downloaded in the bottom left corner of your screen. If you get an error message stating "URL No Longer Exists" after clicking a Community link, it may be due to a single sign-on error related to the SAML Assertion Validator, and you should contact your IT department.
The Date Field Parsing solution parses the date and time from a Date field. It then writes the values to a separate text field for each document returned by a specific saved search.
To download the solution files, visit the Relativity Community.
Before you begin
The Date Field Parsing solution parses date and time values from date source field. It adds these values to two different destination fields. The source is a Date field, while the destinations are Fixed-Length Text or Long Text fields. The solution completes this process all the documents returned by a specific saved search. When configuring the solution, you need to specify the following items:
- A specific saved search.
- The Date field with the data to parse.
- The fields used to store date and time values.
- The format uses for date and time values.
Supported versions
This solution is supported in Relativity 8.1 - Server 2023.
| Solution version | Supported Relativity version |
|---|---|
| 3.1 | 8.2 - Server 2023 |
Components
This solution consists of a Relativity script that runs at the workspace level.
Considerations
Review the following considerations for this solution:
- This script should only be run by a system admin. If you are not a system admin, we recommend you do not run this script.
- The script overwrites the values in the destination fields. You can't undo these modifications.
- The script doesn't parse a date or time value from the date source field for a document when the field is NULL.
- This solution doesn't support the client domains (multi-tenancy) and Data Grid features of Relativity.
Deploying and configuring the solution
To deploy the solution, you first add it to the Application Library as a Relativity application. You can then install it from the Application Library to one or more workspaces.
Note: This script runs from the Admin level, you must install this application into a workspace for it to appear in the Script Library (at the instance level).
To add the solution to the Application Library:
- Log in to Relativity.
- Navigate to the Application Library tab.
- Click Upload Application.
- Click Select File.
- Navigate to and select the application file included in the solution, and then click Open.
- Click Save to upload the file to the Application Library.
To add the solution to a workspace:
- In the Workspaces Installed section, click Select to install the application to one or more workspaces.
- Select the workspace(s) where you want to install the application, and then click the Move select to the right icon.
- Click Apply.
The application is installed to the selected workspace(s). A list of workspace(s) where the application has been installed displays in the Workspaces Installed section.
Creating the destination fields
Before you run the solution, ensure that destination fields exist for storing the date and time values. You can use existing fields or create new fields for storing these values. The solution overwrites any values stored in existing fields.
The destination fields must be Fixed-Length Text or Long Text fields. Designate two fields if you want to store both date and time values. Designate a single field if you want to store only the date or time values.
Complete these steps to create one or more fields to store the parsed data:
- Navigate to the Fields tab.
- Click New Field.
- In the Object Type drop-down, select Document.
- Enter a name for the field in the Name field. You can choose any name for the field name.
- In the Field Type drop-down, select either Fixed-Length Text or Long Text.
- Select any other options that you want for the field.
- Click Save and Back.
- To create an additional destination field, repeat steps 2 - 7.
Running the solution
After setting up the workspace, complete the following steps to configure and run the solution:
- In the workspace, navigate to the Scripts tab.
- Click Run in the row of the Date Field Parsing script.

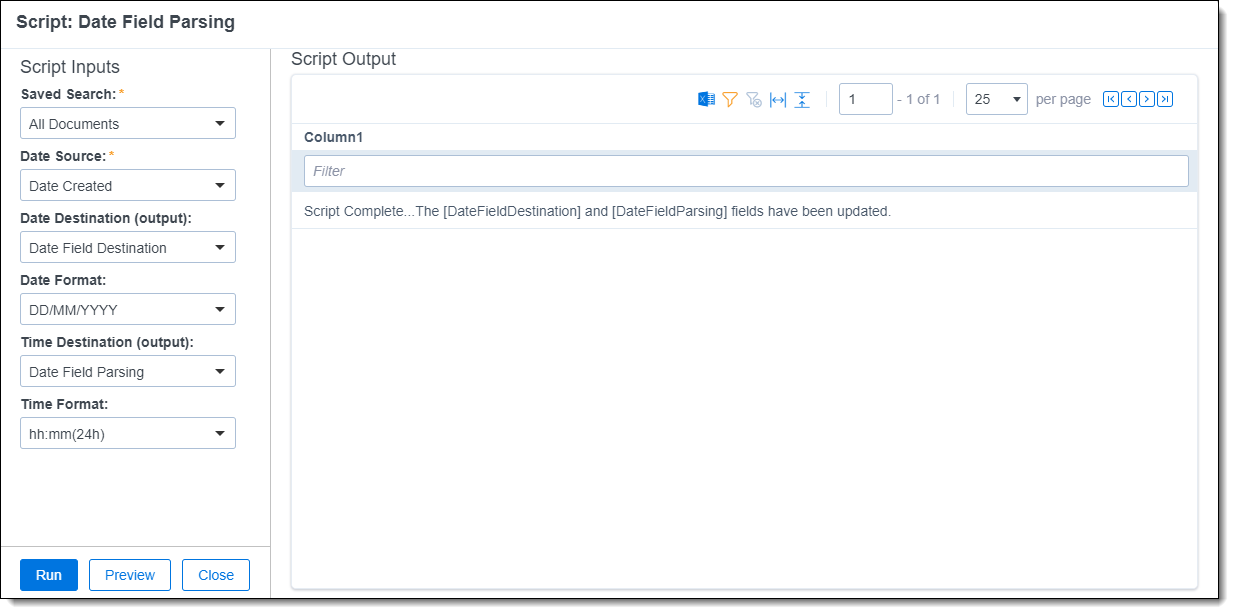
- Complete the following fields:
- Saved Search - Click the name of the saved search. This search returns the group of documents with data that you want to parse and store.
- Date Source - Click the name of the field that contains the data to parse. The field must be a Date field associated with the Document object.
- Date Destination (output) - Optionally, click the name of the Fixed-Length Text or Long Text field used to store date values. The script parses these values from the Date Source field. Leave this field blank if you don't want to parse and store date values.
- Date Format - Optionally, click the format used to store date values. The script parses these values when you select a Date Destination (output) field. Leave this field blank if you don't want to parse and store date values.
The following table uses the date January 25, 2015 to illustrate the format options.
Format Example DD/MM/YYYY 25/01/2015 DD/MM/YY 25/01/15 MM/DD/YYYY 01/25/2015 MM/DD/YY 01/25/15 YYYYMMDD 20150125 - Time Destination (output) - Optionally, click the name of the Fixed-Length Text or Long Text field used to store time values. The script parses these values from the Date Source field. Leave this field blank if you don't want to parse and store time values.
- Time Format - Optionally, click the format used to store time values. The script parses these values when select a Time Destination (output) field. I Leave this field blank if you don't want to parse and store time values.
The following table uses the time 7:18 PM to illustrate the format options.
Format Example hh:mmAM (or PM) 07:18PM hh:mm:ssAM (or PM) 07:18:43 PM hh:mm(24h) 19:18 hh:mm:ss(24h) 19:18:43
- Click Run.
The script parses data from the specified Date field. It makes the following updates for each document returned by the specified saved search:
- If you selected a Date Destination (output) field, the script adds the date value in the Date Source field to the field that you selected. It also uses the format that you selected.
- If you selected a Time Destination (output) field, the script adds the date value in the Date Source field to the field that you selected. It also uses the format that you selected.
After script runs successfully, it displays the Script Complete message. This message indicates that the destination fields now contain the appropriate data for each document.
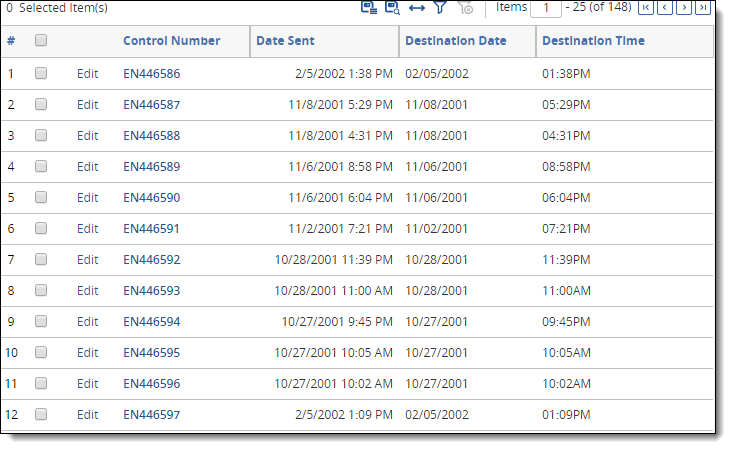
Viewing the solution results
You can view the results of the script by navigating to a view, layout, or other items that contains the destination fields that you selected. You select these fields when configuring the solution script.