


Feedback
Transfer workflows
For information on Staging Area folders, refer to the Staging Area topic and Staging Area FAQ article in Community.
Refer to the sections below for the various transfer workflows available in Staging Explorer.
See Best practices, limitations, and data transfer performance considerations for additional information to be aware of before transferring files.
The maximum number of active transfers for one instance of the Staging Explorer is three. See Updating Transfer Settings.
File and folder naming rules
Follow the rules below referring to names of files and folders you upload to and later use in Staging Explorer:
- File and folder names are case-preserving and case-sensitive.
- File and folder component names must be no longer than 255 bytes.
- File and folder paths must be no longer than 1,024 bytes.
- The following characters are not allowed: " \ / : | < > * ?
- Control characters, for example, U+0001-U+001F, U+007F-U+009F, are not allowed. Note that this includes the tab character.
- Code points, for example, U+E000, are not valid Unicode characters and are not valid in Staging Explorer.
- File and folder names must not end with a dot character (.).
- The following file and folder names are not allowed: LPT1, LPT2, LPT3, LPT4, LPT5, LPT6, LPT7, LPT8, LPT9, COM1, COM2, COM3, COM4, COM5, COM6, COM7, COM8, COM9, PRN, AUX, NUL, CON, CLOCK$, dot character (.), two dot characters (..), or space character.
- File and folder names must not start with .fuse_hidden. This is a reserved filename prefix.
- We strongly discourage use of the following bidi control characters:
- U+200E Left-to-right mark (LRM)
- U+200F Right-to-left mark (RLM)
- U+202A Left-to-right embedding (LRE)
- U+202B Right-to-left embedding (RLE)
- U+202C Pop directional formatting (PDF)
- U+202D Left-to-right override (LRO)
- U+202E Right-to-left override (RLO)
Unsupported characters
The following characters in names of files and folders are rejected in Staging Explorer:
- U+002F (/)
- U+005C (\)
- U+007F
- U+0081
- U+008D
- U+008F
- U+009D
- U+D800 to U+DFFF
- U+FDD0
- U+FDDD
- U+FFFE
- U+FFFF
- U+4FFFE
- U+4FFFF
- U+8FFFE
- U+8FFFF
- U+CFFFE
- U+CFFFF
- U+10FFFE
- U+10FFFF
If you encounter issues with unsupported characters in file and folder names while working in Staging Explorer, you may do the following:
- Review the naming rules and the list of unsupported characters.
- Rename file and/or folders accordingly.
- Retry the operation or start a new job.
- If the problem still occurs, contact Relativity Support.
Uploading files
To upload files:
- In the Staging pane, navigate to the location where you want to upload the files from your local drive.

- In the Local pane, navigate to the location on your local drive containing the files for uploading to Staging and click Upload. If the Auto Start checkbox is selected, the transfer begins immediately. If not, click the Start button. For more information, see Starting and canceling a transfer. If the system detects a potential issue with the transfer job, a warning window is displayed. Click Cancel to cancel the transfer or click I want to proceed anyway to continue with the transfer.
- You may also hold down CTRL to select multiple files or SHIFT to select all the files between the first one you selected and the next.
- The Upload button will be grayed out (inactive) if no items are selected, if the destination folder is a list of fileshares, or if the destination folder is a root of the fileshare.
- If you plan for this data set to be later processed in Relativity, make sure the dataset folder name is unique. Data sources are not case sensitive. If you have data sources with duplicate names, you may see processing errors. For example, \\[file.share]\Processing Source[SOURCE.NAME] and \\[file.share]\Processing Source[Source.Name] would be considered duplicate names since the system does not differentiate between capital and lower case letters. To make them unique, you could rename the folders [SOURCE.NAME1] and [Source.Name2].

- From the Transfers tab, monitor upload progress via the Progress and Status columns displayed for the transfer. When the transfer successfully completes, a circled green check mark
 is displayed. You can click the expand plus button to next to a transfer row to view the transfer details. See Transfer workflows.Uploading overwrites existing files only if it already exists in the destination folder and its metadata and contents differ. Otherwise, the file will be skipped.
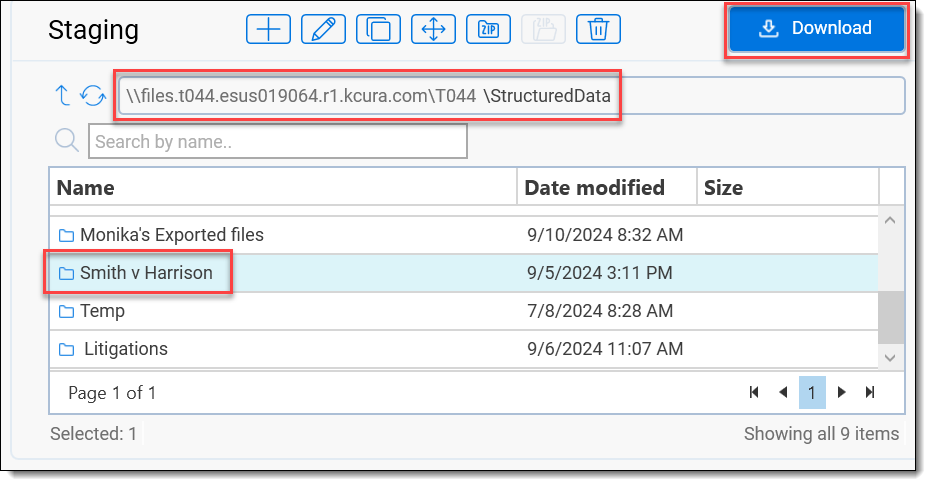
Downloading files
To download files:
- Launch the Staging Explorer.
- In the Local pane, navigate to the location into which you want to download the files from Staging.

- Next, in the Staging pane, navigate to the location containing the folder or files that you want to download to your local drive and click Download. If the Auto Start checkbox is selected, the transfer begins immediately. If not, click the Start button. For more information, see Starting and canceling a transfer. If the system detects a potential issue with the transfer job, such as inadequate space on the destination drive or impact on performance, a warning window is displayed. Click Cancel to cancel the transfer or click I want to proceed anyway to continue with the transfer.
- You may also hold down CTRL to select multiple files or SHIFT to select all the files between the first one you selected and the next.
- The Download button will be grayed out (inactive) if no items are selected or if the destination folder is a list of local drives.
- From the Transfers tab, monitor upload progress via the Progress and Status columns displayed for the transfer. When the transfer successfully completes, a circled green check mark is displayed. You can click the expand plus button to next to a transfer row to view the transfer details. See Transfer workflows.Downloading overwrites existing files only if it already exists in the destination folder and its metadata and contents differ. Otherwise, the file will be skipped.
Starting and canceling a transfer
Staging Explorer does not alter metadata while transferring files. All metadata remains untouched.
You can manually start a canceled/failed transfer or cancel a transfer that is in progress.
- Manually start a transfer: To manually start a transfer, highlight the transfer job in the Transfers tab and click the Start button or simply click the two-way arrow
 icon in the Actions column of the desired job. These options are only available if you do not have the Auto Start checkbox selected in the lower left portion of the application. To start multiple transfers, you may also hold down CTRL to select multiple individual transfers. You may also hold SHIFT to select all the transfers between the first one you selected and the next before initiating the start action. The next transfer starts automatically when the previous transfer finishes.
- Automatically start a transfer: To automatically start a transfer, select the Auto Start checkbox in the lower left portion of the application.
- Cancel a transfer: To cancel a transfer, click the circle with the line through it
 icon in the Actions column of the Transfers tab. The transfer completes the most recent file in progress and stops immediately after that.
Retrying a transfer
The Retry  button is enabled if the transfer was stopped (Canceled) or it failed due to an error. When you click this button, the status reverts to "Transferring" once the transfer is starts. Be aware that the transfer will continue from the point it was stopped. Any files that were successfully transferred prior to the cancellation or failure will not be re-transferred, and any incomplete transferred files will be re-transferred in their entirety.
Transfer jobs that completed successfully are not eligible for retry.
Deleting a transfer
Individual transfers with the status New, In Queue, Canceled, Finished, or Failed can be deleted by clicking the Trash button under the Actions column. To delete multiple transfers, you may also hold down CTRL to select multiple individual transfers. You may also hold SHIFT to select all the transfers between the first one you selected and the next and click the Trash button.
Once a transfer is deleted, it is removed from the Transfers tab. Removing a transfer from this tab is irreversible.
Viewing transfer history
When opening Staging Explorer, all of the transfers you previously ran are displayed in the Transfers tab.
- Launch the Staging Explorer.
- Click on the Created On column header to sort the transfers by the creation time in the ascending or descending order. When a new transfer is created, the transfer is added at the beginning of the Transfers tab list, provided no sorting has been selected.

- Hover over a column heading to view the Filter
 icon and click it. You can filter the column by selected Filter Rules and Filter Values, which will vary depending on the column selected. The sample image displays the filter options for the Type column. To filter on the transfer created date, click the filter icon next to the Created On column heading and use the Filter Values tab to select a date.
 - You can filter the Transfers list by using CTRL+F. Type in filtering criteria in the filter box and press Enter to display only matching transfers.


Viewing and editing transfer details
Refer to the sections below for how to view and edit transfer details.
Viewing transfer details
To view details for a transfer, click the expand plus button for the transfer in the Transfers tab. When you extend the details of a transfer, all folders/files that are in scope of that transfer are highlighted in gray in the source directory in the Local or Staging pane depending on the transfer type—upload or download.

The following information is displayed about the transfer:
- Status—status of the transfer.
- Remaining Time—how long the transfer will take.
- Duration—how long the transfer took.
- Started On—the date and time the transfer started.
- Finished On—the date and time the transfer completed.
- Job ID— unique number of a transfer.
- Settings—this section displays the options selected on the Transfer Settings page. See Updating Transfer Settings for more information.
- Limit Bandwidth—Yes indicates the Limit bandwidth setting is selected in Transfer Settings and No indicates it was not.
- Overwrite Files—Yes indicates the Overwrite Files setting is selected in Transfer Settings and files that have the same name in the destination folder will be overwritten. No indicates the setting was not selected and files will not be overwritten.
- Transfer Empty Directories—Yes indicates the Transfer Empty Directories setting is selected in Transfer Settings and empty folders will be recreated in the destination folder. No indicates the setting was not selected and empty folders will be ignored.
- Transferred Data—the size of the data currently transferred in reference of the total size of the transfer. If the Transferred Data shows more data than requested, for example 6 GB / 4.5 GB, it might mean that some of documents were modified after the transfer was started.
- Transferred Items—the number of files currently transferred in reference to the total amount of files and empty directories of the transfer.The Transferred Data and Transferred Files total values increase while the Calculation phase is in progress.
- Incl. Empty Directories—the number of empty directories included in Transferred Items.
- Skipped files—the number of skipped files in the transfer.
- Failed files—the number of failed files in the transfer.
-
 icon indicates the transfer Failed with failed path issues.
 -
 icon indicates the transfer finished with skipped paths, but no failed paths, in the transfer.
 - For active transfer, if there are any path issues, failed or skipped, the icon is displayed. However, if the transfer finishes with failed paths the icon is displayed.
- Click Skipped/Failed details link to download a CSV file to your local drive containing
- Auto Retry—based on the value set for Maximum Number of Auto Retry in Transfer Settings, this field will display the number of attempts completed out of total number of attempts set. For example, if the maximum number of auto retries is set to 3, then this field will update consecutively, for example 1/3 for one out of three attempts, 2/3 for two out of three attempts, and 3/3 for three out of three attempts. See Updating Transfer Settings for more information.
- Email Recipients—by default this field will be populated with the email addresses entered in Transfer Email Notification Recipients field. If applicable, remove or add email recipients for a particular transfer. This field will only be visible to users who have the Send Email Notification permission on. They will only receive an email notification when a transfer finishes or fails.
- Error—text box displays error messages.
Saving the path issues report
The path issues report is generated for each transfer that has at least one skipped or failed path. The report can be saved during and after the transfer completes by clicking on the Skipped / Failed details  button. The saved file contains information about the phase when the issue occurred, that is Calculation or Transfer, the error message, and the path that was skipped or failed.