


Feedback
Workspaces
In Relativity, a workspace provides a secure data repository for documents used in cases or for applications developed with dynamic objects. You can store all types of documents, such as productions, witness testimony, and so on, in a workspace to facilitate searching, organizing, and categorizing content. In addition, you can use granular security settings to grant or deny permissions to specific content stored in the workspace.
At the workspace level, you can also define views, layouts, fields, and choices. These features streamline workflows, as well as simplify the processes for organizing and categorizing content. Views support filtering on item lists, while layouts, fields, and choices are used for categorizing documents.

See these related pages:
Also see these related workflows:
Creating and editing a workspace
To create or edit a workspace, following these steps:
- Navigate to the Workspaces tab.
- Click New Workspace or if you want to edit an existing workspace, click the
 icon next to the workspace name.
 - Complete the fields in the form. See Fields.
- Click Save.
Any groups that are part of a template workspace will also be a part of the client domain workspace. We recommend removing these non-client domain groups to prevent the client domain admin from seeing information on non-client domain users and groups.
Fields
The Workspace Information section fields are:
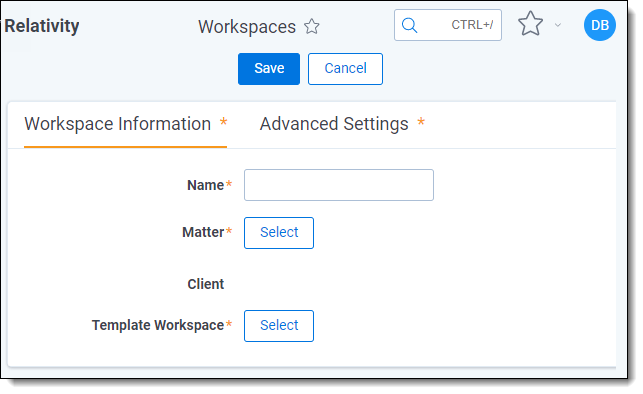
- Name—the name used to identify the workspace. This must not exceed 50 characters.
You can edit a workspace name at any time without affecting any data. The root folder name for the workspace updates along with the workspace name.
- Matter—the case or legal action associated with the workspace. Click Select to choose a matter. The Select Item - Matter modal displays a list of matters based on the conditions set in the MattersOnPicker view.
- Client—the name of this workspace's client object. This field is populates when you select a matter.
- Template Workspace—an existing workspace structure used to create the new workspace. Click Select to select a template. The Select Item - Template Workspace modal displays a list of templates based on the conditions set in the WorkspacesOnPicker view.
We recommend selecting an empty workspace without any documents as a template to prevent potential errors when trying to clean up all the references.
All of the following non-document objects in the template copy to the new workspace:
- Analytics indexes
The Analytics server selection is not copied over and will need to be manually selected once the new workspace is created since the resource pool is not necessarily the same for the new workspace.
- Analytics profiles
- Automated workflows
- Structured analytics sets
The Analytics server selection is not copied over and will need to be manually selected once the new workspace is created since the resource pool is not necessarily the same for the new workspace.
- Choices
- Custom tabs
- User objects
- Fields
- Filters for Repeated Content and Regular Expressions
- Groups, and permissions
- Imaging profiles
- Imaging sets
- To enable an automatic carryover of Imaging Sets to newly created workspaces, confirm the Copy Instances on Workspace Creation setting within the corresponding Object Type template workspace (Imaging Set) is set to Yes.
- Integration Point profiles
- Only export type Integration Point profiles with a source and destination of Relativity are copied.
- Layouts
- Markup sets
- Native types
- OCR profiles
- OCR sets
- To enable an automatic carryover of OCR sets to newly created workspaces, confirm the Copy Instances on Workspace Creation setting within the corresponding Object Type template workspace (OCR Set) is set to Yes.
- Persistent highlight sets
- Pivot profiles
- Placeholders
- Saved searches using Keyword, dtSearch, or Analytics indexes
- Scripts
- Search term reports
- Summary reports
- Views
The Analytics server selection is not copied over and will need to be manually selected once the new workspace is created since the resource pool is not necessarily the same for the new workspace.
- Analytics indexes
The Advanced Settings section fields are:
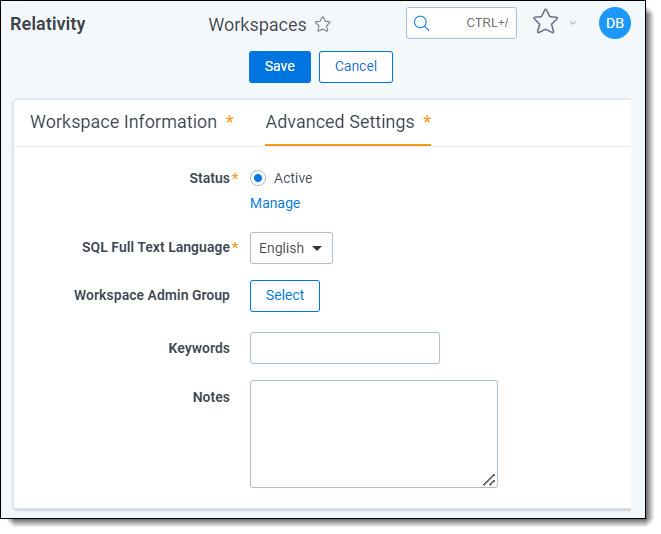
- Status—identifies a workspace as active or inactive. This field has no impact the workspace functionality, but you can add it to views for filtering workspaces. Inactive workspaces can be accessed and edited.
- SQL Full Text Language—determines the correct word-break characters used in the full text index. Select the primary language for documents added to the workspace. The default setting is English. Note that for multiple language workspaces, Microsoft recommends setting the most complex prevalent language as the SQL Full Text language.
The SQL Server settings determine the languages available in this list. Contact your system admin if you require additional languages. For information on configuring and managing word breakers, go here.
- Workspace Admin Group—determines the group that has workspace admin permissions over this workspace. Click Select to choose a workspace admin group. See Workspace admin group for more information.
- Keywords—any keywords you want to associate with the workspace.
- Notes—any notes you want to add to describe the purpose of the workspace.
Viewing workspace details
On the Workspace Details tab, Relativity displays read-only workspace fields, history information, Relativity Utilities console, Production Restrictions, and the Workspace Admin Group field. You can update the Production Restrictions field when you edit a workspace. See Adding and editing production restrictions.

Once a workspace is created, only System Administrators and Client Domain Administrators can make updates to the Matter object. Even users with full permissions for Matters and Clients will not have the ability to modify this object unless they are System Administrators or Client Domain Administrators.
Deleting a workspace
From the Workspace Details tab, you can delete the current workspace. Clicking Delete removes the workspace from Relativity. After you click Delete, a confirmation message appears with the Dependencies button. See Displaying and interpreting the dependencies report.
You must have Delete permissions for the workspace object in order to delete a workspace.
When you delete a workspace, the following occurs in Relativity:
- Relativity removes the workspace from the Workspace lists and marks the workspace for deletion after hours.
- During off-hours, the Workspace Delete agent runs and deletes the following:
- Any documents in the Relativity file repository, except those loaded in with pointers.
- dtSearch indexes.
- Analytics indexes and staging areas.
- The SQL database; however, Relativity does not delete database logs and backups.
- The data store with the artifact ID of the workspace. Specifically, the Workspace Delete/Housekeeping agent sends a message to the worker manager server to delete the data stores.
Using the utilities console
Additional administrative features are available through the Relativity Utilities console on the Workspace Details tab.
System Settings
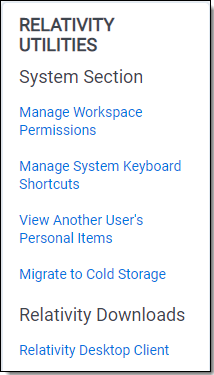
The console includes the following in the System Section:
- Manage Workspace Permissions—set permissions for the workspace.
- Manage System Keyboard Shortcuts—displays a pop-up for modifying the key combination used by system shortcuts. To use this, you must have security permission for the Admin Operation called Modify System Keyboard Shortcuts. See Managing system keyboard shortcuts.
- View Another User’s Personal Items—displays a pop-up for selecting workspace users where you can view a user's personal items. This button is only available to system admins. See Viewing the personal items of workspace users.
Relativity Downloads
In the Relativity Downloads section, click any link to download the corresponding component.
- Viewer Installation Kit—download a standalone utility containing executable files used to install the viewer software.
- Relativity Desktop Client—downloads an executable file called Relativity.Desktop.Client.Setup.exe, which is used to install the Relativity Desktop Client (RDC). You can use this executable file on both 32-bit and 64-bit operating systems.
Re-run event handlers
The console includes the following button for rerunning event handlers:
- Re-run Event Handlers—executes Post Workspace Create event handlers that failed to complete properly. The Workspace Details page displays this button and an error message at the top of the page only when Post Workspace Create event handlers have failed. If the Post Workspace Create event handlers continue to fail, contact Customer Support.
Managing system keyboard shortcuts
You can modify the system keyboard shortcuts for a workspace. These keyboard shortcuts are defined in Relativity for use in the review interface. You must have security permissions for the Admin Operation called Modify System Keyboard Shortcuts.
To manage system keyboard shortcuts, follow these steps:
- Navigate to the Workspace Details tab.
- Click Manage System Keyboard Shortcuts in the Relativity Utilities console.

Use the following instructions to modify a system keyboard shortcut key:
- Select or deselect one or more of the following check boxes: Ctrl, Alt, or Shift for the Control, Alt, and Shift keys, respectively.
You must select either or both the Ctrl and Alt checkboxes. Relativity displays the error message <Invalid Keyboard Shortcut> when these checkboxes are not selected.
- In the Key drop-down menu, select a letter, number, or navigation key. The navigation keys include End, Home, Space, Return, Down Arrow, Up Arrow, Left Arrow, Right Arrow, Page Down, and Page Up.
- Click the Keyboard Legend
 icon to display a list of keyboard shortcuts currently in use by the System and browsers. See Keyboard shortcuts legend.
 - Click Clear to reset the options for keyboard shortcuts.
After you have completed your updates, click Save to display the Workspace Details page.
You can create user-defined shortcuts when you add a new field to Relativity. See Creating and editing fields, and Creating keyboard shortcuts.
Viewing the personal items of workspace users
Access to View User's Personal Items is granted to System Administrators by default. All other groups must have the proper permissions. To view personal items, follow these steps:
- Navigate to the Workspace Details tab.
- Click View Another User’s Personal Items in the Relativity Utilities console.
- Select one or more users whose personal items you want to view, and move them to the right box using the arrows.
To move multiple users between boxes, click the double arrows. You can also select and double-click on user names to move the between boxes.
- Click Save.
Adding and editing production restrictions
Using the Production Restrictions option, you can ensure that your production set does not include privileged or other confidential documents. You can select a saved search that returns documents that you want excluded from the production set. When you run a production, Relativity compares these documents against those in the production and alerts you to any conflicts.
You must have permissions to the documents included in a production to remove production restrictions.
To add a production restriction:
- Create a saved search with criteria that returns documents that you want excluded from the production set. Include family groups in your saved search so that all of the family items are kept together and can be removed if necessary.
- Click to edit the workspace details page. You can only update the Production Restrictions option when editing a workspace. See Creating and editing a workspace.
- Select your saved search in the Production Restrictions option. The default value is <no restriction>.

(click to expand) - Run your production set. If a conflict occurs, you can override the production restriction if you're a system admin with the Override Production Restrictions permission. See Workspace security.
Managing production restrictions in templates
If you use a workspace with production restrictions as a template, you'll see a warning message that requires you to select one of the following options:
- Select a New Production Restriction
- Continue With No Production Restriction
You cannot delete the saved search that the Production Restriction option uses. You must first edit the Production Restriction option so that it no longer references the search.
Workspace admin group
A system admin can assign any group in Relativity to have full admin rights over a particular workspace. A workspace admin has full control over all objects within the workspace, but members of the group do not have the script permissions available only to system admins.
Use the following steps to set a designate a workspace admin group:
- Click Edit on the Workspace Details tab.
- Click
 in the Workspace Admin Group field.
 - Click the radio button next to the group you want to set as the workspace admin group.
- Click Ok.
You can only designate one group per workspace as a workspace admin group.
See Workspace security for more information on configuring permissions for workspaces.