


Feedback
Relativity Desktop Client
The Relativity Desktop Client (RDC) provides the functionality for importing document load, image, and production files, as well as for exporting production sets, saved searches, and folders. You can also use this utility to import and export object data.
Watch the following Relativity Desktop Client (RDC) Overview video.
See these related pages:
- Installing the RDC
- Importing through the RDC
- Exporting with the RDC
- Configuring the RDC
- Import errors for Desktop Client
Also see these related recipes:
- Migrating cases from Summation
- Setting up CJK document workspaces in Relativity
- QC Newly Loaded Data
- Importing productions in Relativity as Natives
RDC menu bar
The RDC menu bar appears above the workspace folder structure. It includes the following menu options:
File:
- Open - switches between different workspaces.
- Exit - closes the RDC.
- Refresh - updates the folder browser.
Tools - Import:
- Image File - imports images from a page-level load file.
- Document Load File - imports native files, document metadata, and extracted text from a document-level load file.
- Production Load File - imports productions from a page-level load file.
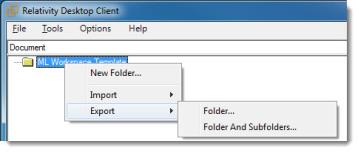
Tools - Export:
- Production Set - exports production sets.
- Saved Search - exports from saved searches.
- Folder - exports from a specific folders.
- Folder and Subfolders - exports from a specific folder and its subfolders.
Options:
- Settings - changes the default value for Force Folder Preview and enter a WebService URL.
- Check Connectivity - assists with troubleshooting network and system configuration errors that occurred while importing and exporting.
Help:
- About - displays the version of the RDC.
- Help - opens the Relativity Desktop Client documentation in your internet browser.
Workspace folder options
The RDC provides right-click options on folders, which you can use to build the workspace folder structure, or to import and/or export directly to and from a folder.
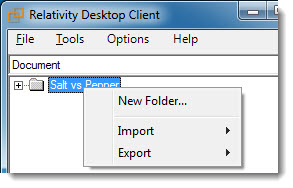
When you right-click on a workspace or folder, the following menu options display:
- New Folder - create subfolders. In the Add New Folder pop-up, enter a folder name, and then click OK. The maximum length for the folder name is 255 characters. Since the folder name is a system field, once you create it, you can't edit it. The new folder is added to the workspace through the RDC.
- Import - import an image file, document load file, or production file into a specific folder. Highlight the folder, point to Import, and select a file type. If you have metadata, natives and images to load, run the load file import first, then the image file import. See
- Export - export a specific folder, or a folder and its subfolders.
Starting the RDC
To open the RDC:
- Double-click on the shortcut installed on your desktop. The Settings dialog box appears when you open the application for first time.

- Select or enter settings for the following options:
- Force Folder Preview Default - options to enable or disable this feature. When enabled, the RDC checks the first 1000 records of the load file after you click Import. It then displays the number of folders soon to be created. You can use this information to ensure that the load process is behaving as expected. If a large number of folders are listed, you can stop the load file, and verify that the Folder Info field is set correctly. By default, this feature is Enabled.
- WebService URL - enter the URL provided by your system admin. This URL is used to establish a connection between the RDC and your server. If the URL path is entered incorrectly, you are unable to connect the RDC to your database.
The WebService URL has the format http or https://<MyServiceName>/RelativityWebAPI/. When you display a Relativity page, you see the web service name listed in the address bar on the browser. For example, if the address bar displayed https://smith.com/Relativity, then your web service URL would be https://smith.com/ RelativityWebAPI/. In addition, you can confirm this URL with your system admin.
- Force Folder Preview Default - options to enable or disable this feature. When enabled, the RDC checks the first 1000 records of the load file after you click Import. It then displays the number of folders soon to be created. You can use this information to ensure that the load process is behaving as expected. If a large number of folders are listed, you can stop the load file, and verify that the Folder Info field is set correctly. By default, this feature is Enabled.
- Click OK. These settings are stored in your machine registry and they are retained when you upgrade the RDC.
Logging on to the RDC
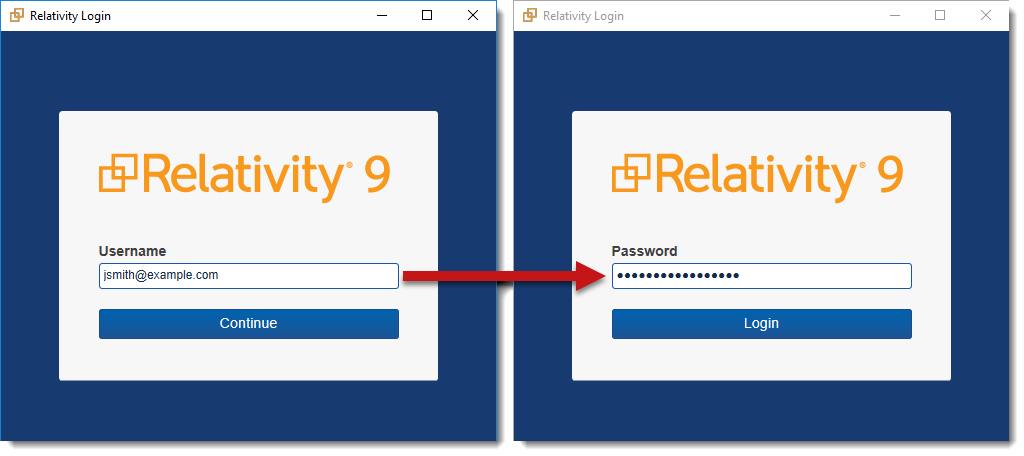
Users log in to the Relativity Desktop Client (RDC) with the same provider method as they have with Relativity. The RDC supports most Relativity authentication providers, such as password, Integrated Authentication, and OpenID Connect, by displaying the Relativity login page within the RDC as a dialog window. The only provider that does not work with the RDC is SAML because the Relativity’s IdP-initiated SAML does not display the Relativity login page directly.
After you log in, the RDC displays a list of workspaces where you have access rights. Use the filter bar to narrow the list.
By default, Relativity uses a wildcard to filter workspaces in the RDC. For example, enter ELA to find workspaces named ELAN and Relativity.
Highlight your workspace and click OK to open it in the RDC. The folder structure of your workspace displays. A new workspace contains only a root folder, while an existing workspace may contain subfolders that you can display by clicking the plus sign.
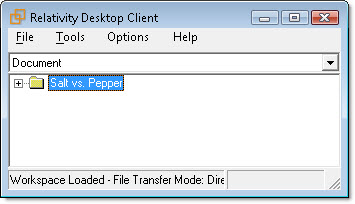
In Relativity Desktop Client, Document is selected by default as the type of object for data import or export. You can also select other object types, including Relativity Dynamic Objects.
RDC OAuth2 client
On your SQL server, you can extend the token lifetime by editing the [AccessTokenLifetimeInMinutes] field in the [EDDS].[eddsdbo].[OAuth2Client] view.
For general information about using OAuth2 in Relativity, see OAuth2 clients.
RDC transfer modes
RDC supports the following data transfer modes:
- Direct- uses the file share client. Direct mode provides the fastest transfer speed. Note the following details:
- Direct mode uses the windows Active Directory account and has direct access to write to the file repository or the BCPPath. This bypasses the need to go through the web server in order to ingest the data, saving a significant amount of time.
- There are two direct modes to be aware of:
- Direct Mode for native files - requires read/write access on the workspace file repository (so that native/image import/export is direct to the share).
- Direct Mode for file metadata - requires Read/Write access on the BCPPath for metadata. Document metadata passes through the BCPPath, not native files.
- Aspera - uses the Aspera client and requires Aspera credentials. This mode is supported only in RelativityOne environments and is not available in Relativity Server installations.
- Web - uses the HTTP client. Because of the limitations of the HTTP protocol and varying network bandwidth, it is the slowest. Note the following details:
- When you don't have read/write permissions to the BCPPath, Relativity must authenticate via the web server.
- When you don't have read/write permissions to the workspace file repository, Relativity must authenticate via the web server.
- When loading through web mode, you can see a drastic performance reduction compared to Aspera mode and an even greater reduction compared to direct mode. Web mode is the slowest method of all, it does, however, work without direct access to the BCPPath.
When you select a Relativity workspace, the RDC queries the workspace and performs tests to determine the optimal transfer mode. You can see the details of the tests under Options > Check Connectivity:
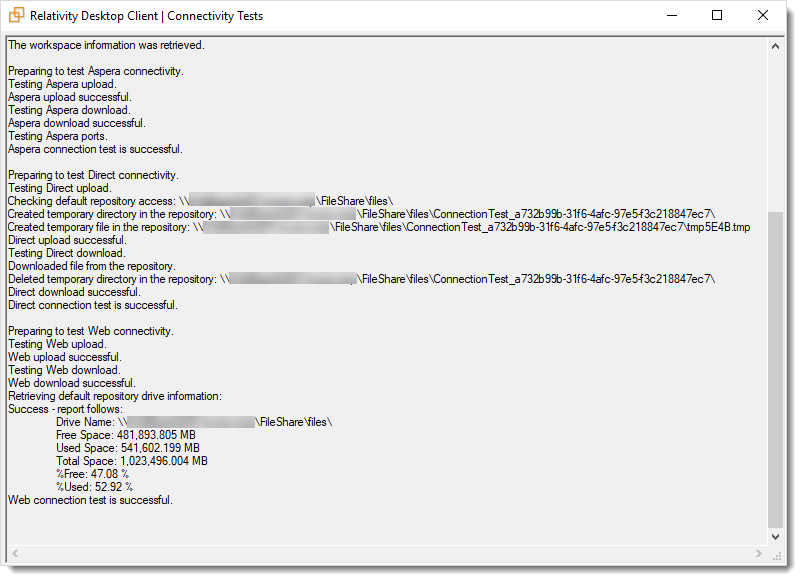
The RDC then automatically selects the optimal available mode for the transfer job.
You can select more than one mode for the transfer job based on your configuration. The fastest mode will be displayed first.
The mode initially selected based on the tests for the workspace may not be used in the actual transfer, for example due to a connection problem. If a problem occurs, RDC falls back to a different mode or displays an error.
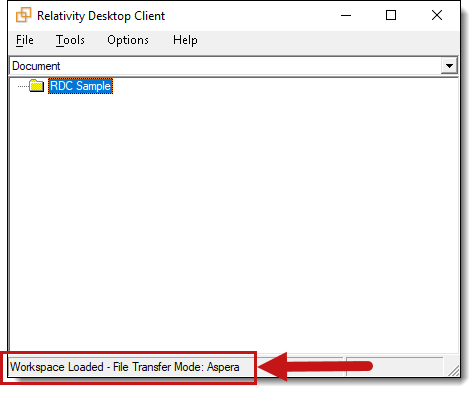
The transfer mode also displays on the RDC progress window.
![]()
You can also force the RDC to use a specific mode.
Transfer Mode Statuses
The following statuses may display during the transfer:
- Pending - displays when transfer mode is not yet determined.
- Disabled - displays when File Repository Preference is set to not copy files.
Direct mode
Direct mode provides faster performance, but it requires a connection to the network hosting the data, as well as specific Windows group permissions. Direct mode has direct access to write to the file repository, which bypasses the need to go through the web server in order to ingest the data, saving a significant amount of time.
Setup
The following conditions must be met in order to load data using direct mode:
- The Active Directory account running the load must have direct access to the Relativity File Repository and BCPPath folder.
- The loaded data must be located on the Relativity system network/domain.
- The computer running the Relativity Desktop Client must be located on the Relativity system network/domain.
- The group of users responsible for uploading documents through the Win Relativity component (Relativity Upload Users) must have Full Control in the Document Repository Share. This allows members of this group to import and export in Direct mode. Non-members can only import and export in Web mode.
The option to change the default repository path when importing through the RDC is unavailable when Aspera mode is enabled.
- The option to change the default repository path when importing through the RDC is unavailable when Aspera mode is enabled.