


Feedback
Installing Elasticsearch
If you want to use Audit in your environment, you must install Elasticsearch using the Elastic installer. To access the Elasticsearch installation package, go to the Community.
Special considerations
- Ensure you complete the pre-installation steps. For more information, see
- You do not need to install Java (Development Kit). This is because the Elastic installer already includes Java, which has been tested and works with the version of Elastic contained in the installation package. For questions, email Support.
- For system requirements, see Elasticsearch system requirements.
Elasticsearch license
An Elasticsearch license is required to use it.
Running the Elastic installer
- Download the Elastic installer and ensure the file is not blocked.
- Extract the contents into a local folder.
- Right-click DataTron.exe, and then select Run as administrator.
Creating the response file
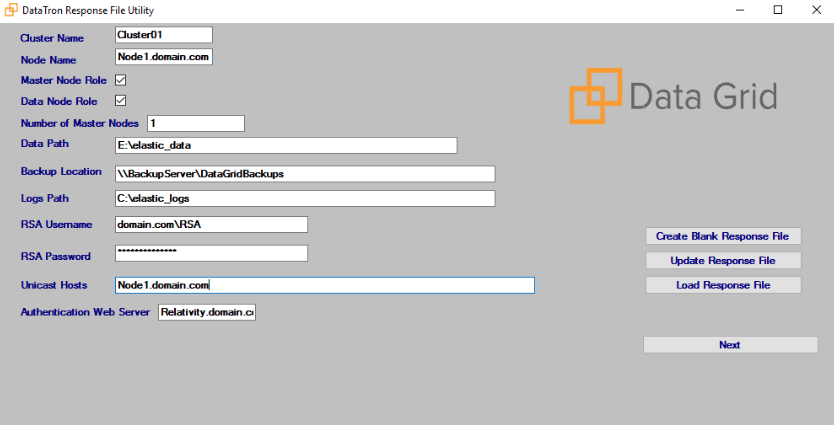
The first page in the installer allows for creation of the response file.
- On the response file utility, click the Create Blank Response File button. This creates a file called DataGridResponseFile in the same folder as DataTron.exe.
- Complete the following fields:
- Cluster Name - enter a name for your cluster.
- Node Name - enter a name for your node. Double-click on the text box to auto-fill the machine name. Update the name to the FQDN of the machine.
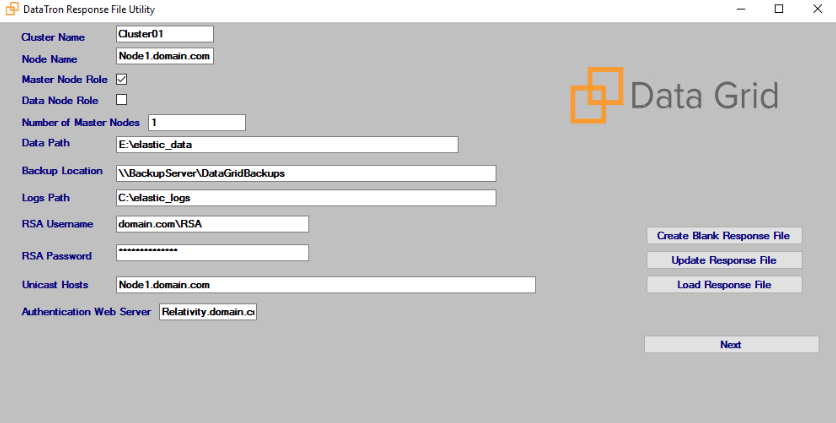
- Select a role for the node. See Elasticsearch system requirements for more information.
Any cluster that will contain monitoring data must have at least one ingest node.
- Master Node Role - the node within a cluster that manages changes across an entire cluster.
- Data Node Role - the node that stores data within a cluster.
- Number of Master Nodes - enter the number of master nodes. This must be an odd number.
- Data Path - double-click on the text box to select a path to store node data. This must be a local drive.
- Backup Location - this must be a UNC path to a file share. The Relativity service account must have full control on the share. For example; \\fileserver\datagridbackup
- Logs Path - double-click on the text box to select a path to store node logs. This must be a local drive.
- Relativity Service Account Username - enter the user name used to access the Relativity service account. Use the domain\user name format.
- Relativity Service Account Password - enter the password used to access the Relativity service account.
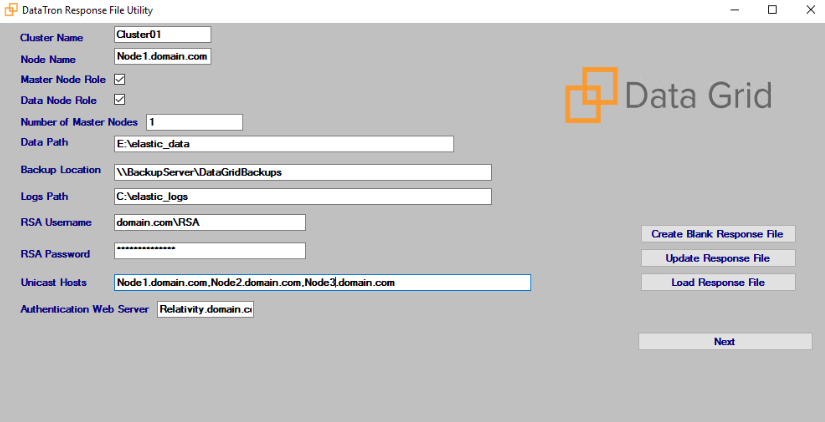
- Unicast Hosts - enter a list of all master nodes in the cluster without spaces and separated by commas. For example, localhost:9300, localhost:9301.
- Authentication Web Server - enter the name of the Relativity web server.
Once you complete all the fields, click Update Response File. Then, click Next.
Installing a node
The next page in the response file contains setup for installing a node.
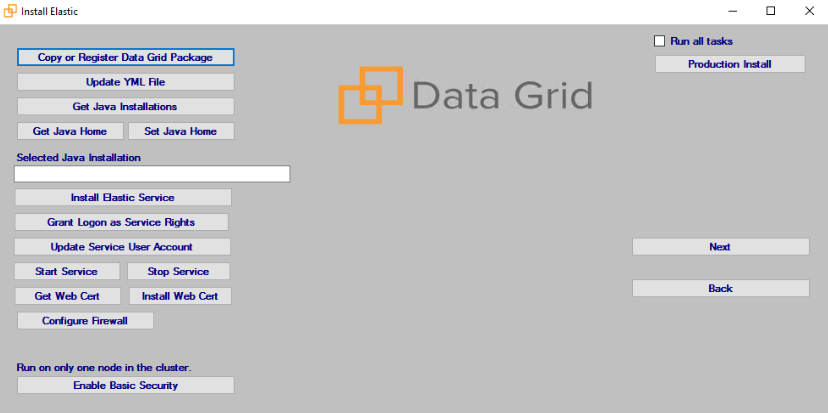
To install a node automatically, select Run all tasks, and then select Production Install or Monitoring Install.
You can also run through the tasks manually by clicking each button in the following order:
- Copy or Register Data Grid Package - opens a dialog box to browse for a location. If the root drive is selected, a folder called RelativityDataGrid will be created at the root level. You can also choose a folder on the drive which will create the RelativityDataGrid in that folder.
- Update YML File - updates the Elasticsearch .yml configuration with the values you entered in the previous form.
- Get Java Installations - gets the installed JDKs that are located in a \Program Files\Java\ subdirectory. and populates the Select a Java Installation field. If the program can't find any JDK installations on your machine, the open JDK folder in the Relativity Data Grid folder will be automatically populated. The path should be in the format C:\Program Files\Java\jdk<version>. For example, C:\Program Files\Java\jdk11.
-
Select a Java Installation – Double click any java installation in the drop down to populate the Selected Java Installation field
- Get Java Home - gets the KCURA_JAVA_HOME environment variable and populates the Selected Java Installation field.
- Set Java Home - sets the KCURA_JAVA_HOME environment variable to the value in the Selected Java Installation field.
- Install Elastic Service - installs the Elasticsearch service.
- Grant Logon as Service Rights - grants the account the ability to log in and run services.
- Update Service User Account - changes the login user to the service account.
- Start Service - starts the Elasticsearch service.
- Get Web Cert - downloads an authentication certificate using the Authentication Web Server provided in the previous form.
- Install Web Cert - installs the authentication certificate to the Java Keystore. To use this button, Get Web Cert must be run first.
- Configure Firewall - creates a firewall rule which allows incoming communication for the service.
Enabling basic security
Before you enable basic security, make sure at least the minimum number of master nodes are running. To verify that the node is active, go to http://nodename:9200/_cat/nodes in your browser.
Click Enable Basic Security. This button starts the trial license on the cluster and creates a genpassword.txt file in the RelativityDataGrid folder.
Instance settings
After you successfully run the Elastic installer, you must update the following instance settings in Relativity.
- ElasticsearchMajorVersion - specifies the major version of Elasticsearch that the cluster is running
- ESIndexCreationSettings - edit the ESIndexCreationSettings entry in Instance Settings to update the template if your setup requires shard or replication modifications. Always update the template through these instance settings to keep templates consistent across Relativity and Elasticsearch.
- ESIndexPrefix - enter a unique prefix for you instance of Relativity. This prefix lets you differentiate data from instance to instance within the cluster.
- AuditDataGridEndpoint - enter the endpoint for the Elasticsearch cluster. This value is required to activate Data Grid operation for the Relativity instance (http://client:9200).
Agents
After you successfully run the Elastic installer, you must add the following agents to Relativity.
| Agent name | Requirement information | Function | Agent type |
|---|---|---|---|
| Data Grid Audit Migrator | Only 1 per core on the agent server. Up to 16 agents per environment. | A Data Grid Audit Migrator agent migrates audit data from SQL to Elasticsearch for any workspace that has Audit installed. The frequency with which this agent checks for migrations and runs the migrations is controlled by the agent run interval value. | Multiple-installation |
| Data Grid Audit Deleter | 1 per environment required. Up to 4 agents per environment. |
The Data Grid Audit Deleter agent is an off-hour agent that deletes all audits from SQL that have been successfully migrated to Elasticsearch. Along with un-migrated audits, it will leave other existing audits in SQL for a configurable number of days for billing purposes. |
Single-installation |
| Data Grid Audit Reporter | (Optional) 1 per environment | The Data Grid Audit Reporter agent reviews the audit queue for errors that occurred during migration from SQL to Elasticsearch. This agent triggers a Relativity error based on the agent's run interval. This agent is set to an hourly run interval by default. | Single-installation |
| Data Grid Audit Manager | Only 1 per environment | Populates filters in the Audit application. | Single-installation |
| Data Grid Manager | Only 1 per environment |
A Data Grid Manager agent is an off-hours agent responsible for Data Grid enabled workspace management, including deleting outdated search results cache tables and monitoring Data Grid index conditions. If you've already installed this agent with Data Grid installation, you don't need to add another. |
Single-installation |
For more information on installing agents, see Adding and editing agents.
Elastic TLS configuration
Configuring TLS is required to apply the Elastic production license in Elastic 6.6.0. The Elastic installer includes a script called ElasticCertificateTool.ps1. The script is found in the DataTronCertifcateUtility.zip. This script gives you four options for configuring TLS:
- Option 1: Set up SSL for Elastic using a self-generated certificate authority (CA).
- Option 2: Convert certificates from CER and PFX format to PEM and Key
- Option 3: Set up SSL for Elastic using an externally generated TLS chain.
- Option 4: Exit the script
To configure TLS on your cluster, complete the following steps:
- Stop the Elastic service on all servers in the cluster.
- Navigate to the folder containing the Elastic installer and run ElasticCertificateTool.ps1 in PowerShell as an administrator.
- In PowerShell, enter 1 or 2 depending on which option you want to select.
- Enter 1 to create a self-signed certificate for the cluster. The generated certificate must be installed to the trusted root store on all agent and web servers. If you select this option, Option 2 and 3 are not needed. For more information, see Option 1: Set up SSL for Elastic using a self-generated certificate authority (CA).
- Enter 2 to convert certificates that have been added to the Keys folder. The certificate must be a PFX with a SAN name with an exportable key. The associated CER files for the TLS chain must also be present in the Keys folder. For more information, see Option 2: Convert certificates from CER and PFX format to PEM and Key.
- Enter 3 after using Option 2 to use the converted certificates. This option can be used as a standalone option if the PEM and KEY files have already been placed into the DataGridCerts folder in the tool as follows:
- Add PEM files for each level of the TLS chain to the TLSChain folder
- Add the PEM file for the node certificate to the NodeCertificate folder
- Add the Key folder for the node certificate to the NodeKey folder
For more information, see Option 3: Set up SSL for Elastic using an externally generated TLS chain.
Option 1: Set up SSL for Elastic using a self-generated certificate authority (CA)
If you selected Option 1, continue as follows in PowerShell:
- Enter a password for the Certificate Authority, and then hit Enter.
Use a long complex alpha numeric password, and avoid using special characters.
- Enter a password for the node’s certificate, and then hit Enter.
Use a long complex alpha numeric password, and avoid using special characters.
The script creates a CA file in the \RelativityDataGrid\elasticsearch-main\bin directory. This completes the installation on the first node.
- Copy the CA file to the \RelativityDataGrid\elasticsearch-main\bin directory for all other nodes in the cluster.
- Run the script on all other nodes in the cluster choosing Option 1.
Option 2: Convert certificates from CER and PFX format to PEM and Key
If you select Option 2, your node’s pfx file and the root and intermediate certificates are converted to PEM and Key format. The pfx certificate must have a subject alternative name and a password for the workflow to be successful:
- Copy the pfx for the node into the Key folder. Create a CER file for all intermediate certificates and the root CA associated with the pfx file.
- In Powershell, enter 2, and then hit Enter.
- Enter the password for the pfx file. The script converts the pfx file and the CER files to PEM and Key format in the DataGridCerts folder.
- Enter 3, and then hit Enter. Continue below.
Option 3: Set up SSL for Elastic using an externally generated TLS chain
After you select Option 3, the script asks to copy the PEM and key files to the appropriate folders. Continue as follows:
- If option 2 is completed, hit Enter. Otherwise, manually copy the files to the appropriate folders, and then hit Enter.
- Enter the password for the node's certificate.
Option 4: Exit
Exits the script.