


Feedback
Relativity Transcripts Limited General Availability
Note: This content refers to Preview, Advance Access or limited-availability functionality that may not be available in all Relativity environments.
You can use the new Relativity Transcripts application to import transcripts synced to multiple .mp4 video files. The transcripts can then be linked to exhibits and you can apply designations to highlight important testimony. You can use Import/Export to import video transcript files. To learn more, see Importing transcript MDB data for Processing via Import/Export.
If you want to import non-MDB transcript file types, the legacy Transcripts application is still available for this task. To learn more, see Transcripts application.
Permissions
The following permissions are needed to use Relativity Transcripts:
| Object Security |
|---|
|
Before you begin
The following applications should be installed in a workspace before you begin using Relativity Transcripts:
- Import/Export
- Processing
- Hydro Review Interface
Exhibits
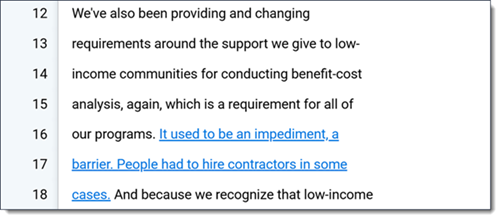
When reviewing transcripts, you can link text to other documents to help build your case strategy.
Note: If more than one user adds exhibit links or designations to the same transcript file at the same time, each user will only see the changes they have made until they refresh the page.
Link an exhibit
To link text in a transcript to other documents:
- On the Documents tab, select a transcripts file to open it in the Viewer.
- Ensure the Coding Layout is expanded.
- Select the desired text and right-click it.
- Hover your cursor over the Link Exhibit option.
- Select one of the following options:
- Link This Occurrence - Links exhibit only to the selected text.
- Link All Occurrences - Links exhibit to all occurrences of the selected text in the Transcript.
- On the Link Exhibit modal, select the document would like to link to the selected text.
- Click Link Exhibit.
The highlighted text is a link that can be clicked to access the relevant document.
Remove an exhibit
To delete an exhibit:
- Right-click on the exhibit text.
- Select the Remove This Exhibit Link option from the right-click menu.
- Click on the Remove Exhibit Link option in the modal.
The hyperlink is removed from the transcript.
Designations
While reviewing transcripts, you can tag text as a designation to track it as part of your case strategy.
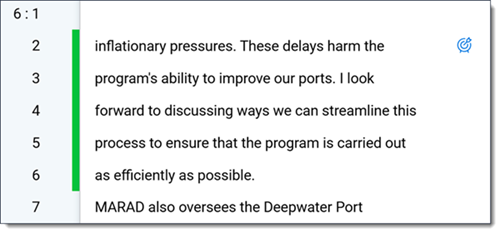
Designations can display in two different ways in the Viewer and you can toggle between the options by clicking on the Designation Display icon.
If Colors Bars is selected, each designation displays as colored bars to the left of the text in the Transcribed Text panel. This option is helpful if there are multiple overlapping designations in a transcript.
This option is helpful if there are multiple overlapping designations in a transcript.

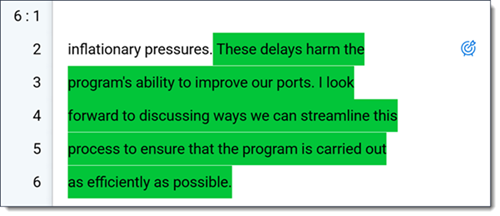
If Highlights is selected, each designation displays as highlights over the text in the Transcribed Text panel.
Add a designation
To add a designation to a transcript:
- On the Documents tab, select a transcripts file to open it in the Viewer.
- Select the desired text and right-click it.
- Hover your cursor over the Add Designation option in the right-click menu.
- Select the designation type by doing one of the following:
- Select the desired Designation Type from the menu.
- If the desired designation type is not in the right-click menu, you can search for it. To do so, expand the Coding Pane, and select the Search All option in the right-click menu. On the Select Designation Type modal, you can filter the list of designation types as needed. Select the desired designation type and click Select to apply that type to the selected text.
- Alternatively, you can create a designation type from the right-click menu. To learn more see Create a new designation type.
The designation is added to the transcript.
Create new designation types before importing transcripts
You can create designation types using the Choices tab before importing a transcript with Import/Export. Creating the designation types ahead of time ensures that the highlights are ready as soon as the import finishes so attorneys can start annotating the transcripts right away.
- Navigate to the Choices tab.
- Click New Choice.
- Select Relativity Transcript Designation for the Object Type field.
Designation Type is automatically selected for Field. - Click Add Choice and enter the name of the new choice using your keyboard. The new designation type is automatically saved.Note: When a new designation type is created, it is automatically assigned a color. You can edit the color for a designation type using Color Map. To learn more, see Color Map.
Create a new designation type
To create a new designation type from the right-click menu and apply it to selected text:
- Select the desired text and right-click it.
- Hover your cursor over the Add Designation option in the right-click menu.
- Select the Add Designation Type option.

- Enter a name in the Designation Type field.
- Select a color for the new designation type either by selecting one on the Swatches tab or select the Color Picker tab and either select a color by clicking on the color gradient and dials or enter a hex color code in the textbox.
The new designation type is created and it is applied to the selected text.
Remove a designation
To delete a designation:
- Right-click on the Designations icon next to the designation you wish to remove.
- Select the Remove Designation option from the right-click menu.
Change a designation type
To change a designation to a new designation type:
- Right-click on the Designations icon next to the designation you wish to edit.
- Hover your cursor over the Change Designation option.
- Select the desired designation type to change the designation to the selected type.