


Feedback
Last date modified: 2026-May-15
Google Workspace preservation source
This topic provides details on how to configure and capture Google Workspace Gmail, Drive, Chats, and Groups data with the Preservation in Place app.
This documentation contains references to third-party software, or technologies. While efforts are made to keep third-party references updated, the images, documentation, or guidance in this topic may not accurately represent the current behavior or user interfaces of the third-party software. For more considerations regarding third-party software, such as copyright and ownership, see Terms of Use.
See these related topics:
Considerations
Consider the following when using the Google Workspace data source:
- This data source cannot preserve Google Groups.
- Inactive user data cannot be preserved. For more information, see Google's documentation.
Requirements
Before setting up a Google Workspace preservation, you must complete the following:
- Create a Google Cloud project.
- Enable required APIs for the project.
- Google Vault API
- Admin SDK API
- Cloud Storage API
- Set up OAuth2 consent screen.
- Create credentials.
- Create admin role for Vault API.
- Create admin role for the user accounts listing.
- Create admin role for the groups listing.
- Enable required privileges.
After completing these required steps, you can create a Google Workspace data source in RelativityOne.
Setting up a Google data source
Connecting your Google Workspace to Preservation takes some setup in both Google and Relativity.
After setting up the
Begin with the credential setup in Google.
Create a Google Cloud project
Create a Google Cloud project to create, enable, and use all Google Cloud services. You will use this account to manage APIs.
To create a Google Cloud project:
- Open the Cloud Resource Manager page, then click Create Project.
- Enter information into the fields:
- Project name—enter a descriptive name for your project.
- Organization—enter the name of your organization.
- Location—enter the parent organization or folder.
- Click Create.

Enable required APIs for the project
Continuing in this process, you now need to enable the required Google Cloud Console APIs and associate them to a new project.
To start enabling APIs:
- In the Google Cloud Console, select the newly created project.
- In the left-navigation menu, select API & Services > Library.
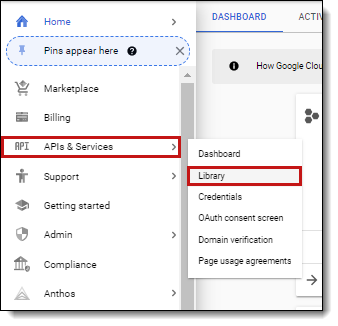
This will open up the Library page that includes all available APIs. - Enter Google Vault API in the search bar and search.
- Click the Google Vault API option, then click Enable.
- In the top left corner, click the Back arrow icon.
This will take you back to the search results page with the search bar. - Enter Admin SDK API in the search bar and search.
- Click the Admin SDK API option, then click Enable.
- In the top left corner, click the Back arrow icon.
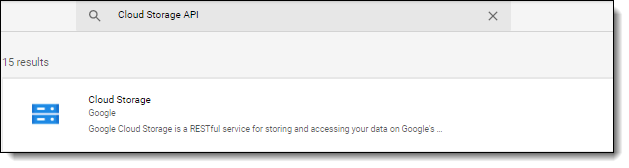
This will take you back to the search results page with the search bar. - Enter Cloud Storage API in the search bar and search.
- Click the Cloud Storage API option, then click Enable.
 This API may be enabled by default.
Set up OAuth2 consent screen
Follow the steps below to create an OAuth2 consent screen.
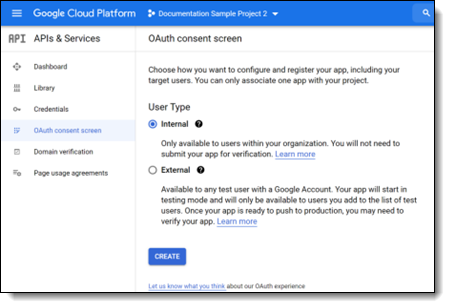
- Open Google Cloud Console and select newly created project.
- Click on the Navigation menu.
- Select APIs & Services > OAuth consent screen.
- Select Internal type and click Create.
- Enter descriptive App name. For example, Relativity Preservation.
- Enter a User support email from within your organization.
- Enter relativity.one as Authorized Domain.
- Enter an email from within your organization in the Developer Contact Information field.
- Click Save and Continue.
On the next step, you will want to add scopes.
- Click Add or remove scopes.
- Enter filter and select https://www.googleapis.com/auth/ediscovery or enter it in a text box.
- Click Update.
- Click Save and Continue.
Create credentials
- Click the navigation menu (
 ) in the top left corner.
 - Hover over APIs & Services > Credentials.
- Open OAuth Consent Screen:
- If you have not already configured an OAuth consent screen, you will be prompted to do so first.
- For more information on setting an OAuth screen, see Set up OAuth2 consent screen.
- Click Create Credentials.
- Click OAuth Client ID credentials.
- Enter the following information in the fields:
- Application type—select Web application.
- Name—enter a name for the credentials.
- Authorized redirect URIs—enter the URL based on the RelativityOne Data Center Geo you intend to run preservations from.
- For example, https://{InstanceURL}/Relativity.REST/api/Preservations/v1/Sources/workspace/{WorkspaceID}/GoogleVault/HandleAuthenticationRedirect
- When the {InstanceURL} is a Relativity instance URL and {WorkspaceID} is the Relativity workspace artifact ID where you are setting up the data source.
- InstanceURL— log into your RelativityOne workspace. The base URL shown is the InstanceURL. For example, https://company.relativity.one/Relativity/.../workspace/1016855/
- WorkspaceID— log into your RelativityOne workspace. The numerical value in the URL is the Workspace ID. For example, https://company.relativity.one/Relativity/.../workspace/1016855/
- To add more than one authorized redirect URI:
- Navigate to the Authorized redirect URIs section.
- Click + Add URI [2].
- Enter your specific redirect URI. Repeat this for any additional URIs you need.
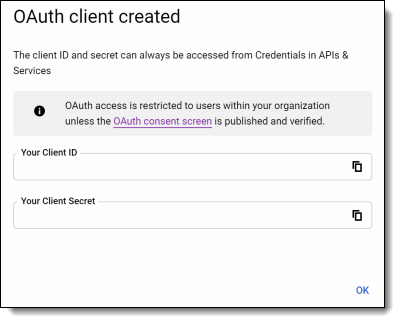
- Click Create.
The newly added redirect URIs should now be recognized by Google's OAuth 2.0 server.
After clicking Create, a pop-up window appears and you can save your Client ID and Client Secret. You will need to use them when creating the new data source under Create the Google Workspace data source.
Google Workspace user account setup
A Preservation hold requires a user account on which behalf Relativity exports data. This can be a dedicated or an existing user account.
Create admin role for Vault API
- Open
- Click Account > Admin roles to open the up the page.
- Click Create New Role.
- Enter the role name. Relativity suggests Relativity Preservation.
- Click Continue to select privileges.
- Select the following privileges:
- Services - Google Vault > Manage Matters
- Services - Google Vault > Manage Holds

- Click Continue.
- Click Create Role.
Create admin role for the user accounts listing
- Open
- Click Account > Admin roles to open the up the page.
- Click Create New Role.
- Enter the role name. Relativity suggests Users Reader for Preservation.
- Click Continue.
- Select the Admin API privileges - Users > Read privilege.
- Click Continue.
- Click Create Role.
Create admin role for the groups listing
- Open
- Click Account>Admin roles to open the up the page.
- Click Create New Role.
- Enter the role name. Relativity suggests Groups Reader for Preservation.
- Click Continue.
- Select the Admin API privileges - Groups > Read privilege.
- Click Continue.
- Click Create Role.
Enable required privileges
- Open
- Navigate to Directory > Users to open the list of users.
- Select or create the user you want to use.
- Select and expand the Admin roles and privileges pane.
- Assign the following roles to the user in All organizational units scope:
- Relativity Preservation
- Users Reader for Preservation
- Groups Reader for Preservation

Create the Google Workspace data source
There are specific steps to connect Google Workspace to Relativity when creating the Preservation data source. To set up the Google Workspace data source, you must enable API access with Google Workspace and then complete the data source settings in Relativity.
After confirming that your Discover APIs are enabled, complete the set up process in Relativity.
To add the Google Workspace data source, follow the steps below:
- Within the Preservation application, navigate to the Preservation Data Source tab.
- Click the New Preservation Data Source button.
- Enter in a unique name for the data source in the Name field.

- Select Google Vault as the data Source Type.
- Complete the Google Vault fields.
- Client ID—enter the Client ID created when you created credentials. For more information, see Create credentials.
- Client Domain—enter the Client Secret created when you created credentials. For more information, see Create credentials.
- Click Save.
- After saving, confirm that four services were created and linked to the data source. One for each of the following:
- Gmail
- Google Chat
- Google Drive
- The status at the top of the page should read, “The user has never authenticated and must authenticate.”
- Click the Authenticate button in the right pane.
- Select or sign in to the Google account on which behalf preservations will be performed. For more information, see Google Workspace user account setup.

- If authentication is successful, you will see the following message:

- Close the window the successful authentication window.
- Click the Re-Validate Authentication button in the right pane on the Preservation Data Source that you created. You should see the following status, “The user credentials are authenticated and ready to use.”

If you are not able to authenticate, or reauthenticate, and see the No refresh token was retrieved, please re-authenticate message, you can do the following:
- Use another account to authenticate Google with Relativity.
- Use a different application to authenticate. You must use a different application for each registration.
- Delete all connections to that user in Google. To delete connections in Google Cloud Console:
- Navigate to Manage your Google Account > Data and Privacy
- Scroll to find Third-party apps & services section.
- Locate and select the app you created in Google to authorize with Relativity.
- Click Delete all connections you have with <app name>.
After completing either of these tasks, retry authenticating.
Preservation data source fields
You must add Google-specific data into the fields in the Default Category during the creation of a Google Workspace data source.
- Name—enter a unique name for this preservation data source.
- Source Type—select a Google Workspace data source.
- Entity ID Field—select an entity type.
- Client ID—enter the Client Id copied from Google’s OAuth2 credentials page.
- Client Secret—enter Client Secret copied from Google’s OAuth2 credentials page. For more information, see Create credentials.
After saving, confirm that four services were created and linked to the data source.
Data source details
Each data source details page includes a console to complete actions. Each data source has different actions.
For Google Vault:
- Authenticate—click to authenticate the client ID and client secret with Google.
- Re-validate authentication—click to re-authenticate the client ID and client secret with Google.
