


Importing a production load file via Import/Export
You can use Import/Export to import external productions, including single and multiple PDF files, into RelativityOne with Import/Export. This is useful after a production goes out the door in the event a case team needs access to documents as they were in the production and needs them available for searching.
If you want to use Import/Export with Express Transfer active, which is the recommended workflow for data transfer, refer to Express Transfer overview for more information.
Refer to Import/Export load file specifications and Data upload size limitation for more information regarding load files. Also see General recommendations for structured data import and export jobs.
To import a production load file:
-
Use tabs, search, or the quick nav bar to navigate to the Import/Export Job page.
-
On the Import/Export Job page, click the New Import/Export Job button to start a new job.
-
On the Choose Workflow dialog, the Import button is selected by default. Next, click the Structured (Processed) Data workflow box to import a production load file into your workspace.
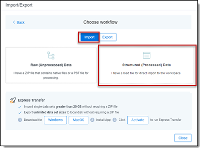

Note: If Express Transfer has been activated, the Express Transfer section will display a status of Active. See Activating and deactivating Express Transfer for more information.
-
On the Choose the Load File type dialog, click the Production box to import a production load file to your workstation.

-
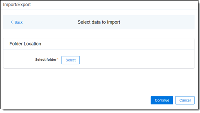
If Express Transfer is not Active, skip this step. If it is Active, click Select on the Select data to Import dialog to browse to your local drive and select the folder with the files that you want to upload. In the case of universal naming convention (UNC) paths (for example, \\ServerName\SharedResourceName\FilePath), you can copy and paste the path into the Select Folder address bar in the dialog box to access the desired folder.
- Notes:
- You can choose only one folder with files to transfer.
-
File names must be 200 characters or less, including the extension.
- We recommend using a local drive instead of a mapped or external drive to avoid potential slowness and connection issues with the file import process. Also see Data transfer performance considerations.
-
When Express Transfer is active, you should not zip data for importing.
-
When Express Transfer is active, all the data from the selected folder, including sub-folders, will be transferred to the staging area, regardless of the specific job configuration.

-
On the Choose Load File and Location dialog, complete the following fields, then click Continue. Refer to Import/Export load file specifications for more information regarding load files.

Job name—provide a descriptive job name so that you can quickly identify and track that job on the Import/Export Job page. The Job name field accepts up to 50 characters.
Destination folder—click the Select button, and do one of the following:
- Choose an existing folder.
- Create a new workspace folder by right-clicking on an existing folder, click Create, enter a new folder name, click out of the new folder to save it, then click Select.
Profile—are job configuration settings that were previously saved to a profile file (.ie or .kw*) so they can be reused when creating future jobs with the same or similar settings in RelativityOne, which saves time and effort as well as helps prevent data entry errors when you're mapping fields, for example. Profiles with the ".ie" extension can only be used in Import/Export.
None—select this option if you do not desire to use a profile for this import or if you intend to create a new profile based on the settings entered in the upcoming steps. You will be able to save the profile settings later on the “Import settings” dialog. The file extension for the new profile created will be “.ie”.
From Local Disk Profiles—use this option to select a previously saved Import/Export profile (.ie file) or an existing .kw* profile (created via the former Relativity Desktop Client application) to reuse the job settings for this workflow. Use the drag and drop feature or browse for a file to choose it. All job settings provided within the selected profile file will be automatically entered where applicable in the succeeding workflow dialogs.
- Load file—drag and drop or use browse for a file to select the load file from your local drive.
Images—drag and drop or use browse for a file to select a zipped image file from your local drive. See Image and extracted text files.
(Optional) Notification Addresses—enable email notifications by providing the email addresses of those who should get notified once the job completed, failed, or canceled.
-
On the Import Settings dialog, you can select the production to import and choose the numbering and import mode settings.

Production—select the Production set to import.
- Start Line—select the line number in the load file where you want the import process to begin. The default value is set to 0, which results in loading the entire load file.
Numbering—choose the numbering option:
Use load file page IDs—default setting.
Auto-number pages—select this option if page IDs in the production are not unique.
Import mode—choose how you want the records to be imported:
Append Only—loads only new records.
Overlay Only—updates existing records only. If selected, then you must assign a unique identifier in the Overlay Identifier that will be used to overlay data in the workspace. This field acts as a link indicating to RelativityOne where to import the data.
Append/Overlay—adds new records and overlays data on existing records. If selected, then you must assign a unique identifier in the Overlay Identifier that will be used to overlay data in the workspace. This field acts as a link indicating to RelativityOne where to import the data.
-
If you selected Overlay Only or Append/Overlay in the previous step, select an Overlay Identifier to specify the field that links your overlay load file to the workspace.
-
Merge Values—merges all values for multi-choice and multi-object fields in the load file with corresponding multi-choice and multi-option fields in the workspace. The fields are merged regardless of the overlay behavior settings in the environment.
-
Replace Values—replaces all values for multi-choice and multi-object fields in the load file with corresponding multi-choice and multi-option fields in the workspace. The fields are merged regardless of the overlay behavior settings in the environment.
-
Use Field Settings—merges or replaces all values for multi-choice and multi-object fields in the load file with corresponding multi-choice and multi-option fields in the workspace. The fields are merged according to the overlay behavior settings in the environment.
-
-
(Optional) Click Save Settings on the Import settings dialog to save the job configuration settings entered thus far to its own profile file (.ie file extension) on your computer so that you can reuse these settings when creating a new import job with Import/Export in the future.
Note: Import/Export saves job configuration settings to its own profile file format (.ie file extension). Comparing to the legacy .kw* standard, it brings more flexibility as you now can apply saved job settings across various workspaces. The .ie profile file format is not supported in other RelativityOne data transfer tools.
-
(Optional) Click Precheck Load File on the Import settings dialog to run a validation process on the load file to check for errors prior to importing it. The following validation is performed during precheck: Image file paths (checks 1,000 random lines across the whole load file). All detected errors are displayed in the Precheck window.
Click the down arrow next to any error message to view its details. If you want to correct the errors in the source file(s) and repeat the importing steps, click Cancel to discontinue importing the file at this time. Otherwise, go to the next step to import the load file with errors and correct them later.
Note: The Precheck Load File summary dialog displays a maximum of 1,000 errors for each error category. For example, if an error category has 2,000 errors, only the first 1,000 will display in the drop-down list.

- Click the Import button to start the importing process.
-
Review the importing progress on the Importing dialog. Real-time details regarding the number of transferred files and data size being processed displays during the Uploading and Extracting steps. If needed, click Cancel to stop the import job before it completes. Otherwise, click Close when the importing process is complete.
Caution: If you used Import/Export in web only mode (meaning Express Transfer was not active), do not close the Importing dialog until after the Uploading step has successfully completed. Closing the dialog prior to the Uploading step completing will terminate the data transfer (upload) process.

-
When the import is complete, the Import Summary displays. If no errors were found in the load file, go to the next step. If errors were found, the number and other information will be listed. You can do either of the following:
Note: Only records that imported without errors will appear in the workspace.
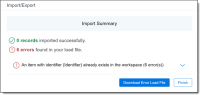
- To proceed without correcting the errors, go to the next step.
- To manually correct them now, click the Download Error Load File button. Review the errors and correct them as needed. When done, upload the file with the corrected data by clicking the Select button on the Import Summary screen next to New Load File and navigating to the load file on your local drive. Once selected, click Import to import the job with corrected data.
-
Click Finish to close the dialog.

You can review the Import/Export Job page to see more information about the job. Refer to
For more information on where Import/Export saves files, see the Community article, Import/Export: Where Files Are Saved By The Import/Export Application.
Note: If you ran the job with Express Transfer active, you are able to close the Import/Export application while the job is running, if desired, and the transfer job will continue and not be affected. You can monitor the progress and history of jobs within Express Transfer (see Express Transfer Job tracking and history). You do not have to be logged into RelativityOne to view information within the Express Transfer application.