SQL, agent, services, and web servers
In addition to Workers, Analytics, cache location, and Worker Manager servers, the Servers tab also lists all SQL, agent, services, and web servers that were automatically registered in your environment when you upgraded to or installed Relativity. You can't manually add these types of servers to your environment through the Servers tab, but you can monitor their status and view their version.
Adding SQL, agent, services, or web servers
Upon upgrading or installing Relativity, the SQL, agent, services, and web server types on the network automatically register with the Servers table. Therefore, you don't need to manually add these server types.
For more information on how each of these server components fits into the upgrade process, see Using the Relativity installer.
-
When adding a new server to your resource pool, ensure that you apply the same hotfix to the new server that you may have applied to any existing Web or Agent Servers.
Editing SQL, agent, services, or web servers
To edit a SQL, agent, services, or web server, locate the server you want to edit in the Servers tab and click the Edit link next to its name. The fields available for editing vary per server type.
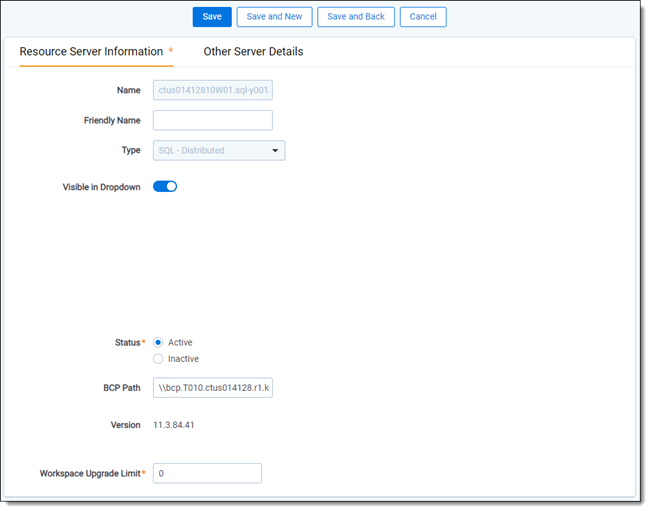
- The following fields are editable on a SQL Server:
- Friendly Name - enter a user-friendly name to the SQL Server that indicates its purpose.
- Visible In Dropdown - select Yes or No in the drop-down to display the server as an available item within the drop-down list when creating a new workspace.
- Status - indicate whether you want the SQL Server to be Active or Inactive.
- BCP Path - list the UNC share path used to store temporary files during bulk copy operations.
- Workspace Upgrade Limit - enter the maximum number of agents able to access the SQL Server during an upgrade of Relativity. The setting entered in this field can’t exceed the setting in the GlobalWorkspaceUpgradeLimit instance setting value. For more information, see Upgrading workspaces.
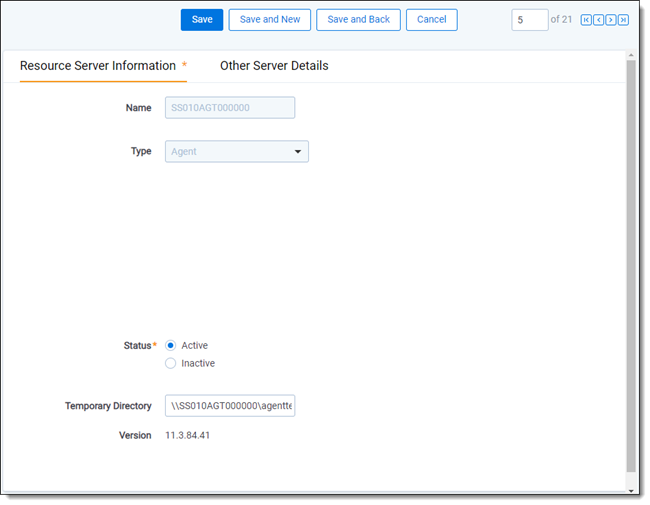
- The following fields are editable on an agent server:

- Status - indicate whether you want the agent or services server to be Active or Inactive.
- Temporary directory - list the UNC share path used to store temporary files during Relativity processes related to the work that the agent did. Note that this field is available for agent and web servers but not for Services servers. Among the Relativity features or components that use the temporary directory for storage purposes are:
- Analytics (analytics indexer)
- dtSearch (dtSearch indexer)
- ECA and Investigation
- Data Grid
- Text extraction queue
- Search Terms Reports

- You can edit the Status and Temporary directory fields on a web server. You can also edit certain load balancing fields on a web server. For details, see Monitoring Relativity user load balancing (RULB) on web servers.
Monitoring Relativity user load balancing (RULB) on web servers
You can equally distribute user loads across all web servers by setting the Enable User Load Balancing option, which is available when you edit a web server. Relativity performs load balancing by checking the user status table to determine how many users are logged in to each web server. When a user logs in to the application, the system logs in a user to the server with the smallest number of users. This functionality requires you to set up multiple URLs and web servers.
Relativity user load balancing (RULB) leverages Microsoft's network load balancing (NLB), in that it lets you set up multiple web servers through NLB and then assign each server an external IP address and URL.
RSA user load balancing is not supported.
On the Servers tab, you can track load balancing per server. Select the Web Servers view to display fields that you can use to monitor load balancing.

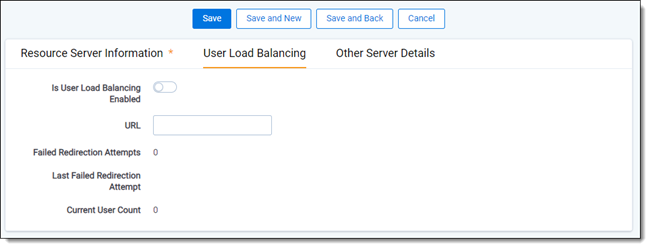
The Web Servers layout includes the following user load balancing fields:

- Enable User Load Balancing - indicates whether user load balancing is enabled for the server. By default, this is set to No. Set this to Yes to arrange for user load balancing between web servers.
- URL - enter the URL of the web server location. This must be a valid URL, and you must equip it with a certificate that permits it to communicate with the web server being balanced. For example, you have a URL of https://relativity.company.com/ to direct traffic to the NLB cluster, which contains two web servers. Those two web servers need their own external facing IP and URL, such as https://relativity1.company.com, which brings traffic to web server 1. Meanwhile, https://relativity2.company.com brings traffic to web server 2. If you enable Relativity user load balancing and access Relativity using https://relativity.company.com, it directs you to one of those two URLS. Then, the next person to log in to the system would be directed to the other URL, and so on.
- Failed Redirection Attempts - lists the number of times that Relativity failed to redirect the user to a URL. When Relativity detects servers participating in user load balancing, it attempts to pass new login requests to the least-utilized server. If this server is unresponsive, Relativity logs a failed redirection attempt and passes the user to the next least-utilized server. Relativity disables user load balancing for the server after 10 failed redirection attempts occur within 10 minutes. Users don't experience any difference in Relativity performance when they're redirected due to a failed attempt.
- Last Failed Redirection Attempt - lists the date and time of the last failed redirection to the URL used for load balancing.
- Current User Count - lists the number of users currently using a web server.
We recommended that you not bypass NLB when using Relativity user load balancing, as NLB includes a cluster name that then provides redundancy. That cluster name makes it so that if one component goes down, the balancing can be distributed across the other two components of the cluster. Relativity load balancing provides no such redundancy on its own.
For more information on web server registration, contact Support.


