Feedback
Building your first event handler
Relativity Event Handler Express is specific to Relativity Server applications. In RelativityOne, it has been replaced with Conditional Coding Rules. For details about using Conditional Coding Rules in RelativityOne, refer to Conditional Coding Rules Overview within RelativityOne documentation.
This tutorial explains how to use Event Handler Express to build a simple event handler that checks if the user selects the Responsive choice in the Responsiveness field. If so, it verifies at least one option is chosen in the Issue Designation field, otherwise an error message appears.
After building it, deploy your new event handler to the current workspace. This process makes it immediately available on its associated layout. For general information about building event handlers, see Using Event Handler Express.
When you use ARM to restore a workspace that contains the Event Handler Express application, you must manually redeploy any Event Handlers created with the application.
Before you begin
Complete the following tasks before building your event handler:
- Obtain access to an instance of Relativity that has Event Handler Express installed. In Relativity, confirm that you have the correct permissions. For more information on event handler permissions, see Setting security permissions.
- For testing purposes, identify a workspace where you can execute your new event handler. You can create a new workspace or use an existing one. Ensure that it contains some sample documents, and add the following objects to it. You reference these objects when you build your event handler.
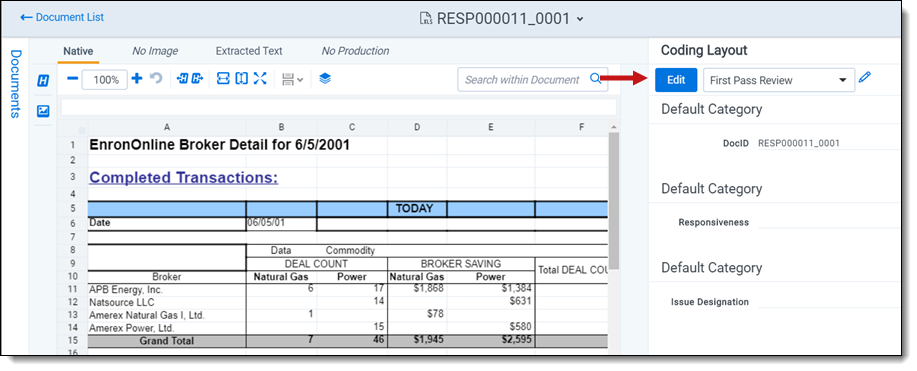
Object Type Name Comments Field Responsiveness Create a Single Choice field on the document object. Field Issue Designation Create a Multiple Choice field on the document object. Choice Responsive Select Responsiveness in the Field option. Choice Not Responsive Select Responsiveness in the Field option. Choice Not Relevant Select Issue Designation in the Field option. Choice Technical Issue Select Issue Designation in the Field option. Layout First Pass Review Select Document as the Object Type. Add the Responsiveness and Issue Designation fields to the layout. The following screen shot illustrates how the First Pass Review layout appears after you add the Responsiveness and Issue Designation fields to it.

Build an event handler
Use the following procedure to build a sample event handler with Event Handler Express:
- In Relativity, navigate to the workspace where Event Handler Express is installed.
- Click the Event Handler Express tab.
- Click New Event Handler Express.
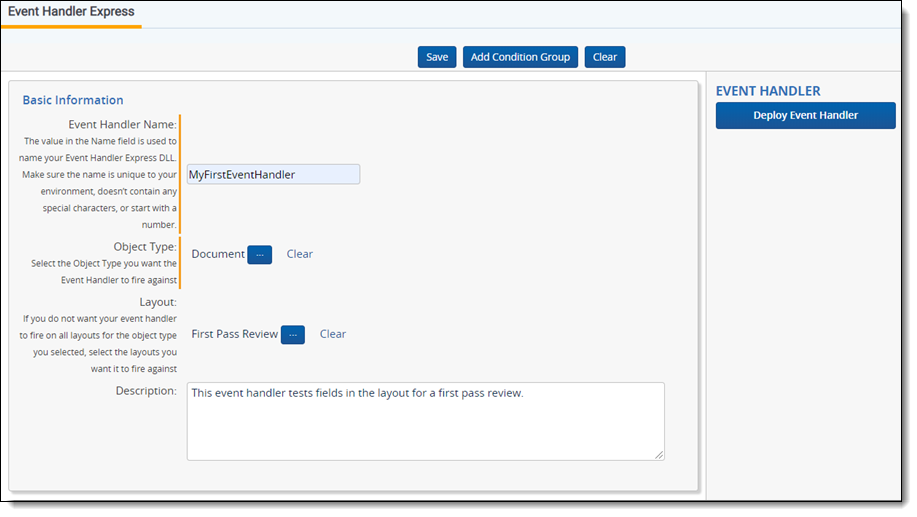
- In the Basic Information section, enter the following information in these fields:
- Event Handler Name—enter a descriptive name for the event handler. For your test example, enter MyFirstEventHandler.
- Object Type—click
 to display the Select Item dialog. Select the Document object, and then click Set.
 - Layouts—click to display the Select Item dialog. Select the First Pass Review layout, and then click Add > Set.
- Description—enter a description of what this test handler will do. For example, "This event handler tests fields in the layout for a first pass review."
- In Condition Group - 1, enter the following example text in the Description box: These conditions check whether the Responsiveness field is set to Responsive. Next, they verify that the Issue Designation field is also set.
- To define Condition - 1, complete these steps:
- Click
 to select the left parenthesis.
 - Select Field as the Validation Type.
- To set the Field/Group, click to display the Select Item dialog. Filter on Responsiveness in the Name column, select this choice, and click Set.
- In the Condition drop-down menu, select Is as the operator.
- To set the Field/Group, click to display the Select Item dialog. Select Responsive, and click Set.
- Click
 to select the right parenthesis.
- Click
- Click
 to link Condition - 1 with the AND operator to Condition - 2, which you add in the following steps.
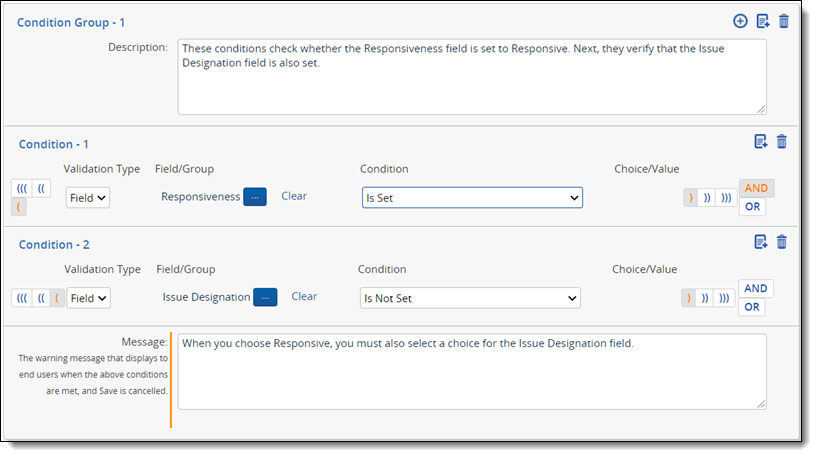
- Click
 to create a new condition. Repeat this process when you need to add another condition.
- Click to select the left parenthesis.
- Select Field as the Validation Type.
- To set the Field/Group, click to display the Select Item dialog. Filter on Issue Designation in the Name column, select this field, and click Set.
- In the Condition drop-down menu, select Is Not Set as the operator.
- Click to select the right parenthesis.
- Click
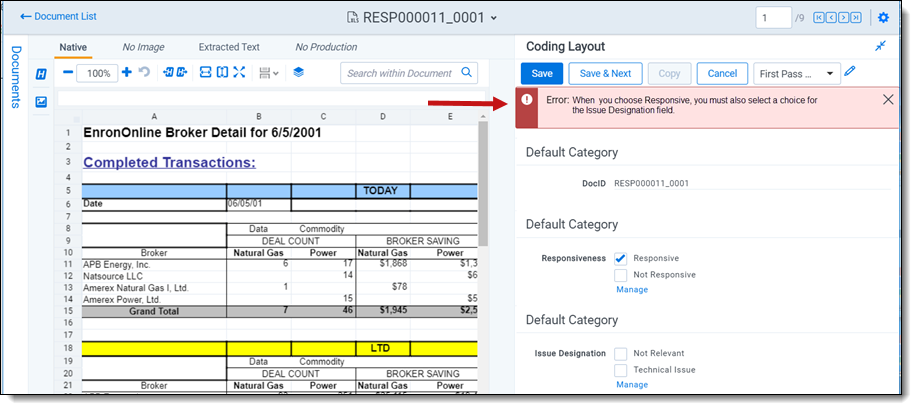
- In the Message box, enter the following: When you choose Responsive, you must also select a choice for the Issue Designation field.
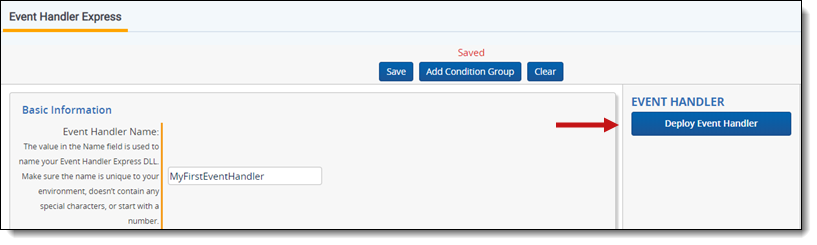
- Click Save.
- Click Deploy Event Handler in the Event Handler console. Your event handler now executes against the First Pass Review layout associated with it in your workspace.
Executing your event handler in a layout
You can test your sample event handler by coding documents in the viewer in the workspace where you deployed the event handler.
- In the current workspace, open a document in the viewer.
- Select the First Pass Review layout and click Edit.
- To test your event handler, select Responsive and click Save. Your error message should appear when you haven't selected a choice for the Issue Designation field.