Feedback
Configuring IIS security
Once your web server installation is complete, it's recommended that you harden those servers via the IIS security measures described in this topic.
Adding HTTP strict transport security
HTTP strict transport security protects websites against protocol downgrade attacks and cookie hijacking.
Doing this tells web servers to declare that web browsers (or other complying user agents) should only interact with it using secure HTTPS connections and never via the insecure HTTP protocol.
To add HTTP strict transport security:
- Open IIS and select the root site labeled Default Website.
- Select HTTP Response Headers.
- Choose Add and enter the following entry in the dialog prompt: IIS - Name “Strict-Transport-Security”; Value “max-age=31536000; includeSubdomains”
- Repeat the steps above for the IIS site labeled Relativity, if applicable.
Adding X-frame options
X-frames protect web applications against click-jacking. Doing this tells the browser whether content can be displayed within frames.
The Relativity web site in IIS sets to SameOrigin by default. We require SameOrigin on the Relativity site because some Relativity resources use iframes instead of HTTP.
To add x-frame options:
- Open IIS and select the root site labeled Default Website.
- Select the option HTTP Response Headers
- Choose Add and enter the following entry in the dialog prompt: IIS - Name “X-Frame-Options”; Value "SAMEORIGIN”
- Repeat the steps above for the IIS site Relativity if applicable. iisreset is required for the changes to take effect
Adding a referrer policy
A referrer policy governs which referrer information, sent in the Referrer header, should be included with requests made. If configured improperly, this could risk exposing information about the browsing session.
To add a referrer policy:
- Open IIS and select the root site labeled Default Website.
- Select the option HTTP Response Headers.
- Choose Add and enter the following entry in the dialog prompt: IIS – Name “Referrer-Policy”; Value “no-referrer”.
- Repeat the steps above for the IIS Site Relativity, if applicable.
Adding X-content type options
Adding an X-content type prevents browsers from interpreting files as a different MIME type than what is specified in the Content-Type HTTP header, such as treating text/plan as text/css.
To add an ex-content type:
- Open IIS and select the root site labeled Default Website.
- Select the option HTTP Response Headers
- Choose Add and enter the following entry in the dialog prompt: IIS - Name “X-Content-Type-Options”; Value “nosniff”.
- Repeat the steps above for the IIS site Relativity if applicable. iisreset is required for the changes to take effect
The X-XSS-Protection header is currently deprecated and not supported by most major browsers.
Reducing IIS header information
HTTP response headers can show information that experienced attackers can use to infiltrate an environment. It's recommended to decrease the response header information for X-Power-By, XAspNet-Version and Server headers.
Removing the X-power-by header
To remove the x-power-by header:
- Open IIS and navigate to the Default Website.
- Double-click on the HTTP Headers feature.
- Select the ASP.NET X-Powered-By header.
- Select Remove in the Actions pane.
Removing X-AspNet-Version header
To remove the x-aspnet-version header:
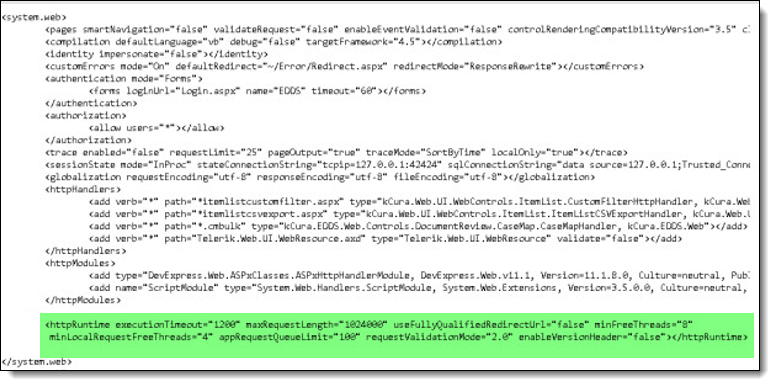
- Open the web.config file located in the C:\Program Files\kCura Corporation\Relativity\EDDS location. Response
- In the <system.web> section add the enableVersionHeader="false" variable within the <httpRuntime> tags.
Removing the server header
To remove the Server header:
- Open IIS and navigate to the Default Website.
- Double-click the HTTP Response Headers feature.
- Select the Server header.
- Select Remove in the Actions pane.
- Repeat the steps above for the site Relativity.
If 'Server' header is not found in the HTTP Response Headers feature, follow the below steps to Rewrite the Server header:
- Open the IIS Manager and navigate to Default Web Site.
- Select URL Rewrite.
- On the right-handpane, double-click View Server Variables... and select Add.
- Add the server variable RESPONSE_SERVER.
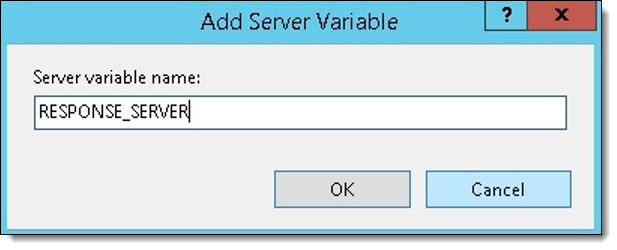
- Click OK.
- Navigate back to Default Web Site and select URL Rewrite.
- On the right-hand pane, double-click Add Rule (s)... and double-click Blank rule under Outbound rules.
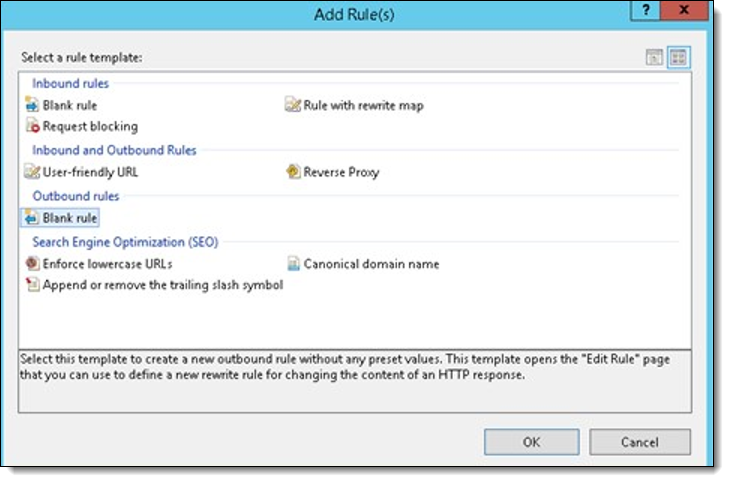
- Edit the rule as shown in the Match section and leave others by default.
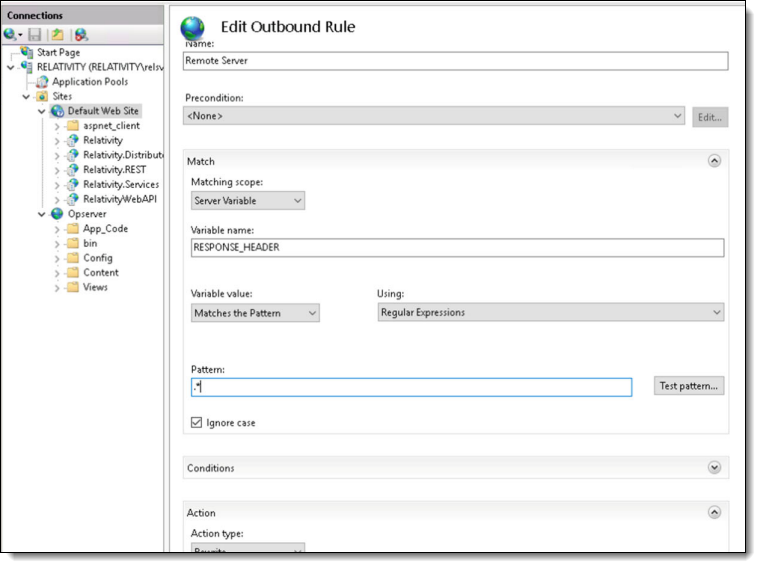
- Click Apply in the Actions panel.
- Reset IIS to ensure these changes take effect.
Some third-party applications may require the Server header, so you may need to remove this rule for those applications. Refer to each vendor's documentation for information on adding that rule, if required.
Enabling HTTP verbs
Enable the following methods to support your specific business requirements:
- GET
- POST
- PUT
- DELETE
- PATCH
Disabling HTTP methods
Disable the following methods via the steps found below:
- OPTIONS
- HEAD
- CONNECT
- TRACE
- Open IIS Manager and select the name of the machine to configure this globally.
- Double-click Request Filtering.
- Navigate to the HTTP Verbs tab.
- In the Actions pane select Deny Verb.
- Insert the method to be disabled in the Verb field, and click OK.
For more details on HTTP verbs, see HTTP headers, verbs, and related information on the developers site.
Enabling custom errors
Perform the following steps to enable custom errors, which ensures that no server file paths are shown to users:
- On each web server, open the C:\Program Files\kCura Corporation\Relativity\EDDS\web.config file.
- Edit the customError attribute to <customErrors mode="On" defaultRedirect="~/Error/Redirect.aspx" />.
Disabling directory browsing
Disable directory browsing to ensure that users cannot display the contents of directories in a webpage.
- Open the IIS Manager and navigate to Default Web Site.
- Double-click on the Directory Browsing feature.
- Select Disable in the Actions pane.
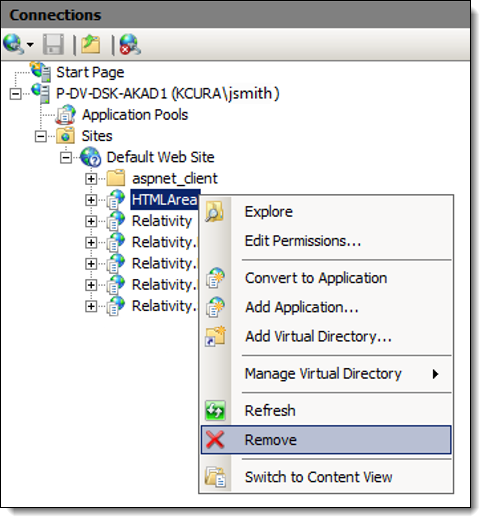
Removing the HTMLArea application
Since Relativity Web servers don’t require the HTMLArea Application/Virtual Directory, you can remove it via the following steps:
- Open IIS and navigate to the HTMLArea website under Default Website.
- Right-click HTMLArea and choose Remove.