


Independent Software Vendors (ISV) provide clients with a single platform to manage e-discovery needs. One of those needs is to make sure that everything is compatible with your Relativity version. The Solution Snapshot site helps ISVs keep track of their applications’ compatibility. Within the Solution Snapshot site, users can add applications, RAP files, installation documentation, and compatibility information, which allows your clients to automatically get the installed applications' compatibility information and to update their applications, if an update is available.
For the latest Solution Snapshot, see Solution Snapshot 4.2.5.0.
Accessing the Solution Snapshot site
An organizational user and organizational admin user can access the Solution Snapshot site, https://solutionsnapshot.relativity.com/, with Relativity Community access.
Note: Relativity recommends having a minimum of two organizational admin users for security purposes.
If you’re not a member of the Relativity Community, you need to register.
To register for the Community:
-
Click Register with Community Account.
-
Click the Not a member? link on the Community sign-in page.
-
Complete the form to create a Relativity Community account.
-
Click Sign Up.
You can sign up and create an account right away, but for it to be verified, you will need to log in once and set your password.
Once you have access to the Community, you will need to be approved by Relativity for access to the Solution Snapshot site. Note that for your account to be approved by Relativity, you must have created your Community account using your professional email, so as for Relativity to be able to associate you with the correct organization.
After Relativity registers you as an organizational user in the Solution Snapshot site, you are listed as disabled. From here, your organizational admin controls your user status. To be enabled, contact your organizational admin to request to be enabled.
When registered, log in with your Community Account to access the Solution Snapshot landing page. Depending on your role (Organization user or Organization admin user), you will have two tabs in the left navigation – Applications and Keys. Admins will see a third tab for Users

From the landing page, navigate using the left-handed sidebar. You can also click on your name in the top right to view your user information or logout. Navigate to the User Information page to view name, email, and organization. Please contact Relativity Support if the above information is not correct.
Applications
The Applications page lists all the applications that are owned by your organization. Each application that has been entered is listed with the given description on the landing page. You can view, add, edit, or delete any of the applications from this page.
Adding an application
On the application page, click the Add New Application button. To create an application, you need to enter the name, description, GUID, and the support website URL. All fields are required and must be entered before clicking Save.
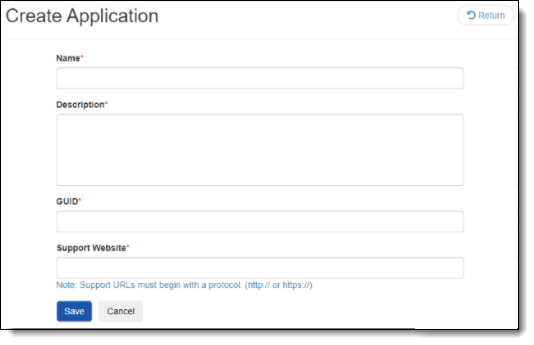
Once created, you can view the application and its details. The Details page includes the description, the creator’s name, GUID, creation and modification data, and the support website link.
Within the application’s table, you can view the application version, the release notes with the version, the compatible Relativity versions, modification date, if a RAP file is included, and if there are installation documents included. From this page, you can add a new version, edit a version, or delete a version.
Adding and editing a new version
To add a new version, click the Add New Version button. To edit an existing version, click the Edit icon next to the version number.
To add or edit a version:
-
In the Version field, enter the application version number or name.
-
Enter Release Notes attached to the version’s release.
-
Select Relativity versions compatible with the application version.
-
Click the directional arrows to move versions to the Selected Versions column.
-
-
(Optional) Upload a RAP File by selecting Choose File.
-
While this is optional, it is required if you want to allow users of the RAP to upgrade their applications when using the Solution Snapshot RAP. This also requires an Instance Key to be created on their behalf (see the relevant section Keys below).
-
-
(Optional) Upload Installation Documentation that is relevant to your application (.txt or .pdf) by selecting Choose File.
-
Up to 5 total, 2 MBs max each.
-
Adding a file will add another row below it.
-
Please note: The installation documents you upload will be available to Relativity Support teams when downloading the RAP file. These documents are intended to help them install the application on a customer's instance when they license the application
-
-
Click Save.

Deleting a version
After clicking the application name, you can view the application’s version information. The version table includes the version, release notes, compatible Relativity versions, the modification date, and if it includes a RAP file.
In the table, click  to delete the version. In the pop-up modal, click Continue. Once deleted, the version is can longer available in Solution Snapshot and can’t be directly installed from Solution Snapshot.
Keys
An instance key is a unique identifier for a Relativity instance. It gives permission to upgrade an application in Relativity. A key in Solution Snapshot allows a user to upgrade the RAP file for the applicable application version from the Solution Snapshot site. The user will obtain this instance key from their Instance Key tab in the Solution Snapshot RAP application. The Solution Snapshot RAP users should then reach out to your team with their Instance Key in order to set themselves up for upgrading.
View the list of applications and the number of keys for each application on the Keys page. Click on one of the application’s name to view the previously created instance keys.
When adding an instance key, you need to complete the following three fields:
-
Name – enter the name of the instance key.
-
Key – enter the instance key provided by the end user of the RAP file. The client must send an instance key for each individual instance for the developer to add to the list.
-
Description – enter a description that distinguishes this application’s key from the rest.
Users
The users page is only accessible by an organizational admin user. This page lists the users and their metadata. An admin can enable or disable a user’s access to the Solution Snapshot site.

The Status column notifies you whether the user is Enable or Disabled. Enable the user by clicking  . Disable the user by clicking
  . Once a user is disabled, they no longer have access to the Solution Snapshot site.
Removing a user with the , will remove the user from your organization and they will no longer have access to the Solution Snapshot site.