


Feedback
Working with ARM
As a system admin, you can configure settings and leverage ARM functionality. The ARM tab appears in the tab list when you’re in Home mode. The tab isn’t visible in the workspace in which it was installed, and it’s only visible to system admins. To work with ARM, select one of the subtabs. Clicking ARM Jobs takes you to the Job list screen, and clicking Configuration takes you to the ARM Configuration page.
It is recommended that the maximum number of ARM jobs running in parallel must be less or equal to the number of enabled ARM Agents.
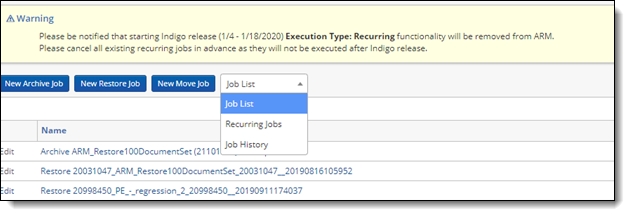
Job list screen
The Job list screen displays all workspace jobs with the following statuses:
- Not Started—the job has been created but not started.
- Paused—the job has been created and was started, then paused.
- Processing—the job has been created and is in the process of running.
- Errored—the job has been created and was started, then encountered an error.
The Job list screen includes the job’s name, type, priority, and status, as well as the name of the user who submitted the job and the job’s creation date.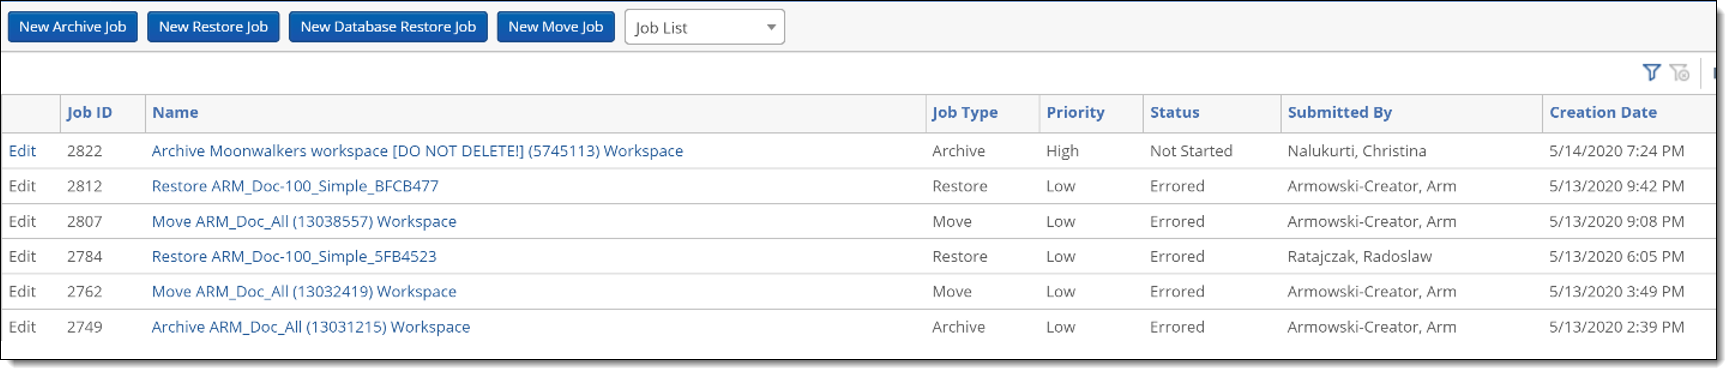
If a job has been created but not yet run, you can click the Edit link to edit the job from the Job list screen.

Click the name of any job to view more details for that job.
Job Details pages
The content of the Job Details page varies with each type of job.
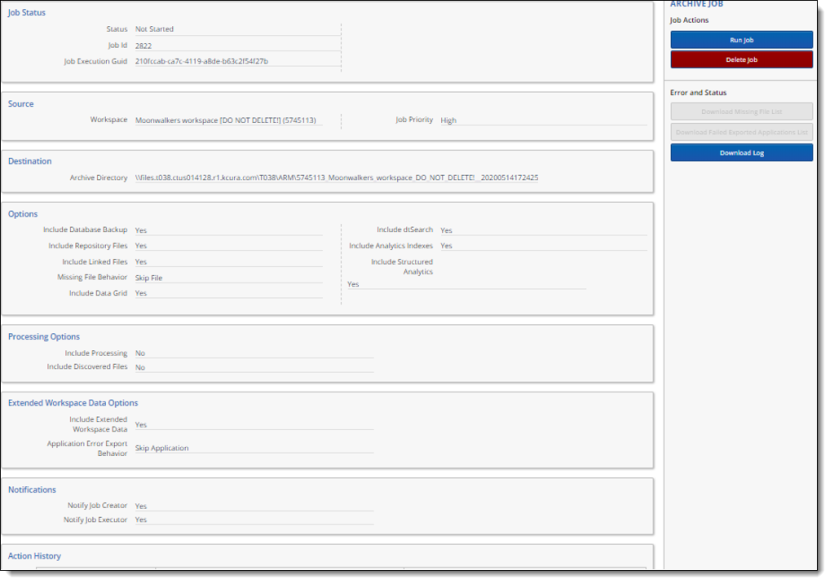
Archive Job Details page
The Archive Job Details page lists the details for the job based on the settings when the job was created and provides additional options, through the console at the right of the screen, based on the job’s status.
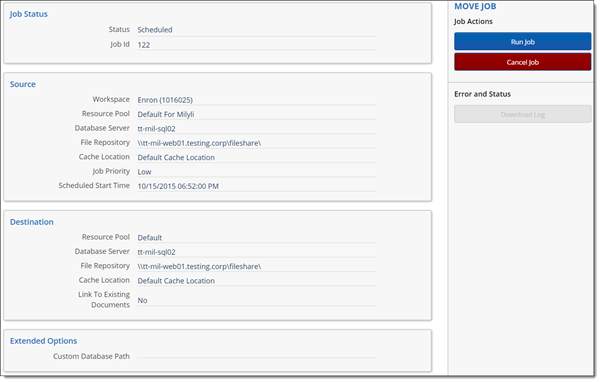
Move Job Details page
The Move Job Details page lists the details for the job based on the settings when the job was created and provides additional options, through the console at the right of the screen, based on the job’s status.
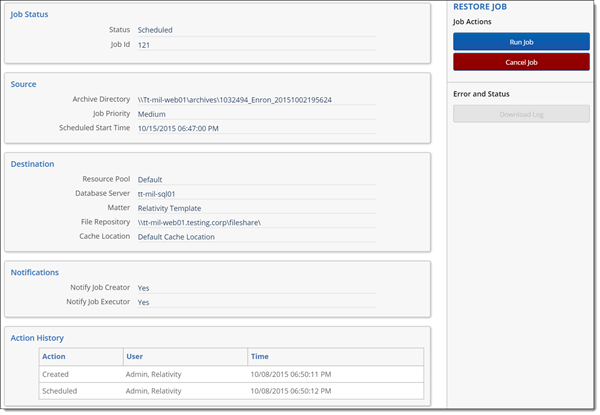
Restore Job Details page
The Restore Job Details page lists the details for the job based on the settings when the job was created and provides additional options, through the console at the right of the screen, based on the job’s status.
Job statuses and options
The Job Details pages display different content and options based on the status of each job.
Not Started
For jobs that haven’t yet been run, you can run or cancel the job from the Job Actions section of the console at the right of the screen. Canceling the job stops the job if it is already running, and then removes the job from the job list whether or not it has started running.

When you click Run Job or Cancel Job, a confirmation dialog appears. Click OK to proceed with running or canceling the job.
Processing
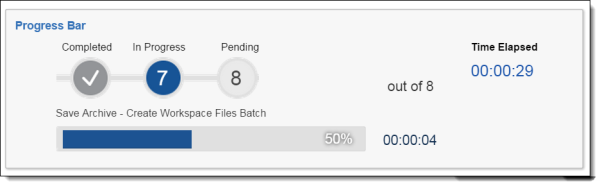
For jobs that are currently running, a Progress Bar pane appears at the top of the screen. This pane identifies the stage that the job is currently in along with a visual display of the stages and percent completed.
The stage name is displayed above the progress bar at the bottom of the pane. The timer to the right of the progress bar indicates the amount of time since that particular stage was started. The Time Elapsed timer at the top right of the pane indicates the amount of time since the job was started.
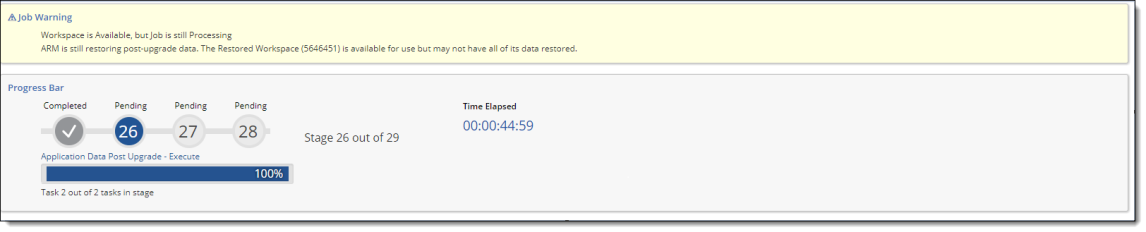
Processing a Restore job
When running a Restore job, after the Procuro workspace upgrade has been complete, the following warning message will be displayed above the Progress Bar pane.
ARM will also send an email notification with the same warning message if you are subscribed to receive them.
This warning message indicates that the archived workspace is available with limited accessibility while the job is still processing.
More job statuses and options
For currently running jobs, you have the option to Pause or Cancel the job from Job Actions section of the console at the right of the screen.

When a job is paused, it will continue to execute tasks and pause it after the stage is completed. Status of the job will change to Pause Requested.
When a job is canceled, it will continue to execute tasks until it reaches a safe spot to cancel. This provides a stable location to continue processing from if you retry the job.
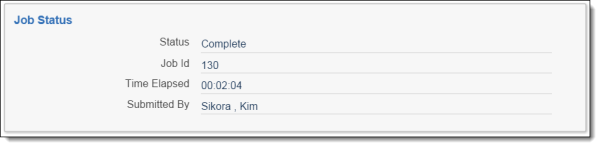
When a job has finished running, a new Job Status pane appears at the top of the Job Details page. This pane displays the status, the Job Id, the Time Elapsed, and the name of the user who submitted the job.
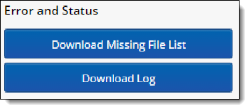
When a job is finished, you can click Download Log on the console to display a report of the job.

For Archive jobs, you can also click Download Missing File List if any of the files in the job were missing. This generates a CSV file listing the missing files.
Errored
When a job encounters an error, you can either retry or cancel the job. In the ARM tool, each stage is broken into a set of tasks. The tool makes note of the tasks that failed during the job so that you can resolve the error and retry the job.

Recurring Jobs list
- Beginning in ARM 10.3, the Recurring Jobs option will not be available for customers who do not have any recurring jobs already scheduled.
- Existing recurring jobs will execute normally at scheduled recurrence until ARM 11.0.0.3012 (1/4 - 1/18/2020).
- Customers with scheduled recurring jobs will no longer be able to edit their recurring jobs.
Job History screen
To access the Job History screen, click the ARM tab, and then select ARM Jobs. Next, select Job History from the drop-down list.
The Job History screen shows all jobs that have been run from the ARM application. Click the name of a job to view the Job History page for that job.
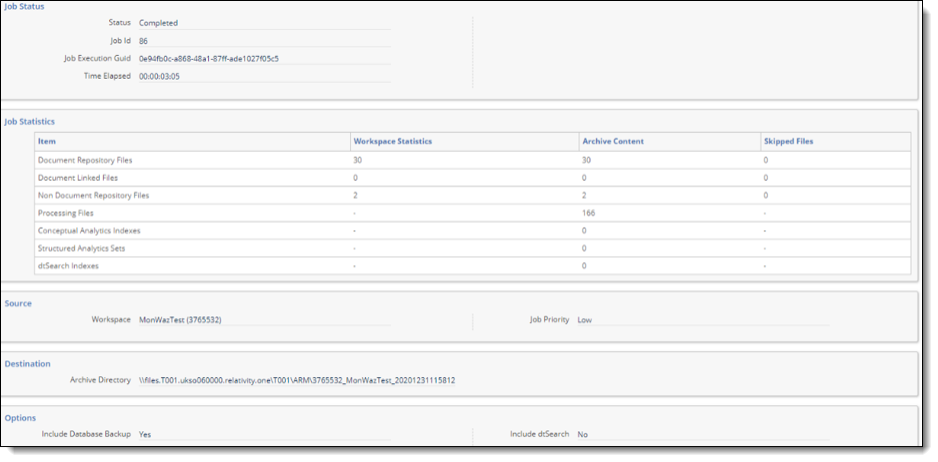
The Job History page includes a Job Status section which displays the following information for each job:
- Status—jobs can have the following statuses:
- Cancellation Complete
- Complete
- Errored
- Job Id—the identification number for the job.
- Time Elapsed—the total time the job took to complete.
The Job Statistic section for Archive jobs, displays the following information for each job:
- Document Repository Files—the number of repository files archived.
- Document Linked Files—the number of linked files archived.
- Non Document Repository Files— the number of non-repository files archived. Files attached to Relativity objects in the workspace but not to documents are called non-repository files, such as placeholder and file type icon.
- Processing Files—for RelativityOne, you may see this field. This is the number of Processing files archived.
- Conceptual Analytics—the number of conceptual analytics files archived.
- Structured Analytics—the number of structured analytics files archived.
- dtSearch Indexes—the number of dtSearch indexes archived.
The Job Statistic section for Restore jobs, displays the following information for each job:
- Document Files (Repository + Linked)—sum of restored Document repository and linked files.
- Processing Files—for RelativityOne, you may see this field. This is the number of Processing files archived.
- Conceptual Analytics—the number of conceptual analytics files archived.
- Structured Analytics—the number of structured analytics files archived.
- dtSearch Indexes— the number of dtSearch indexes archived.
Additionally, the Job History page lists the details for the job based on the settings when the job was created. It also includes Record History and User Action History sections to provide information on users’ interaction with the job.
This page provides additional options, through the console at the right of the screen, based on the job’s status.
Cancellation Complete
When a job has a status of Cancellation Complete, the Download Log button appears active; however, the log file is currently empty and does not display information on the steps taken in the job.
A successfully canceled job cannot be retried.
Complete
When a job has a status of Complete, the Download Log button appears active; however, the log file is currently empty and does not display information on the steps taken in the job.
Errored
When a job has a status of Errored, the Download Log button appears active. Click Download Log to download a text file log showing details about each step in the job.
When an Archive job encountered a missing file, you can download a missing file list in .CSV format from the Error and Status section of the console.
For jobs with a status of Errored, the Stage column on the Job history page displays the stage the job was in when the error was encountered. With this information, you can attempt to resolve the error. Once the error is resolved, click Retry Job.