


Feedback
Moving Analytics indexes and structured analytics sets
Moving Analytics indexes and structured analytics sets
The steps below assist with Analytics index and structured analytics set moves, where the Analytics installation remains on its original server. These instructions differ depending on whether the Analytics server is using Single Data Directory mode.
- Identifying the directory mode
- Moving the data in Single Data Directory Mode
- Moving the data to a new server
Please note that there can only be one index and structured analytics set location per Analytics server. Indexes and structured analytics sets must use the same location. Moving indexes requires downtime of all Analytics functionality in Relativity, such as clustering, categorization, index creation, etc. This doesn't impact any functionality in Relativity other than Analytics functions. For this reason, we recommend performing the move during off-hours.
Identifying the directory mode
Single Data Directory mode is only available on new Analytics installations; you can't enable it on upgrades. To determine whether or not the server is using Single Data Directory, take the following steps:
- Open a browser on the Analytics server and navigate to the Analytics REST URL:
https://<servername.FQDN>:8443/nexus/r1/system/devices
- Log in with the Analytics REST credentials.
- Verify the configured device and the device's path.
If the server is in Single Data Directory mode, the device appears with a special name of single-data-directory and the file path.
If you have a server on Non-single data directory mode, contactRelativity Support.
Moving the data in Single Data Directory Mode
- After verifying that the server is in Single Data Directory Mode, stop the Content Analyst (CAAT)/Relativity Analytics Engine Windows service on the Analytics server.
- Copy the indexes and sets from the original location to the new location.
You must copy all subfolders, even if they are empty. The Analytics software needs this folder structure in order to access the index or set. Be sure to copy all indexes and structured analytics sets to the same folder location.
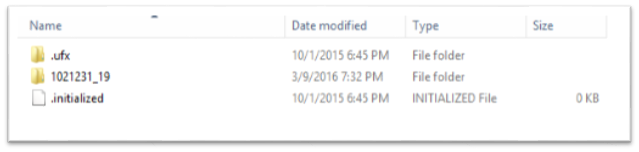
- Move the index directory to the new location. This will include all indexes, older structured analytics sets, a .ufx folder, and an .initialized file.
- Verify that the new location contains all indexes and structured analytics sets with no separation using subfolders, as shown below.
- Navigate to the C:\CAAT\etc directory.
- Open the single-data-dir.properties file in a text editor. Change the “caat.single.data.directory” line to point to your new index location. The file path should have a forward slashes ( / ).
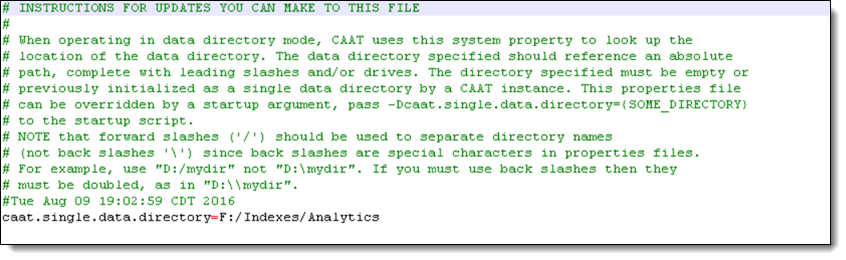
- Save the single-data-dir.properties file.
- Start the Content Analyst (CAAT)/Relativity Analytics Engine Windows service.
- Verify the new location.
To verify that the new directory is working properly, perform the following steps:
- Open a browser on the Analytics server, and then navigate to the Analytics REST URL:
https://<servername.FQDN>:8443/nexus/r1/
- Verify that you can see and access all expected Analytics indexes and structured analytics sets.
- Log in to Relativity, and then navigate to the Servers tab.
- Activate the Analytics server.
- Verify that you're able to run concept searches against the pre-existing indexes.
- Create a small Analytics index in one of the demo workspaces, such as Salt vs. Pepper.
- Once complete, confirm the new index resides in the new location.
- Create a small Language ID structured analytics set in one of the demo workspaces, such as Salt vs. Pepper.
- Once complete, confirm the new structured analytics set resides in the new location in the .ufx folder.
- Open a browser on the Analytics server, and then navigate to the Analytics REST URL:
Moving data to a new server
You can move your data to a new server. Confirm the server is in single data directory mode and do the following:
- Detach the Analytics drive from source server.
- Install Analytics in a temporary or dummy drive on the new server, then test to make sure the install was successful.
- Re-attach the drive from the old server to the new server.
- Verify that permissions for the re-attached drive have been granted correctly for users.
- Update caat\etc\single-data-dir.properties file to point to the new drive's folder.
- Restart the Analytics service.
- Optionally, before starting the next step, you can navigate to RESTUI to ensure that all of the indexes and sets are visible as an additional QC measure.
- Then run the Analytics Move script to begin using the new server with Relativity.
Please note that you cannot merge shares, but you can merge data on the new server. To merge data, do the following:
- Archive both the index and structured analytics data.
- Update the single-data-dir.properties file to the new location.
- Then restore the data that was archived to merge them.
Migrating the Analytics server
If you need to migrate the Analytics server to a new server, use these instructions. For this procedure, you need to move the Analytics installation as well as the indexes and structured analytics sets.
- Step 1 - Copying the Analytics indexes
- Step 2 - Copying over the structured analytics sets
- Step 3 - Installing Analytics on the new server
- Step 4 - Restoring the Analytics indexes
- Step 5 - Restoring the structured analytics sets
- Step 6 - Adding the Analytics server to Relativity
- Step 7 - Verifying the migration
- Step 8 - Uninstalling the old Analytics installation
This requires downtime of all Analytics functionality in Relativity, such as clustering, categorization, index creation, etc. This doesn't impact any functionality in Relativity other than Analytics functions. For this reason, we recommend performing the move during off-hours.
Step 1 - Copying the Analytics indexes
You must copy all indexes from the old Analytics server to the new Analytics server. If the index directory is stored in another path, you will copy this directory to the desired location on the new server in Step 4 - Restoring the Analytics indexes.
- Navigate to the Analytics index location.
- Stop the Content Analyst (CAAT) service, which has a hold of all of the indexes.
This causes an outage of all Analytics functionality on this server.
- Copy the existing folders with the following naming convention:
AnalyticsEngineIndexID
- Be sure to copy all subfolders, including empty ones. Take care when using the command line copy to verify that you copy all folders.
Do not rename any of these folders.
- Start the Content Analyst (CAAT) Windows service after completion.
Step 2 - Copying over the structured analytics sets
You must migrate all structured analytics sets from the old Analytics server to the new Analytics server via the Analytics Backup/Restore script and the following instructions:
Verifying the structured analytics sets for backup:
- From the Analytics server, run the Analytics backup script as an admin.
- Input option 1 to verify the structured analytics sets that need to be backed up on the Analytics server.
- Input the location of where the structured analytics sets are stored on the server, and then press Enter.
A notepad file opens indicating which sets are available for backup.
Backing up the structured analytics sets:
- Input option 3 to begin the process of backing up the structured analytics sets.
The system prompts you to input the location of where the structured analytics sets reside. In this will be the folder location you inputted during the verification process. - Input the location of the staging-backup.cmd file. This file is stored in the C:\CAAT\bin location. Depending on your folder structure, you may need to rename the CAAT portion to point to the bin folder correctly.
- Input the location of where the backup folder is created. This folder will be created automatically by the script.
- Press Enter to begin the backup process.
To verify that the backup is running, navigate to the location of the backup folder. You should see staging area files being written to the backup folder specified in step 3 and the size of the files growing. If you run into any issues during backup, please contact Support. - Once the backup process completes, copy over the backup folder to the new Analytics server.
Step 3 - Installing Analytics on the new server
To install Analytics on the new server:
- Run through the
- Run the
- Stop the Content Analyst (CAAT) Windows service after the installer completes.
Step 4 - Restoring the Analytics indexes
To restore your Analytics indexes on the new server:
- Navigate to the Analytics index location.
- Using the Analytics indexes you copied in Step 1 - Copying the Analytics indexes, paste in the backed up indexes, including all empty folders that may reside in the parent index folder.
- Restart the Content Analyst (CAAT) Windows service after all the files are copied over.
Step 5 - Restoring the structured analytics sets
After installation, restore the structured analytics sets from the old Analytics server to the new Analytics server via the Analytics Backup/Restore script and these instructions:
Verifying the structured analytics sets for restoring:
- Ensure that the backup folder is present on the new Structured Analytics server.
- From the Analytics server, run the Analytics Backup/Restore script as an admin.
- Input option 2, which provides you a list of structured analytics sets that are available for restore.
Restoring structured analytics sets:
- Input option 4, to restore the structured analytics sets.
- Input the location of the staging-restore.cmd file. This file is stored in the C:\CAAT\bin location. Depending on your folder structure, you may need to rename the CAAT portion to point to the bin folder correctly.
- Input the location of the backup folder where the structured analytics sets are backed up.
- Press Enterto kick off the restore.
To verify that the process is running, navigate to the location where your current structured analytics sets are stored. The sets are commonly restored to the C:\CAAT\.ufx\work location. Depending on your configuration, the sets may be restored to a different location.
Step 6 - Adding the Analytics server to Relativity
Analytics is now configured on the new server. You now need to add this server to Relativity.
To add the Analytics server to Relativity, use the following steps:
- Verify that you have a valid URL value entered for the RestUriForCAAT instance setting. This is the fully qualified domain name (FQDN) URL to the web server hosting your Kepler services. For example, https://client.domain.name/Relativity.REST/API.
- Add a new Analytics server from the Servers tab in Relativity. See Adding an Analytics server for more information.
When entering the URL:- Use this format: https://<servername.FQDN>:8443/.
- Duplicate all other settings from the original Analytics server.
- Add the new Analytics server to all of the same Resource Pools as the original server.
- Add the Analytics Move script to the Relativity Script Library and run the script.
- Navigate to the Relativity Script Library tab.
- Click New Relativity Script.
- Select and copy the contents of the
- Click Save.
- Test functionality by creating a small structured analytics set or index.
- Run the Analytics Move script to swap all references from the original server to the new server just created.
- Delete the old Analytics server from the Servers tab in Relativity.
Step 7 - Verifying the migration
To verify that the new installation is working properly, follow these steps:
- Log in to Relativity to verify you are able to query against the current indexes.
- Create a small Analytics index in one of the demo workspaces, such as Salt vs. Pepper.
- Once complete, confirm the new index resides in the new location.
- Create a small Language ID structured analytics set in one of the demo workspaces, such as Salt vs. Pepper.
- Once complete, confirm the new structured analytics set resides in the new location in the .ufx folder.
Step 8 - Uninstalling the old Analytics installation
Now that Analytics is installed on the new server, perform the following steps:
- Delete the old Analytics server from the Servers tab.
- Uninstall the Analytics installation from the old Analytics server.
- Delete the Analytics installation files and indexes from the old server.
Backing up or archiving Analytics data
Use these instructions for backing up or archiving Analytics data.
- Backing up or archiving an Analytics index
- Backing up an individual structured analytics set
- Backing up all structured analytics sets
Backing up or archiving an Analytics index
Copy all needed indexes from the Analytics server using these instructions:
- Navigate to the Analytics index location.
- Stop the Content Analyst (CAAT) Windows service, which has ahold of all of the indexes.
This causes an outage of all Analytics functionality on this server.
- Copy the folders with the following naming convention:
AnalyticsEngineIndexID
- Be sure to copy out all subfolders, including empty ones. Take care when using the command line copy to verify that you copy all folders.
Do not rename any of these folders.
- Start the Content Analyst (CAAT) Windows service after completion.
Backing up an individual structured analytics set
To back up only select structured analytics sets, use these instructions:
- Open a browser on the Analytics server and navigate to the Analytics REST URL: https://<servername.FQDN>:8443/nexus/r1/staging/
- Log in with the Analytics REST credentials. This will show the list of all structured analytics sets.
- Take note of the ones you would like to back up. The naming convention is as follows: ArtifactIDofWorkspace_ArtifactIDofStructuredAnalyticsSet
- Open a Windows command prompt, and then change to the following directory:
cd C:\CAAT\bin
- Run the next command to back up the structured analytics set, using the name of the structured analytics set that was recorded.
In the following example command, 1016636_1111253 is the name of the structured analytics set, and C:\migration\1016636_1111253backup is the location where the backup file will be written.staging-backup 1016636_1111253 C:\migration\1016636_1111253backup
- Copy the resulting file.
- Repeat these steps for all needed structured analytics sets.
Backing up all structured analytics sets
If you need to back up all structured analytics sets on the server, use the Analytics Backup/Restore script script, which sequentially backs up every structured analytics set.
This script differs based on the directory mode that the server is using. If Single Data Directory is enabled, the structured analytics sets are commonly stored in C:\CAAT\.ufx\work. If the server is not on Single Data Directory, the structured analytics sets are commonly stored in C:\CAAT\device-links\caat\.ufx\caat. See Identifying the directory mode above.
Verifying the structured analytics sets for backup:
- From the Analytics server, run the Analytics Backup/Restore script as an Administrator.
- Input option 1 to verify the structured analytics sets that need to be backed up on the Analytics server.
- Input the location of where the structured analytics sets are stored on the server and then press Enter. A notepad file will open indicating which sets are available for backup.
Backing up the structured analytics sets:
- Input option 3 to begin the process of backing up the structured analytics sets.
- You will be prompted to input the location of where the structured analytics sets reside in this will be the folder location you inputted during the verification process.
- Input the location of the staging-backup .cmd file.
This file is stored in the C:\CAAT\bin location. Depending on your folder structure, you may need to rename the CAAT portion to point to the bin folder correctly.
- Input the location of where the backup folder is created. This folder will be created automatically by the script.
- Press Enter and then the backup process will begin.
To verify that the backup is running, navigate to the location of the backup folder. You should see staging area files being written to the backup folder specified in step 4 and the size of the files growing. If you run into any issues during backup, please contact Relativity Support.
- Once the backup process completes, copy over the backup folder to a safe location.
Restoring Analytics data
Use these instructions for restoring Analytics data.
- Restoring necessary Analytics indexes
- Restoring an individual structured analytics set
- Restoring all structured analytics sets
Restoring necessary Analytics indexes
Restore the needed indexes to the Analytics server using these instructions:
- Navigate to the Analytics index location.
- Paste in the backed up indexes, including all empty folders that may reside in the parent index folder.
- Restart the Content Analyst (CAAT) Windows service after the copy is complete.
Restoring an individual structured analytics set
Perform the following steps to restore a structured analytics set.
- Make sure that the backed up structured analytics sets are on a lettered drive on the Analytics server, but not located in the Analytics indexes directory.
- From the Analytics server, open a Windows command prompt and change to the following directory:
cd C:\CAAT\bin
- Run the staging-restore.cmd script as follows:
staging-restore <new structured analytics set name> <path to backup file>
For example, to restore a structured analytics set called 1015041_1111253 from a backup file called 1015041_1111253backup in the Backups directory on the C: drive, the following statement would be used:
staging-restore 1015041_1111253 C:\Backups\1015041_1111253backup
- If you receive the message in parentheses after the restore ("The staging area was successfully restored, but CAAT had some issue in recognizing this new staging area"), then navigate to the following URL on the Analytics server to allow the structured analytics set to be recognized:
http://localhost:8443/nexus/r1/staging/1015041_1111253
- Repeat these steps for all structured analytics sets in the workspace.
Restoring all structured analytics sets
If you would like to restore all structured analytics sets to the server, use the Analytics Backup/Restore script, which sequentially restores every structured analytics set.
This script differs based on the Directory mode that the server is using. If Single Data Directory is enabled, the structured analytics sets are commonly stored in C:\CAAT\.ufx\work. If the server is not on Singe Data Directory, the structured analytics sets are commonly stored in C:\CAAT\device-links\caat\.ufx\caat. See Identifying the directory mode above.
Verifying the structured analytics sets for restoring:
- Ensure that the backup folder is present on the new Structured Analytics server.
- From the Analytics server, run the Analytics Backup/Restore script as an admin.
- Input option 2. This will provide you a list of structured analytics sets that are available for restore.
Restoring structured analytics sets:
- Input option 4, to restore the structured analytics sets.
- Input the location of the staging-restore .cmd file. This file is stored in the C:\CAAT\bin location. Depending on your folder structure, you may need to rename the CAAT portion to point to the bin folder correctly.
- Input the location of the backup folder where the structured analytics sets are backed up.
- Press Enter to kick off the restore.
To verify that the process is running, navigate to the location where your current structured analytics sets are stored. The sets are commonly restored to the C:\CAAT\.ufx\work location. Depending on your configuration, you may be able to restore the sets to a different location.