


Feedback
Upgrading or installing your Analytics server
An upgrade of your Analytics server is required for Server 2024. Follow these steps to upgrade your analytics servers.
Version compatibility
For this version of Relativity, CAAT version 5.1.0.A1 is compatible.
Pre-installation considerations
Before upgrading the Analytics servers, make sure you have completed the following steps:
- Review the Analytics upgrade considerations for the current version. For more information, see Upgrade considerations for Relativity.
- Install or upgrade your Relativity instance by performing the required steps.
- Perform a
- If you are upgrading your Analytics server, confirm whether your existing Analytics instance uses Single Data Directory (SDD) mode and migrate your data to an SDD install if necessary.
- For instructions on how to check your directory mode, see Identifying the directory mode.
TLS version considerations
The Analytics engine has TLS 1.1 disabled by default. This may cause issues if you're not using TLS 1.2 everywhere throughout your environment.
For this reason, we recommend enabling TLS 1.2 comprehensively throughout your environment. If it is already, no further action is recommended.
If you're not sure whether it is or not, check the registry key on all web and agent servers and then enable TLS 1.2, per the description in Managing TLS protocols and specifying cipher suites.
For assistance with enabling TLS 1.2, contact Support.
Installing or upgrading Analytics
You need the following items in order to successfully run the upgrade or installation:
- The Relativity Service Account user name and password.
- A self-signed or a trusted SSL certificate with the certificate's private key is required by Analytics. We recommend using the certificate that Relativity Secret Store generates. For more information, see Relativity Secret Store.
- If your SQL Server uses SSL encryption, see Installing Analytics server when SQL Server uses SSL encryption before beginning the Analytics server installation.
Starting with CAAT 5.1.0.A1, upgrades from CAAT 4.x require additional response file parameters due to architectural changes, including the redesigned authentication mechanism. Ensure caat.http-user and caat.http-password are configured. If SSL is enabled, caat.ssl-certificate-key-path and caat.ssl-password must also be provided.
Special considerations
Consider the following when upgrading or installing:
- Before attempting an upgrade, stop all Analytics engine processes, such as ensuring that all Java and PostgreSQL processes are stopped. After you do this, back up the CAAT install directory and the CAAT data directory. If something goes wrong with the upgrade, this will greatly reduce any downtime spent to fix the problem.
- The Analytics Index Share houses all of your Analytics data for a particular Analytics server, and it can grow to be very large. We have found that NTFS file systems work for small environments, but if you anticipate running sets of 10 million or more documents through your Analytics Engine, you should use a file system that supports larger files such as exFAT or ReFS. We do not have a recommendation for either file system, so you must determine which is the better fit for you.
- The Analytics upgrade includes an updated version of PostgreSQL, which is installed in the background. For more information, see Upgrading from previous versions.
Installing Analytics for the first time
Use the following sections to install Analytics for the first time. If you have previously installed Analytics and want to upgrade, see Upgrading from previous versions.
Setting properties in the response-file.properties file
Before new installations, unzip the Analytics package and open the response-file.properties file in a text editor. Complete the below Common Properties settings in the input file.
For first time installs, all settings are considered and you must specify all response file values. Check to make sure the provided default works with your environment.
The following are available properties in the response-file.properties file:
caat.install-dir
In former versions of the installer, this was called “Analytics Server folder.” This is the path to the folder containing the Analytics installation files. This value is required for upgrades.
- We recommend using the default folder of C:\CAAT, or C:\ContentAnalyst for a legacy installation.
- This path must be absolute, and it can’t contain spaces or invalid characters.
- If the installer cannot find or access the location you specify, it installs the application to the default C:\CAAT folder.
A forward slash ( / ) or a double back slash ( \\ ) should be used as a path separator, rather than a single back slash, as shown in the examples below.
caat.install-dir=C:/CAAT
caat.install-dir=C:\\CAAT
Spaces cannot be present within the file path.
caat.http-port
In former versions of the installer, this was called “Analytics Server Port Number.” This is the HTTP port to be used for requests to the Analytics engine. The HTTP port will default to 8080 for new installations, but you can configure a different port number, except for port 8443, which is reserved for the REST UI. For upgrades, the value entered will only be used to ensure that the CAAT server is not running on that port.
caat.http-port=8080
caat.as-windows-service
This option should be set to true. Please note that this option is ignored upon upgrade.
caat.as-windows-service=true
caat.windows-service-name
This is the Windows service name. The service name will default to Relativity Analytics Engine if a service name is not provided. Please note that the service name will not change upon an upgrade, and this value is ignored upon upgrade.
caat.windows-service-name=Relativity Analytics Engine
caat.single-data-dir
In former versions of the installer, this was called “Analytics Index Directory.” The Analytics data directory must also be created before installing Relativity Analytics. A forward slash ( / ) or a double back slash ( \\ ) should be used as a path separator, rather than a single back slash, as shown in the examples below. This value is required for initial installs.
This is the directory where indexes and structured analytics sets are stored on disk.
- We recommend that you not keep the index directory on the C: drive due to the size requirements.
- We recommend you use locally-attached storage referenced by a drive letter, i.e. E:\CAATindexes, rather than a UNC path. For more information, see Index directory requirements.
- Do not create a local drive map to a UNC. For example, do not open \\servername\CAAT1 and map it to drive Z:. This is because drive mappings are specific to each Windows user and may not be available to the Relativity Service Account.
- This path must be absolute, and it can’t contain spaces, invalid characters, or any Unicode.
- This value is ignored upon upgrade.
caat.single-data-dir= E:/AnalyticsData
caat.single-data-dir= E:\\AnalyticsData
caat.single-data-dir= //servername/AnalyticsData

caat.single-data-dir= \\\\servername\\AnalyticsData
caat.min-heap-size
This is the minimum Java Heap size in megabytes. If this is left blank, the default will be used. The default is 1/8 of total physical memory installed on the machine. It is recommended to leave this blank. This value is ignored upon upgrade.
caat.min-heap-size=
caat.max-heap-size
This is the maximum Java Heap size (-xmx) in megabytes. For example, 4096. If this is left blank the default will be used. The default is half of total physical memory installed on the machine.
caat.max-heap=
caat.http.authentication-status
This value must be set to true.
caat.http.authentication-status=true
caat.http-password
In former versions of the installer, this was called “REST Password.” This is the password you create for the REST API user. This can be any password that you choose, but for ease of use, you may want to enter your Relativity Service account password. Whatever you enter here corresponds only with the REST API password field on the Analytics server that you will add in Relativity after you install the Analytics server here. This value is not related to any pre-existing part of the system, meaning that it is not the password for a SQL login, Windows Domain user, or Relativity user. This value is required for upgrades.
The caat.http-password value entered here must be 20 characters or less.
caat.http-password=SuperSecretPassword
In order to change the password, see Changing the REST password.
caat.http-user
In former versions of the installer, this was called “REST Username.” This is the username that a system admin or Relativity uses to authenticate with the REST API. This can be any user name that you choose, but for ease of use, you may want to enter your Relativity Service account user name. Whatever you enter here corresponds only with the REST API user name field on the Analytics server that you will add in Relativity after you install the Analytics server here. This value is not related to any pre-existing part of the system, meaning that it is not a SQL login, Windows Domain user, or Relativity user. This value is required for upgrades.
caat.http-user=AnalyticsUser
caat.ssl-status
This value needs to be set to true. This value is ignored upon upgrade.
caat.ssl-status=true
caat.ssl-certificate-key-path
This is the file path to the existing valid PKCS12 certificate-key file. This value is ignored upon upgrade. A forward slash ( / ) or a double back slash ( \\ ) should be used as a path separator, rather than a single back slash, as shown in the examples below.
caat.ssl-certificate-key-path=C:/CertPath/AnalyticsCert.pfx
caat.ssl-certificate-key-path=C:\\CertPath\\AnalyticsCert.pfx
This value is required. The Relativity Analytics engine accepts both self-signed and trusted certificates. To create a self-signed certificate, see Updating the default SSL/TLS certificate.
caat.ssl-password
This is the SSL certificate password. This value is ignored upon upgrade.
caat.ssl-password=CertificatePasswordHere
Running the Analytics installer
Before running the Analytics Server Installer:
- You must have system admin rights to both the Analytics server and the index share path in order to run the installer without interruption.
- Run the server setup as the Relativity Service Account.
Running the Install.cmd file
- Stop the Content Analyst CAAT Windows Service.
This service may be named Relativity Analytics Engine depending on your version of Relativity.
- Open Task Manager and ensure all analytics processes have stopped. This includes java.exe, lsiapp.exe, postgres.exe, and booleng.exe. If the processes do not disappear after a few minutes, right click them and kill the processes.
- After configuring the response-file.properties file, right-click on the Install.cmd file. Select the Run as administrator option to start the Analytics Installation.
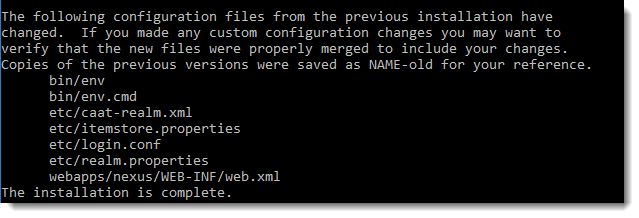
This can take several minutes to complete. The installation specifications will be displayed in the command line window. Do not close the command prompt until the installation is complete. For more information, see Setting properties in the response-file.properties file. - (Optional) Monitor the status of the installation. The installation is finished after “The installation is complete” message is displayed in the command prompt:
- Once the installation is complete, change the Content Analyst CAAT, or Analytics Engine, Windows service to run under the Relativity Service Account.
- Relativity requires a certificate signed by a trusted certificate authority (CA). If you did not specify a valid PKCS12 certificate-key file during installation or the certificate expired, you will need to update the certificate. By default, the Analytics service runs over an untrusted SSL/TLS certificate. For steps to modify, see Updating the default SSL/TLS certificate.
- Start the Content Analyst CAAT, or Analytics Engine, Windows Service.
- (Optional) Confirm that all components of the Analytics service are running by visiting: http://<Analytics Server Hostname>:<REST Port>/nexus/r1
Check the Available Services list. Make sure to specify your Analytics server host name and REST port in the URL. - If this is a new Analytics server, add it to the Servers list. For these steps, see Adding an Analytics server. If the server has already been added, navigate to the Servers tab and activate it. Make sure to enter the information on the server layout the same as you did in the Analytics installer.
- If you enter the information correctly, you can successfully save the server.
- If you receive a not found error on the server, make sure the Analytics service is running and that you used the correct port.
- If you get an unauthorized error, make sure that you entered the credentials correctly.
- Verify that you have a valid URL value entered for the RestUriForCAAT instance setting. This is the fully qualified domain name (FQDN) URL to the web server hosting your Kepler services. For example, https://client.domain.name/Relativity.REST/API.
Logging
During the installation or upgrade of the Analytics Engine, the process will log to a file, such as installer.log, in the logs directory. For example, CAAT-win64-kcura-[Version].GA\logs.
The pattern for the log message is:
[log-level] [date] [thread-name] message
Example: [INFO] [2017-01-18 19:05:54 [main]: Loading installation options
Log messages will be appended to the same log file on subsequent runs.
Upgrading from previous versions
The Analytics upgrade includes an updated version of PostgreSQL, which is installed in the background. Review the following guidelines for applying this upgrade:
- Ensure that the Users group has Full Control permissions on the install and data directories.
-
Ensure that you have Microsoft Visual C++ Redistributables 2010/2012/2013/2015, x64 and x86, installed. For download links, see Microsoft's Support site.
- Ensure that you have adequate disk space for the upgrade. A new pgsql folder is created as part of the upgrade, which temporarily doubles the disk usage while both versions of PostgreSQL are installed on the server. The caat.pg.upgrade-in-place and caat.overrideDiskSpaceCheck properties provide additional configuration options for upgrading. See Setting properties in the response-file.properties file.
- The upgrade may take longer than normal as the existing PostgreSQL data needs to be converted.
- After applying the upgrade, we recommend running the Structured Analytics portion of the Post-installation verification test document.
After you apply the upgrade and verify all Analytics components are functioning correctly, delete the old PostgreSQL install directory from the following locations to complete the uninstall:
${install_dir}/CAAT/pgsql_9.3${install_dir}/CAAT/pgsql_9.6
Also check the corresponding folders in the indexshare location (.ufx/rdbms_9.3 and rdbms_9.6).
Setting properties in the response-file.properties file
Before upgrades or new installations, unzip the Analytics package and open the response-file.properties file in a text editor.
For upgrades, only the following settings are considered:
- caat.install-dir
- caat.http-user
- caat.http-password
- caat.ssl-certificate-key-path
- Required only when caat.ssl-status is either not set (blank) or explicitly set to true
- caat.ssl-password
- Required only when caat.ssl-status is either not set (blank) or explicitly set to true
- caat.allow-postgres-data-upgrade
- caat.pg.upgrade-in-place
- caat.overrideDiskSpaceCheck
For a complete list of settings and descriptions, see Installing Analytics for the first time.
The caat.upgrade-now response file property is no longer used.
Complete the following Common Properties settings in the input file:
caat.install-dir
In former versions of the installer, this was called Analytics Server folder.
This is the path to the folder containing the Analytics installation files. This value is required for upgrades.
- We recommend using the default folder of C:\CAAT (or C:\ContentAnalyst for a legacy installation).
- This path must be absolute, and it can’t contain spaces or invalid characters.
- If the installer cannot find or access the location you specify, it installs the application to the default C:\CAAT folder.
A forward slash ( / ) or a double back slash ( \\ ) should be used as a path separator, rather than a single back slash, as shown in the examples below.
caat.install-dir=C:/CAAT
caat.install-dir=C:\\CAAT
Spaces cannot be present within the file path.
caat.http-user
In former versions of the installer, this was called REST Username.
This is the username that a system admin or Relativity uses to authenticate with the REST API. This can be any username that you choose, but for ease of use, you may want to enter your Relativity Service account username. Whatever you enter here corresponds only with the REST API username field on the Analytics server that you will add in Relativity after you install the Analytics server here. This value is not related to any pre-existing part of the system, meaning that it is not a SQL login, Windows Domain user, or Relativity user. This value is required for upgrades.
caat.http-user=AnalyticsUser
caat.http-password
In former versions of the installer, this was called REST Password.
This is the password you create for the REST API user. This can be any password that you choose, but for ease of use, you may want to enter your Relativity Service account password. Whatever you enter here corresponds only with the REST API password field on the Analytics server that you will add in Relativity after you install the Analytics server here. This value isn't related to any pre-existing part of the system, meaning that it isn't the password for a SQL login, Windows Domain user, or Relativity user. This value is required for upgrades.
The caat.http-password value entered here must be 20 characters or less.
caat.http-password=SuperSecretPassword
In order to change the password, see Changing the REST password.
caat.allow-postgres-data-upgrade (upgrading only)
This option defaults to false. When false, this checks whether the Analytics server needs a major version PostgreSQL upgrade in order to succeed. If a PostgreSQL upgrade is needed, the Analytics server upgrade will fail, and you will see a message to check the installation prerequisites. Once you have satisfied all the prerequisites, set this value to true and re-run.
caat.allow-postgres-data-upgrade=false
Take a full backup of CAAT and associated data prior to upgrading to CAAT 5.0.4.A1, as this release includes a major PostgreSQL version upgrade.
caat.pg.upgrade-in-place (upgrading only)
This property enables or disables in place upgrades for PostgreSQL data. It defaults to false, indicating that data is copied during upgrade.
caat.pg.upgrade-in-place=false
Review the behavior based on the following settings for this property:
- true—when this property is set to true, the upgrade uses hard links instead of copying data files to a new cluster. This process reduces the required free disk space and speeds up the upgrade. It also modifies the existing cluster and data loss is possible in error scenarios. When setting this property to true, take a full backup of CAAT and associated data before attempting this upgrade.
- false—when this property is set to false, the upgrade copies all data and upgrades the copied data. This avoids the possibility of data loss in the event of error. It requires free disk space equal to or greater than the current PostgreSQL cluster size, and it increases the disk I/O time. We recommend setting this property to false for most scenarios.
If you use the bin/upgrade command directly, set this property as follows:
.\upgrade.cmd -Dcaat.upgradePgInPlace="true"
- Take a full backup of CAAT and associated data before upgrading with this property set to true.
- This property only applies when CAAT is performing a major version PostgreSQL upgrade.
- After a successful upgrade, you can delete the old PostgreSQL data directory regardless of whether the caat.pg.upgrade-in-place setting was true or false.
caat.overrideDiskSpaceCheck (upgrading only)
This property enables or disables a disk space check override when CAAT is performing a major version PostgreSQL upgrade. It defaults to false, indicating that a disk space check is run.
caat.overrideDiskSpaceCheck=false
To disable the disk space check, set this property to true.
If you use the bin/upgrade command directly, set this property as follows:
.\upgrade.cmd -Dcaat.overrideDiskSpaceCheck="true"
Running the Analytics installer for an upgrade
Analytics installer considerations
Consider the following before running the Analytics Server Installer:
- Run the server setup as the Relativity Service Account.
- You must have system admin rights to both the Analytics server and the index share path in order to run the installer without interruption.
Running the Install.cmd file
- Stop the Content Analyst CAAT Windows Service.
This service may be named “Relativity Analytics Engine” depending on your version of Relativity.
- Open Task Manager and ensure all analytics processes have stopped. This includes java.exe, lsiapp.exe, postgres.exe, and booleng.exe. If the processes do not disappear after a few minutes, right click them and kill the processes.
- After configuring the response-file.properties file, right-click on the Install.cmd file. Select the Run as administrator option to start the Analytics Installation. This can take several minutes to complete. The installation specifications will be displayed in the command line window. Do not close the command prompt until the installation is complete. For more information, see Setting properties in the response-file.properties file.
- (Optional) Monitor the status of the installation. The installation is finished after The installation is complete message is displayed in the command prompt:
- Once the installation is complete, change the Content Analyst CAAT, or Analytics Engine, Windows service to run under the Relativity Service Account.
- Relativity requires a certificate signed by a trusted certificate authority (CA). If you did not specify a valid PKCS12 certificate-key file during installation or the certificate expired, you will need to update the certificate. By default, the Analytics service runs over an untrusted SSL/TLS certificate. For steps to modify, see Updating the default SSL/TLS certificate.
- Start the Content Analyst CAAT, or Analytics Engine, Windows Service.
- (Optional) Confirm that all components of the Analytics service are running by visiting: http://<Analytics Server Hostname>:<REST Port>/nexus/r1
Check the Available Services list. Make sure to specify your Analytics server host name and REST port in the URL. - If this is a new Analytics server, add it to the Servers list. For these steps, see Adding an Analytics server. If the server has already been added, navigate to the Servers tab and activate it. Make sure to enter the information on the server layout the same as you did in the Analytics installer.
- If you enter the information correctly, you can successfully save the server.
- If you receive a not found error on the server, make sure the Analytics service is running and that you used the correct port.
- If you get an unauthorized error, make sure that you entered the credentials correctly.
- Verify that you have a valid URL value entered for the RestUriForCAAT instance setting. This is the fully qualified domain name (FQDN) URL to the web server hosting your Kepler services. For example, https://client.domain.name/Relativity.REST/API.
Logging
During the installation or upgrade of the Analytics Engine, the process will log to a file, such as installer.log, n the logs directory. For example, CAAT-win64-kcura-[Version].GA\logs.
The pattern for the log message is:
[log-level] [date] [thread-name] message
Example: [INFO] [2017-01-18 19:05:54 [main]: Loading installation options
Log messages will be appended to the same log file on subsequent runs.
Updating the default SSL/TLS certificate
Generating a security certificate
Use the certificate generated by Relativity Secret Store when the Analytics server is registered. For more information, see Relativity Secret Store.
Keystores used by Analytics
Your certificate uses one of the following keystores. To determine which one is in use, see Updating a certificate.
- %CAATDirectory%\etc\keystore—the keystore that the Analytics Installer updates when you initially install Analytics. The password for this keystore is set during installation. The password is removed from the response file when the installation completes. To obtain the password, you must locate it in your records.
If you do not have the password, you must install a duplicate copy of Analytics with a new certificate. You need to replace the keystore file in the original installation with the duplicate generated as part of the new installation. Next, you need to change the password that the keystore is using to the password from the new installation. See Analytics - How to change the keystore password for Analytics on the Relativity Community site.
- %CAATDirectory%\etc\ssl\server.keystore—the legacy keystore. The default password for this keystore is caat4me. To update the password, see Analytics - How to change the keystore password for Analytics on the Relativity Community site.
Updating a certificate
Use the following steps to update a certificate.
- Delete an expired certificate from the keystore:
- Locate the start.ini file in the root of the CAAT directory. The file path is commonly in C:\caat\start.ini.
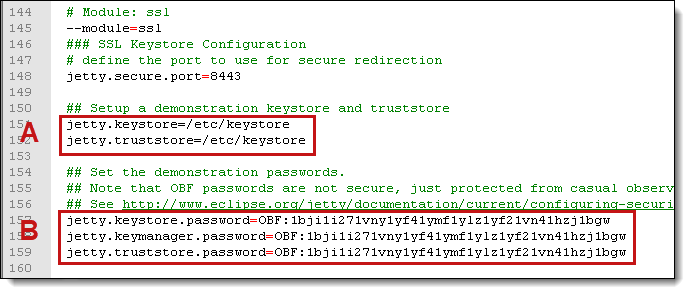
- Open the start.ini file and locate the SSL section near the bottom of it. Review the following information in the file:
- Keystore in current use—see section A in the following screenshot.
- Password—see section B in the following screenshot. The passwords in this section should match.
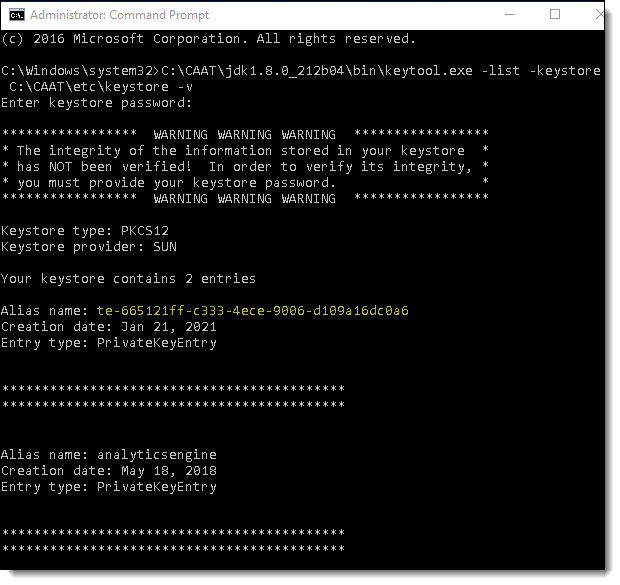
- Use the following command to list all certificates in the keystore:
C:\CAAT\jdk1.8.0_212b04\bin\keytool.exe -keystore <<PathToKeystore>> -list -v
Replace the <<PathToKeystore>> placeholder in this command with the keystore path from step 1b.
- In the results from the list command, note the Alias name for the keystore as illustrated in the following example screenshot:
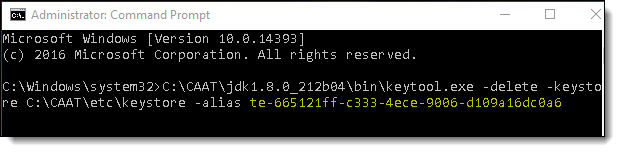
- Run the following command to delete the certificate from the keystore. It deletes only the specified alias. Repeat this command for each alias that is returned by the list command in step 1f.
- Run the list command from step 1c to confirm that the keystore does not have any entries. If the keystore contains any aliases, repeat the delete command in step 1e until your keystore contains 0 entries. See the following screenshot for the final results:
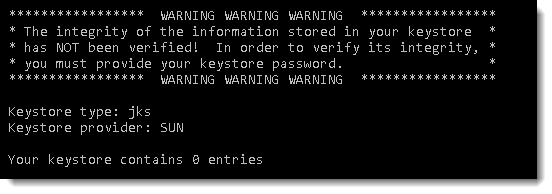
C:\CAAT\jdk1.8.0_212b04\bin\keytool.exe -delete -keystore <<PathToKeystore>> -alias <<ALIAS_NAME>>
- Locate the certificate issued to the FQDN for the Analytics server in Certificate Manager in the Microsoft Management Console (MMC). For more information, see How to: View certificates with the MMC snap-in on the Microsoft website.
- To export the certificate, complete these steps:
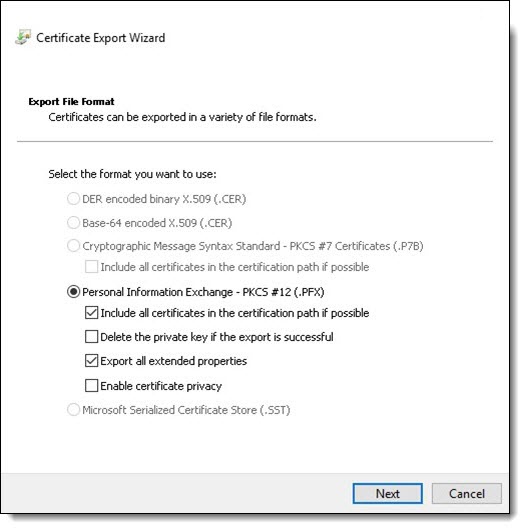
- Open the Certificate Export Wizard.
- On the Export File Format dialog, select the Personal Information Exchange field, and the following subfields:
- Include all certificates in the certification path if possible
- Export all extended properties
- Choose a password for the certificate. The password should match the current keystore password. This password is typically set during the initial installation of the Analytics server, but it may also have been updated as part of step 1.
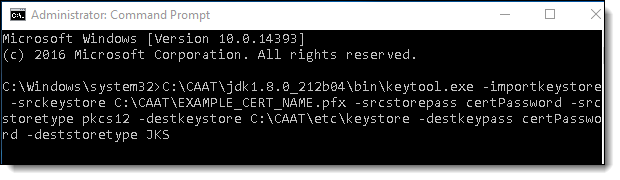
- To import the certificate into the Analytics keystore, run the following command:
- Restart the Analytics service.
- To confirm the service is using the new certificate, navigate to the REST UI. Verify that no certificate errors occur.
- Confirm the server is now active through the Relativity UI. If this server is new, complete the steps in Verifying the Analytics server in Relativity.
C:\CAAT\jdk1.8.0_212b04\bin\keytool.exe -importkeystore -srckeystore <<Certificate>> -srcstorepass <<CertPassword>> -srcstoretype pkcs12 -destkeystore <<PathToKeystore>> -deststorepass <<DestinationsPassword>> -deststoretype JKS
https://<servername.FQDN>:8443/nexus/r1
If you use Secret Store, you do not need to push the certificate to the agent, web, and message broker, including the Relativity Service Bus, servers because they already trust certificates from it. However, if you use self-signed certificates, you must update certificates on these servers.
Verifying the Analytics server in Relativity
Verify in Relativity that the Analytics server URL uses the fully qualified domain name (FQDN) and not the server name or IP address. Navigate to the Servers tab, and check the URL of the Analytics server. If it does not contain the FQDN, then follow these steps:
- Verify that you have a valid URL value entered for the RestUriForCAAT instance setting. This is the fully qualified domain name (FQDN) URL to the web server hosting your Kepler services. For example, https://client.domain.name/Relativity.REST/API.
- Add a new Analytics server from the Servers tab in Relativity. See Adding an Analytics server for more information.
When entering the URL:- Use this format: https://<servername.FQDN>:8443/.
- Duplicate all other settings from the original Analytics server.
- Add the new Analytics server to all of the same Resource Pools as the original server.
- Add the Analytics Move script to the Relativity Script Library and run the script.
- Navigate to the Relativity Script Library tab.
- Click New Relativity Script.
- Select and copy the contents of the
- Click Save.
- Test functionality by creating a small structured analytics set or index.
- Run the Analytics Move script to swap all references from the original server to the new server just created.
- Delete the old Analytics server from the Servers tab in Relativity.
Managing TLS protocols and specifying cipher suites
When setting up Analytics, you have the option of disabling TLS 1.0 and 1.1 to enforce stricter security protocols. Additionally, you can specify which cipher suites you want to use or block.
To do this, complete the following steps:
- Search for C:\CAAT\etc\ssl\tweak-ssl.xml. Create or update it as follows.
If the file already exists, append the following lines:
 Click to expand text
<!-- Eliminate Insecure Protocols -->
    <Call name="addExcludeProtocols">
        <Arg>
            <Array type="java.lang.String">
                <Item>SSL</Item>
                <Item>SSLv2</Item>
                <Item>SSLv3</Item>
                <Item>TLSv1</Item>
                <Item>TLSv1.1</Item>
            </Array>
        </Arg>
    </Call>
If the file does not exist yet, create a new XML file with that name and file path. Enter the following full text:
Click to expand text<!DOCTYPE Configure PUBLIC "-//Jetty//Configure//EN" "http://www.eclipse.org/jetty/configure_9_3.dtd"> <!-- Tweak SslContextFactory Includes / Excludes --> <Configure id="sslContextFactory" class="org.eclipse.jetty.util.ssl.SslContextFactory$Server"> <!-- Eliminate Insecure Protocols --> <Call name="addExcludeProtocols"> <Arg> <Array type="java.lang.String"> <Item>SSL</Item> <Item>SSLv2</Item> <Item>SSLv3</Item> <Item>TLSv1</Item> <Item>TLSv1.1</Item> </Array> </Arg> </Call> </Configure>
-
(Optional) To specify allowed or excluded cipher suites, append the following to C:\CAAT\etc\ssl\tweak-ssl.xml.
The cipher suites used in this sample text are examples only. We do not currently endorse specific cipher suites, and we recommend discussing preferred suites with your security team.
Click to expand text
<!-- Include allowed cipher suites --> <Call name="setIncludeCipherSuites"> <Arg> <Array type="String"> <Item>TLS_ECDHE_RSA_WITH_AES_256_GCM_SHA384</Item> <Item>TLS_ECDHE_RSA_WITH_AES_128_GCM_SHA256</Item> <Item>TLS_ECDHE_RSA_WITH_AES_128_CBC_SHA</Item> <Item>TLS_ECDHE_RSA_WITH_AES_256_CBC_SHA</Item> <Item>TLS_RSA_WITH_AES_256_GCM_SHA384</Item> <Item>TLS_RSA_WITH_AES_128_GCM_SHA256</Item> <Item>TLS_RSA_WITH_AES_256_CBC_SHA256</Item> <Item>TLS_RSA_WITH_AES_128_CBC_SHA256</Item> </Array> </Arg> </Call> <!-- Exclude weak ciphers --> <Call name="addExcludeCipherSuites"> <Arg> <Array type="String"> <Item>SSL_RSA_EXPORT_WITH_DES40_CBC_SHA</Item> <Item>SSL_DHE_RSA_EXPORT_WITH_DES40_CBC_SHA</Item> <Item>SSL_DHE_DSS_EXPORT_WITH_DES40_CBC_SHA</Item> <Item>TLS_RSA_WITH_DES_CBC_SHA</Item> <Item>TLS_DHE_RSA_WITH_DES_CBC_SHA</Item> <Item>TLS_RSA_EXPORT_WITH_DES40_CBC_SHA</Item> <Item>TLS_DHE_RSA_EXPORT_WITH_DES40_CBC_SHA</Item> <Item>TLS_DHE_DSS_EXPORT_WITH_DES40_CBC_SHA</Item> </Array> </Arg> </Call> -
Open C:\CAAT\start.ini. Look for the tweak-ssl.xml file path. If it's not listed yet, append it to the bottom as follows:
## Override SSL configuration file
etc/ssl/tweak-ssl.xml
If you do not have a file called start.ini, do not create a new one. Instead, contact our Support team at support@relativity.com.
-
Restart the Content Analyst (CAAT) Windows service.
-
Update the registry key on all web and agent servers as follows. If you previously disabled TLS 1.0 and 1.1 for other parts of Relativity, you can skip this step.
- Create or update the following registry keys on each server as shown below. You should be able to create a *.reg file out of the snippet below.
- Restart IIS or the agent service on each applicable server.
Windows Registry Editor Version 5.00
[HKEY_LOCAL_MACHINE\SOFTWARE\Microsoft\.NETFramework\v4.0.30319]
"SchUseStrongCrypto"=dword:00000001
[HKEY_LOCAL_MACHINE\SOFTWARE\Wow6432Node\Microsoft\.NETFramework\v4.0.30319]
"SchUseStrongCrypto"=dword:00000001
-
Verify that the connection works by clicking Save in the Analytics Server layout.
Installing Analytics server when SQL Server uses SSL encryption
When your primary SQL Server uses SSL encryption, you must satisfy the following additional environment requirements in order for the Analytics server to communicate with SQL Server:
- The SQL Server's certificate must be installed in the Analytics server KeyStore. See Install a SQL Server certificate in the Analytics server KeyStore
- The Common Name (CN) property of the SQL Server's certificate must match the server name value recorded for the SQL Server in Relativity. See Use the CN property of a SQL Server certificate in Relativity.
Install a SQL Server certificate in the Analytics server KeyStore
Complete the following steps to install a SQL Server's certificate in your Analytics server KeyStore:
- Export the SQL Server's certificate in X.509 DER format and place a copy of the certificate on the Analytics server.
- Note the CN property value recorded in the certificate.
- Open the following directory in a command prompt on your Analytics server :
- Run the following command from the command prompt:
- Enter your Java KeyStore password followed by yes when prompted to install the certificate.
<CAAT install drive>\jdk1.x\jre\lib\security
The <CAAT install drive> reference represents the Analytics server installation folder, and x represents the version of the JDK installed on your Analytics server. Browse to the security directory using Windows Explorer first to ensure you use the correct Analytics server installation path.
..\..\bin\keytool.exe -import -alias <CN> -keystore cacerts -file <path to cert file from Step 1>
Replace <CN> with the CN property recorded in the SQL Server's certificate and replace <path to cert file from Step 1> with the path location of the certificate file you copied to the Analytics server.
This step is only required if your Java KeyStore is password protected. Please refer to Oracle for default Java password information.
Use the CN property of a SQL Server certificate in Relativity
When running an Analytics server with a SQL Server that uses SSL encryption, the name of the SQL Server recorded on the Servers tab in Relativity and the name entered during Analytics server installation must match the CN value recorded in the SQL Server's security certificate. When running the Analytics Server installation, enter the CN property value from your SQL Server's certificate in the Primary Database Server Instance field on the Primary Database Server Configuration dialog.
If your SQL Server's Name value recorded on the Servers tab in Relativity does not match the CN property in the SQL Server's security certificate, contact Relativity Support for assistance with updating the SQL Server name in Relativity. Change the SQL Server's Name value in Relativity after you complete the Analytics installation.
Changing the REST password
If you need to change the REST API password used by the Analytics server, generate a new obfuscated password, update the realm.properties file on the Analytics server, and then update the password in Relativity.
Generate an obfuscated password
- Open Command Prompt or Windows PowerShell on the Analytics server.
- Navigate to the CAAT bin directory: C:\CAAT\bin
- Run the following command, passing the new plaintext password as an argument.
- .\transform-password.cmd <new_password>
- Example: .\transform-password.cmd newpassword
- The tool returns an obfuscated password value similar to the following:
- OBF:1uo91vn61ymf1yt41v1p1ym71v2p1yti1ylz1vnw1unp
- Copy the generated value. This value will be used to update the password in the realm.properties file.
If you pass a value that already begins with OBF:, the tool deobfuscates it back to plaintext. This can be useful for verifying an existing password stored in the realm.properties file.
Update the realm.properties file
- Navigate to the following directory on the Analytics server: C:\CAAT\etc
- Open the realm.properties file in a text editor.
- The file contains user credentials in the following format:
- <username>: <password>, <role>
- Example: rest_user: OBF:1uo91vn61ymf1yt41v1p1ym71v2p1yti1ylz1vnw1unp,rest-role
- Replace the existing password value with the newly generated obfuscated password.
- Ensure that the password value begins with OBF:.
- Save the realm.properties file.
Restart the Analytics service
After updating the password in the configuration file, restart the Analytics service.
- Open Windows Services on the Analytics server.
- Locate the following service: Analytics Engine / Content Analyst
- Restart the service.
Update the REST password in Relativity
After updating the password on the Analytics server, update the password stored in Relativity.
- Log in to Relativity.
- Navigate to the Servers tab.
- Locate the Analytics server.
- Click Edit.
- Update the REST API password.
- Click Save.
Uninstalling the Analytics server
We do not recommend uninstalling the Analytics Server application for any reason as it causes data loss. If you uninstall the Analytics Server application from the analytics server, all structured analytics sets created in Relativity cannot be used with another installation. There is no way to merge a previous Analytics Server installation with a new installation. As a result, structured analytics sets become unusable.
You should not uninstall the application from the server unless you're certain you will not use the server for Analytics functionality in the future, and you understand that uninstalling Analytics renders structured analytics sets unusable.
If you still need to uninstall the Analytics components from the server, complete the following steps:
- Open Windows Services and stop the Content Analyst CAAT or Analytics Engine Windows service if it is running.
- Open Task Manager, and check to see if Java is running. If it is, right click it, and then select End process tree.
- Navigate to the Analytics directory. For example, C:\CAAT.
- Run the C:\CAAT\bin\unregisterWinService.cmd file as an Administrator to unregister the Windows service.
- If desired, delete the Analytics installation directory, like C:\CAAT, and the index directory associated with Analytics.