


Feedback
Sampling
With sampling you can generate a randomized subset of items from a larger population. You can use that randomized sample to QC the list items or to identify characteristics of the whole population. To execute sampling, Relativity uses a randomization algorithm which guarantees an efficient and unbiased result.
You can enable any object to use Relativity's sampling. By default, sampling is enabled on the Document object.
Once you've enabled sampling for an object, the sampling icon ![]() is available at the top right hand side of the view bar in the workspace.
is available at the top right hand side of the view bar in the workspace.
The sampling feature requires the Use Sampling Admin Operations permission. See Workspace security.
See these related pages:
Enabling sampling on an object
To enable an object for sampling:
- Click the Workspace Admin tab and click the Object Type tab.
- Click the name of the object for which you want to enable sampling.
- Ensure that you are in edit mode.
- Change the Sampling field to Enabled. If you are creating a new object, this is already set to Enabled.
- Change the Lists field to Enabled. If this field is disabled, you can't save the list of sampled items without creating a separate field, and then using mass edit to tag all of the sampled items. This field is set to Disabled by default for new object types.
- Click Save. The sampling icon is now available on the object as long as you are assigned the Use Sampling Admin operation permission.

You can't save a list of sampled items as a saved search because the sample results are generated randomly.
Generating a sample
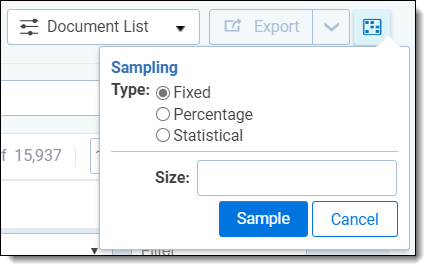
The sampling drop-down menu provides three options for setting the sampling type (size):
- Fixed size - creates a randomized sample set of a specific number of items from the entire item list.
- Percentage - creates a randomized sample set of a specific percentage of items from the entire item list.
- Statistical - creates a randomized sample set of a size based on statistical sample calculations, which determines how many items reviewers need to address in order to get results that reflect the entire data set as precisely as needed.
If you select a sampling type you previously applied in the same workspace, Relativity automatically populates the related settings field(s) with your last value(s).
Clicking Sample on the sampling drop-down menu applies your sampling settings to the item list and creates the randomized sample set.
The sample summary bar displays the sampling type you applied and a count of the sample set out of the total number of items.

Once you've applied the desired sampling settings, you can save the sampling results as a list using the Save as List mass operation. Then open the list as a saved search. For more information on lists, including creating and viewing lists, see Lists.
Note the following:
- Click Clear Sample on the sample summary bar menu to clear the sample. The sample set you create persists on the list of items until a user clears it. This includes while updating search conditions, switching and navigating within browser panels, including adding in relational items, and navigating to other tabs.
- The Sampling button is disabled when a related items option is selected from the Related Items drop-down menu or a search. If you have applied sampling and select a related items option from the Related Items drop-down menu, the sampling is removed from the list.
Creating a fixed size sample set
To create a sample set of a fixed size:
- Click the Documents tab.
- Display the documents you want create a randomized sample of by selecting a folder, view, saved search, or performing a document search.
- Click the Sampling icon
 to display the sampling drop-down menu.
 - Select Fixed size and provide a value greater than 0 in the Size field.
- Click Sample.
Creating a percentage sample set
To create sample set of a specified percentage of total documents:
- Click the Documents tab.
- Display the documents you want to create a randomized sample of by selecting a folder, view, saved search, or performing a document search.
- Click the Sampling icon to display the sampling drop-down menu.
- Select Percentage and provide a percentage value greater than 0% in the Percentage field.
- Click Sample.
Creating a statistical sample set
We recommend that you only use the statistical sampling type on data sets that are large enough to return a reliable statistical sample. If a data set contains fewer than 300 items, you may want to consider using a different sampling type.
To create a sample set size based on statistical confidence and margin of error specifications:
- Click the Documents tab.
- Display the documents you want to create a randomized sample of by selecting a folder, view, saved search, or performing a document search.
- Click the Sampling icon to display the sampling drop-down menu.
- Select Statistical.
- Select 99%, 95%, or 90% for the Confidence Level field.
- Select a value for the Margin of Error field. This is the room for error you want to allow in your sample results when you select a sampling type of statistical. Selecting a lower margin of error requires a larger sample size.
- Click Sample.