


Feedback
Case Dynamics Pre-Entity Integration Script
If you are on a version of Relativity where Case Dynamics uses the Person and Organization objects (Relativity 10.1 or below) and are upgrading to a Relativity version where Case Dynamics is integrated with the Entity object (Relativity 10.2 or above), run the Case Dynamics Pre-Entity Integration Script. The script aims to detect possible upgrade conflicts, data truncation, and customization on the Person and Organization objects that may need to be re-created on the Entity object.
See these related pages:
Information captured by the script
The script return two sets of results:
Result - Workspace details and conflicts
The Workspace details and conflicts result tab contains this information:
- The number of workspaces with Case Dynamics at the instance level
- The number of workspaces with the Case Dynamics application locked
- The number of workspaces with the Case Dynamics application unlocked
- Potential data truncation
Fields listed in the table have a higher character limit on Relativity 10.1 and below than they do in Relativity 10.2 and above. Relativity reduced the character limits to increase database performance. This means that in fields where data exceeds the new lower limits, there will be truncation unless measures are taken to store the additional information in another field.
Field name Old character limit New character limit Organization - Office Location Long text field type 255 (Fixed-length text) Person - First Name 222 125 Person - Full Name 450 255 Person - Last Name 222 125 Phone Number Long text field type 255 (Fixed-length text) -
Number of relationships for these pairs:
-
Fact – Organization
-
Fact – Person
-
Issue – Person
-
Organization – Outline
-
Organization – Person
-
Person – Interview Question
-
Person – Outline
-
Person - ReportSet
This information may help you to better estimate your migration time.
-
-
Possible conflicts with existing data
Naming conflicts occur during upgrades when fields, views, and layouts that are being used by Case Dynamics are implemented in a workspace. For example, if you have a custom field called Key Entities, a naming conflict will result upon upgrade because the custom field name matches the name of one of the fields used by the Case Dynamics application. Relativity recommends renaming custom fields that conflict with the application.
The script operates under the assumption that no other application which uses Entity is installed. If you see a conflict for “Entity,” it is very likely that you have another application that uses entities, such as Analytics, installed.
 Possible naming conflict types
-
Object Types
-
Name conflicts for Object Types that are going to be created
-
Name changes/removal on existing Object Types which are going to be migrated
-
-
Fields
-
Name conflicts for Fields that are going to be created
-
Name changes/removal on existing Fields which are going to be migrated
-
-
Views
-
Name conflicts for Views that are going to be created
-
Name changes/removal on existing Views which are going to be migrated
-
-
Layouts
-
Name conflicts for Layouts that are going to be created
-
Name changes/removal on existing Layouts which are going to be migrated
-
-
Choices
-
Name conflicts for Choices that are going to be created
-
Name changes/removal on existing Choices which are going to be migrated
-
-
Result - Workspace Customizations (second tab)
The Case Dynamics views, fields, and layouts are re-created on the Entity object upon upgrade, but custom work needs to be evaluated. The Result - Workspace Customizations tab displays the customization made on the Person and Organization objects that need to be migrated after the upgrade. For example, the data in custom fields needs to be exported and re-imported in the custom field that is now on the Entity object. See Step 2 - Export custom data and Step 3 - Upgrade Case Dynamics and import custom data.
For security, the names of these customizations are not shown by default. However, you can adjust the script to display the friendly custom names. See Step 2 - Export custom data.
Tips for filtering results on select workspaces
The script only filters on workspaces that have Case Dynamics installed. If you want to further target or limit your search, follow one of these tips:
-
Export the results to a .csv file.
- Navigate to the Result tab.
- Select All and Export to File.
- Click Go.
- Modify the script to enable SQL syntax filtering of the results based on a list of specific workspaces. See Step 1 - Execute the script.
Upgrade Case Dynamics
To upgrade Case Dynamics, follow the steps in these sections:
- Step 1 - Execute the script
- Step 2 - Export custom data
- Step 3 - Upgrade Case Dynamics and import custom data
Step 1 - Execute the script
To execute the script:
-
Download the Case Dynamics Pre-Entity Integration Script from the Relativity Community.
You must have valid Relativity Community credentials in order to download any Community file linked to the documentation site. You'll need to enter those credentials on the Community login screen if you're not already logged in. If you're already logged in to the Community at the time you click a link, the file is automatically downloaded in the bottom left corner of your screen. If you get an error message stating "URL No Longer Exists" after clicking a Community link, it may be due to a single sign-on error related to the SAML Assertion Validator, and you should contact your IT department.
-
(Optional) Modify the script to show the friendly names of customizations made on the Person and Organization objects.
If you don't want to modify the script, you can use the Case Dynamics Pre-Entity Integration Script _ Friendly Names from the Relativity Community. See Relativity Community.
- Open the script in a text editor.
-
Search the text for:
SELECT DISTINCT Workspace_Detail, Item_Detail FROM #_CUSTOM ORDER BY Workspace_Detail
Searching the text, will take you to this portion of the script:

- Read the NOTE carefully.
-
Use SQL syntax to comment out the active line and to uncomment the following line. The script should now look like this:

-
(Optional) Modify the script to enable SQL syntax filtering of the results based on a list of specific workspaces.
- Open the script in a text editor.
-
Search for the first occurrence of "Interactive" in the text. Searching the text, will take you to this portion of the script:

-
Add a where clause that follows this sample SQL syntax:
WHERE [CaseID] in (Workspace Artifact ID, Workspace Artifact ID, Workspace Artifact ID)
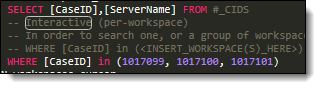
After running the modified script, you will be able to filter results on the list of Workspace Artifact IDs that pass in this WHERE clause.
- Copy the WHERE clause you wrote.
- Search for the second occurrence of “Interactive” in the text.
- Paste the copied WHERE clause beneath the notes following the second occurrence of “Interactive”.
- Add the script to Relativity.
- Navigate to the Relativity Script Library tab.
- Click New Relativity Script.
- Clear all existing content from the Script Body.
- Copy and paste the entire content of the Case Dynamics Pre-Entity Integration Script into the Script Body.
- Click Save.
- Execute the script.
- Click Run Script. A pop-up window opens.
- Click Run.
- Click Ok.
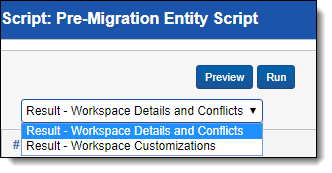
The script generates two results:
- Result – Workspace Details and Conflicts - detects conflicts and possible data truncation.
- Result – Workspace Customizations - identifies customized items which require manual migration.
Step 2 - Export custom data
If you have custom data from the Person and/or Organization objects, than you need to export that data before you upgrade.
The instructions below illustrate how to export custom data on the Person object. The instructions for the Organization object are similar.
To export the custom fixed-length text field on the person object called "Custom Field on Person Object" and the custom view on the person object called "Custom View":

- Open the Relativity Desktop Client (RDC).
- Select the Person object from the RDC drop-down.
- Select the custom view that has your custom field. In this example, the custom view is called Custom View.
-
Map the following fields in the Data Source tab:
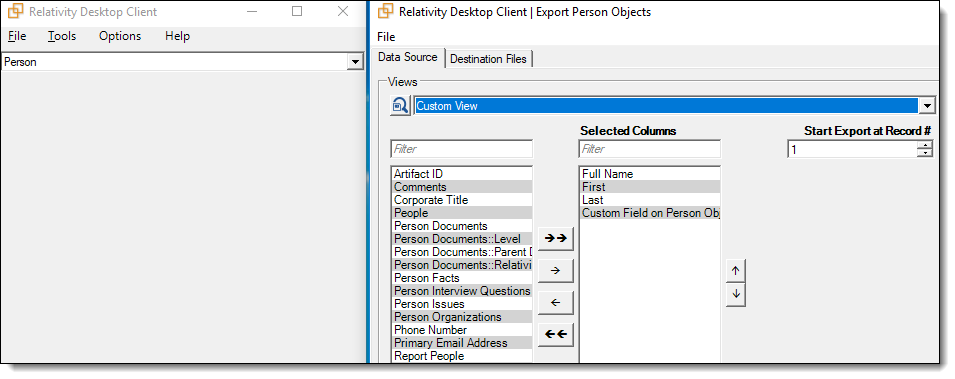
- Full Name
- First Name
- Last Name
- Custom Field on Person Object
-
In the Destination Files tab, complete the following:
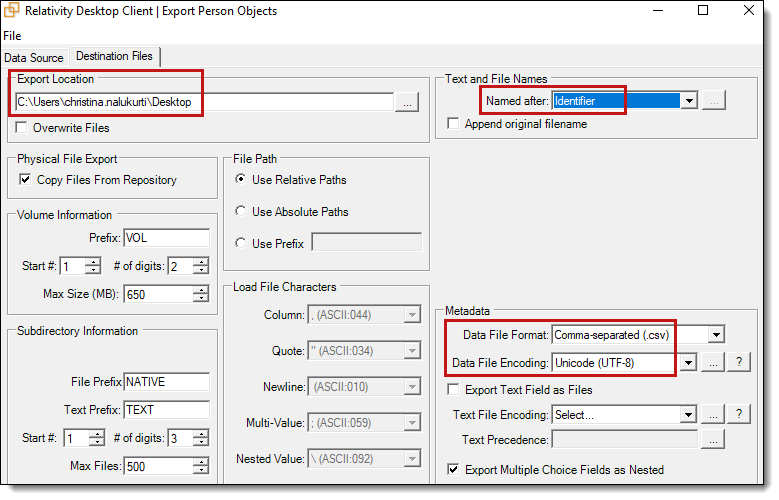
-
In the Export Location section, select an export location. In this example, the export will be stored on the desktop.
- In the Named after field of the Text and File Names section, select Identifier.
-
In the Metadata section, select the following:
-
Comma-separated (.csv)
-
Unicode (UTF – 8)
-
-
Step 3 - Upgrade Case Dynamics and import custom data
After exporting the custom data, you can upgrade Case Dynamics and set up customizations on the Entity object.
All custom data needs to be exported by this step for both the Person and Organization objects.
To upgrade Case Dynamics and set up customization on the Entity object:
The instructions below illustrate how to import custom data from the Person object. Example custom data includes a fixed-length text field called "Custom Field on Person Object" and a custom view called "Custom View." The instructions for the Organization object are similar.
- Upgrade Case Dynamics.
-
Create the same custom field and view on the Entity object.
- “Custom Field on Entity Object” created of type fixed-length text.
- Create a custom view that has the following fields:
- Full Name
- Last Name
- First Name
- Custom Field on Entity Object
- “Custom Field on Entity Object” created of type fixed-length text.
-
Import the custom Person object data you exported:
- Open the RDC.
- Select the Entity object from the RDC drop-down.
- Select your exported load file from Step 2 - Export custom data. See Step 2 - Export custom data.
- In the Field Map tab, complete the following:
- Map these fields:
- “Full Name [Identifier]” to “Full Name”
- “Custom Field on Entity Object” to “Custom Field on Person Object”
- In the Overwrite section, select Overlay Only.
- In the Overlay Identifier section, select Full Name [Identifier].
- Map these fields:
- Run the import. The data from the “Custom Field on Person Object” imports into the “Custom Field on Entity Object”.